
Special Hobby 1/72 Dornier Do-27
| KIT #: | SH72349/72327 |
| PRICE: | $23.00 |
| DECALS: | Three options |
| REVIEWER: | Torben Plesberg |
| NOTES: | CASA 127 + Do 28 B 1 ambulance plane |
| HISTORY |
The Dornier Do 27 was the first military German aircraft put into production after WWII. Many German aircraft designers had to operate in other countries, until Germany became a member of the NATO, and again allowed to produce military aircraft. The Dornier team had moved to Spain, where they designed and built a prototype of the Do 25, a shoulder wing single engine light utility aircraft with STOL characteristics. This plane was developed further and renamed Do 27, and in Spain CASA 127. The Do 27 was put into production in the new Dornier factory in Germany, and no less than 428 aircraft were built for the Bundeswehr: Luftwaffe, Bundesmarine and Heer. Another 200 aircraft were produced for a number of air forces and for civilian use. The Spanish production of the CASA 127 amounted to 50 aircraft.
The aircraft was very popular by
its users with its spacious cabin and pronounced STOL characteristics. The Do 27
is a modern Fieseler Storch, however with a lot more cabin room. There were
several variants, dep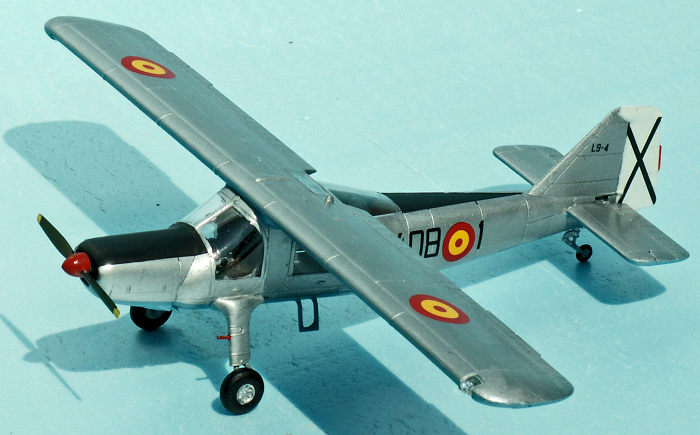 ending on landing gear, engine and propeller. I learned
about the Do 27, when I as a boy watched a nature movie from Serengeti National
Park in Tanzania. The Zebra striped Do 27 played a vital role during the making
of the movie. Sadly, the Dornier collided with a big vulture, crashed and killed
the pilot. This aircraft is an option of the civilian kit.
ending on landing gear, engine and propeller. I learned
about the Do 27, when I as a boy watched a nature movie from Serengeti National
Park in Tanzania. The Zebra striped Do 27 played a vital role during the making
of the movie. Sadly, the Dornier collided with a big vulture, crashed and killed
the pilot. This aircraft is an option of the civilian kit.
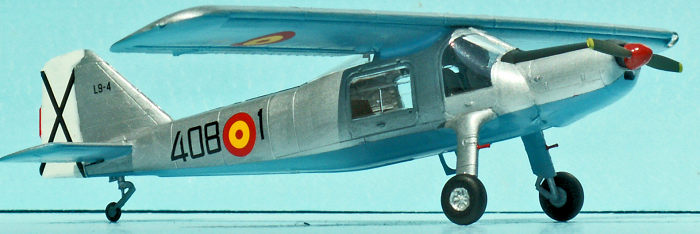
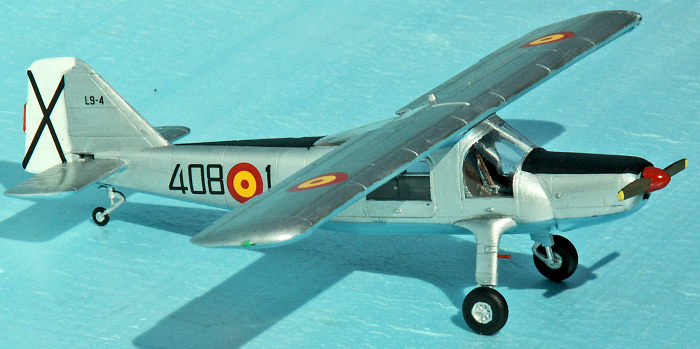
In 1971, I visited Spanish Sahara, and at the airfield in El Aaiun I watched the CASA 127 and a lot of Heinkel 111 and a couple of Ju 52 aircraft in Luftwaffe colors for the movie, Battle of Britain. Therefore, the CASA 127 is the subject of my model in military service.
In 1962, the twin engine Dornier Do 28 B 1 was demonstrated at an airshow on a small airfield just outside Copenhagen. I was impressed by the performance of this plane. It would take off still faster than Do 27 did. Later in August the same year, I visited the Airport in Frankfurt am Main, where a Do 28 B 1 offered a 12 minute flight for DM 20,- and I begged my dad to give me the needed money. He did so, and I had an exciting flight experience in this amazing STOL plane. The twin engines of the Do 28 greatly improved the performance of the Do 27.
The Do 28 is a unique perception: its twin engines are placed on short wing pylons beneath the cockpit, and the rugged fixed main undercarriage is placed beneath the engine nacelles. This gives a wider track than with the Do 27. The wing is lengthened by some 7 feet and with a modest dihedral. The cabin is the same as the Do 27 with room for six passengers. The Do 28 turned out to be a rugged, low cost utility plane with a high cruising speed and excellent low speed handling characteristics and very short take off and landing performance.
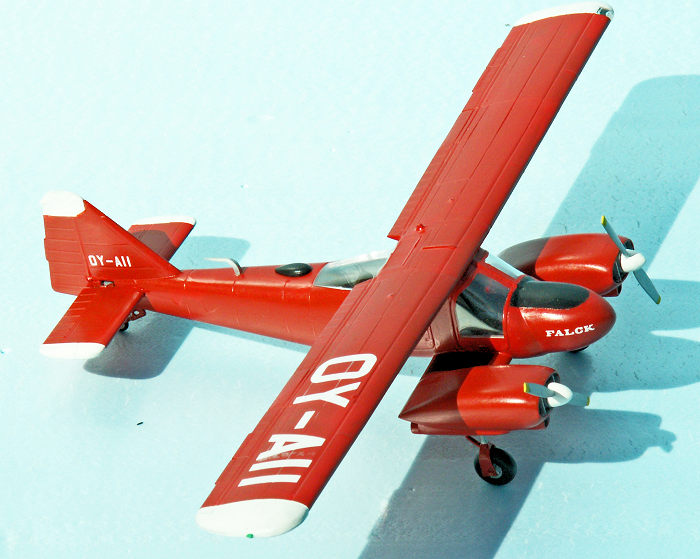
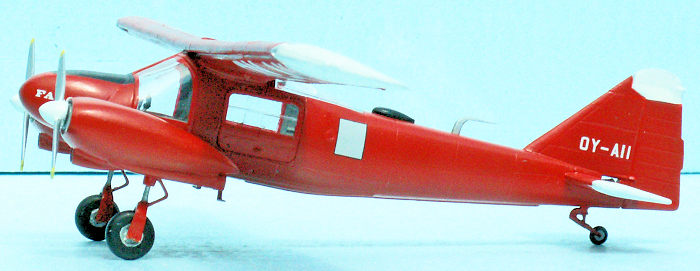
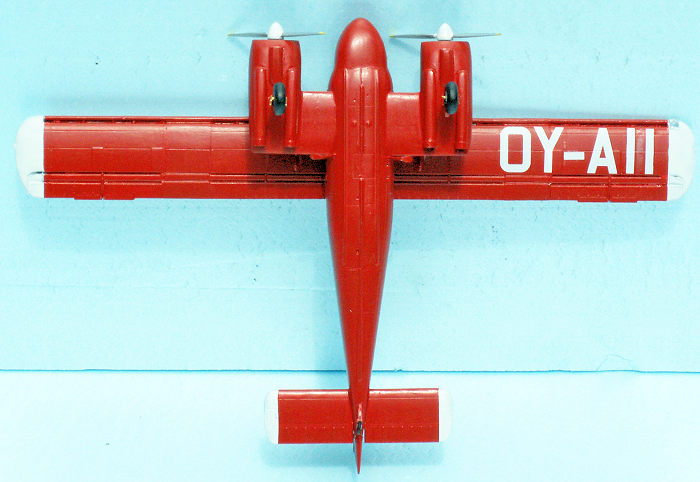
The Do 28 B was in the end replaced by the Do 28 D in production. The D, however, was an entirely new and much larger aircraft, which better fulfilled military needs. The cabin of the Do 28 B was too small. In Denmark, both the Do 27 and Do 28 were in service as ambulance planes by Falck’s Air Services, and their Do 28 OY-AII is the subject of my conversion.
| THE KIT |
 The kits come in nice small
boxes with a photo of the real thing on the lid, and on the bottom, there are
drawings of the three options of the kits. The boxes open in the ends and
therefore not suitable as bases for the building. The instructions are nice
leaflets printed on quality paper and in full color. Page one gives a short
history of the Do 27 in Czech and English. Page two shows the sprues and the
fret with photo- etched parts, a symbol explanation, and a color guide for
Gunze. Pages three to seven show in twelve steps how to assemble the models.
Pages eight to ten show the painting and decaling of the three options of the
kits. Pages eleven and twelve are commercials for other Special Hobby products.
The kits come in nice small
boxes with a photo of the real thing on the lid, and on the bottom, there are
drawings of the three options of the kits. The boxes open in the ends and
therefore not suitable as bases for the building. The instructions are nice
leaflets printed on quality paper and in full color. Page one gives a short
history of the Do 27 in Czech and English. Page two shows the sprues and the
fret with photo- etched parts, a symbol explanation, and a color guide for
Gunze. Pages three to seven show in twelve steps how to assemble the models.
Pages eight to ten show the painting and decaling of the three options of the
kits. Pages eleven and twelve are commercials for other Special Hobby products.
The decal sheets are large with each three options and the quality is first class. The sprues are in a medium grey styrene. The parts are crisp and without any flash or sink marks. The clear parts are almost perfect – with the exception of the curved windshield parts. When separating from the sprues they get some white spots on either side of the center frame, and these must either remain white spots or be painted over. In the latter case, the center frame gets too thick, more than double size! This is the only flaw of the kits, due to bad engineering, I guess. The civilian service kit has a high fin as an option. This fin is also the fin of the Do 28, and therefore the civilian service kit is the basic kit for my Do 28 conversion.
| CONSTRUCTION |
SH72327: It is straight forward to build the military Do 27/CASA 127 out of the box. There are no problems worth mentioning. However, the wing assembly needs some attention – if you want a straight wing! It is necessary to use a piece of minimum 6 mm plywood as a jig and in the least five clamps to secure the straightness of the wing. If you don’t do that, you might end up with a down curving wing as seen from the front! The glue might soften the wing too much, and when it dries up, it is curved.
There are two options of the main undercarriage and wheels. Look at the drawings or photos of the real thing to make your choice right. There are also two options of the propeller. The instructions, however, makes your choice easy: part 11. I did not use any of the photo-etched parts for the CASA 127.
 Construction SH 72349 – Do 28
conversion:
Construction SH 72349 – Do 28
conversion:
The following modifications are necessary to create a Do 28 from the Do 27 kit:
The wing should be made 24 mm longer and have a dihedral
The front engine of the Do 27 must be replaced by a short nose. The Do 28 is 60 cm shorter than the Do 27
Two engines mounted on wing pylons should be produced
A new main undercarriage should be made – with or without trousers
The wing modification was done by inserting two 12 mm wing pieces made of Ureol (artificial wood). The assembled Do 27 wing is cut about 4 cm from each wing tip, and the new wing pieces are glued to the wing and clamped to a piece of plywood and secured with at least 7 clamps.
When the glue is set on the following day, the next step is to make the dihedral of the wing. I cut the wing a little more than halfway through on the upper side in two places 16 mm from the center of the wing. The center of the wing (32 mm!) is now clamped to the plywood jig, and the wing tips are elevated 4 mm (using small pieces of wood to support), corresponding to the thickness of the wing. The narrow slots, where the wing had been cut halfway down, are now filled with plastic cement. The following day the glue has set, and the wing is finished with the correct dihedral.
 The nose was made of a suitable
piece of Ureol. I made a bar with the dimensions of the height and width of the
nose as seen from the side and from above/below. The length of the bar was about
10 cm, which is sufficient to handle the workpiece properly. Now it was a matter
of cutting and sanding until the correct shape was obtained. During this
process, my photos from 1962 of the real thing were very helpful to get the
right shape.
The nose was made of a suitable
piece of Ureol. I made a bar with the dimensions of the height and width of the
nose as seen from the side and from above/below. The length of the bar was about
10 cm, which is sufficient to handle the workpiece properly. Now it was a matter
of cutting and sanding until the correct shape was obtained. During this
process, my photos from 1962 of the real thing were very helpful to get the
right shape.
Step 6 of the instructions is irrelevant (positioning of the front engine of the Do 27). The two taps on the front of the assembled fuselage should be cut off and sanded to get in alignment with the front –the base of the Do 28 nose. Now, the nose should be cut from the bar - in the correct length, and then glued to the front of the fuselage. There will be some extra sanding to make the new nose match perfectly with the fuselage front.
The wing pylons were also made from Ureol. I made a bar with the dimensions: 1.7 x 0.3 x 5 cm. This bar was sanded to obtain a rather thick wing profile. This part is necessary to fix the engines to the fuselage, and is rather unique. You might call the Do 28 a biplane – with a very short underwing!
 The engine nacelles are the most
complex item of the conversion. The work pieces are two blocks of Ureol: 3.1 x
1.4 x 1.15 cm. Most important for a good result are the oval front openings. I
made these by drilling a 6 mm hole in the center, and two 4 mm holes in each
side. The width of the opening is 12 mm. At an early stage of the shaping
process, it was a good idea to fix the nacelles to the ends of the wing pylon
bar. This was done by milling a slot in the nacelles before they were sanded in
shape. The nacelles could now be glued in place. This makes it possible to clamp
the nacelles, necessary for further milling for the exhaust pipes and for the
carburetor intake. When all this was done, it was only a matter of cutting and
sanding to get the right shape of the nacelles. In the center of the front
opening, a 5 mm gauge disc is glued in place as base for the propellers. Two
equal 2-bladed propellers were fortunately available from the two Do 27 kits.
The engine nacelles are the most
complex item of the conversion. The work pieces are two blocks of Ureol: 3.1 x
1.4 x 1.15 cm. Most important for a good result are the oval front openings. I
made these by drilling a 6 mm hole in the center, and two 4 mm holes in each
side. The width of the opening is 12 mm. At an early stage of the shaping
process, it was a good idea to fix the nacelles to the ends of the wing pylon
bar. This was done by milling a slot in the nacelles before they were sanded in
shape. The nacelles could now be glued in place. This makes it possible to clamp
the nacelles, necessary for further milling for the exhaust pipes and for the
carburetor intake. When all this was done, it was only a matter of cutting and
sanding to get the right shape of the nacelles. In the center of the front
opening, a 5 mm gauge disc is glued in place as base for the propellers. Two
equal 2-bladed propellers were fortunately available from the two Do 27 kits.
Next step in the construction is to cut the wing pylon to the right “span” – keeping in mind that the end of each pylon must be shaped to match the curvature of the fuselage at the fixing points. However, before the separation of the wing pylons it was about time to drill the holes for the main undercarriage legs, if I wanted the correct position of the undercarriage. For the shaping of the ends of the wing pylons, I had a suitably curved milling iron to do the job properly.
 Now the wing pylons with complete
engine nacelles were ready for being fixed to the fuselage. It is important that
this is done properly and correct in the first try. I made a jig for this
procedure. However, it took an hour before I was sure that the position of the
wing pylons was correct. Then all I had to do was to put some glue into the gap
between the fuselage and the pylons. It was not even necessary to use filler.
Now the wing pylons with complete
engine nacelles were ready for being fixed to the fuselage. It is important that
this is done properly and correct in the first try. I made a jig for this
procedure. However, it took an hour before I was sure that the position of the
wing pylons was correct. Then all I had to do was to put some glue into the gap
between the fuselage and the pylons. It was not even necessary to use filler.
The main undercarriage legs were made of 1 mm brass wire, and the wheel fork was cut out from a 0.25 mm brass plate, bend in a U-shape, and holes were drilled for wheel shafts. The forks were soldered to the legs, the wheels were placed on the shafts, and the undercarriage was ready for the Do 28.
The conversion was almost completed. A couple of small fittings for the top of the fuselage was made, and glued in place. Foot steps behind the wing pylons were added, and that was it! I wonder why Special Hobby did not offer a Do 28 as an option of the Do 27 kit. Probably because this aircraft type is rather unknown to most people. Of course, they know the Do 28 D Skyservant, and there are several kits of this entirely different aircraft.
| COLORS & MARKINGS |
CASA C 127 Ejército del Aire. The upper sides are aluminium, Revell Aqua 361-99. There are
two matt black areas, the anti glare on the top of the nose, and a triangular
area behind the roof glazing behind the wing, Model Master engine black 4888.
The undersides are light blue. I used a Revell Aqua light blue 361-50 and added
15 % Revell Aqua white 361-05 to get a color matching the clear blue sky of
Sahara. The rudder is white with a red trim tab. The spinner is red, too, Revell
Aqua fire red 361-31. Propeller blades are olive drab in the front, and black to
the rear with yellow tips. The decals are first class and easy to apply.
However, the black crosses on the fin need some care to be placed properly.
are first class and easy to apply.
However, the black crosses on the fin need some care to be placed properly.
Do 28 B 1: The twin engine Do 28 is Revell Aqua fire red 31 all over. The wing tips, the tale plane tips and the top of the fin are white. There is a matt black anti glare area on the top of the nose, and black walkways on the wing pylons beneath the cockpit. The spinners are white, propeller blades aluminium with yellow tips.
The decaling was rather simple: The registration letters OY-AII, both the large ones on the wings and the small ones on the fin, were taken from the decal sheet of an ambulance KZ-VII from Stoppel Kits. The registration of the KZ VII ambulance was OY-ABK, however it is not too difficult to cut the B and the K to make two x I. The “Falck” logo was also useful. An extra window on the port side was made as a decal, taken from a sheet for the Curtiss C-46 Commando in Swedish service.
| CONCLUSIONS |
The Do 27 1/72 kits from Special Hobby are very fine kits, however, with the mentioned flaw of the windscreen. They are actually highly recommendable to all modelers, who fancy single engine utility aircraft, civil or military. For me it was an extra challenge making a conversion for the twin engine Do 28 B 1. I simply had to build this very special aircraft type, because I made a flight in it as a school- boy.
| REFERENCES |
William Green: The Observer’s Book of Aircraft 1962 Edition, page 81 for a three-view drawing of the Do 28. This is very important to get the exact idea of the look of the aircraft. This book was published by Frederick Warne & Co, Ltd. No ISBN number.
My photos of Do 28 B 1: D-IBYD, D-IHIL, D-IDTF and OY-AII. Without these photos, it would not have been possible to create the model of the Do 28.
5 November 2019
Copyright ModelingMadness.com
If you would like your product reviewed fairly and fairly quickly, please contact the editor or see other details in the Note to Contributors.