Revell 1/25 Camaro RS/SS
| KIT #: | 7457 |
| PRICE: | $16.95 MSRP |
| DECALS: | Includes rallye stripes |
| REVIEWER: | Greg Hansel |
| NOTES: |
| HISTORY |
The Camaro was introduced in 1967 to compete against the wildly popular Ford Mustang. It was classified as a “Pony Car” and not a muscle car due to its smaller size. The car was originally marketed towards the younger crowd on top 40 radio and when asked by the press what the word “Camaro” meant, they were told it was a “small vicious animal that eats Mustangs”.
 The first generation
Camaro ran for 3 model years and was available as a 2 door, 2+2 seating, coupe
or convertible with a choice of inline 6 and V8 powerplants. In the early days
the Z/28, SS, and RS models were not really models at all but options of the
standard sport coupe. The 1969 Camaro received a major facelift. The car was
wider and had a more aggressive look which included smaller and flattened wheel
wells that had sculptured feature lines flowing off them to the rear. It also
had three vents added in front of the rear wheel well. The overall look of the
car was greatly improved. Too bad it only lasted one year.
The first generation
Camaro ran for 3 model years and was available as a 2 door, 2+2 seating, coupe
or convertible with a choice of inline 6 and V8 powerplants. In the early days
the Z/28, SS, and RS models were not really models at all but options of the
standard sport coupe. The 1969 Camaro received a major facelift. The car was
wider and had a more aggressive look which included smaller and flattened wheel
wells that had sculptured feature lines flowing off them to the rear. It also
had three vents added in front of the rear wheel well. The overall look of the
car was greatly improved. Too bad it only lasted one year.
Camaros had many engine options in 1969 including a 250 straight six, 307, 350, and 396 V8s and some even had big block 427s put in by dealers. Chevy built over 240,000 cars between their Norwood and Van Nuys plant in 1969. The 1969 Camaro was and is so popular that Chevrolet themed the new 08 Camaro’s style after it.
| THE KIT |
The kit was first released
around 1990 and was a landmark kit for the day. The level of detail and
complexity of the assemblies is a direct reflection of its origin as a 1/12
scale kit. The 69 Camaro has been issued continuously and in a few different
configurations including RS/SS, Yenko, and Baldwin Motion. There is also a
convertible available (I would love to see that in 1/12th!). My copy
of 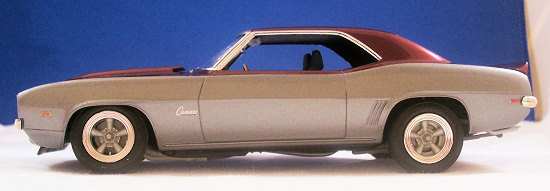 the kit was molded in
white plastic and all sprues were bagged. The Chrome sprue, glass, and tires
were loose in the box. The decal sheet had the traditional stripes in both
black and white as well as a couple of license plates and a couple of under hood
markings.
the kit was molded in
white plastic and all sprues were bagged. The Chrome sprue, glass, and tires
were loose in the box. The decal sheet had the traditional stripes in both
black and white as well as a couple of license plates and a couple of under hood
markings.
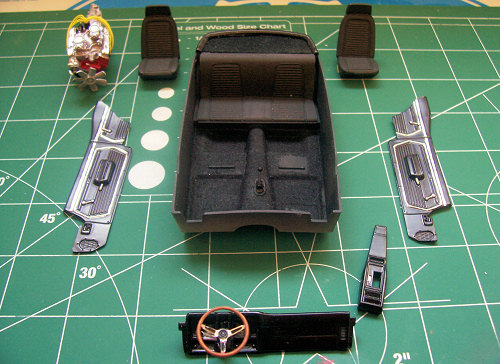
The parts breakdown makes it easy to add extra detail. The engine features separate fuel pump, coil, two piece carbs, and headers. The engine bay includes a two piece brake master cylinder and well defined locations for the heater hoses. The interior door panels are separate pieces with excellent engraving allowing the builder to really make them shine with paint and foil. The body is very finely molded and much more accurate in shape then the older Monogram tool. The kit I built came with an excellent set of rally wheels that are also appropriate for many other GM cars of the era. The kit really stands up well for being a 17 year old mold.
| CONSTRUCTION |
 All that incredible detail
and fidelity has one drawback. Construction of this kit is challenging. There
are no fit problems, but the tolerances are tight and getting the body on the
chassis in final assembly was a nail biter for sure.
All that incredible detail
and fidelity has one drawback. Construction of this kit is challenging. There
are no fit problems, but the tolerances are tight and getting the body on the
chassis in final assembly was a nail biter for sure.
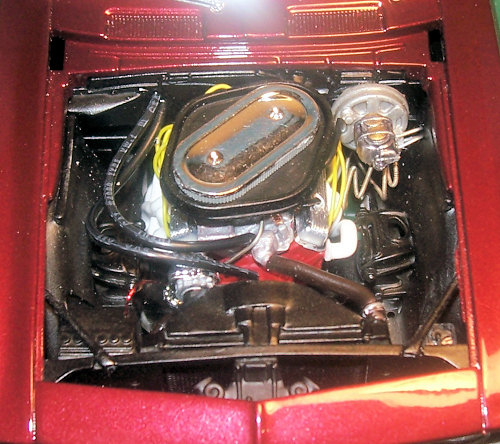
I started with the engine and it went together pretty well. Using a reference photo from my book I was able to drill out the holes for the various hoses and wires I was going to add. The heater hose I used was from Detail Master and the other hoses were actually the insulation from the wire for holing the model down that comes in the AMT display cases. I used a pre-wired distributor and the kit supplied coil to simulate the ignition wiring. The fuel line was the wire left over from the display case after I stripped the insulation. It runs from the frame rail, through the fuel pump and into the carb. I didn’t bother constructing the distribution connectors to run it to both carbs because with the air cleaner mounted it’s all obscured anyway. Same deal on the throttle linkage. I used fine brass wire from VCR motor for the spring and ran it to the carb. I drilled and mounted stiff wire to the front of the engine and to a block I scratch built and attached to the manifold to mount the heater hoses and hoses going to the valve cover and brake master cylinder. I mounted the hoses by slipping them over the wire and securing them with CA glue, this gave it a clean look. I modified the headers by removing the webbing between tubes so that the ignition wiring could mount between them to the head. The headers are one of the areas where you have to take care. The mounting surface is a bit vague and you have to ensure they are lined up to match up with the exhaust, 23mm apart at the collectors in my case.
The hardest part is getting
the engine in the chassis. The headers will not slip under the chassis if they
are mounted to the engine ahead of time as per the instructions; if they do…they
are not mounted properly. There are two solutions. One, mount the headers
after installing the engine; this way you can line the up perfectly with the
exhaust. The second is to remove about a
 square centimeter of
plastic from the chassis in front of the transmission cross member and inside
the front frame rails. Removal of the small tabs will allow clearance. I chose
option 2 because I determined that trying to get the headers mounted to the
heads around the ignition wires would be too difficult. One thing to look out
for is side to side clearance between the frame rails for the headers; it’s a
tight fit even with the chassis modification!
square centimeter of
plastic from the chassis in front of the transmission cross member and inside
the front frame rails. Removal of the small tabs will allow clearance. I chose
option 2 because I determined that trying to get the headers mounted to the
heads around the ignition wires would be too difficult. One thing to look out
for is side to side clearance between the frame rails for the headers; it’s a
tight fit even with the chassis modification!
The rest of the construction was very straight forward, the interior literally falls together. The mounting points for the exhaust are not very sturdy so I recommend using super glue (CA) or epoxy to secure them. I used epoxy to fill in the gap between the header and exhaust and painted it white to make it look fully connected, it came out pretty well and I’ll use that technique again. One last hurdle to get the model done is getting the chassis and body together. You have to install the firewall and radiator support to the chassis, then put the body, with interior installed, on the chassis from front to back. Due to the shape of the body, you really have to spread it open to get it over the firewall. I heard a few cracks of breaking glue bonds as I stretched the body over! If the radiator support is not in its proper place, you may not even get the body on. A bit of care and patience and the chassis will install without cement of any kind and be rock solid.
I chose to use the torque thrust wheels from the 69 Yenko kit instead of the rally wheels supplied. When I installed the front suspension I pinched it up as high as I could to lower the front end a little. I also added the riser blocks from Revell’s 68 Firebird kit to raise the rear up a little. The result was a killer stance. I left the wheel backs off the front tires to allow the brake rotors molded to the front suspension to show through. I would have added calipers if I had time, next time I will!
| COLORS & MARKINGS |
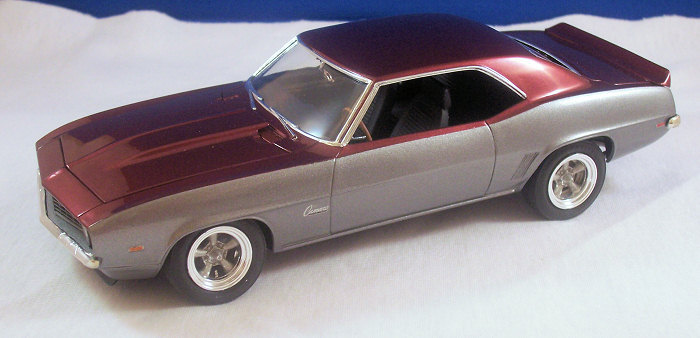
I used a mix of DuPont and
Cobra Colors paints to create the two tone finish. I would like to thank Sam,
Andy, and Mike of Car Quest Refinishing Supplies in Spokane, Wa for all their
assistance. Sam always makes sure I get the right paint in the right
 formula. She also
introduced me to DuPont’s new “Hot Hues” line of vibrant colors which you will
be seeing on my future builds! Thanks guys!
formula. She also
introduced me to DuPont’s new “Hot Hues” line of vibrant colors which you will
be seeing on my future builds! Thanks guys!
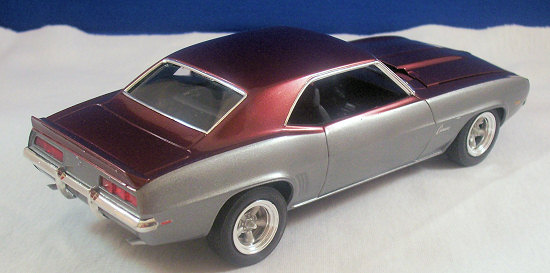
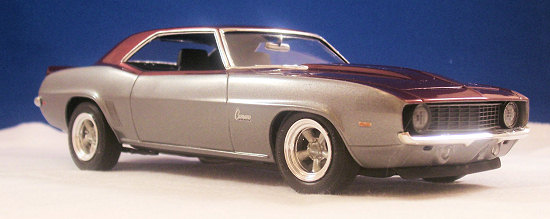
First, I based the entire car with three medium coats of 06 Corvette Machine Silver from Cobra Colors. I masked off the sides and shot three additional medium coats of DuPont BMW Barbera Red on the top. I clear coated the model with Martin Seymour 2 part clear from Napa auto parts. Great care must be used with these automotive paints. A spray booth and a good respirator are a must! There were a few boogers in the finish so I had to polish the roof and hood. I started with 3600 grit micromesh and worked my way to 12,000. I followed it up with a new polish from England that Car Quest was trying called Farecla Swirl Remover. They were selling it in sample bottles, but of course a sample for a full size car is a lifetime supply for models! The swirl remover did a wonderful job removing all the sanding marks and made the finish gleam. I followed it up with some of Farecla’s hand glaze for the final finish.
| CONCLUSIONS |
This was a challenging and enjoyable build. A bit of planning was needed to get the engine installed and the chassis on the body, but it all went together better then I thought it would. I recommend a bit of experience with other car kits before taking this one on. It’s not that it’s a poorly designed kit, far from it! The kit is extremely well done, but the complexity of the final assembly makes it unsuitable for beginners.
| REFERENCES |
 The only reference I used was the
Enthusiast Color Series
book Camaro MBI publishing 1995. This book had a perfect photo of the
exact engine in the kit and enabled me to wire my model very accurately.
The only reference I used was the
Enthusiast Color Series
book Camaro MBI publishing 1995. This book had a perfect photo of the
exact engine in the kit and enabled me to wire my model very accurately.
Your editor would like to recommend the Specialty Press 'Musclecar Tech' book on the 1967-72 Camaro as another fine source of information and photos.
July 2007
Kit courtesy of your editor. If you would like your product reviewed fairly and
fairly quickly, please
contact
the editor or see other details in the
Note to
Contributors.