ProModeler 1/48 Ju-88A-4
|
KIT # |
5498 |
|
PRICE: |
$26.97 |
|
DECALS: |
Four aircraft |
|
REVIEW : |
Terry Miesle |
|
NOTES: |
|
|
HISTORY |
The Junkers 88 was a family of Fast Bombers the Germans produced in WWII. It filled the roles of bomber, night fighter, destroyer, and finally as a Mistel. The A models were the mainstay of German medium bombing during the war, and the A-4 was one of the most produced models. It’s pretty much a straghtforward bomber, with a crew of 3 or 4 in the front of the aircraft, as was common in German designs. I probably don’t need to go into a lot of detail here, as the Ju-88 is a pretty well-known aircraft.
 I had envisioned this
project as a break. A simple out-of-the-box project, after a couple of
challenging build-ups. I've always liked the Junkers 88, a very versatile and
attractive aircraft. I have had experience with DML models in the past, and
their fit was good. Since the ProModeler Junkers 88A-4 kit was once a DML
mold, I figured I had an easy time ahead of me. I was wrong.
I had envisioned this
project as a break. A simple out-of-the-box project, after a couple of
challenging build-ups. I've always liked the Junkers 88, a very versatile and
attractive aircraft. I have had experience with DML models in the past, and
their fit was good. Since the ProModeler Junkers 88A-4 kit was once a DML
mold, I figured I had an easy time ahead of me. I was wrong.
Upon examination of the kit, it was obvious this kit was part of a family of
Ju-88s produced with common and specific parts. I have a Ju-88G1/G10 kit from
DML, which includes other optional parts. In order for DML to do this, various
nacelles, engines, wingtips, cockpit sections etc are needed. Those
are a lot of joints, and a lot of seams.
This review may read like a litany of problems, but if you know where the difficult spots are before you start you'll have an easier time than I did. I did have the advantage of seeing a couple examples of this model built at shows (not to forget your editor's review of several years ago), and was satisfied that the problems were inherent to the kit, not exclusive to my copy.
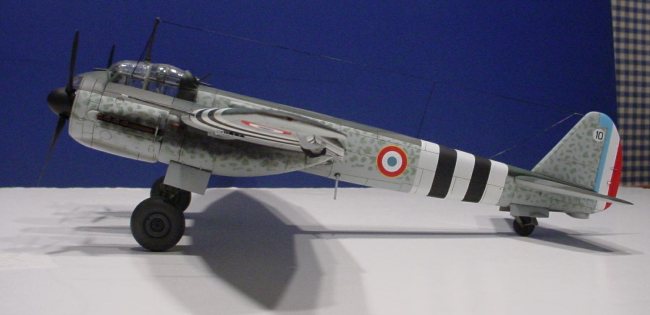
I found the French-operated Ju88A-4 color scheme in Flying Colors, and thought it was just so unusual and eye-catching I just had to do it. The mere sight of invasion stripes on a Junkers should turn heads at any show. In the Spring of 1945, if I were a French pilot I’d want the big, unmistakable ID bands on my German-made airplane, too. The book lists the aircraft as serving with Groupe de Bombardement 1/31 "Aunis" with the Forces Francaises de l’Antlanique, Bordeaux-Merignac, March 1945.
|
CONSTRUCTION |
 First things first,
I started with the cockpit. There are several seats you'll have to choose
from. The pilot's seat is an oddly shaped armored carapace, not a traditional
chair-shaped seat. This confused me, as the instructions were less than
helpful in regards to the shape of the seat. I distrusted the instructions,
and eventually found some visual evidence in Squadron's books. Each seat was
detailed with makeshift seatbelts made from strips of instruction sheet. The
pilot's and navigator's seats have seatbelts which pass through the seat
itself, you'll need to cut holes if you wish to depict the seats with belts.
First things first,
I started with the cockpit. There are several seats you'll have to choose
from. The pilot's seat is an oddly shaped armored carapace, not a traditional
chair-shaped seat. This confused me, as the instructions were less than
helpful in regards to the shape of the seat. I distrusted the instructions,
and eventually found some visual evidence in Squadron's books. Each seat was
detailed with makeshift seatbelts made from strips of instruction sheet. The
pilot's and navigator's seats have seatbelts which pass through the seat
itself, you'll need to cut holes if you wish to depict the seats with belts.
The rest of the cockpit fit pretty well, and fit within the fuselage very
well. I'd been warned this was a potential hazard of the kit, but found no
difficulties. The cockpit isn't badly detailed, even the throttle quadrants
have individually-molded levers. The panels are convincing, and although the
details may be simplified, it still looks good painted standard dark gray,
black, and dirtied up a bit.
You'll need to sand the fuselage halves on a flat surface, the edges aren't
quite as good as I'd like. I glued the fuselage halves together with Tenax 7
and reinforced them in a few key spots with epoxy from within. I've had
occasional problems with Tenax on long joints, and I had the feeling I'd have
to handle this model quite a bit in the near future so I wanted to be very
safe.
All sub-assemblies went pretty well, landing gear, wings, stabilizers etc. No
surprises yet. The model is well designed for breakdown assembly. You don't
need to add the landing gear/bulkhead assembly until the last minute. The
front of the assembly isn't visible, so you don't need to paint it. The
tail gear can wait until the end. I also did not add the spine clear parts
until later, not before gluing the fuselage together as the instructions
indicated. There are substantial gaps with those parts, and I had some ideas
to handle that.
The fuselage seams were fairly substantial. I tackled these with epoxy putty.
I used Aves Apoxy Putty, thinned slightly with alcohol. This was applied
directly to the seam area, and smoothed with a soft brush and alcohol. I let
that dry, then sanded the areas smooth. After that, I added the clear parts to
the spine and the small spacer near the canopy area. The clear bits needed to
be supported while they were cemented in position, I used a bit of masking
tape. All these parts needed a bit of epoxy putty for gap filling. Additional
treatments with Gunze's Mr. Surfacer 500 and 1000 would be needed to yield
satisfactory results. I sanded the clear parts along with the surrounding
plastic and fillers. This makes the clear parts absolutely flush with the
surrounding area, but will require polishing to make completely clear again.
Simple enough, and the results speak for themselves.
 Here’s another little
nugget of joy. The little clear piece depicting the antenna insulator fell
through the fuselage when I was trying to glue it in place. No great loss, it
didn’t fit well anyway. My solution was to squirt some clear epoxy in the
fuselage, place some cellophane tape over the hole, and allow the epoxy to
harden over the hole. Great results, and you can be sure I’ll be using that
technique again in the future.
Here’s another little
nugget of joy. The little clear piece depicting the antenna insulator fell
through the fuselage when I was trying to glue it in place. No great loss, it
didn’t fit well anyway. My solution was to squirt some clear epoxy in the
fuselage, place some cellophane tape over the hole, and allow the epoxy to
harden over the hole. Great results, and you can be sure I’ll be using that
technique again in the future.
The wings and stabilizers fit together quite well with one exception, the wing extensions. These were thicker than the wings they mounted to. I had to sand them down a fair amount, then used a bit of Gunze Surfacer to blend the joint. I've seen several examples of this aircraft built-up, and all had this exact problem. Adding to that problem is the fact that the panel lines don't exactly line up after the extensions are added. More fun.
The fit of wing to the fuselage was not so good. The wings were not as
thick as the wing roots, some sanding of the roots were needed. I did this
sanding on the undersurfaces, and smoothed the upper wing root just a little
bit. After that, the fit was OK, but needed a little epoxy putty treatment to
provide a nicely blended joint. The tail surfaces were similar, a gap which
needed some epoxy. I put masking tape on either side of the joints, then
trowelled some thinned epoxy putty along the joint. After I was relatively
satisfied, I removed the masking tape, leaving a raised line of putty. This
dried overnight, and I wet-sanded it smooth the next day. For the underside
tail surfact joint, I thinned the putty to a very thin consistency and brushed
it 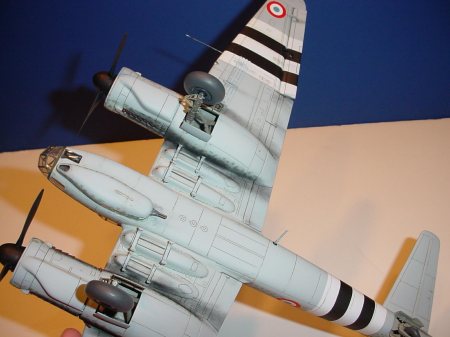 into the joint. That
provided a good seal. The vertical stabilizer required similar treatment.
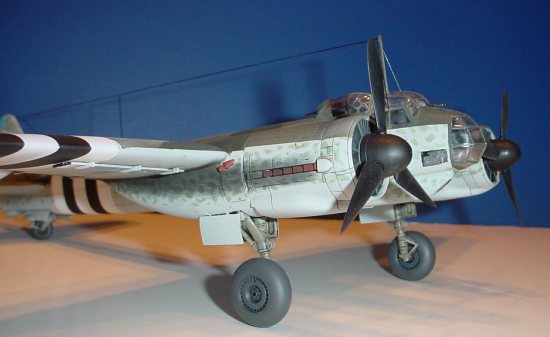
Other sub-assemblies were completed at this stage. The landing gear, engine
cowls (exhausts left out) etc. were all finished and painted, weathered with
oils and drybrushing.
into the joint. That
provided a good seal. The vertical stabilizer required similar treatment.
Other sub-assemblies were completed at this stage. The landing gear, engine
cowls (exhausts left out) etc. were all finished and painted, weathered with
oils and drybrushing.
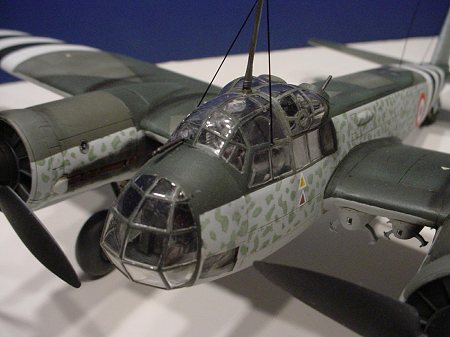
The wheel bays, engine nacelles etc were painted RLM Gray 02. The cockpit interior was painted RLM 66 Dark Gray. I applied Future to the canopy, and glued it in place with a light amount of Tenax, I knew I would have to glaze the parts in place with epoxy putty later, so I just needed to hold it in place. That joint is very bad, a serious gap. Using thinned epoxy putty, I literally caulked or glazed the canopy parts in place. The nosecone isn't bad, but the gondola and upper canopies are not at all good. The nice thing about epoxy putty is that excess can be removed with a tissue, and cleaned with alcohol. This makes glazing easy. After the epoxy dried, I used light applications of Gunze Mr. Surfacer in a couple of low spots I didn't glaze extremely well.
Oh, did I forget to mention there are ejector pin marks all over the place? In the seats, now there’s a pain in the keester…
|
PAINT & DECALS |
 With all major assembly
complete and seams filled, I was ready to mask the canopy window frames. I had
purchased some pre-cut vinyl masks from EZ-Mask. I found the parts guide
lacking, and the vinyl adhesive extremely aggressive. Even with taming the
adhesive down by sticking it to my hand it was still much too tacky. I've used
other, much better vinyl masks. I reverted to my age-old method of using small
strips and shapes of masking tape. I've found the Tamiya tape well worth the
expense, it is a thin, flexible paper with very little to no residue. There
are over 50 windows on the Ju88A-4, so know before you start that you'll spend
a lot of time masking.
With all major assembly
complete and seams filled, I was ready to mask the canopy window frames. I had
purchased some pre-cut vinyl masks from EZ-Mask. I found the parts guide
lacking, and the vinyl adhesive extremely aggressive. Even with taming the
adhesive down by sticking it to my hand it was still much too tacky. I've used
other, much better vinyl masks. I reverted to my age-old method of using small
strips and shapes of masking tape. I've found the Tamiya tape well worth the
expense, it is a thin, flexible paper with very little to no residue. There
are over 50 windows on the Ju88A-4, so know before you start that you'll spend
a lot of time masking.
The first step in painting is flat white. This would be my primer coat,
allowing me to inspect the model, find messy areas, and fix them before
continuing. After that, I painted another coat or two of flat white,
particularly over the areas which would receive the ID bands. The ID bands
were masked off, 3/8 inch is just right for the 16 inch stripes. Black was
painted over the white, and the bands were masked off. The rudder was masked
and painted in French Tricolors. Most paints used were Gunze-Sangyo Acrylics,
and some Testors Acryl paints.
The undersurfaces are Lichtblau RLM, and were masked off to paint the upper
splinter camouflage, Black Green RLM and Dark Green RLM. After those
were painted, the masking was removed, and a hand-cut tape mask was used as a
template for the spots. These spots appear to be hand-painted on the aircraft,
so I cut randomly-sized holes into some 3M Post-It note tape. I drybrushed
Light Green RLM as spots with the template over the required surfaces.
Several coats of Future sealed the paint, decals were applied, and sealed
with another coat of Future. At this point, I washed oil paint into the panel
lines and recessed 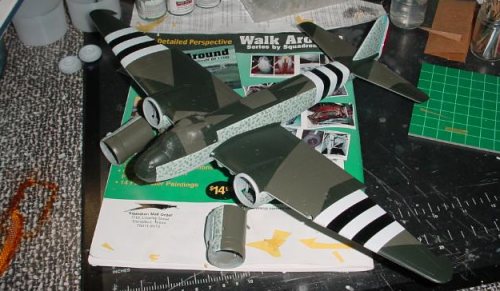 areas.
Black paint was used in the darkly colored areas and a dark brown was used in
the lightly colored areas. After the wash had dried, I dullcoated the entire
plane with Gunze acrylic flat coat.
areas.
Black paint was used in the darkly colored areas and a dark brown was used in
the lightly colored areas. After the wash had dried, I dullcoated the entire
plane with Gunze acrylic flat coat.
A bit of drybrushing helped weather the aircraft, as did some application of
pastel dust. Additional details were picked out with various paints, including
PolyScale Grimy Black for the tire rubber and Gunze Burnt Iron for the
gunmetal. The engine exhausts were added late in the assembly, after painting
and are painted with Testor's Model Master Rust and dirtied with pastel dust.
After the exhausts were added, the radiator fronts were added and the cowls
glued to the nacelles.
I made the antenna wires from stretched sprue, which turned out better than I had hoped for. I haven’t stretched sprue for a while, typically I’ve used wire for rigging recently. The sprue was actually easier to mount and glue together.
|
CONCLUSIONS |
These Ju88 kits are not for the meek. You’ll need to do a lot of work to get a good-looking aircraft without glaring problems. It can be done, however. There are aftermarket kits available for conversions, cockpits, and various weapons. Such a versatile aircraft can surely be depicted in dozens of variants in anyone’s display case. It’s pretty large, and many paint schemes are possible. You should be confident in your abilities to fill major gaps, and adapt poorly fitting parts so they look good. I hope I gave you some tips and pointed out some trouble spots to help make this happen for you. Can I recommend the kit? Yes, with warnings about fit and finish problems. I’ll definitely build more Ju-88s in the future, I have two more versions on the pile waiting to be built.
|
REFERENCES |
Flying Colors, compiled by W. Green and G. Swanborough; Salamander Books, published by Barnes & Noble, 1999 ISBN 0-7607-1136-4
Ju-88 In Action, Squadron Publications.
Copyright ModelingMadness.com.
All rights reserved. No reproduction in part or in whole without express
permission from the editor. If you would like your product reviewed fairly and fairly quickly, please
contact
the editor or see other details in the Note to
Contributors. Back to Reviews Page
2023