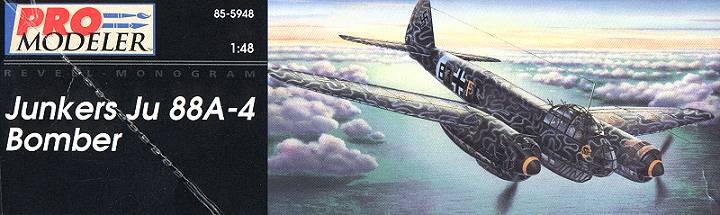
ProModeler 1/48 Ju-88A-14
Kit Number: 5948
Price: $26.97
Decals: 4 Versions: 3/KG 54 and2/LG1 in Italy, 1943 with desert inspired camo; III/KG3 and9/KG51 from the Russian front in standard camo.
Date of Review: June 15 1998
Review and Photos by: Scott Van Aken
Probably the most widely used German bomber of WWII is Junkers Ju-88. An aircraft that became a 'jack of all trades' and operated as a transport, night fighter, assault aircraft, torpedo bomber, as well as test bed for many experiments, the Ju-88 first became famous for its participation during the Battle of Britain. ProModeler's kit is for a later version of the Ju-88, the A-4, a version built in more numbers than any other.
ProModeler's Ju-88 will look familiar to those who have built any of the DML 1/48 Ju-88s. It is basically the same kit with separate moldings for the A-4. You can tell the new moldings as they do not have the 'pebble finish' of the DML kit. In addition, the DML kit has no alignment pins for many of the parts (fuselage, wings, tail, stabilizers, engines....) whereas the Monogram parts do. The kit comes in R-Ms infamous non-box that makes it impossible to use while construction is underway. Why R-M cannot supply a nice sturdy box is beyond me. You'll have to find a substitute; I did: the Tamiya Betty box. On the plus side, each of the sprues is individually bagged to prevent scratches during shipment, it comes with a great Scalemaster decal sheet (typically out of register) and excellent instructions including many photos of the USAF Museum's Ju-88D.
Upon close examination of the sprues, two things struck me (other than the lack of alignment pins). One was the large number of mold release marks. Especially on the 'A' tree, where all the instruments had these on the face, but strangely, none on the backs. Definitely an engineering screw-up. Fortunately, most will be hidden as construction continues. The other was the condition of the common parts. These molds have been used a LOT, and show it. You will have to do a bit of cleanup of a number of parts, not all in easy to get to places (like the inside of the tail-wheel fender). Other areas of concern are some sink marks in thick pieces, but not as many as you would think and all are easy fixes. Frankly, one is getting what used to be a $50.00+ kit for about half price.
First step for me is to build subassemblies, especially those that will be painted the same color. This meant building the cockpit areas, wheels, bombs, tail, stabilizers...... before getting down to painting. No real problems. You must be aware of all the ejector pin marks in the cockpit pieces and decide if you are going to spend the time filling them in and cleaning them up. You will for a contest, but for me, I just got the easy ones. The cockpit, once assembled, was painted in RLM 66, some boxes and other goodies painted in black or steel as the instructions suggested, then drybrushed. I did not use the Reheat decals on this one, just washed the instruments with dirty white and picked out some details.
Much of the aircraft subassemblies do not need to be installed until final assembly. I found this out by reading a back issue of Military Model Preview, a magazine now out of print. As a result, it was a lot faster to construct than would have otherwise been. Indeed, many of the small, bothersome bits, like the DF antenna, with it's clear base, would have been nearly impossible to mask if installed when the instructions deemed necessary.
I did not reach all the same conclusions as MMP as they claimed that construction was pretty straightforward. While that is generally true, I did have to use quite a bit of putty to clean up gaps and sink marks. For instance, the wings had sink marks just forward of the ailerons that needed filled. In addition, the wingtips did not fit well. Never mind that the left one needed card to fill the space, but the tips did not end up being the same chord as the wings, so quite a bit of putty and smoothing out needed done to ensure an acceptable appearance. Since I was modeling an A-14, the dive brakes were not installed. The engine mounts were not a great fit and needed filler as well. The landing gear assemblies must be fit into the wings prior to attaching the engine mounts and they were a superb fit. My fears of trashing the gear during the rest of construction were unfounded. When it came time to fit the wings to the fuselage, there were some curious fairings on the wing root of the fuselage that looked like they needed similar fairings on the wings. Don't know what they are for, so you can either sand them down, or leave them; your choice.
MMP suggested adding the wings to the fuselage prior to attaching the cockpit section and this is what I did. Before that, however, I fit the tail and stabilizers to give me a vertical and horizontal reference for the wings. These assemblies gave me no trouble and needed no filler. The wings also gave me no problems once the gluing faces were shaved down. Once that was dry, the cockpit was attached. The panel lines on the upper wing portion of the fuselage were used to line everything up and the fit was surprisingly good. Naturally, I needed filler for a smooth finish, but nothing terrible.
What was a surprise was the lack of a smooth transition from the leading wing root to the cockpit section. It is almost as if the wing was not wide enough at that area. It took several applications of filler to get a good looking transition. I looked at Ju-88 photos and did not see this apparent glitch. I just chalk it up to DML airframe and Mongram cockpit area differences that happen when you have more than one team design sections of a kit. The aft fairing for the cockpit was also in need of filler although the fit was pretty decent.
Under the wings are the external bomb racks. A couple of them fit perfectly and a couple did not. No reason why that I could see, but I did have trouble getting a good, tight fit with one inner rack and one outer rack; neither on the same wing! Assembling the propellers also took a bit of ingenuity as there was no guide as to how the blades fit. It would have been easy to have all three blades with different angles of attack. Look at the photos in the instructions when you assemble yours. The blades also needed clean up and had more flash than other parts of the kit.
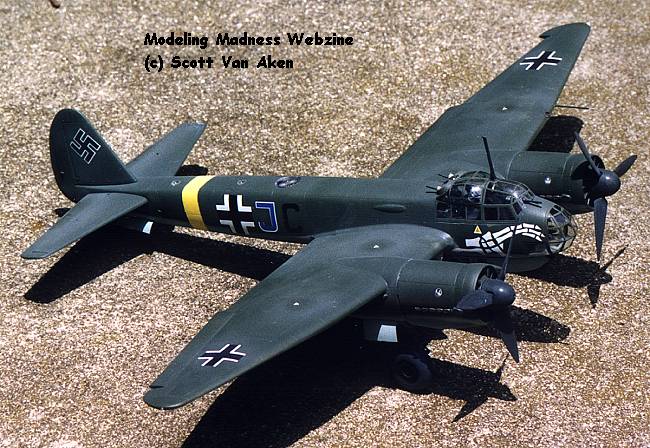
The transparencies were a pretty decent fit although the upper two needed to be trimmed a bit to get them both to fit. They were also a major pain to mask, as you can imagine, but although time consuming, were finally done. And it is the transparencies that were the biggest problem for me. What went beautifully with the Tamiya Betty, was a disaster with this kit. No fault of the kit, but somehow the same masking techniques failed me this time and I had lots of paint seepage and other nasty things happen. Every kit I build has at least one major disaster, and this was it :( The underfuselage gondola was modified by flattening the front part and fitting in a piece of sheet plastic. Into this was drilled a hole for the 20mm cannon barrel as befitting an A-14. In all other respects, the A-14 is identical to the A-4 and frequently had the 20mm cannon removed and the bomb sight put in its place. Fortunately, I found a great cannon that was spare from the AMT 1/48 A-20G kit. Anyway, the gondola is made entirely of clear plastic which makes it a real pain to putty and paint. It did not fit together well for me at all but careful filing, filling and fitting finally found a fair fit.[:)]
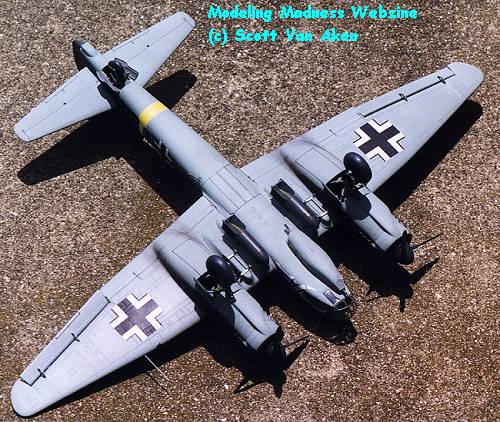
After white gluing the nacelles on, it was time to paint. The A-14 I chose is from an Aeromaster sheet. This particular aircraft has a simple scheme of RLM 71 upper and RLM 65 lower. After all, I needed a break from building this thing. I first painted the underside color, and when fully dry, masked and painted the upper color. When that was dry, I repainted the various oversprays. Masking the engines was a particular trial for me, but with the help of Parafilm M, I managed to get a decent paint scheme. Once painted, it was oversprayed with Future for decal placement. I chose a scheme with a skeletal hand from an unknown unit in Rumania in mid-1944. The Aeromaster decals worked quite well and I used Champion decal setting solution to get a great fit. Maybe it is because of the Champion solution, but the upper color of a two part decal on the fuselage shrank after it had dried, leaving the impression of an off-register decal. I have never run into this problem before.
Next step was attachment of various 'fiddly bits' like antenna, machine guns, and the like. Naturally I lost the clear insert for the fuselage antenna. I replaced it with epoxy in which a hole was drilled once dry. Strangely missing was the underfuselage antenna that is shaped like a shallow W. Almost all German bombers seemed to have this antenna and it's absence on this kit is quite noticeable. The cockpit canopy sections were not a very good fit and needed a lot of dry fitting before it was acceptable. When all was complete, the kit was oversprayed with a matte clear and the clear bits then had their masking material removed. A rather tedious process, but necessary.
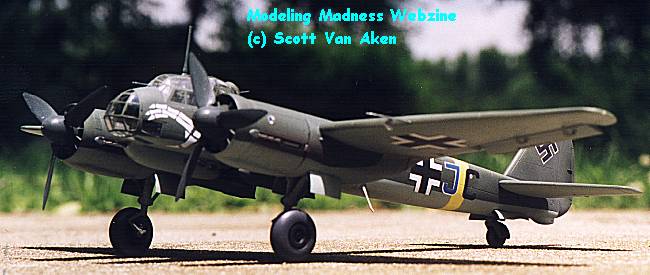
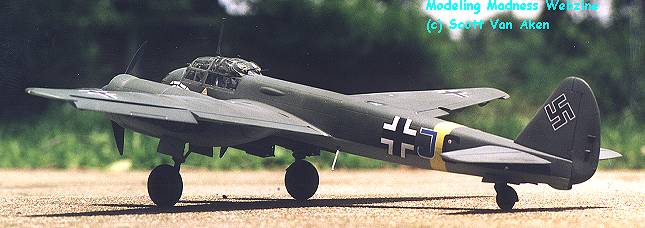
The end result is a rather nice, largish aircraft that looks very nice in the display case along with the He-111, G4M1, and B-25. While I won't be building another for a little while, now that I know all the problem areas, the next one will be easier. Maybe the DML Ju-188, or Mistel or the next upcoming R-M version. Recommended for intermediate modelers due to the fit problems and complexity of the kit.
Reference: Squadron 'Ju-88 In Action, Volume 1'
Copyright ModelingMadness.com. All rights reserved. No reproduction in part or in whole without express permission from the editor.
Back to
Reviews Page 2023