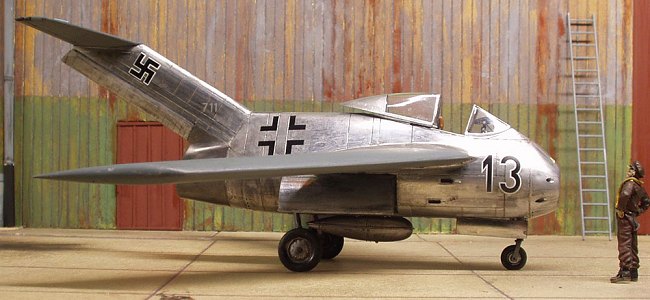
Tamiya 1/48 Ta-183 A
|
KIT # |
89586 |
|
PRICE: |
£45.00 |
|
DECALS: |
One aircraft |
|
REVIEWER: |
|
|
NOTES: |
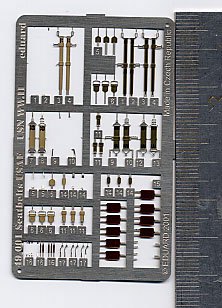
Reboxed AMtech kit. Eduard belts and EagleCals #29 decals used. |
|
HISTORY |
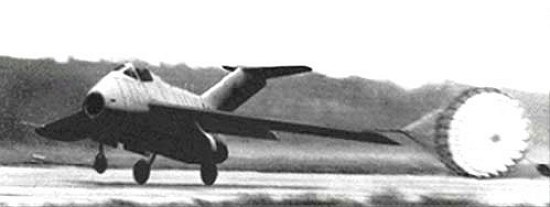
Since good histories of this plane have been provided before, I allow myself to be brief. The Hückebein was one of those rather wild designs the Germans produced during the end of World War II. The aircraft had been fully designed, it had undergone full scale wind tunnel testing, and it might be possible the aircraft had been build after the war, in Russia. Internet resources are undecided; I found a picture of a landing Ta 183, but some say this is a forgery. I don’t know, the picture itself looks pretty convincing to me, although I have my doubts about that parachute (I don’t see any parachute housing in technical drawings I found, and I wonder about the fully deployed chute while the front wheel is still up in the air).
Note to editor; picture ‘huc2.jpg’ could be used here. I have no publishing rights to this picture, I found it on the web, feel free to leave it out if you see this as a problem
Whatever the case, the design of the Ta 183 has been studied well by all allied parties after the war. Both Russians and Americans used German research in swept wing design and high speed flight. And thus it became possible for descendants of this aircraft to meet over Korean skies; the first jet to jet dogfights, with the Russian Mig –15 on one side, and the American F-86 Sabre on the opposing side…
Main design feature of this kind of aircraft: it is more or less a huge engine in the centre, with a cockpit strapped on top of it, and some wings glued on. As such, the Ta 183 is the founding father of a whole breed of jet aircraft.
Comparing the first jets:
|
|
Ta 183 Huckebein |
MiG-15bisFagot |
F-86 F Sabre |
|
1e flight Length Wingspan Height Engine Thrust Empty weight Take-off weight Speed Ceiling Range Weapons |
Planned in 10,00 m.
He S 011 1589 Kg.
962 Km/h 14.000 m.
4x 30mm m.g. 4 rockets 500 Kg bomb load |
1947 10,08 m. 10,86 m. 3,70 m. Klimov VK-t 2700 Kg. 3681 Kg. 6045 Kg. 1076 km/h. 15.500 m. 1420 km. 1x37mm m.g. 2x23mm m.g. 500 Kg bomb load |
1947 11,44 m. 11,31 m. 4,50 m. Gen. Elec. J 47 2656 Kg. 4940 Kg.? 9234 Kg.? 965 Km/h. 14.630 m. 2584 Km. 6x .50 m.g. 16 rockets 900 Kg bomb load |
|
THE KIT |
This kit was initially sold by AMTech, and now is also sold by Tamiya, with a little extra: the kettenkraftrad tow vehicle and some ground crew figures. Everything fits great, the kit almost builds like a snap kit. For a look at the kit, please see the preview.
|
CONSTRUCTION |
Since I hand paint my models, building and painting are not really separated. I decided to go for a factory fresh Huckebein, in bare metal. Since the wings were made of wood, I painted them grey.
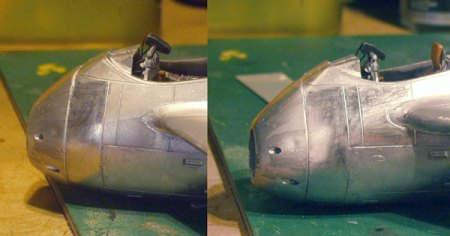
 I started with the cockpit. The
detail on instrument panel and side consoles was a bit low for optimal brush
painting, but looked convincing in the end. I started out by painting
everything bright grey (Revell 76), then washed it all with thinned black.
Switches, dials and other details were dry brushed with metal paint to bring
them out. In the end I added several bright colours for some switches and
instrument dials. At the front of the instrument panel, there is a little gap
between the panel and the fuselage, but the backside of the instrument panel
has the backside of instruments as well. I added some wires made from nylon
fishing line. In the end, this is only visible for the beholder armed with a
maglite, but hey, I know it’s there anyway…
I started with the cockpit. The
detail on instrument panel and side consoles was a bit low for optimal brush
painting, but looked convincing in the end. I started out by painting
everything bright grey (Revell 76), then washed it all with thinned black.
Switches, dials and other details were dry brushed with metal paint to bring
them out. In the end I added several bright colours for some switches and
instrument dials. At the front of the instrument panel, there is a little gap
between the panel and the fuselage, but the backside of the instrument panel
has the backside of instruments as well. I added some wires made from nylon
fishing line. In the end, this is only visible for the beholder armed with a
maglite, but hey, I know it’s there anyway…
The chair received photo etched safety belts from a Eduard detail set (I took the liberty of using RAF type seatbelts since I was a bit eager to get on with it). These were a pre-painted affair, and a great addition they proved to be. The construction of these seatbelts was a bit of a challenge, as each belt had to be build op from 3 to 5 pieces. Abstinence from coffee for several days in advance might be a good idea.
Since the cockpit turned out so nice,
I decided I wanted to open up the one piece canopy. I took the razor saw and
did my worst. This was a first time for me, and the
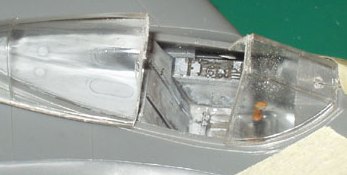 end result is not perfect,
next time I should start at the sides instead of the top. But I hoped the
painted framework would cover up most of my problems, and decided to stay with
it.
end result is not perfect,
next time I should start at the sides instead of the top. But I hoped the
painted framework would cover up most of my problems, and decided to stay with
it.
Having started vandalizing this perfect kit, I decided to keep going on the chosen road. I glued the wings together and scribed the flaps until they came off. The inside of the flaps and the wing needed a lot of putty to fill the gap, but that was easy.
Next were the wheel bays. Again, the fit of the kit was surprisingly well. The wheel wells have some nice detail, which should be painted before adding them. I did not, and had a bit of a hard time picking out the tubes and boxes afterwards. It turned out the cockpit with instrument panel could be fitted through the open nose, so I could now build up all the large components of the aircraft.
Fuselage halves went together well, cockpit tub was inserted and glued into place, then the wings went into place. No putty needed whatsoever! This aircraft will be a tail sitter if no weight is added in the nose. I glued in the front wheel well, figured out where the main wheels would be, and placed the aircraft on a round pencil to look at the balance. I glued some lead (I use soldering tin for this) on top of the front wheel well until the front of the model went down. Then the nose could be glued in place. This nose cone has some sink marks on the left and right side I did not notice until the aircraft was finished, next time…
|
CAMOUFLAGE & MARKINGS |
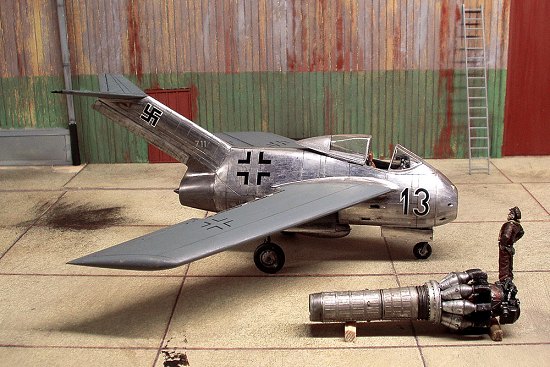
 The fuselage of the Hückebein was
painted with buffable Model Masters aluminium paint (Model Masters metalizer
no 1401). This paint is already thinned to airbrush consistency, but painting
with a very soft, wide brush works just as well. The end result is not
completely even, but that is just how I like it. Instant weathering! The paint
is meant to be polished with a soft cloth after spraying on, but I use a
slightly different technique. I use a polishing steel to rub the paint into a
sheen (I did some etching in a former life). The backside of a teaspoon or a
small smooth pebble will do just as well as a tool. By polishing one panel at
the time, and if needed repainting and polishing panels again, a nice and
complicated look can be achieved. As a bonus, the metalizer becomes less
fragile.
The fuselage of the Hückebein was
painted with buffable Model Masters aluminium paint (Model Masters metalizer
no 1401). This paint is already thinned to airbrush consistency, but painting
with a very soft, wide brush works just as well. The end result is not
completely even, but that is just how I like it. Instant weathering! The paint
is meant to be polished with a soft cloth after spraying on, but I use a
slightly different technique. I use a polishing steel to rub the paint into a
sheen (I did some etching in a former life). The backside of a teaspoon or a
small smooth pebble will do just as well as a tool. By polishing one panel at
the time, and if needed repainting and polishing panels again, a nice and
complicated look can be achieved. As a bonus, the metalizer becomes less
fragile.
The last part of the fuselage, the engine exhaust, was given a gun metal finish, (Model Master metalizer no 1405).
The wings were painted grey (Revell 57). Looking back at it, it might be a good idea to leave the wings off until all the painting is done, now I had to be careful about the borderline. After painting the wings grey, I gave them a gloss coat to prepare them for decals.
 Small parts were done while big parts
were drying. The landing gear was painted grey with chrome (Revell 76 and
Model Master 1790). The wheel were painted black, with chrome hubs, and
likewise all the loose panels. If I can’t polish, the Model Master chrome my
choice, especially after a thinned black wash.
Small parts were done while big parts
were drying. The landing gear was painted grey with chrome (Revell 76 and
Model Master 1790). The wheel were painted black, with chrome hubs, and
likewise all the loose panels. If I can’t polish, the Model Master chrome my
choice, especially after a thinned black wash.
When the metal finish was done, I washed the panel lines with black and brown watercolours. This was a first time for me, it was my purpose to darken and smudge the lines that would otherwise stick out like very bright lines. By using watercolours, I could paint, clean and paint again as much as I liked, until I was satisfied with the end result. The basic technique is using very diluted paint, and letting it flow into the panel lines with a very fine brush. The paint would dry up lighter, so I had to repaint the lines several times (I prefer this, as it allows better control).
The Tamiya kit comes with decals for one (more or less fictional) operational aircraft in camouflage. Since it never reached this state, I preferred after marked decals. The decals I used came from EagleCals, No 29. This sheet is designed to be used on a Messerschmitt Me 262, and includes decals for an unpainted, just out of the factory aircraft with werkenummer 111711. I decided to use these markings. On the EagleCals sheet were quite a few general markings (nicht anfassen, hier afbocken) and the national markings as used on unfinished aircraft. Since the original 111711 was lost with a defecting pilot, I decided even the werkenummer might have been used again. The only decals from Tamiya I used were a big 13 on the left and right side fuselage.
|
FINAL CONSTRUCTION |
When the decal were done and the
wings were painted with dull varnish again (Windsor & Newton acrylic matt
varnish) I started the final montage. All small bits were attached; wheels and
landing gear, gear doors, drop tank and canopy. The wheels took a bit of
fiddling; the have the weighted down look, with a flat underside. The struts
had a little room to move 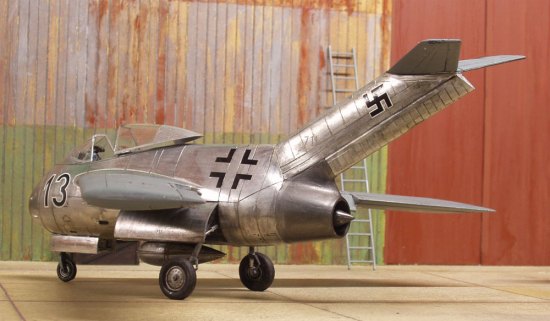 sideways, so it became a matter of getting it all
right in one go; angle of the of the landing gear, angle of the wheels, and
getting the flat side down. With the aid of CA it worked out well enough.
sideways, so it became a matter of getting it all
right in one go; angle of the of the landing gear, angle of the wheels, and
getting the flat side down. With the aid of CA it worked out well enough.
Since the bird stands high on its legs, I decided to use the drop tank to ‘fill the void’ underneath the aircraft. This decision can be made this late because the kit comes with both the drop tank and its bay and a panel to close up this bay, and they fit so well, I did not even need to glue them into place…
In it’s open position, this backward part of the canopy is a bit wide to fit over the fuselage. To make it fit better, I cut 2 small strips of sheet plastic (0.5 x 1 x 10 millimetres) and glued these to the underside of this part of the canopy, sticking inward. They act as a sort of rail for the canopy to slide on.
|
CONCLUSIONS |
As said by others all over the web; this is a great kit to build, what more can I say?
|
REFERENCES |
http://www.luft46.com/fw/ta183-i.html for some background information on the Ta 183.
April 2003
Copyright ModelingMadness.com.
If you would like your product reviewed fairly and fairly quickly, please contact
the editor or see other details in the Note to
Contributors.