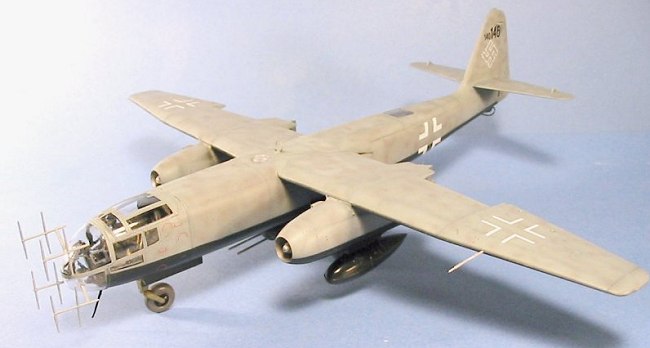
Hasegawa 1/48 Ar-234B-2N
|
KIT # |
JT 85 |
|
PRICE: |
¥3400 at Hobby Link Japan |
|
DECALS: |
See Review |
|
REVIEWER: |
|
|
NOTES: |
|
HISTORY |
Following the success of the Arado Ar-234B-2, designed to be used in the photo recon/bombing role, Arado submitted a plan to develop a night fighter version of the aircraft, the Ar-234B-2/N with a radar operator in the rear compartment normally used by the cameras, and a podcarying two 20mm cannon on the bomb rack.
Named "Natchtigall"
(Nightingale), the Ar-234B-2/N prototype, serial 140145, was completed in
December 1944. According to Jorg Czypionka, one of the few surviving pilots
of the jet nightfighter unit, Kommando
 Welter,
nightfighter ace Kurt Welter flew the "Nachtigall" during December while he
was researching the possibility of using a jet in the night interception role,
but found the Ar-234 deficient due to the problem of reflected light from the
ground in the curved windscreen panels disturbing the pilot's night vision.
Welter went on to use the Me-262 day fighter with great success in the "Wilde
Sau" style of non-ground-controlled night interception. 140145 was later used
during January and February 1945 by Hauptmann Josef Bisping for
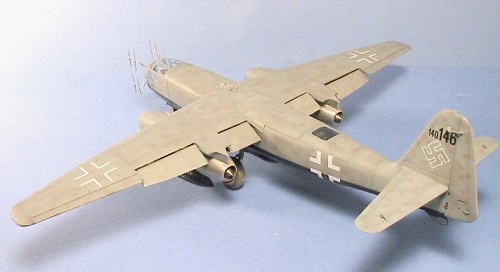
attempted night interceptions. The second prototype, serial 140146, was
painted in a "traditional" night fighter camouflage of RLM76 with blotches of
RLM75 on the upper surfaces with semi-gloss black lower surfaces, and
participated in field evaluation missions during February 1945.
Welter,
nightfighter ace Kurt Welter flew the "Nachtigall" during December while he
was researching the possibility of using a jet in the night interception role,
but found the Ar-234 deficient due to the problem of reflected light from the
ground in the curved windscreen panels disturbing the pilot's night vision.
Welter went on to use the Me-262 day fighter with great success in the "Wilde
Sau" style of non-ground-controlled night interception. 140145 was later used
during January and February 1945 by Hauptmann Josef Bisping for
attempted night interceptions. The second prototype, serial 140146, was
painted in a "traditional" night fighter camouflage of RLM76 with blotches of
RLM75 on the upper surfaces with semi-gloss black lower surfaces, and
participated in field evaluation missions during February 1945.
There are no records of any Ar-234B-2/N ever scoring a victory against an Allied aircraft, and there are no firm records as to how many Ar-234B-2s were even converted to this configuration.
|
THE KIT |
The kit is exactly the same as the previously-released Hasegawa Ar-234B-2, with additional sprue trees providing the "antler" radar array and the parts for the radar operator's cockpit, as well as the gun pod. Markings are included for the first two conversions, the only Ar-234B-2/Ns for which any documentation proves their existence.
|
CONSTRUCTION |
 Other than the
addition of the radar operator's cockpit and the attachment of the radar
antennas, construction of the kit is exactly the same as that for the
previous release. I am including here the
important highlights from that project.
Other than the
addition of the radar operator's cockpit and the attachment of the radar
antennas, construction of the kit is exactly the same as that for the
previous release. I am including here the
important highlights from that project.
This is a well-designed kit, but we are - after all - talking here about Hasegawa, and this always means there is at least on tricky item to get right, or the construction becomes a tedious process of overcoming a design mistake.
There are two areas that make construction of this model tricky: the assembly of the clear nose to the fuselage, and the attachment of the wings to the fuselage. However, if you follow my instructions here, you will experience no difficulty and have a fun time with this model.
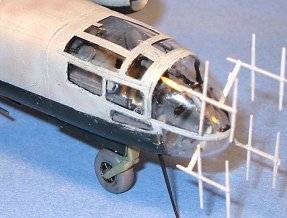 The first area of
difficulty is cockpit attachment. It is imperative to get the rear cockpit
bulkhead properly fitted and glued in place, in order to insure an easy
assembly of the nose. It turns out that this bulkhead is just a bit large.
If you assemble it without modifying it, there is every change it will pop out
of position; since this is not obvious, you can miss it, and the result will
be that the fuselage is not wide enough to fit to the cockpit, and you will
have a ridge that will take a lot of putty to cover over on the left side of
the model.
The first area of
difficulty is cockpit attachment. It is imperative to get the rear cockpit
bulkhead properly fitted and glued in place, in order to insure an easy
assembly of the nose. It turns out that this bulkhead is just a bit large.
If you assemble it without modifying it, there is every change it will pop out
of position; since this is not obvious, you can miss it, and the result will
be that the fuselage is not wide enough to fit to the cockpit, and you will
have a ridge that will take a lot of putty to cover over on the left side of
the model.
It turns out this bulkhead is just a bit too wide to fit the fuselage. Test fit, and sand it down on the sides until it fits in position easily without splitting the center fuselage seam. It should stick out a bit from the fuselage, to provide fit guidance for the clear parts of the canopy. Let this completely set up before you proceed to attach the cockpit and the canopy, and all will be well.
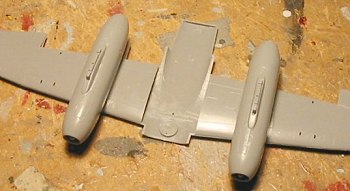 The second area of
difficulty is wing attachment. The solution to the problem is simplicity
itself: cut off the locating pins on the wing parts, and manually align the
parts during assembly of the wing sub-assembly. If you do this, the wing will
slot into position on the fuselage with no problem whatsoever.
The second area of
difficulty is wing attachment. The solution to the problem is simplicity
itself: cut off the locating pins on the wing parts, and manually align the
parts during assembly of the wing sub-assembly. If you do this, the wing will
slot into position on the fuselage with no problem whatsoever.
Those areas aside, there is no other "surprise" in the assembly of the model.
Use and Assembly of the Cutting Edge Aftermarket Parts:
The flaps are easy to use and require only that you cut out the flaps on the kit wing parts, and thin down the area immediately ahead of the flap in the upper wing part. I found I had to sand the inner flaps so that, when positioned, they did not rub against the fuselage.
The resin cockpit parts greatly improve that very-visible area of the model, though one could easily get away with only replacing the seat. The parts all fit correctly and there is no difficulty experienced in mating them with the kit parts.
|
CAMOUFLAGE & MARKINGS |
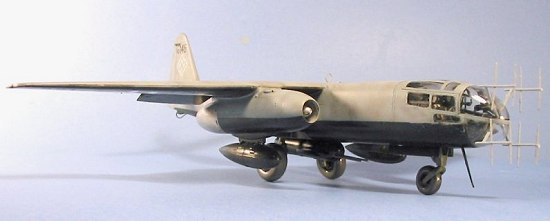
Painting: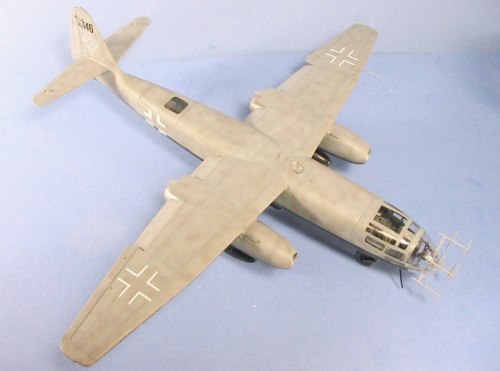 I decided to do the
second prototype, since the scheme was different from that of the standard
Ar-234 bomber. The major difference in painting this model as opposed to the
earlier one is that you will paint the camouflage over the attachment
stiffeners of the canopy from the outside.
I decided to do the
second prototype, since the scheme was different from that of the standard
Ar-234 bomber. The major difference in painting this model as opposed to the
earlier one is that you will paint the camouflage over the attachment
stiffeners of the canopy from the outside.
I first painted the lower surface with "Tamiya Semi-gloss Black," then continued on to "pre-shade" the upper surfaces of the model. I then masked off the lower surfaces and painted the upper surface with Gunze-Sangyo "RLM76 Lichtblau" with Gunze-Sangyo "RLM75 Grauviolett" blotches. The model was unmasked and a coat of Future was applied.
Decals:
I used the kit decals with no problem. A coat of Micro-Sol over the decals once they were in position, followed by slicing the decals along the various panel lines once they were mostly set, resulted in a "painted on" look. I then washed the model to get rid of dried decal setting solution, and gave the model another coat of Future.
|
FINAL CONSTRUCTION |
Personally, the underwing RATO units are a pain in the patootie to attach, and to me they ruin the lines of this sleek-looking airplane, so I left them off of this model. I gave the upper surfaces a coat of Dullcote before unmasking the canopies, then I attached the landing gear and the radar antenna array, and the model was complete.
|
CONCLUSIONS |
 For Luftwaffe
fanatics who have to have every version of anything flown by Germany during
the war, this is a good-looking model that will enhance your collection of
German jets. It's almost more of a "Luft '46" model than anything else, since
it had no "operational career" during the war, and likely wouldn't exist were
it not for Hasegawa's policy of making every version possible from any set of
kit molds.
For Luftwaffe
fanatics who have to have every version of anything flown by Germany during
the war, this is a good-looking model that will enhance your collection of
German jets. It's almost more of a "Luft '46" model than anything else, since
it had no "operational career" during the war, and likely wouldn't exist were
it not for Hasegawa's policy of making every version possible from any set of
kit molds.
March 2003
Copyright ModelingMadness.com
Thanks to HobbyLink Japan for providing the review copy.
If you would like your product reviewed fairly and fairly quickly, please contact the editor or see other details in the Note to Contributors.