|
KIT: |
Hasegawa 1/48 Ar-234 'Blitz' |
|
KIT # |
9083 |
|
PRICE: |
$39.98 MSRP |
|
DECALS: |
Three aircraft |
|
REVIEWER: |
|
|
NOTES: |
Dense Foam resin base |
|
HISTORY |
Of all the German jets, the Arado Ar-234 had the easiest transition and least change from prototype to operational aircraft. Once the decision was made to equip the airframe with a standard tricycle undercarriage, there was little if any change onward.
In July 1944,
1.Staffel/Versuchsverband Ob.d.L. took delivery of the Ar-234 V5 and V7 at
Juvincourt, near Rheims. These were essentially A-series aircraft, using the
trolley-and-skids system for takeoff and landing. The unite used the
Rauchgerate (RATO) units for takeoff and the braking parachute for landing.
By mid-August, the Staffel had flown several successful reconnaissance missions
- including missions over the Normandy beachhead and Great Britain - and
experienced no difficulty eluding Allied fighters at an operational altitude of
29-30,000 feet. In late August, the unit took delivery of two Ar-234B-1s, the
production recon-only sub-type. That September, they took two more Ar-234B-1s
and returned the V5 and V7 to the RLM, as they became the Sonderkommando
Goetz. By November, two other reconnaissance units, the Sonderkommandos
Hecht and Sperling, were formed with four Ar-234B-1s each. Also in
November, the first Ar- 234B-2
bombers were delivered to II/KG 76 at Achmer, with the pilots receiving
transition training in time to take part in pinpoint attacks in the Ardennes the
next month as the Germans smashed though American lines in what became The
Battle of the Bulge.
234B-2
bombers were delivered to II/KG 76 at Achmer, with the pilots receiving
transition training in time to take part in pinpoint attacks in the Ardennes the
next month as the Germans smashed though American lines in what became The
Battle of the Bulge.
The recon Sonderkommanos were disbanded at the end of the year, with the crews going on to 1/FernAufklarensGruppe 100, a long-range reconnaissance unit. At the same time, I and III Gruppen of KG 76 began reequipping with the Ar-234B-2, though neither unit would ever achieve full strength on the type and their operations would be hindered by the severe fuel shortage the Luftwaffe faced after the successful Allied bombing campaign against the synthetic fuel industry in the previous summer and fall.
By early March, 1945, improvements in fuel supplies allowed the Ar-234B-2s of III/KG 76 to undertake missions against the Ludendorff Bridge at Remagen, which the American Army had seized before it could be destroyed and was using to rush Allied forces across the Rhine into central Germany. The bridge was taken March 7, and survived over 100 attacks by Ar.234B-2s using the 2,205-lb SD 1000 bomb before finally collapsing on March 17.
 Three Ar-234B-1s of
FAGr 100 were sent as a Sonderkommando to Udine, Italy, in mid-March as a
result of the constant complaints from the German forces in Italy that they were
unable to obtain useful photo-reconnaissance with the aircraft available. The
three Ar-234s, operating at 29-39,000 feet, radically changed the situation as
they operated regularly over the Ancona and Leghorn sectors of the front.
Unfortunately, it was again a case of too little too late, as the German forces
rapidly collapsed in northern Italy in April.
Three Ar-234B-1s of
FAGr 100 were sent as a Sonderkommando to Udine, Italy, in mid-March as a
result of the constant complaints from the German forces in Italy that they were
unable to obtain useful photo-reconnaissance with the aircraft available. The
three Ar-234s, operating at 29-39,000 feet, radically changed the situation as
they operated regularly over the Ancona and Leghorn sectors of the front.
Unfortunately, it was again a case of too little too late, as the German forces
rapidly collapsed in northern Italy in April.
By the end of March, the Ar-234B-2s of III/KG 76 were immobilized for lack of fuel at Oldenburg, while the remnant of I/KG 76 was at Leck, with II/KG 76 at Scheppern. In the meantime, 1./FAGr.123 and 1./FAGr.33 had received some Ar-234Bs and were based in Denmark. Following the end of the war on May 8, these aircraft were rapidly taken over by British and American forces.
A total of 210 Ar-234Bs were produced during the war. Due to fuel shortages and the confusion that reigned in Germany during the final year of the war, less than two-thirds of them were actually delivered to combat units, and less than half were used on operations due to fuel shortages and Allied air domination over the bases they flew from.
|
THE KIT |
I refer you to my preview of the kit.
|
CONSTRUCTION |
This is a well-designed kit, but we are - after all - talking here about Hasegawa, and this always means there is at least on tricky item to get right, or the construction becomes a tedious process of overcoming a design mistake.
There are two areas that make construction of this model tricky: the assembly of the clear nose to the fuselage, and the attachment of the wings to the fuselage. However, if you follow my instructions here, you will experience no difficulty and have a fun time with this model.
 The first area of
difficulty is cockpit attachment. It is imperative to get the rear cockpit
bulkhead properly fitted and glued in place, in order to insure an easy assembly
of the nose. It turns out that this bulkhead is just a bit large. If you
assemble it without modifying it, there is every change it will pop out of
position; since this is not obvious, you can miss it, and the result will be
that the fuselage is not wide enough to fit to the cockpit, and you will have a
ridge that will take a lot of putty to cover over on the left side of the model.
The first area of
difficulty is cockpit attachment. It is imperative to get the rear cockpit
bulkhead properly fitted and glued in place, in order to insure an easy assembly
of the nose. It turns out that this bulkhead is just a bit large. If you
assemble it without modifying it, there is every change it will pop out of
position; since this is not obvious, you can miss it, and the result will be
that the fuselage is not wide enough to fit to the cockpit, and you will have a
ridge that will take a lot of putty to cover over on the left side of the model.
It turns out this bulkhead is just a bit too wide to fit the fuselage. Test fit, and sand it down on the sides until it fits in position easily without splitting the center fuselage seam. It should stick out a bit from the fuselage, to provide fit guidance for the clear parts of the canopy. Let this completely set up before you proceed to attach the cockpit and the canopy, and all will be well.
 The second area of
difficulty is wing attachment. The solution to the problem is simplicity
itself: cut off the locating pins on the wing parts, and manually align the
parts during assembly of the wing sub-assembly. If you do this, the wing will
slot into position on the fuselage with no problem whatsoever. Those areas
aside, there is no other "surprise" in the assembly of the model.
The second area of
difficulty is wing attachment. The solution to the problem is simplicity
itself: cut off the locating pins on the wing parts, and manually align the
parts during assembly of the wing sub-assembly. If you do this, the wing will
slot into position on the fuselage with no problem whatsoever. Those areas
aside, there is no other "surprise" in the assembly of the model.
The cameras in the rear fuselage are fiddly, but present no problem if you take you time.
The airplane will be a
tail-sitter if you do not add weight in the forward fuselage behind the
cockpit. Because this is not very far ahead of the main gear, and therefore has
only a very short  moment
arm, I found I needed four 1 oz. lead weights, placed as far forward as
possible, to insure nose-sitting.
moment
arm, I found I needed four 1 oz. lead weights, placed as far forward as
possible, to insure nose-sitting.
When assembling the cockpit and canopy, you should attach the cockpit interior into position with the rear bulkhead first. If you have the wheel well properly aligned with the fuselage opening, the cockpit will be properly positioned.
I painted the cockpit
sides before any assembly, so that I could paint them inside. Many of you will
note a "mold line" inside the plastic of the major clear parts. This is an
unavoidable consequence of having to injection mold such large parts from
transparent plastic, which is not as malleable as opaque plastic. I found I
could only see the mold lines where I held the parts to the light and looked
directly at them. When I dipped them in Future, the mold line became harder to
see, and at any angle to viewing the part, the mold line became invisible. I
can assure you that - once the canopy is assembled and painted - you will not
notice this, so it is nothing to send you whining to the Bitch & Moan Society (aka
the internet modeling discussion boards) over. The front of the canopy,
however, does have a raised mold line; I sanded it down, polished the canopy,
dipped it in Future, and all was fine.
As to assembly of the canopy: start with the right side. Position it properly and glue it to the fuselage joint. Hold that tight until the glue sets up. You do not need to glue the interior side consoles to the canopy side, as this will give you a chance to get a glue smear in the windows. Do glue the front of the cockpit interior to the edge of the canopy, to keep it in position. Now then, attach the left side of the canopy in the same manner, starting from the rear and working forward, and then glue them together along the lower centerline. I strongly suggest that, if you are using a liquid cement such as Ambroid Super Weld (which is what I use), that you not use their applicator brush but rather use a 0000 paint brush to attach the upper canopy to the sides. If you are very careful, it will attach perfectly, the glue will fill the seam, and you will have it together. After you have attached the instrument panel inside the nose cap, attach that and the most-difficult and most-important part of the entire project is complete.
I caution you to take your time with the cockpit and canopy, because you are only going to get one chance here - if you blow it, the model is over. This is the area of the model that every viewer's eyes will be drawn to, and it has to be right. Take you time, follow my instructions here (I know, I know, it's a radical concept "follow the instructions"), and all will be well.
 Everything else is
easy. I found I only needed Mr. Surfacer on the fuselage seams, and that there
was a bit of a gap in the attachment of the upper and lower clear parts in the
rear fuselage. I really have no idea why there is an upper clear part, since
the hatches above the cameras did not have windows in them; Hasegawa has
provided it and suggests leaving the forward hatch clear, most likely so you can
see the cameras - otherwise they are pretty much invisible once in position.
(If you find them too fiddly during construction, and if you agree with my rule
that "if you can't see it, I didn't do it," leaving them off will not affect the
final look of the model.)
Everything else is
easy. I found I only needed Mr. Surfacer on the fuselage seams, and that there
was a bit of a gap in the attachment of the upper and lower clear parts in the
rear fuselage. I really have no idea why there is an upper clear part, since
the hatches above the cameras did not have windows in them; Hasegawa has
provided it and suggests leaving the forward hatch clear, most likely so you can
see the cameras - otherwise they are pretty much invisible once in position.
(If you find them too fiddly during construction, and if you agree with my rule
that "if you can't see it, I didn't do it," leaving them off will not affect the
final look of the model.)
If you are not good with "fiddly" parts, then I suggest you attach the main landing gear before assembling the main gear well, as the instructions say to do; all you'll have to do is stuff Kleenex around the gear legs while painting the model to mask them. I attached my main gear after painting, which can be done, but is a bit difficult. I'll likely attach the gear per the instructions when I make another one of these.
|
PAINT & DECALS |
Painting:
 I first masked of the
glass in the canopy, using Scotch Brand Transparent Tape and a #11 X-acto blade,
then painted the canopy framing RLM66 "Dark Grey". When that was dry, I masked
off the entire canopy and framing with drafting tape and then proceeded to paint
the rest of the model.
I first masked of the
glass in the canopy, using Scotch Brand Transparent Tape and a #11 X-acto blade,
then painted the canopy framing RLM66 "Dark Grey". When that was dry, I masked
off the entire canopy and framing with drafting tape and then proceeded to paint
the rest of the model.
If you are doing one of the three options provided in the kit decals, be aware that there were two different camouflage patterns for the Ar-234, and that the two 8./KG 76 airplanes use the different patterns on each. Hasegawa got that right, so following the kit drawings will give you an accurate-looking model.
I pre-shaded the model
with flat black along the panel lines, then painted the lower surfaces with
Gunze-Sanyo H-417 "RLM 76 Light Blue". The upper surfaces were done with H-421
"RLM81 Brown Violet," and H-422 "RLM82 Light Green"
 (Luftwaffe purists need to
note that Gunze-Sanyo got this wrong and that this color is really RLM83, which
is the right color for this camo.)
(Luftwaffe purists need to
note that Gunze-Sanyo got this wrong and that this color is really RLM83, which
is the right color for this camo.)
The RLM81 color comes basically as Olive Drab. After I painted it, I added some Tamiya "XF-64 Red Brown" to simulate the fading this paint was subject to, and went over it again to bring out a more "red-brownish" tone. I also lightened both the RLM76 and the Light Green "RLM82" (wrong number again!) and faded them. I did the whole scheme freehand, but that's because I have 30-odd years' experience with air-brushing. For those newly back to the hobby - or who are known to their friends as "Shakes" - I suggest you follow the pattern in the kit instructions, and mask it off with Drafting Tape (NOT Masking Tape). Run thread 1/16' in from the edge to raise it, and you will get a "hard edge" with "scale overspray" and no paint buildup to form a "ridge" along the tape line.
 When everything was dry, I removed the drafting tape from the canopy to expose
the canopy frames, and gave the model a coat of Future.
When everything was dry, I removed the drafting tape from the canopy to expose
the canopy frames, and gave the model a coat of Future.
When that was dry, I masked off the area around the rear of the engine nacelles, and painted that with Testor's Model-Master metalizer "Magnesium" and sealed it. This is tricky, since I didn't want metalizer on the rest of the model, so I held a card as a "backstop" while airbrushing (one of those times when it would be really useful to be an octopus). This was done this way because the metalizer is so thin that, even if it is sealed, if you mask over it even with low-tack drafting tape, you are very likely to have some of it pull up when you take off the mask, no matter how careful you are.
Decals:
Surprise, surprise! These kit decals are good! They are thin, they go down under a light coat of Micro-Sol, and are eminently useful. You can do any one of the three airplanes using these decals, and have a good-looking model. Since I happened to have Aeromaster sheet 48-162C (AR-234 Blitz Bombers Part II," I decided to use these decals for most of the markings. However, Aeromaster got it wrong about the lower wing insignia, so use the kit insignia there; however, the kit does not have the underwing aircraft letter, which the Aeromaster sheet does. Also, the Aeromaster sheet's decals for the entry steps on the left side of the canopy will not fit this kit, so use the kit decals there, too.
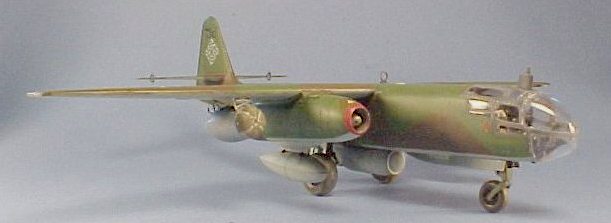
I did the airplane flown by Oberfeldwebel Friedrich Bruchlos of 8./KG 76, which was used in attacks on the Bridge at Remagen.
|
FINAL BITS |
 After another coat of
Future over the decals once they set, I gave the model several thin coats of
thinned Testor's Dullcote till I got the "almost-flat" finish I wanted with a
slight sheen.
After another coat of
Future over the decals once they set, I gave the model several thin coats of
thinned Testor's Dullcote till I got the "almost-flat" finish I wanted with a
slight sheen.
The only "weathering" I did to the airplane was to "muddy" the tires. These airplanes were not extensively used on operations, and the photos I have seen show them pretty clean.
The final item was to unmask the canopy glass, and I breathed a big sigh of relief to see no paint had flowed under the edge of the masks, and that the most obvious part of the model was perfect.
|
CONCLUSIONS |
Every once in awhile, about halfway through a project, you can begin to get a clue that maybeperhapspossibly it's going to turn out pretty close to what you hoped for when you started. For me, this is one of those models, and I am quite happy to have it sitting on the shelf with my Me-262, He-162, and Me-163. If you follow what I discovered here and apply those tricks to your model, I am sure you'll have a good chance of obtaining a similar result.
Highly recommended.
August 2002
Thank you to Scott Hards at HobbyLink Japan for providing a review sample of this excellent kit!

If you would like your product reviewed fairly and quickly by a site that has well over 150,000 visitors a month, please contact me or see other details in the Note to Contributors.