Tamiya 1/48 Bf-109G-6
| KIT #: | 61117 |
| PRICE: | $40.00 |
| DECALS: | Three options |
| REVIEWER: | Blair Stewart |
| NOTES: | Great surface detail; detailed engine and engine bay |
| HISTORY |
From Wikipedia: The Bf 109 was designed by Willy Messerschmitt and Robert Lusser. It was conceived as an interceptor; however, later models were developed to fulfill multiple tasks, serving as bomber escort, fighter-bomber, day and night all-weather fighter, ground-attack aircraft, and aerial reconnaissance aircraft. It was one of the most advanced fighters when it first appeared, having an all-metal monocoque construction, a closed canopy, retractable landing gear, and a liquid-cooled, inverted-V12 engine. First flown on 29 May 1935, the Bf 109 entered operational service during 1937; it first saw combat during the Spanish Civil War.
During the Second World War, the Bf 109 was supplied to several states and was present in quantity on virtually every front in the European theatre; the fighter was still in service at the end of the conflict in 1945. It continued to be operated by several countries for many years after the conflict. The Bf 109 is the most produced fighter aircraft in history, with a total of 34,248 airframes having been produced between 1936 and April 1945.
 The
Bf 109 was flown by the three top-scoring fighter aces of all time, who
claimed 928 victories among them while flying with Jagdgeschwader 52, mainly
on the Eastern Front. The highest-scoring, Erich Hartmann, was credited with
352 victories. The aircraft was also flown by Hans-Joachim Marseille, the
highest-scoring ace in the North African campaign, who shot down 158 enemy
aircraft (in about a third of the time). It was also flown by many aces from
other countries fighting with Germany, notably the Finn Ilmari Juutilainen,
the highest-scoring non-German ace. He scored 58 of his 94 confirmed
victories with the Bf 109. Pilots from Hungary, Romania, Bulgaria, Croatia,
Slovakia and Italy also flew the fighter. Through constant development, the
Bf109 remained competitive with the latest Allied fighter aircraft until the
end of the war.
The
Bf 109 was flown by the three top-scoring fighter aces of all time, who
claimed 928 victories among them while flying with Jagdgeschwader 52, mainly
on the Eastern Front. The highest-scoring, Erich Hartmann, was credited with
352 victories. The aircraft was also flown by Hans-Joachim Marseille, the
highest-scoring ace in the North African campaign, who shot down 158 enemy
aircraft (in about a third of the time). It was also flown by many aces from
other countries fighting with Germany, notably the Finn Ilmari Juutilainen,
the highest-scoring non-German ace. He scored 58 of his 94 confirmed
victories with the Bf 109. Pilots from Hungary, Romania, Bulgaria, Croatia,
Slovakia and Italy also flew the fighter. Through constant development, the
Bf109 remained competitive with the latest Allied fighter aircraft until the
end of the war.
The most-produced Bf109 model was the Bf 109G series (more than a third of all 109s built were the G-6 series, over 12,000 units being manufactured from March 1943 until the end of the war).
The G series, or Gustav, was introduced in mid-1942. Its initial variants (G-1 through G-4) differed only in minor details from the Bf109F, most notably in the more powerful 1,455 hp Daimler-Benz DB 605 engine. Odd-numbered variants were built as high-altitude fighters with a pressurized cockpit and GM-1 boost, while even-numbered variants were un-pressurized, air superiority fighters and fighter-bombers. There were also long-range photo-reconnaissance variants. The later G series (G-5 through G-14) was produced in a multitude of variants, with uprated armament and provision for kits of packaged, generally factory-installed parts known as Umrüst-Bausätze ("conversion kits", usually contracted to Umbau) and adding a "/U" suffix to the aircraft designation when installed. Field kits known as Rüstsätze were also available for the G-series but those did not change the aircraft title. By early 1944, tactical requirements resulted in the addition of the MW-50 water injection boost and high-performance superchargers, boosting engine output to 1,775-1,973 hp. From early 1944, some G-2s, G-3s, G-4s and G-6s were converted to two-seat trainers, known as G-12s. An instructor's cockpit was added behind the original cockpit, and both were covered by an elongated, glazed canopy.
| THE KIT |
 Tamiya
released this kit in 2017 (#61117). The kit was originally issued as the
aircraft by itself, but a 2022 release (kit #25204) includes a 1/48 scale
Kubelwagen Type 82, kit #32501 (this is the kit I purchased). In addition to the
seated pilot figure in the aircraft kit, the enclosed Kubelwagen kit contains a
standing pilot figure and a mechanic figure, which makes the set nice for
dioramas.
Tamiya
released this kit in 2017 (#61117). The kit was originally issued as the
aircraft by itself, but a 2022 release (kit #25204) includes a 1/48 scale
Kubelwagen Type 82, kit #32501 (this is the kit I purchased). In addition to the
seated pilot figure in the aircraft kit, the enclosed Kubelwagen kit contains a
standing pilot figure and a mechanic figure, which makes the set nice for
dioramas.
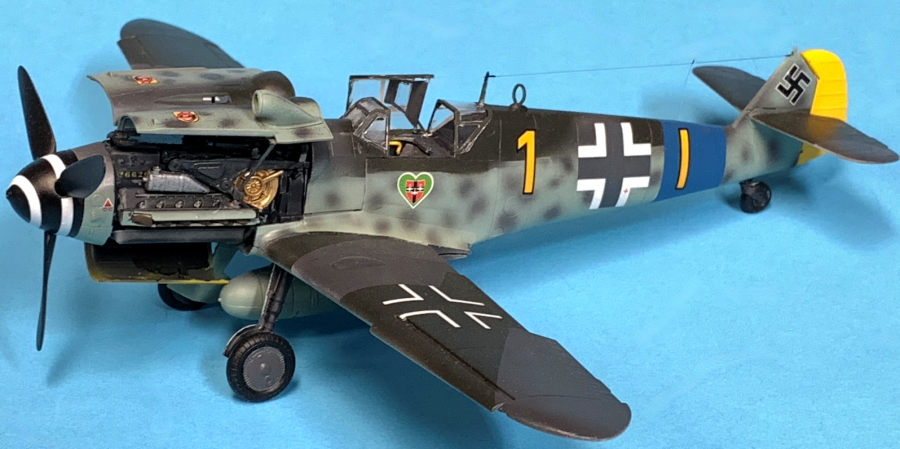
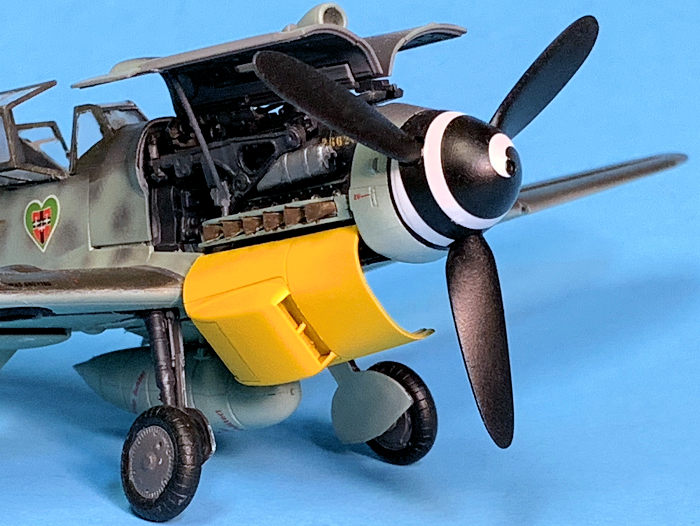
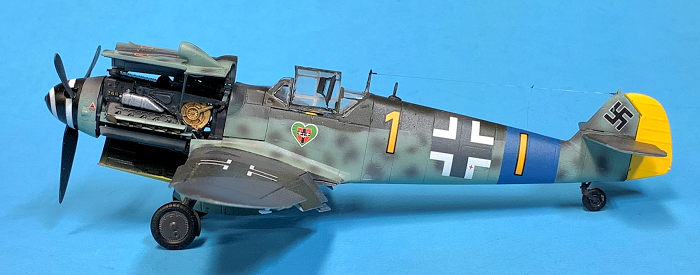
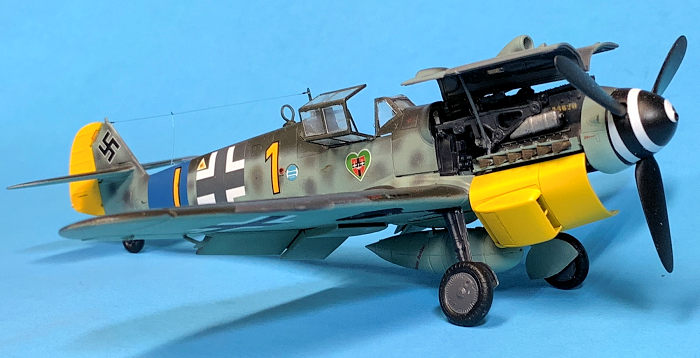
The aircraft kit presents a very detailed, multi-part DB605A engine. Engine cowlings can be depicted open to show off the engine bay with engine and very detailed auxiliary components. Tamiya also provides the parts to depict the cowlings as closed. The cowling and engine parts are attached via magnets to allow one to interchange them once the model has been assembled. Another feature is the distinctive dual radiator flaps in the wings that can be depicted in up or down positions, or a combination of the two. The kit also includes a nicely detailed drop tank. One can assemble the model with the canopy in the open or closed position simply by cutting off the two tabs that hold the canopy in the open position.
Finally, the kit includes one seated pilot figure, three marking options (denoted as A, B and C in the instructions), and a set of canopy masks along with Tamiya’s standard “well illustrated,” 37-step instructions. For additional kit details, see da Boss' earlier kit review.
| CONSTRUCTION |
 Assembly
begins with installing and painting the cockpit sidewall instruments and gears.
One of the fuselage halves has the prop shaft and a detailed central engine
mount molded to it. Once completed, I glued the fuselage halves together.
Assembly
begins with installing and painting the cockpit sidewall instruments and gears.
One of the fuselage halves has the prop shaft and a detailed central engine
mount molded to it. Once completed, I glued the fuselage halves together.
The next step is assembly and painting of the very detailed cockpit and pilot’s seat. There is an optional decal for a lap belt and harness included if one chooses to build the kit without the seated pilot figure, which has the harness molded to it.
Step 7 calls for mounting the completed (minus instrument panel) cockpit tub into the fuselage in Tamiya’s rather standard, and, in my estimation, the preferred way: from the open bottom into the assembled fuselage (this minimizes cockpit alignment problems when gluing a cockpit to one fuselage half and then trying to glue the two halves together. I can assure you younger modelers this was a problem on more than one occasion with aircraft kits I have built in the past).
Step 8 involves gluing the machine gun feed tubes to the front of the fuselage and around the engine brace. One then moves to the detailed lower engine (Step 9), which consists of ten nicely detailed parts. A nice touch is decals for the engine serial numbers. The instructions call for mounting two magnets to the engine brace at this stage.
Step 10 requires gluing of the one-piece horizontal stabilizer (also a nice touch – it avoids having to align thin stabilizer parts together and sanding them smooth if required), which is pinned to the fuselage via the bottom (fixed) portion of the aircraft’s tail. This then allows the rudder to be mated to the tail and fuselage via two rather thick tabs (note: don’t glue this on yet if your chosen aircraft includes a white or yellow rudder in its paint scheme). The kit contains two types of tail wheels to install, depending on which of the three aircraft you have chosen to model.
The lower wings are molded as one piece, which includes the bottom center section of the fuselage – another feature that minimizes potential alignment and fit problems. Before gluing the upper wing sections to this assembly, one is required to glue on the interior wheel well walls. A caution: the instructions require the modeler to open several holes in this assembly, all depending on the chosen aircraft. Thus, it is important to be aware of this and also to choose the aircraft you want to depict prior to starting the assembly process (I can’t count the number of times I have flubbed this procedure [we don’t need no stinking instructions!], and it is a pain to properly align/drill holes AFTER gluing the upper wing halves to the bottom wing assembly.
 Step 13
involves gluing together the radiator/flap assemblies, and one must choose up or
down flaps at this point. These assemblies along with the ailerons are then
glued to the wing assembly. One then inserts the one-piece wing tips, and these
insert via large tabs - the same way the rudder mounts. The main flaps are
attached next, and these require removal of two tabs if they are to be displayed
in the down position. The one-piece leading edge slats are then glued to the
front of the wings, and these also can be displayed either up or down.
Step 13
involves gluing together the radiator/flap assemblies, and one must choose up or
down flaps at this point. These assemblies along with the ailerons are then
glued to the wing assembly. One then inserts the one-piece wing tips, and these
insert via large tabs - the same way the rudder mounts. The main flaps are
attached next, and these require removal of two tabs if they are to be displayed
in the down position. The one-piece leading edge slats are then glued to the
front of the wings, and these also can be displayed either up or down.
Once the wing assembly is completed, it is time to glue it to the fuselage, and the instructions illustrate a two-step process for doing this (i.e., first insert the rear of the wing into a rear fuselage groove and then pop the front of the wing into the forward fuselage. This insures a tight fit).
The main landing gear are then assembled. Another nice touch is the one-piece tires into which one glues a hub before attaching to the gear.
Step 21 involves mounting of the centerline drop tank fixture, and this has two options depending on the chosen aircraft (one of which uses a poly cap that must be scored before installation). Here one also glues the landing gear into the wheel wells, which is another two-step process to insure proper fit.
 Step 22 is
the assembly of the drop tank and the optional 20mm cannon wing gondolas, which
are only mounted on aircraft B.
Step 22 is
the assembly of the drop tank and the optional 20mm cannon wing gondolas, which
are only mounted on aircraft B.
Step 24 shows how to plan on an open or closed canopy. The front windscreen is molded to the upper part of the front fuselage, so this again eliminates alignment problems when attaching the windscreen. At this point, the instructions show how to mask the overall canopy in preparation for painting.
Step 25 involves assembly and painting of the instrument panel and gun sight. The kit includes nice decals to depict the instruments, which are also molded into the panel. The instrument panel is then glued to the front windscreen/fuselage section.
Step 29 completes the upper section of the engine, along with the 20mm cannons that are mounted in the nose.
The remaining steps (33-37) guide assembly of the various covers and cowling pieces, depending on how one chooses to display the model. Once I had assembled all of these parts, I ran into a problem I have had before with Tamiya models that allow you to display the engine: the cowlings for the closed engine did not seem to fit (examples of other Tamiya kits where I had this problem include their 1/32 A6M2b Type 21 Zero and the 1/48 P-38F). Of course, the question is do I have an assembly problem that I create or is this a real problem with these kits?). At any rate, it was at this stage I decided to build the model in the “engine-displayed” configuration (which is neat).
| COLORS & MARKINGS |
 Per the
nice scale, full-color sheet included in the kit, I used Tamiya acrylic paints
as called for on the sheet. I first airbrushed the entire model with Rustoleum
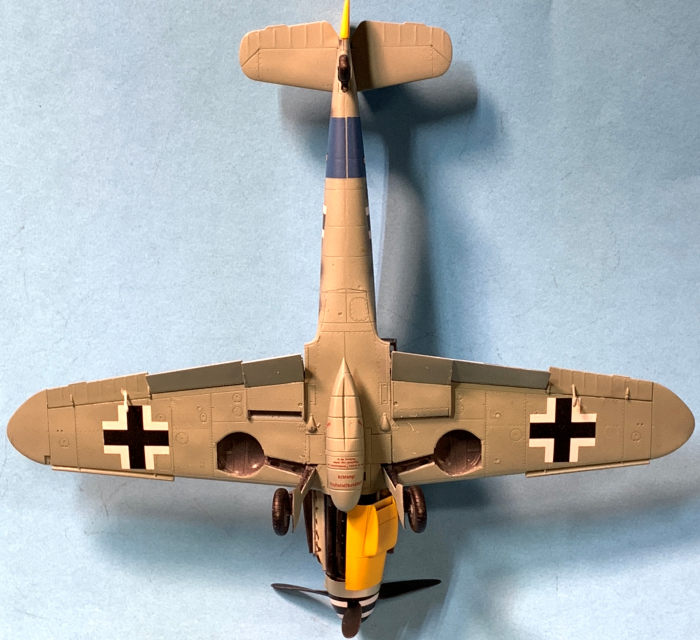
flat white from a rattle can. Once this was dry, painted the bottom of the
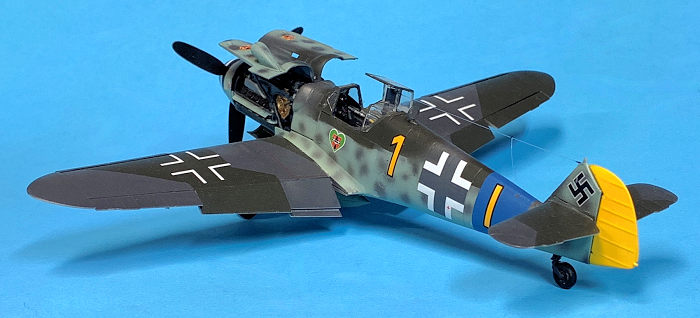
aircraft and the fuselage sides with Tamiya XF-23 Light Blue. I then painted the
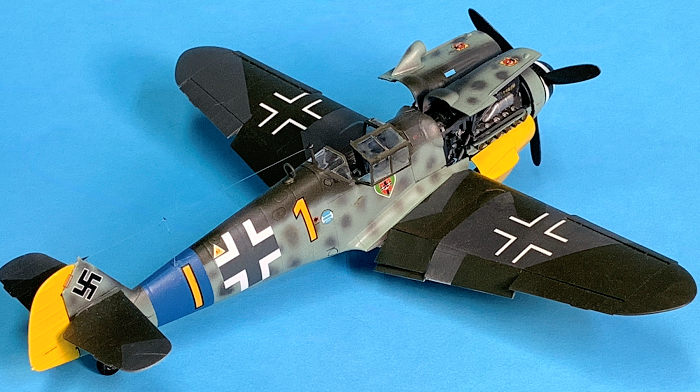
upper wings and upper fuselage Tamiya XF-53 Neutral Gray, then masked off the
edged camouflage pattern on the upper wings. I then sprayed on Tamiya XF-51 Dark
Green. I also “free-handed” the Dark Green camo parts on the upper fuselage with
my airbrush. I then free-handed the dark gray mottling on the fuselage sides,
again using my airbrush.
Per the
nice scale, full-color sheet included in the kit, I used Tamiya acrylic paints
as called for on the sheet. I first airbrushed the entire model with Rustoleum
flat white from a rattle can. Once this was dry, painted the bottom of the
aircraft and the fuselage sides with Tamiya XF-23 Light Blue. I then painted the
upper wings and upper fuselage Tamiya XF-53 Neutral Gray, then masked off the
edged camouflage pattern on the upper wings. I then sprayed on Tamiya XF-51 Dark
Green. I also “free-handed” the Dark Green camo parts on the upper fuselage with
my airbrush. I then free-handed the dark gray mottling on the fuselage sides,
again using my airbrush.
Next, I had chosen aircraft A, so I painted the underside of the engine cowling and the rudder (which I had not yet glued to the tail) with Tamiya XF-3 Flat Yellow. Once everything dried, I sprayed the entire model with Testors Glosscote lacquer in anticipation of attaching the decals. The decals nicely settled to the model with an application of Micro Set. Another nice touch for the chosen aircraft is Tamiya’s white spiral decal for the propeller hub, which easily contours around the hub.
| CONCLUSIONS |
In the 72 years I have been building plastic models, I am amazed at the detail that modern day models contain. This kit is no exception. Except for the closed cowling fit problems, the kit builds into a beautiful example of the Bf109G-6. If you must choose, you can’t wrong with this kit from an assembly and detail standpoint.
| REFERENCES |
Messerschmitt Bf 109, Wikipedia, World-wide Web, January 2026.
Blair
Stewart 29 January
2026 Copyright ModelingMadness.com. All rights reserved. No
reproduction in part or in whole without express permission of the editor.
If you would like your product reviewed fairly and fairly quickly, please contact the editor or see other details in the
Note to
Contributors.
Back to the Main Page
Back to the Review
Index Page
Back to the Previews Index Page