Tamiya 1/48 Bf-109G-6
| KIT #: | 61117 |
| PRICE: | 3700 yen SRP |
| DECALS: | Three options |
| REVIEWER: | Scott Van Aken |
| NOTES: | 2017 tooling |
| HISTORY |
 So why was it still being built? Well, I think the bottom line is that it
was easy to build, the production facilities were already well established,
and it was fairly inexpensive. That last reason was probably why it was put
into production instead of the He-112, which was a generally better
airframe, but more costly to produce.
So why was it still being built? Well, I think the bottom line is that it
was easy to build, the production facilities were already well established,
and it was fairly inexpensive. That last reason was probably why it was put
into production instead of the He-112, which was a generally better
airframe, but more costly to produce. | THE KIT |
Many, including myself,
often wonder why a manufacturer will produce a kit of something where there
are lots of other people making the same thing. Well, there are several
reasons. One is that it is new and new sells well. Another is that it is an
improvement over what has come before and after looking this one over, I
have to say that it is very much an improvement over the Eduard and even the
older Has
 Several notable items with
this kit is that you can easily swap the engine cowlings
Several notable items with
this kit is that you can easily swap the engine cowlings
Wings have separate wheel well items to install and the tips are also separate. The radiator exhaust doors can be built in two ways and you are provided specific pieces depending on how you want to build them. The same goes for the flaps and the wing slats. One wonders why the elevators were not separate, but I'm sure aftermarket will deal with that. Actually, they are pretty easy to cut through a repose yourself.
 Landing gear is well done and so designed that it
will be pretty much impossible to get their angle wrong. Both the prop and fuel
tank are held in place with polycaps. Interestingly, Tamiya has you cut them so
apparently they were too tight. You can also install under wing canon pods.
Canopy can be posed open or closed and you are given optional head armor
sections. Many of these options are keyed to which of the markings options they
are appropriate, so if using kit decals, you need to make a decision fairly
early in the build.
Landing gear is well done and so designed that it
will be pretty much impossible to get their angle wrong. Both the prop and fuel
tank are held in place with polycaps. Interestingly, Tamiya has you cut them so
apparently they were too tight. You can also install under wing canon pods.
Canopy can be posed open or closed and you are given optional head armor
sections. Many of these options are keyed to which of the markings options they
are appropriate, so if using kit decals, you need to make a decision fairly
early in the build.
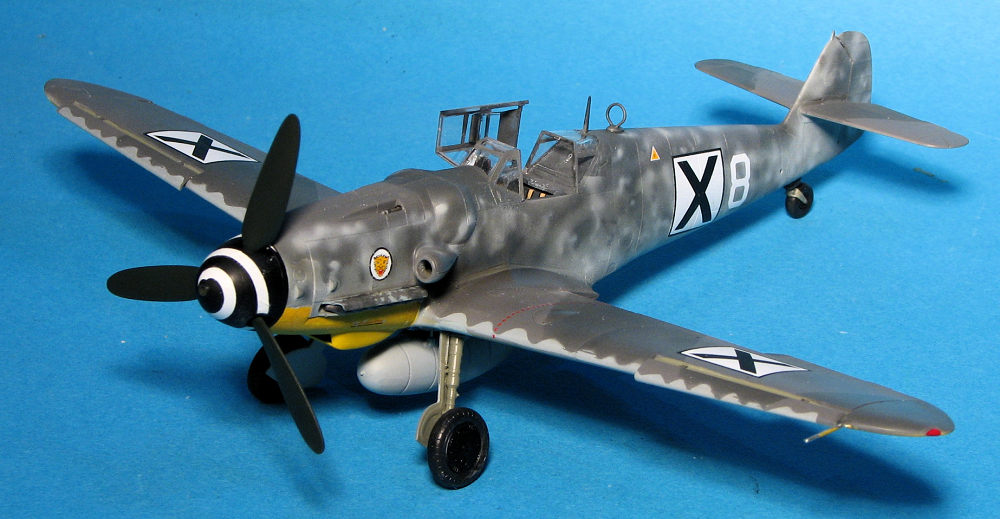
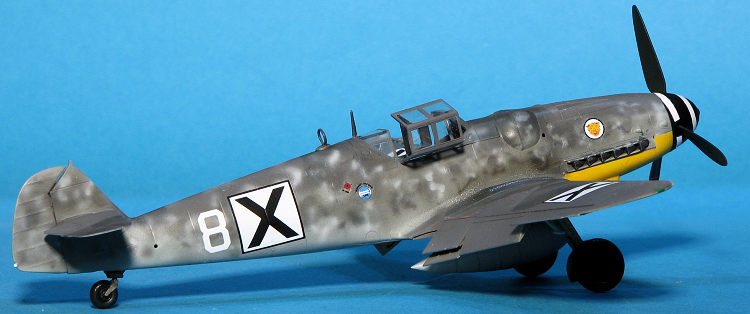
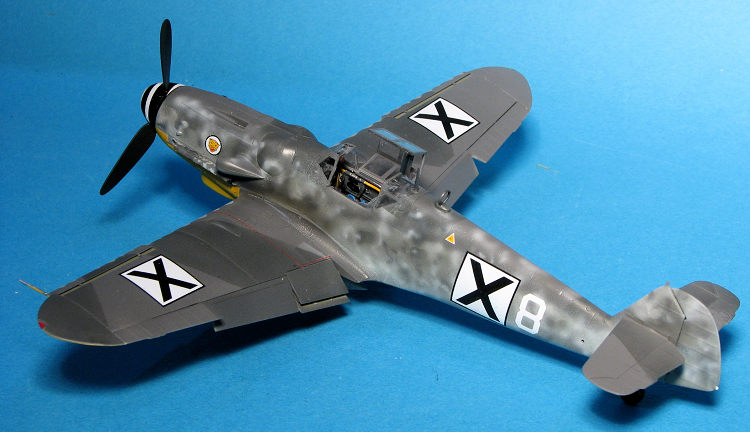
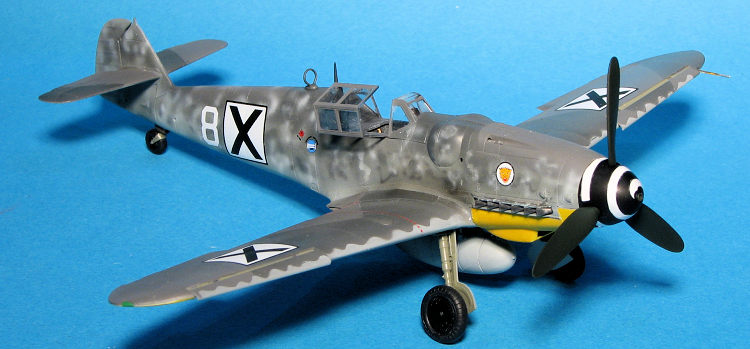
Instructions are superb in Tamiya-only color references. Three markings options are all in RLM 74/75/76 and you are provided a huge full color markings guide. There is also a stencil guide. The options are the box art plane with 9./JG 54 on home defense duties, one based on Crete in 1943 with 7./JG 27 that has a white rudder and white tail band, and a 9./JG 52 plane in Russia during 1943 with the usual yellow eastern front markings. The decals look very good and Tamiya even provides a set of canopy masks.
| CONSTRUCTION |
 Though I have built a considerable number of 109s, I'd been advised to be
fairly slavish in following the instruction sequence so I did just that.
There are quite a few parts to the interior, and it is just on the verge of
what many would call fiddly. What keeps it from that is that the parts do
fit very well. This is a kit where one glues the fuselage halves together
and then installs the completed cockpit. There are notes that state there
should be a seam on the upper and lower halves so other than sand away a few
nubs, I made no attempt to fill the fuselage seam. The insert that goes just
behind the cockpit ended up being a bit more narrow than the width of the
cockpit. Were I to build this kit again (and I probably will as I bought
two), then I'll squeeze the fuselage there with a clamp.
Though I have built a considerable number of 109s, I'd been advised to be
fairly slavish in following the instruction sequence so I did just that.
There are quite a few parts to the interior, and it is just on the verge of
what many would call fiddly. What keeps it from that is that the parts do
fit very well. This is a kit where one glues the fuselage halves together
and then installs the completed cockpit. There are notes that state there
should be a seam on the upper and lower halves so other than sand away a few
nubs, I made no attempt to fill the fuselage seam. The insert that goes just
behind the cockpit ended up being a bit more narrow than the width of the
cockpit. Were I to build this kit again (and I probably will as I bought
two), then I'll squeeze the fuselage there with a clamp. 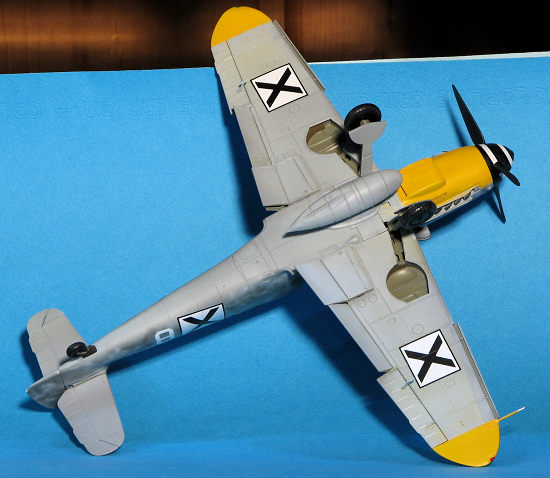 Next one is to begin building up the engine. Now you have to build up some
of it to hold the exhaust, but I'm not a fan of 'everything open', so I
added only minimal parts. I also did not fully build up the exhaust as I
want to install this after the painting is done. It seems that can be done
so I only glued on the backing piece. The tailplanes and fin/rudder are
next. Based on the modular design, I'd be willing to bet that in the future,
Tamiya will do other variants.
Next one is to begin building up the engine. Now you have to build up some
of it to hold the exhaust, but I'm not a fan of 'everything open', so I
added only minimal parts. I also did not fully build up the exhaust as I
want to install this after the painting is done. It seems that can be done
so I only glued on the backing piece. The tailplanes and fin/rudder are
next. Based on the modular design, I'd be willing to bet that in the future,
Tamiya will do other variants. | COLORS & MARKINGS |
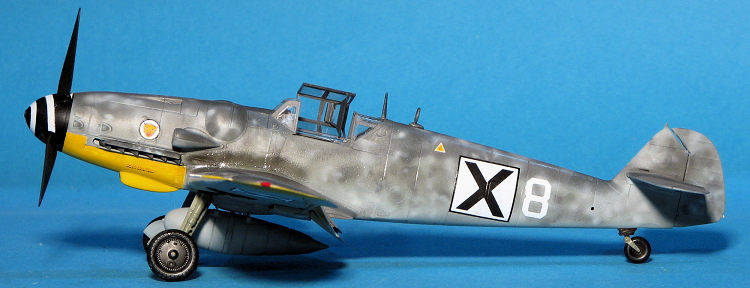
I decided to do a Bulgarian Bf-109 using an old Aeromaster sheet. I wasn't really sure if I wanted to do an Axis version, or one after Bulgaria changed sides. So I painted the lower cowling, upper and lower wing tips and a fuselage band with Tamiya white. After some consideration, I decided to go with the Axis version so painted the lower wing tips and cowling with yellow. These were masked and the lower fuselage and parts of the side were sprayed with RLM 76.
I then moved to the upper surfaces and painted everything with RLM 75 using Mr.Color paints. I'm very impressed with these lacquer paints and will undoubtedly be adding more to my paint rack as I run out of other shades. I then used Top Notch masking set TNM48-M23 for a Regensburg built 109. This set works fairly well, though doesn't really like curves all that much. Then the RLM 74 was sprayed on.
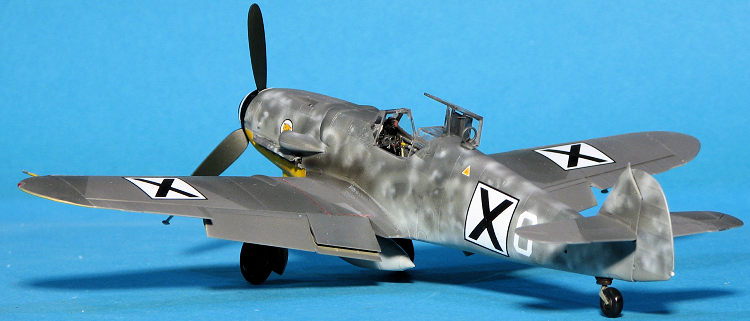 Bulgarian 109s had their fuselages heavily
overpainted in RLM 74 and RLM 75. In addition, they used an unknown light grey
which is quite noticeable. I used FS 16475 for this. Once all was dry, I
returned to the bench to install the landing gear. The way Tamiya does this is
quite interesting and seems to work very well. I used the tail gear option with
the covering over most of the strut.
Bulgarian 109s had their fuselages heavily
overpainted in RLM 74 and RLM 75. In addition, they used an unknown light grey
which is quite noticeable. I used FS 16475 for this. Once all was dry, I
returned to the bench to install the landing gear. The way Tamiya does this is
quite interesting and seems to work very well. I used the tail gear option with
the covering over most of the strut.
Then the airframe was given a clear gloss for decals. In this case I used the markings from Aeromaster 48-310. This sheet provided the insignia, unit badge, and a white number. The camo scheme shown is only correct for the upper wing and tail planes. The sheet is also missing the triangle for the fin that included the aircraft type and serial number. I had no source for this so did not attempt to paint one on as it would have been a mess. With the repainted fuselage, I figured data markings would be minimal so I only used a few.
With the decals in place, I provided a coat of Tamiya matte clear. Then for the other fiddly bits. The exhaust did fit from the outside but not without putting up a bit of a fight as the fit is tight. I also added the DF loop antenna, pitot, gun barrles, and the aileron balances. Bulgarian 109s had very wide prop spinners. I've never seen decals wide enough for that and not trusting my hand painting, I used the standard size one from the kit decals. I then removed the masking and was a bit disappointed to notice that the Tamiya masks were not all that good at keeping out bleed under. I went to install the canopy in the open position and noticed that the notches in the cockpit shown in the instructions were not there on the kit part. I re-read the instructions and did not see any note on cutting these notches. It was then super glued into place.
| CONCLUSIONS |
So, is this the best 1/48 Bf-109 on the market? Well, you wouldn't be wrong to say yes, especially if you like the way it is designed with the ability to pose the engine covers open and the engine in view. This feature adds a number of steps to the build and while building it with cowling closed isn't difficult, it requires careful work to get right. So if you want a nice built with little fuss, choose the Hasegawa kit. If you want more detail and really great fit (for the most part), then get this one. I've not built the Eduard 109G so cannot comment on how it builds. Guess I need to do one in the near future.
1 May 2020
Back to the Main Page Back to the Previews Index Page
Back to the Previews Index Page