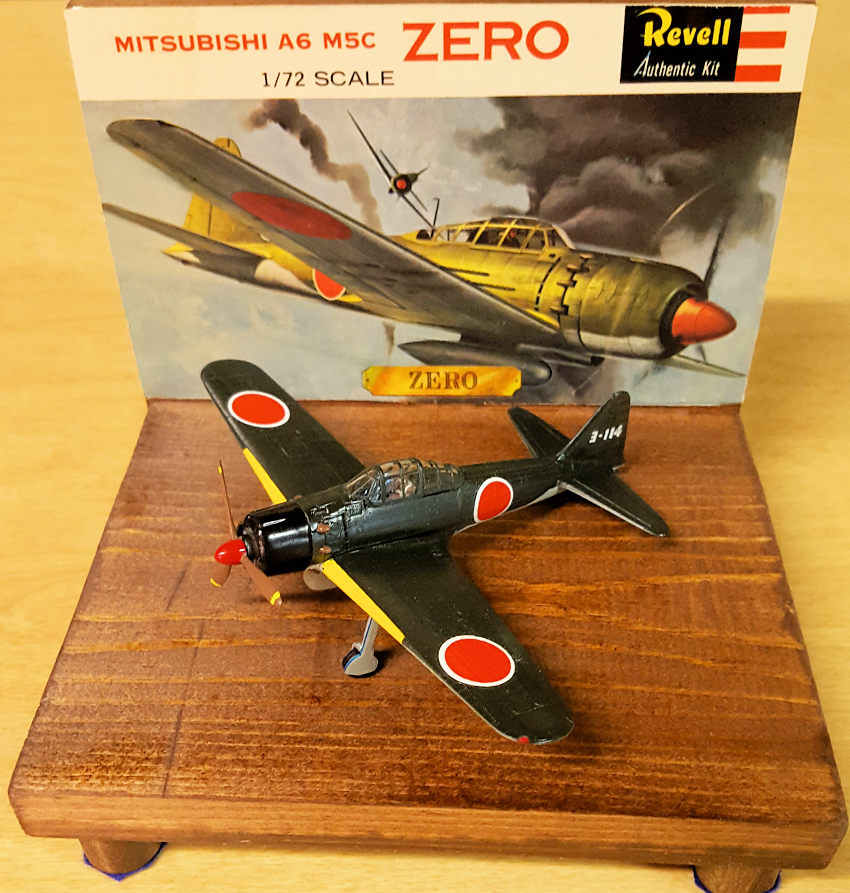
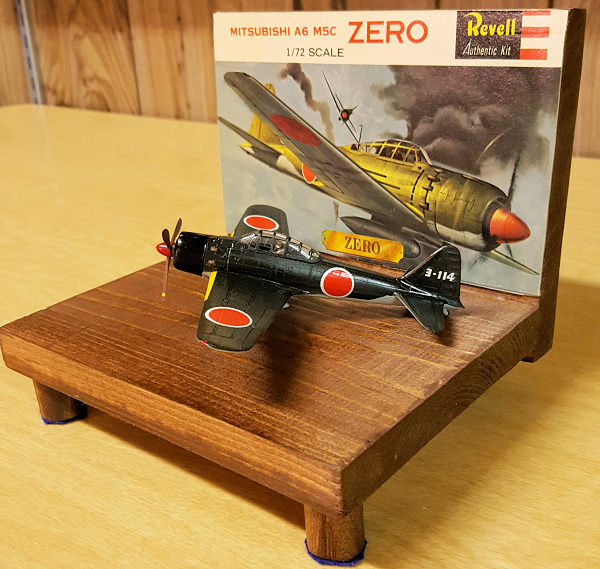
Revell 1/72 A6M5 Zero
| KIT #: | H-617 |
| PRICE: | $5.00 or so today |
| DECALS: | One option |
| REVIEWER: | Chris Mikesh |
| NOTES: | A real oldie |
| HISTORY |
 The
Mitsubishi A6M "Zero" is a long-range fighter aircraft manufactured by
Mitsubishi Aircraft Company, and operated by the Imperial Japanese Navy from
1940 to 1945. The A6M was usually referred to by its pilots as the "Reisen"
(zero fighter). The official Allied reporting name was "Zeke", although the use
of the name "Zero" was later adopted by the Allies as well.
The
Mitsubishi A6M "Zero" is a long-range fighter aircraft manufactured by
Mitsubishi Aircraft Company, and operated by the Imperial Japanese Navy from
1940 to 1945. The A6M was usually referred to by its pilots as the "Reisen"
(zero fighter). The official Allied reporting name was "Zeke", although the use
of the name "Zero" was later adopted by the Allies as well.
The Zero was considered the most capable carrier-based fighter in the world when it was introduced early in World War II, it combining excellent maneuverability and very long range.
In early combat operations, the Zero gained a legendary reputation as a dogfighter achieving an outstanding kill ratio of 12 to 1, but by mid-1942 a combination of new tactics and the introduction of better equipment enabled Allied pilots to engage the Zero on generally equal terms. Japan produced more Zeros than any other model of combat aircraft during the war.
| THE KIT |
 Years ago,
my father had a huge collection of models in the basement. As I am an aircraft-oholic
(building since I was 7), I lusted to build the many he had down there. As time
goes by, he wanted me to buy/sell them at an IPMS Convention (a whole different
chapter in my life with Nostalgic Plastic). But, I wanted to keep the Revell
1/72 WWII “H” series kits – specifically the fighters, which number 24 of them.
The box art is what inspired my early desire to build the kits. So I set out to
build all of them the best I could – but preserve as much of the intended model
and box art as possible. Straight out of the box, plus paint and glue where
possible. This building series is in honor of the early Revell Box artists, Jack
Leynnwood, Richard Kishady, Scott Eidson, Brian Knight, George Akimoto, and John
Steel who inspired all of us.
Years ago,
my father had a huge collection of models in the basement. As I am an aircraft-oholic
(building since I was 7), I lusted to build the many he had down there. As time
goes by, he wanted me to buy/sell them at an IPMS Convention (a whole different
chapter in my life with Nostalgic Plastic). But, I wanted to keep the Revell
1/72 WWII “H” series kits – specifically the fighters, which number 24 of them.
The box art is what inspired my early desire to build the kits. So I set out to
build all of them the best I could – but preserve as much of the intended model
and box art as possible. Straight out of the box, plus paint and glue where
possible. This building series is in honor of the early Revell Box artists, Jack
Leynnwood, Richard Kishady, Scott Eidson, Brian Knight, George Akimoto, and John
Steel who inspired all of us.
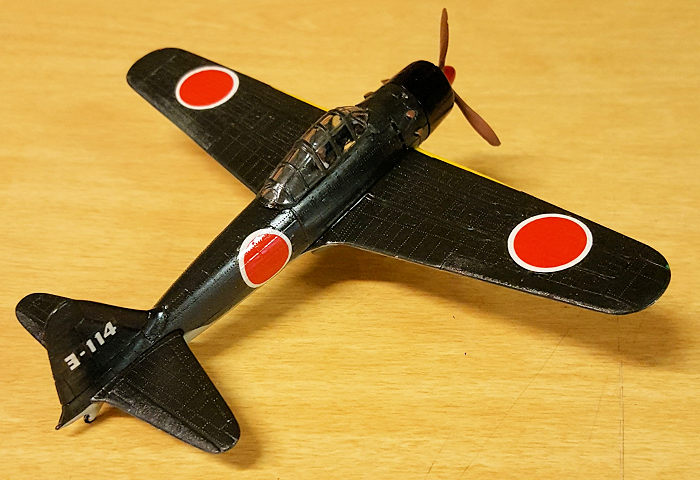
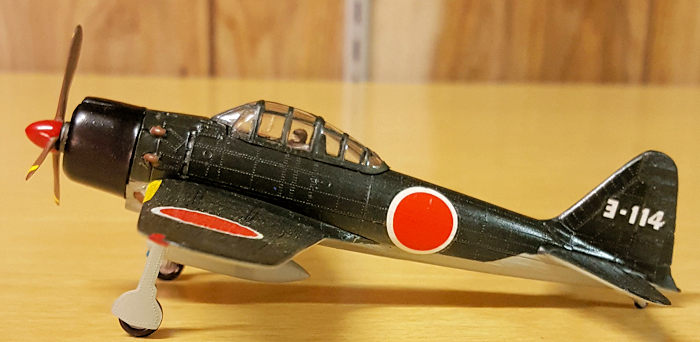
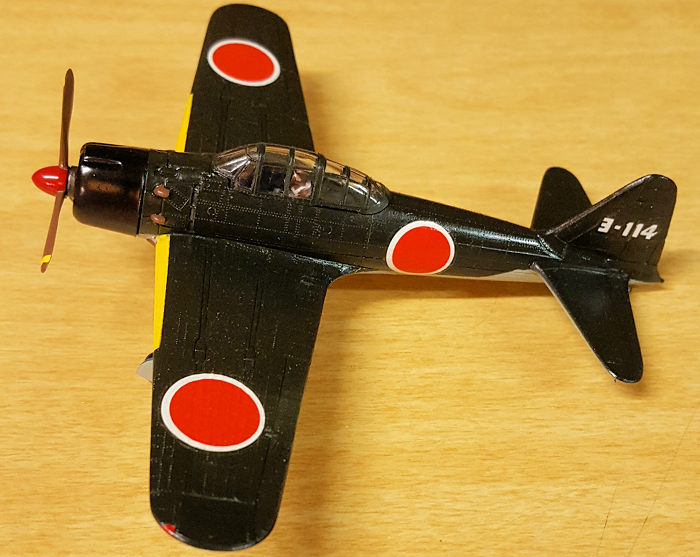
The kit is of the good ‘ole hard pale blue plastic (…you know…the kind that does not bend – but breaks). Dry fit was good – as those early models often were (circa 1962). Typical, is the “bullet proof” clear plastic canopy. Unlike other Revell Molds of the time, this model had finer rivets and raised details. There is no cockpit to speak of except an undersized pilot on a stick. The next concern will be the 50+ year old decals trying to rest on rivets. I’ll be looking for replacements if needed.
| CONSTRUCTION |
 The
instructions for assembly were intuitive but often misleading when noting color.
I did not deviate from the instructions for the most part. But, I anticipate
this will not be an easy build.
The
instructions for assembly were intuitive but often misleading when noting color.
I did not deviate from the instructions for the most part. But, I anticipate
this will not be an easy build.
I did not expect the fuselage halves to fit well – but they did. The interior of the cockpit wheel wells, and gear doors were painted with Hobby Color “Metalic Blue-Green” (H63). After the skewered miniature pilot (Shrimp on the Barbie) is glued to the fuselage, the elevators (1 piece unit) are slipped between the fuselage halves. There is a “top” stamped on the elevators, but I did not see the difference on either side. I didn’t take the risk to see what would happen if it were upside down. Also the post for the Pilot is WAY too far back. There is no fix for this unless you want to do some major reconstruction. Glue the fuselage halves together with liquid cement. Hold together, blow on it, wave it in the air whatever until it holds together – which is not hard because of good fit. I really like Tamiya’s Extra Thin Cement – recommended.
Well, the
party’s over! Wing fit is not good. However – I figured it out. The wing does
not fully seat onto the fuselage, and leaves a big gap that you can see light
through. The fuselage in the very front where the engine cowling and leading
edge of the wing root meet is a poor fit. But the fix is simple. There is a flat
side at the front where everything meets that needs to be sanded down so the
wing will fit tight. Now, everything squares up nicely. Quick! Glue!!! I noticed
that the elevators actually align up too. But there is also a huge gap at the tr ailing
edge of the wing/fuselage joint. Looks like more super glue or putty
filling….grind grind!
ailing
edge of the wing/fuselage joint. Looks like more super glue or putty
filling….grind grind!
Watch that you do not damage the rivets in the area as you are sanding. I covered the wing and fuselage surrounding the sanding area with masking tape as I smoothed the area. That way, I could preserve as many rivets and kit detail as possible while sanding them off. The tight rivets are difficult (!!??) to replace. I simply scribed in the panel lines, (I’m not going to an IPMS competition with the model anyway!).
Time for the canopy. The canopy was dipped in Future to improve clarity (not that there is anything to see). The canopy fit is fair. It is not wide enough for a perfect fit, and will wobble left or right and not settle to center. It also does not line up well at the wind-screen – but generally will work. White glue is great for attaching the canopy and filling gaps where the canopy meets the fuselage. It will not mar or craze the canopy, and if you need to take it off (static attracting interior dust for example) it will be easy to remove and re-glue.
Once glued in place, the canopy was masked waiting for paint. I used a combination of regular clear tape, (so I could see the frames and trim around them), and Tamiya Masking Tape for Curves (great stuff!). Also MicroScale Canopy Mask is great for seams or cracks between layers of tape, so the paint does not run under the tape – just for added assurance.
| COLORS & MARKINGS |
I had noticed that the 50+ year old decals will be nearly useless, but I figured I’d give it my best shot. I had already seen some cracks, but wanted to try anyway, so I mopped on some Microscale Liquid Decal Film on the decal sheet in preparation.
 Important….
Fill the wheel well gaps and engine (before adding cowling) with paper towel or
something. You can see straight to the pilot and canopy from the wells and
engine. You don’t want to paint the inside of the canopy.
Important….
Fill the wheel well gaps and engine (before adding cowling) with paper towel or
something. You can see straight to the pilot and canopy from the wells and
engine. You don’t want to paint the inside of the canopy.
Next, the yellow leading edges of the wings. Simple, out of the bottle “Flat Yellow” (Tamiya XF-3). Once dried, they were masked off in the correct locations (as close as I could – because the fuselage and wings are not accurate).
I airbrushed the bottom first with Tamiya J.N. Grey (XF-12). The color looks good and went down nicely right out of the bottle (if it is fresh). I recommend thinning it a little more. This is also a very forgiving paint and dries very evenly with a semi-gloss surface (ideal for decals). Consider also that it is easier to paint dark colors over light colors. Often light colors will require more paint if painted over dark. It may have a “shadow” effect. So I recommend painting the bottom first in this case.
While that was drying for a couple days, I painted wheels, cowling, engine, and prop. Instructions and box art are inaccurate in painting – so do a bit of research first (ie: black or black/blue cowling). The propeller is Tamiya “Red-Brown” (XF-64). The Engine is painted with Tamiya “Metallic Grey” (XF-56).
 The bottom
was masked for areas I wanted to keep grey, then upper surfaces and fuselage
airbrushed with J.N. Green (XF-11). I love Tamiya paint – except color accuracy
sometimes. The color perception was too dark compared to Hobby Color (H59) J.N.
Green and other accounts I have seen. I continued anyway, because the
instructions indicate “green” only.
The bottom
was masked for areas I wanted to keep grey, then upper surfaces and fuselage
airbrushed with J.N. Green (XF-11). I love Tamiya paint – except color accuracy
sometimes. The color perception was too dark compared to Hobby Color (H59) J.N.
Green and other accounts I have seen. I continued anyway, because the
instructions indicate “green” only.
Everything looked good, so I un-masked (except canopy). Then like a butterfly out of the cocoon, emerges a very dark A6M (56) Zero. The Tamiya paint adheres to plastic perfectly, and only a small amount of yellow stuck to the tape. Satisfied with that, (after touch-up) I added landing gear, and prop/cowling combination. Suddenly… I noticed I was out of parts!
As the green paint was very flat and sizable rivets, I sprayed Future all over the plane. This will help adhesion of the decals. Recommended!
I had a Hasegawa decal sheet for a Nakajima Ki-44 on stand-by. All of the Revell decals worked (except one - not unexpected with 50 year old decals). With a mixture of Micro-Sol and Elmer’s glue, the other decals went right down. A hair dryer and Micro Set helped settled the decals to the model. Due to thickness of the decals, some air bubbles and silvering are still visible. (The Hasegawa decal had to be separated from the backing – but it went down nicely also. Very thin – so don’t treat it roughly. Bottom port wing.) Another coat of future to seal the decals and then unmask the canopy. I’m done! I did not put a flat coat on it as I have not had good luck with most of them on Future. Over time dust will give it the flat look I want anyway.
Missing in the kit and not intended is the radio mast at the rear of the canopy. It is not difficult to make but I declined as it would require drilling the canopy. Also, guns and Pitot tube are not provided or mentioned in the kit. If I added those I would have felt obligated to include other details.
| CONCLUSIONS |
 What is a “Mitsubishi
A6 M56 Zero”? I think the kit is trying to depict an A6M5.
Warning: If you are looking for an accurate A6M
Zero – this is NOT it! The pilot is about 1/87 scale, no cockpit, with
lots of surfaces that look like the mold was sanded – but not smoothed before
casting. It will look like a Zero in the end, but it is not comparable to its
counterparts of other companies. Please note: I am NOT ‘trashing’
the kit. It is what it is in 1962, and at the time, maybe not a popular
subject like a super-duper F-104 Starfighter. But it will meet my requirements
as noted above.
What is a “Mitsubishi
A6 M56 Zero”? I think the kit is trying to depict an A6M5.
Warning: If you are looking for an accurate A6M
Zero – this is NOT it! The pilot is about 1/87 scale, no cockpit, with
lots of surfaces that look like the mold was sanded – but not smoothed before
casting. It will look like a Zero in the end, but it is not comparable to its
counterparts of other companies. Please note: I am NOT ‘trashing’
the kit. It is what it is in 1962, and at the time, maybe not a popular
subject like a super-duper F-104 Starfighter. But it will meet my requirements
as noted above.
Is this a great kit? It depends on your end goal. External details and fit are good for a raised detail kit. Internals are non-existent. It’s a great kit to re-live your past or if you want to go to the trouble of fixing the interiors. It is also a great entry level kit (as is the entire series).
But re-consider what the end goal was in building this model. It was to honor the kit makers and box artists of Revell. Another goal was to build it as intended (OTB). Granted, ‘builder prerogative’ can take precedence over the model as he sees fit. This model – and especially my skills – is not contest competitive. But a completed kit always graduates to a good model. I enjoyed re-living my past and I think you will too, if you like old kits.
Chris did a very nice write-up with pictures on making his base in a previous article, so rather than duplicate the effort, so to speak, here is a link. Ed
| REFERENCES |
Many internet references.
“Zero Fighter”, Robert C. Mikesh (my dad), Crown Publishing, (1980)
29 January, 2019 Copyright ModelingMadness.com If you would like your product reviewed fairly and fairly quickly, please contact the editor or see other details in the
Note to
Contributors. Back to the Main Page
Back to the Review
Index Page
Back to the Previews Index Page