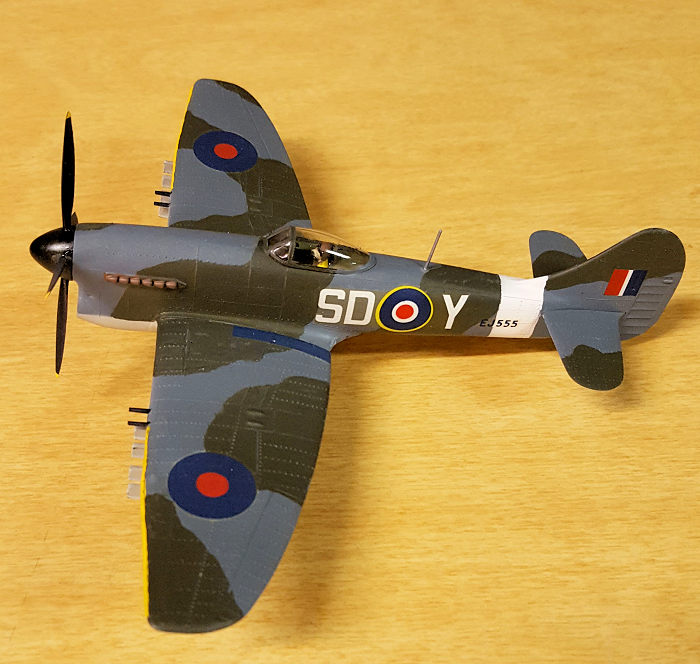
Revell 1/72 Hawker Tempest V
| KIT #: | H-620 |
| PRICE: | $5.00 'Used' |
| DECALS: | One option |
| REVIEWER: | Chris Mikesh |
| NOTES: | Out of Box and including the box - literally |
| HISTORY |
 When the Germans began their “Vengeance” raids on England with
the dreaded V-1 flying bombs, the British found a ready defense for this
unorthodox weapon in the Hawker Tempest V. Upon entering service in 1944, the
Tempest was used as a low-level interceptor and Fighter-Bomber.
When the Germans began their “Vengeance” raids on England with
the dreaded V-1 flying bombs, the British found a ready defense for this
unorthodox weapon in the Hawker Tempest V. Upon entering service in 1944, the
Tempest was used as a low-level interceptor and Fighter-Bomber.
The Tempest is an upgraded Hawker Typhoon with a new low drag laminar flow wing developed by NACA in the United States, which had been used in the new North American P-51 Mustang. It had a punch of 4 20mm cannons, 2, 500lb or 1000lb bombs, and 8 RP-3 Rockets.
There is a lot of additional information on the internet.
| THE KIT |
Years ago, my
father had a huge collection of models in the basement. As I am an
aircraft-oholic (building since I was 7), I lusted to build the many he had down
there. As time goes by, he wanted me to buy/sell them at an IPMS C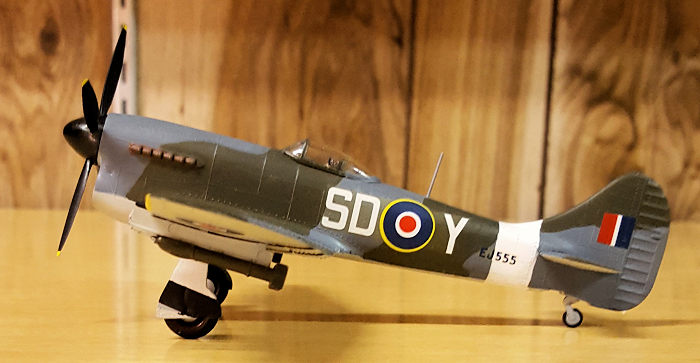 onvention (a
whole different chapter in my life with Nostalgic Plastic). But, I wanted to
keep the Revell 1/72 WWII “H” series kits – specifically the fighters, which
number 24 of them. The box art is what inspired my early desire to build the
kits. So I set out to build all of them the best I could – but preserve as much
of the intended model and box art as possible. Straight out of the box, plus
paint and glue where possible. This building series is in honor of the early
Revell Box artists, Jack Leynnwood, Richard Kishady, Scott Eidson, Brian Knight,
George Akimoto, and John Steel who inspired all of us.
onvention (a
whole different chapter in my life with Nostalgic Plastic). But, I wanted to
keep the Revell 1/72 WWII “H” series kits – specifically the fighters, which
number 24 of them. The box art is what inspired my early desire to build the
kits. So I set out to build all of them the best I could – but preserve as much
of the intended model and box art as possible. Straight out of the box, plus
paint and glue where possible. This building series is in honor of the early
Revell Box artists, Jack Leynnwood, Richard Kishady, Scott Eidson, Brian Knight,
George Akimoto, and John Steel who inspired all of us.
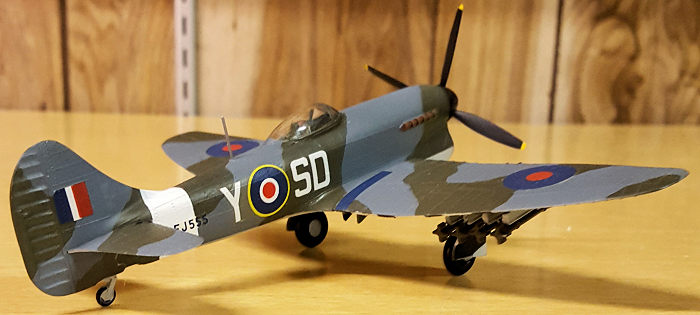
The kit is of the good ‘ole hard dark green plastic. Dry fit was excellent – but those early models often did (circa 1964). Typical, is the “bullet proof” clear plastic canopy. But the locomotive raised rivets were a nightmare waiting to happen. There is no cockpit to speak of except a seat and pilot. The next concern will be the 50+ year old decals trying to rest on rivets. Groan! Note: Greg Ewald has previously done a review of the kit turning it into a well done model from a gag gift.
| CONSTRUCTION |
The instructions for assembly were intuitive but often misleading when noting color. I did not deviate from the instructions for the most part.
Interior: Other Tempest models I had seen showed Chromate Green interiors so I proceeded using Testors Acrylic. Splat! The pilot figure is painted typical RAF, with brown helmet and flight jacket, life vest yellow, and white straps. You can’t see through the canopy well, so I didn’t spend too much time on him.
Fuselage
Assembly: The seat takes a little thinking to install it as it sits on 4 pins,
but generally not a problem. The fuselage halves fit together well with the
elevator, tail wheel, propeller hub, and seat. You need to balance and ju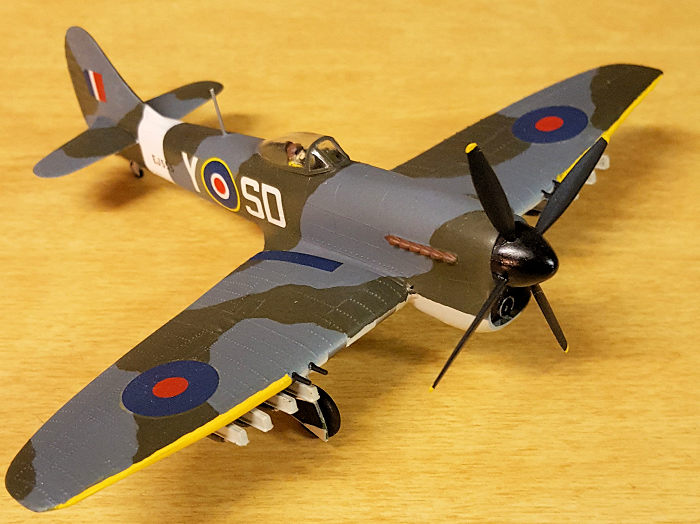 ggle
the pieces a bit, but once it all seats home you know it. Don’t drop it! I
prefer the Tamiya Extra Thin Cement as it runs very well across the seams and
sets quickly. The fuselage needed no filler and the seams cleaned up nicely
because of the good alignment of the mold. (Not bad for 1964!)
ggle
the pieces a bit, but once it all seats home you know it. Don’t drop it! I
prefer the Tamiya Extra Thin Cement as it runs very well across the seams and
sets quickly. The fuselage needed no filler and the seams cleaned up nicely
because of the good alignment of the mold. (Not bad for 1964!)
The inside of the wings had an injection bulge on the top wings, so it did not sit well initially. Once cut away and flash removed, it dropped right in. (So far, so good!) The leading and trailing edges cleaned up well after the glue set.
Mating the wings to the fuselage seemed tight – but it fit. However, I noticed the wings drooped downward because of pressure at the wing roots to the fuselage. A quick sanding at the root, (not too much) resolved the problem and actually seated better.
I needed to fill and sand the mating point behind the radiator where the wing joins. That is a big gap, so I used Super Glue. Watch that you do not damage the rivets in the area. I covered the wing and fuselage surrounding the sanding area with tape as I smoothed the area. That way, I could preserve the many rivets (locomotive bolts) and kit detail as possible while sanding.
Previously, the canopy was dipped in Future to improve clarity (not that there is anything to see). White glue is great for attaching the canopy. It will not mar the canopy, and if you need to take it off (static attracting interior dust for example) it will be easy to re-glue. Once glued in place, the canopy was masked waiting for paint. I used a combination of regular clear tape, (so I could see the frames and trim around them), and Tamiya Masking Tape for Curves (great stuff!). MicroScale Canopy Mask is great for seams or cracks between layers of tape, so the paint does not run between the tape – just for added assurance.
| COLORS & MARKINGS |
I had noticed that the 50+ year old decals will be nearly useless, but I figured I’d give it my best shot. I mopped on some Microscale Liquid Decal Film in preparation. I had already seen some cracks, but wanted to try anyway.
Also remembering the locomotive
bolt sized rivets on the plane, I used an 800 grit sanding stick to reduce the
 size of those rivets. They can still be seen, but at least it gives the decal a
fighting chance to stick. (Imagine lying on a bed of nails!)
size of those rivets. They can still be seen, but at least it gives the decal a
fighting chance to stick. (Imagine lying on a bed of nails!)
I air brushed Tamiya Ocean Gray 2 RAF (XF-82) and hand brushed Dark Green 2 RAF (XF-81) for the top Camouflaged pattern. After it had cured a day, I masked it to paint the bottom of the plane. Another kit manufacturer suggested Tamiya “Medium Sea Gray 2” (XF-83) for the bottom. I tried a small area, but when dried, it seemed way too dark compared to the top gray (XF-82). I used Valejo AV71296 FS36622 light gray (close enough). CAUTION: it does not stick to plastic if there is any finger print oil. Treat it gently after painted. I should have used a primer.
At this point, I used white glue to close the landing gear doors to line up the Invasion Stripes correctly on the doors and removed later. The invasion stripes were as expected. Measure it out based on the pictures (https://en.wikipedia.org/wiki/Hawker_Tempest). Paint the white panel, and mask off the black (about 9mm). Then mask off your whole model or you will paint more than you expected to! The aerated paint gets into unexpected places. However, if you have a spare decal sheet for Invasion stripes, USE THEM! The Invasion Stripes are not provided with the kit.
The leading edge and propeller tips are Tamiya XF-3 yellow. Black Sharpie® for the prop and cone. Yup!...it lays down nearly perfect so why load up an airbrush when you don’t need to?
Peel the masking off the cocooned Tempest, and prepare to see a beautifully camouflaged plane. Leave the canopy masking on until after all the clear coats are done.
| FINAL CONSTRUCTION |
The decals were not as bad as anticipated.
I started with the bottom roundel. Soaking for about 10 minutes, it would not
release from the paper. Using an X-acto knife I (gently) separated the decal
from the paper and floated it to the model. I also used MicroSol and Set with
gentle pressure to settle the decal. And of course, in 5 mi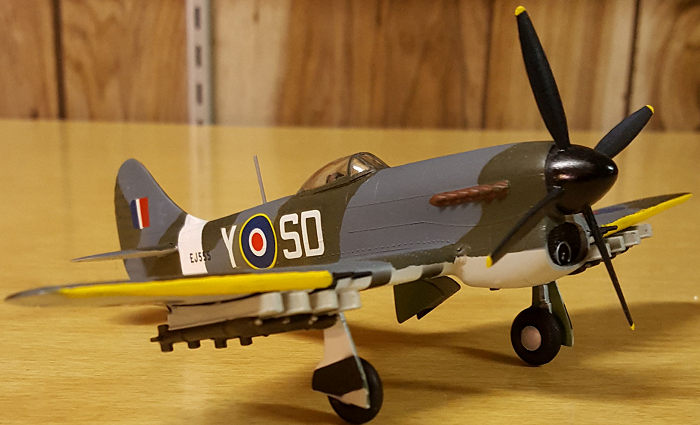 nutes, the edges
curled. Having seen this before, I made a solution of Elmer’s Glue and MicroSol
and worked it under the decal. Blowing and pressing enough to make the glue
stick, it finally settled enough to plug in the hair dryer. Cooking and pressing
with a damp paper towel, it really dropped in place nicely. Good ‘ole brute
force! All the other decals were the same way.
nutes, the edges
curled. Having seen this before, I made a solution of Elmer’s Glue and MicroSol
and worked it under the decal. Blowing and pressing enough to make the glue
stick, it finally settled enough to plug in the hair dryer. Cooking and pressing
with a damp paper towel, it really dropped in place nicely. Good ‘ole brute
force! All the other decals were the same way.
Add all the “break-off” pieces like the propeller, rockets and radio antennae. The 60 pound rockets are intended to be painted black on the model. However reality research has them as being olive generally, so I used an Olive Drab on the rockets.
A quick coat of Future all around to seal everything, then a dusting of dull coat, and we’re done!
| CONCLUSIONS |
Is this a great kit? It depends on your end goal. Compared to more modern kits of different brands…no. For a 1964 vintage model…yes. In that time frame, it was probably the only Tempest available until Airfix made one. External details and fit are very good for a raised detail kit. Internals are non-existent. It’s a great kit to re-live your past or if you want to go to the trouble of fixing the interiors and detailing the wheel wells. Externally, it is still quite good.
But re-consider what the end goal was in building this model. It was to honor the kit makers and box artists of Revell. Another goal was to build it as intended. Granted, ‘builder prerogative’ can take precedence over the model as he sees fit. This model – and especially my skills – is not contest competitive. But a completed kit always graduates to a good model - until you drop it, and it becomes a kit again – but that’s a different review.
| REFERENCES |
Internet of other builders, and painting instructions of more modern kits as a general reference.
https://en.wikipedia.org/wiki/Hawker_Tempest
====================
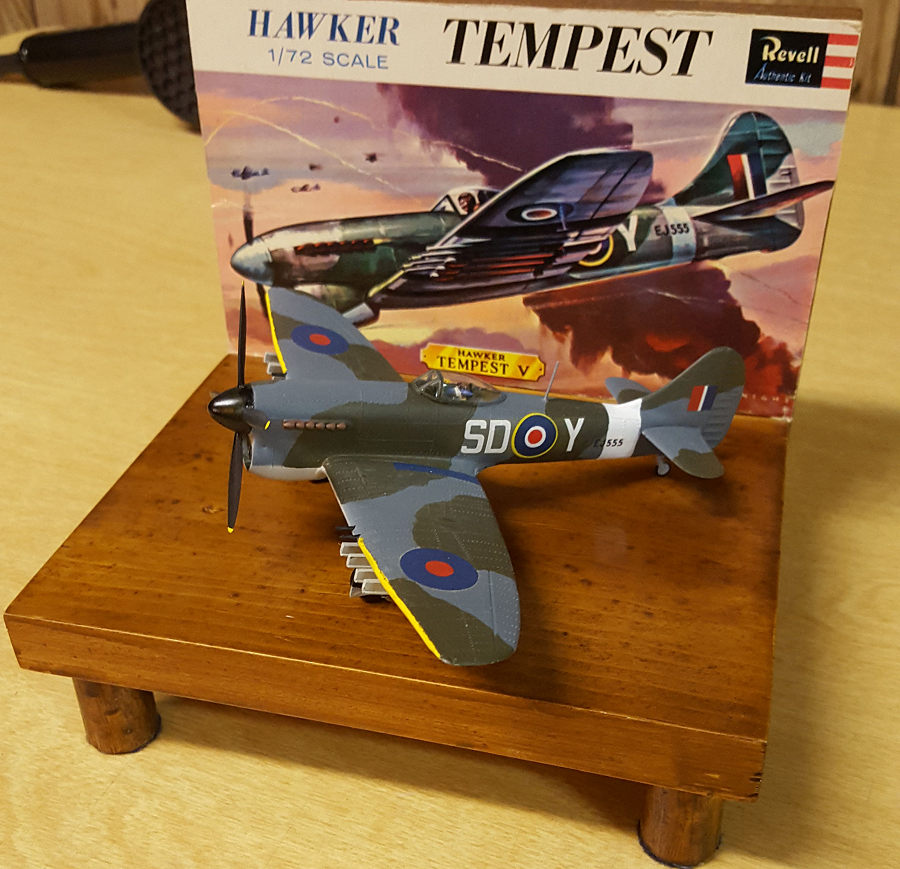
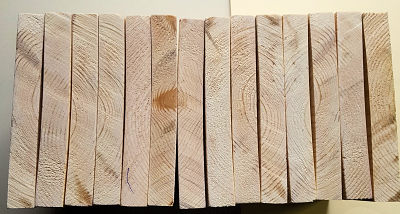
| THE DISPLAY STAND |
 The display is
not difficult to do – time consuming – but well worth it. This offers
individuality of the model and unity of the series.
The display is
not difficult to do – time consuming – but well worth it. This offers
individuality of the model and unity of the series.
Go to the local
lumber yard and get some wood that is ¾ inches thick by 5.5 inches (advertised
as 1x6), and cut it into 7 inches
 horizontally (the size of the model box). You
may also want some ¾ inch dowel rod, wood stain or paint, and felt.
horizontally (the size of the model box). You
may also want some ¾ inch dowel rod, wood stain or paint, and felt.
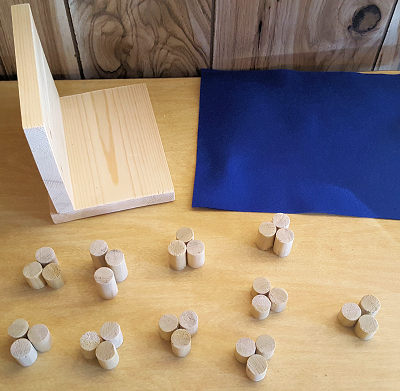
Make sure you get some wood that is flat. NOTE: “Kiln Dried” is generally green wood and sap tacky. Not recommended. You get what you pay for. That is why I used 3 wood legs because 4 would end up rocking as the wood cures. (Yeah… I’m cheap!)
Attach the two
parts to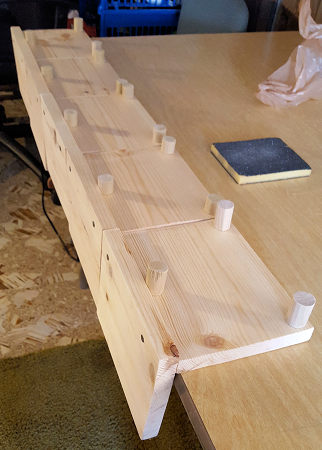 gether at 90 degrees, with an exposed area of about 4.25 X 7 inches
surface area for the box art (or whatever size box art you want to display). Cut
the 3 legs of the display from the dowel rod at even lengths. I chose .25 inch
measurements as each display stand could be different heights for the individual
look.
gether at 90 degrees, with an exposed area of about 4.25 X 7 inches
surface area for the box art (or whatever size box art you want to display). Cut
the 3 legs of the display from the dowel rod at even lengths. I chose .25 inch
measurements as each display stand could be different heights for the individual
look.
Sand, stain or paint the display. Reminder; wet or sappy wood will not take to paint well. It is not recommended to paint the area where the box art will be glued. The white glue may not penetrate the stain or paint.
 Then gluing the
box art to the display, use regular white glue – but spread it evenly over the
wood. Then add the box art and shift so when trimmed to the wood, you are not
cutting off anything vital. Place it on the face and press. Keep pressure on it
for several hours. The point is to avoid a ‘ripple’ in the box art. Trim the box
art flush to the display.
Then gluing the
box art to the display, use regular white glue – but spread it evenly over the
wood. Then add the box art and shift so when trimmed to the wood, you are not
cutting off anything vital. Place it on the face and press. Keep pressure on it
for several hours. The point is to avoid a ‘ripple’ in the box art. Trim the box
art flush to the display.
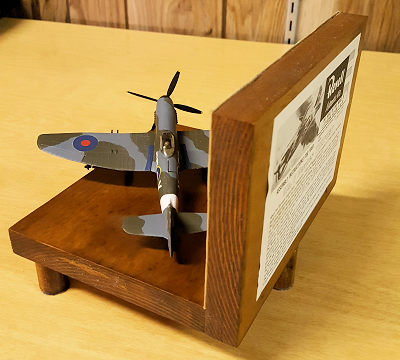 Add felt on the
bottom for that “professional feel”. Build and display model. Annual dusting is
optional.
Add felt on the
bottom for that “professional feel”. Build and display model. Annual dusting is
optional.
10 January 2019 Copyright ModelingMadness.com If you would like your product reviewed fairly and
fairly quickly, please
contact
the editor
or see other details in the
Note to
Contributors.
Back to the Main Page
Back to the Review
Index Page
Back to the Previews Index Page