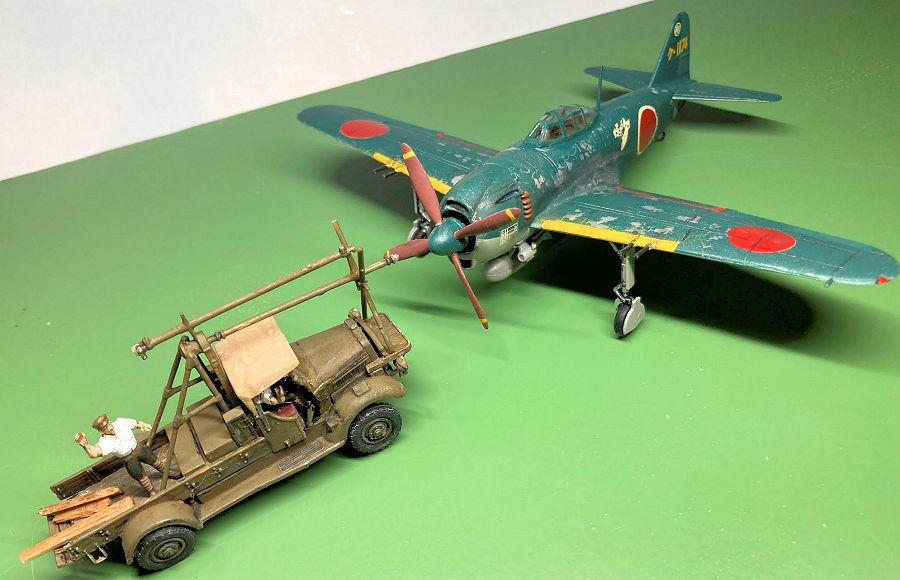
Aoshima 1/72 N1K1-Ja Shiden
| KIT #: | 016275 |
| PRICE: | $10.00 |
| DECALS: | Two Options |
| REVIEWER: | Joe Essid |
| NOTES: | Surprisingly good kit. Find the newest boxing you can. |
| HISTORY |
Japan’s increasingly desperate situation from 1943 onward, especially a shortage of strategic materials, meant that many promising aircraft appeared too late or in numbers so small as to make only a ripple against an Allied tidal wave of destruction from land, sea, and for the Home Islands, air. Nothing, it seemed, could stop the B-29 Superfortress.
One of the most promising aircraft, a Kawanishi design derived from the Kyofu floatplane, was the Shiden (Violet Lightning in Japanese; “George” in Allied code books). The fighter had an impressive record in the last year of the war, particularly in the hands of a group of skilled Imperial Navy pilots of the 343rd Kokutai, led by Minoru Genda, who had been instrumental in planning the attack on Pearl Harbor. Genda’s unit, known as the “Ken Butai” or “Genda’s Circus,” flew the fighter with considerable local success against impossible odds.
 Though this aircraft failed in its intended role of high-altitude
interceptor, the Shiden
was quite the dogfighter, featuring self-sealing fuel tanks, cockpit armor,
and heavy armaments. As with other late-war designs, this philosophy
belatedly reversed prewar choices that favored maneuverability over
ruggedness and pilot-protection. Despite its limits at altitude, down low it
could compete with the Mustangs, Hellcats, late-model Thunderbolts, and
Corsairs that appeared over the Home Islands in 1945.
Though this aircraft failed in its intended role of high-altitude
interceptor, the Shiden
was quite the dogfighter, featuring self-sealing fuel tanks, cockpit armor,
and heavy armaments. As with other late-war designs, this philosophy
belatedly reversed prewar choices that favored maneuverability over
ruggedness and pilot-protection. Despite its limits at altitude, down low it
could compete with the Mustangs, Hellcats, late-model Thunderbolts, and
Corsairs that appeared over the Home Islands in 1945.
The first Shiden, the subject of this review, featuring a mid-fuselage wing, encountered problems landing because of its tall landing gear. It first fought in the Philippines, again against steep odds, then in Formosa and Okinawa. A redesign moved the wing flush with the bottom of the fuselage and thus shortened the gear. (Editor's note: the redesign also greatly reduced the number of parts, allowing it to be built faster with many fewer man hours)This was the Shiden Kai, an aircraft called superlative by US pilots who tested them after the war. One of these planes can be found today at the USAF Museum in Dayton, Ohio, where I first encountered the type in the late 80s, while on a weekend getaway from grad school. I never forgot its appearance, a stubby, tough-looking cigar of a plane with good visibility from its bubble canopy; I was reminded of a P-47D, though the Shiden is far smaller. Still, one can imagine how in the heat of combat, a Shiden could be mistaken for a Thunderbolt or, from certain angles, a Hellcat.
Genda’s flying circus and other pilots acquitted themselves well, but it was too little, too late against the B-29s and their escorts. Japan was out of skilled pilots, fuel, and critical materials needed for quality manufacturing.
While four Shiden Kai aircraft survive, I can find no evidence of a mid-wing Shiden in a museum or under restoration. Historical photos show that at least one example was captured in the Philippines and tested by the US. The plane’s weak spot reared its head, however, since “It only flew once. . .as the undercarriage collapsed on landing.”
| THE KIT |
 I began
this model with an eye toward a diorama called “Too Little, Too Late,” from
1945, as the once-Rising Sun set over the Empire’s home islands. I envisioned a
couple of Imperial Navy fighters ready to escort a prototype four-engine bomber.
I was surprised to see that no one at Modeling Madness had yet reviewed the
Aoshima Shiden,
perhaps because the Tamiya kit of this aircraft,
reviewed by our
editor, is so good.
I began
this model with an eye toward a diorama called “Too Little, Too Late,” from
1945, as the once-Rising Sun set over the Empire’s home islands. I envisioned a
couple of Imperial Navy fighters ready to escort a prototype four-engine bomber.
I was surprised to see that no one at Modeling Madness had yet reviewed the
Aoshima Shiden,
perhaps because the Tamiya kit of this aircraft,
reviewed by our
editor, is so good.
Aoshima’s model has a three-decade history, and has been re-issued with new parts recently. The box-art of my example dates it to either 2018 or way back to 1996, two years after its original release.
I picked my copy up for a good price at Frontline Hobbies in Staunton, VA, an LHS in the Shenandoah Valley that stocks a lot of older kits. I was a little leery when I opened the box, recalling the primitive Aoshima kits in the 70s. Back then, these were a one-dollar consolation prize for kids who had already squandered their allowances or paper-route money on comic books or chewing gum. Build, burn, or blow up with firecrackers.
But things have certainly changed in 50 years.
| CONSTRUCTION |
I found sprues of grey plastic with good molding, recessed panel lines, a decent cockpit interior, and a choice of open or closed canopies. The transparencies were both thin and clear. Flash was present on a few parts but was more an annoyance than a problem. The instructions are in Japanese, but illustrations make the 6 steps clear enough. I followed the instructions save for the landing gear, which I saved for last.
 I began
with the cockpit. I don’t recall having to do a lot of work to clean up those
parts, and assembly was simple. The kit uses a decal for the instrument panel,
and it includes a decent seat and floor. To be honest (it’s been a couple of
months) I don’t recall any sidewall details beyond a few ribs. No matter, since
my Shiden would
feature a closed canopy and the cockpit is hard to glimpse, even under the
bubble canopy. I added masking-tape seat belts. An aftermarket pilot figure
would stand beside the plane in the diorama, as I used Aoshima’s well-molded
pilot to fill the spartan cockpit of a Hasegawa
Raiden.
I began
with the cockpit. I don’t recall having to do a lot of work to clean up those
parts, and assembly was simple. The kit uses a decal for the instrument panel,
and it includes a decent seat and floor. To be honest (it’s been a couple of
months) I don’t recall any sidewall details beyond a few ribs. No matter, since
my Shiden would
feature a closed canopy and the cockpit is hard to glimpse, even under the
bubble canopy. I added masking-tape seat belts. An aftermarket pilot figure
would stand beside the plane in the diorama, as I used Aoshima’s well-molded
pilot to fill the spartan cockpit of a Hasegawa
Raiden.
I painted the interior with a homebrew mix of dark tan and a bit of OD green, to match my best guess at images found online. Only after the fuselage was buttoned up did I find an Aviation of Japan reference, which shows that Shiden interiors were likely more green than tan, “a general cockpit interior color again matched to FS 34127.” And so it goes. Greenish tan rather than a tannish green for my model!
One wing joint needed filler and sanding, but that was nothing compared to the multiple gaps and long sandpaper sessions for a Hasegawa “Rita” strategic bomber that will be the centerpiece of this diorama. Everything else fell together with ease on the Aoshima kit except the rather spindly landing gear, rather like their counterparts on the real aircraft. I had it ready to paint in a few days time.
| COLORS & MARKINGS |
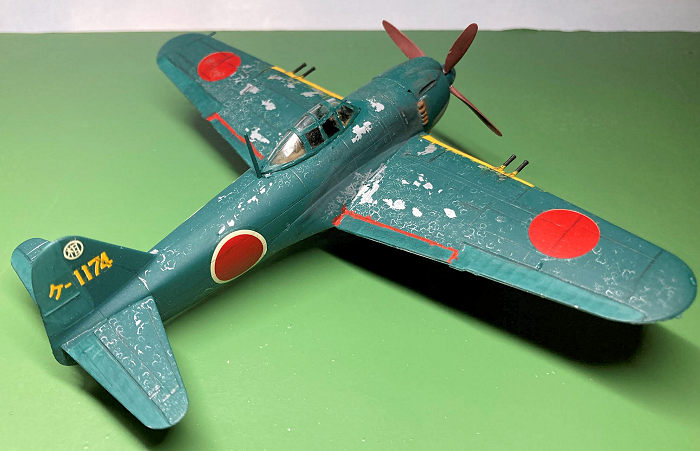
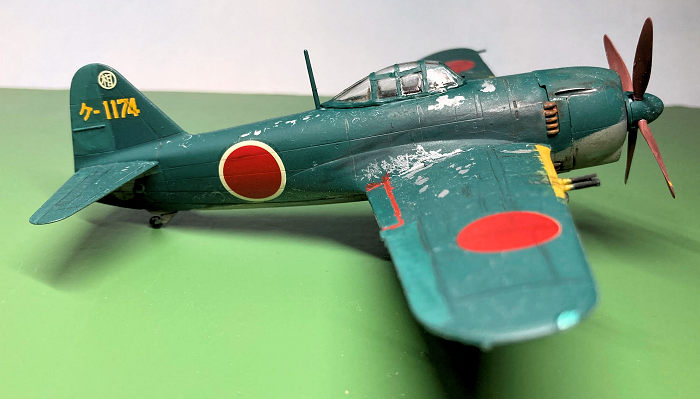
I planned to depict an aircraft that had not been primed before painting, and I had Vallejo’s set of paints for Japanese aircraft on hand. I was drawn to a particular color, 71.310, called “Deep Dark Green” that looks emerald. I’ve seen it on other Shiden models, and my motto “simulate, don’t replicate” came in handy. It looked right.
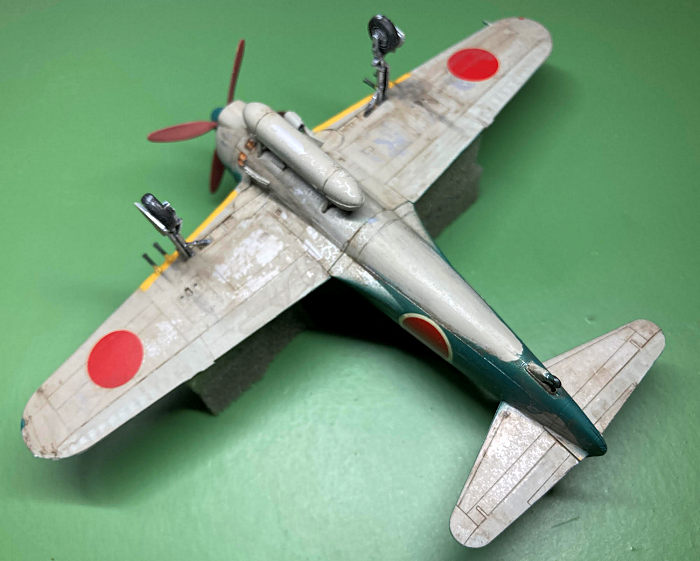
After cleaning the model with alcohol, I sprayed it with Tamiya Bare Metal from a rattle can. After that cured overnight, I hit the kit with hairspray, then the Vallejo from my airbrush. I used an IJN gray from the same set to paint the bottom, including the nicely detailed wheel wells. Some sources say the Shidens were left in bare metal on the bottom, and you often see kits with Aotake wells.
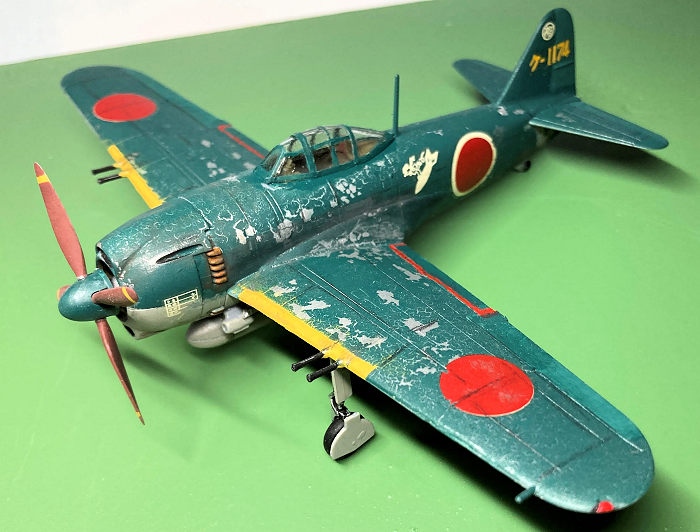 When the
acrylics had dried, I used damp paper towels, Q-Tips, and other found objects to
score and lift the top finishes, getting the look of hastily applied paint over
bare metal, without primer. This was, to me, a joy. I love weathered aircraft
and fought to keep from overdoing it. What I wanted was a fairly new aircraft,
hastily painted. Thus I did not weather the propeller when painting it Tamiya
brown. I then brushed on the prop’s yellow warning stripes, as well as the
identification lines on the leading edges of the wings. Everything got a coat of
Tamiya flat. When it dried, I brushed Future on spots that would get decals.
Some tore, and the no-step decals for the wings disintegrated, so I masked and
painted the red lines on the trailing edge. One kit decal not in the
instructions shows a bird perched on a bomb. I put this on the port fuselage, to
fit my diorama’s fictional scene. Finally, I added the landing gear and some
Flory “Grime” wash, heavier on the bottom. Pastels gave me exhaust staining.
When the
acrylics had dried, I used damp paper towels, Q-Tips, and other found objects to
score and lift the top finishes, getting the look of hastily applied paint over
bare metal, without primer. This was, to me, a joy. I love weathered aircraft
and fought to keep from overdoing it. What I wanted was a fairly new aircraft,
hastily painted. Thus I did not weather the propeller when painting it Tamiya
brown. I then brushed on the prop’s yellow warning stripes, as well as the
identification lines on the leading edges of the wings. Everything got a coat of
Tamiya flat. When it dried, I brushed Future on spots that would get decals.
Some tore, and the no-step decals for the wings disintegrated, so I masked and
painted the red lines on the trailing edge. One kit decal not in the
instructions shows a bird perched on a bomb. I put this on the port fuselage, to
fit my diorama’s fictional scene. Finally, I added the landing gear and some
Flory “Grime” wash, heavier on the bottom. Pastels gave me exhaust staining.
As is my habit, I took airbrushed strips of masking tape and cut out my canopy framing, touching up spots where the bits of tape touch. I tend to use a very small brush that comes from the world of wargaming miniatures to paint by hand curved framing where the tape will not work. I have used this technique on dozens of kits instead of masking the canopy; so far, only one tape strip peeled up on all these kits. Naturally, it was on my Shiden. It’s an easy repair; if pressing with a toothpick does not set the tape, a dot of clear-parts cement under the tape makes things stick.
For some photos, I posed the Shiden with a Hasegawa Toyota KC starter truck I reviewed here earlier. Revisiting that kit gave me the chance to correct some of the detail, while getting both models ready for the diorama. I also posed the Shiden beside a P-47D to give a sense of scale for readers who have not seen the real thing.
After shooting photos, I saw that I’d forgotten stretched EZ Line to make a radio antenna. I did that and I called it done.
| CONCLUSIONS |
The Tamiya kit can cost a bit. Why not try your skills on a cheaper and readily available Aoshima? I am glad that I did. Now on to a Shiden Kai recently ordered. Aoshima and Hasegawa released this version in 1/72. Then there is the Kyofu. I clearly have a fascination with the no-nonsense looks of Kawanishi’s dangerous flying cigar.
| REFERENCES |
Airhistory.net https://www.airhistory.net/photo/681828/S7
Francillon, R. Kawanishi N1K Kyofu / “Rex” & Shiden/ “George.“ Profile No. 213. Windsor, England: n.d.
“Shiden-Kai, Shiden, and Kyofu Colours Part Two, Interiors.” http://www.aviationofjapan.com/2010/05/shiden-kai-shiden-kyofu-colours-part.html
16 July 2026 Copyright ModelingMadness.com. All rights reserved. No
reproduction in part or in whole without express permission from the editor. Thanks t If you would like your product reviewed fairly and fairly quickly, please
contact the editor or see other details in the
Note to
Contributors.