AZ Models 1/72 D4Y3 'Suisei'
| KIT #: | 7397 |
| PRICE: | $15.00 |
| DECALS: | Three options |
| REVIEWER: | Spiros Pendedekas |
| NOTES: | Beaver p.e. set |
| HISTORY |
The origins of the D4Y can be traced back to 1938, when the Imperial Japanese Navy Aviation Bureau (Kaigun Kōkū Hombu) issued requirements for a carrier-based dive bomber to replace the Aichi D3A. The emerging aircraft would be a single-engine, all-metal, low-wing monoplane, with a wide-track retractable undercarriage and wing-mounted dive brakes. Though reported that its design may have been influenced by the Heinkel He 118 (itself a development of the He 70, losing out to the Junkers Ju 87 Stuka in the 1930s and never ordered by the Luftwaffe), as the Japanese Navy having acquired two He 118 examples from Germany in early 1938, the two aircraft had actually little in common.
The Suisei had a crew of two, a pilot and a
navigator/radio operator/gunner, seated under a long, glazed canopy which
provided good all-round visibility. Power was provided by the Aichi Atsuta
liquid-cooled in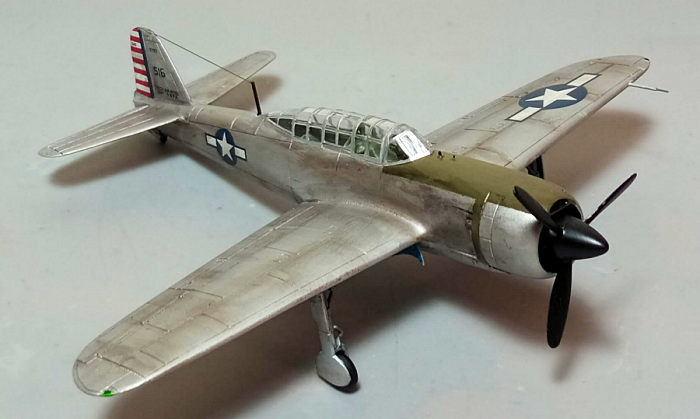 verted
V12 engine, a licensed copy of the Daimler-Benz DB 601, rated at 895 kW (1,200
hp), with the radiator housed behind and below the three-blade propeller.
verted
V12 engine, a licensed copy of the Daimler-Benz DB 601, rated at 895 kW (1,200
hp), with the radiator housed behind and below the three-blade propeller.
The aircraft had a slim fuselage that enabled it to reach high speeds in both horizontal flight and in dives whereas, despite its high wing loading, it exhibited great maneuverability, having superior flight characteristics to contemporary dive bombers such as the Curtiss SB2C Helldiver. This good performance, apart from the solid design, was also attributed to the minimized weight by not fitting the D4Y with self-sealing fuel tanks or armor, in order to conform with the Japanese Navy's (not particularly well-aimed) requirement for long range, which made the type extremely vulnerable and tended to catch fire when hit.
Armament consisted of two machine guns in the nose and one in the rear of the cockpit. Bombs were fitted under the wings and in an internal fuselage bomb bay. Usually one 500 kg (1,100 lb) bomb was carried, but there were reports that the D4Y sometimes carried two 250 kg (550 lb) bombs.
The first (of five) prototypes made its maiden flight in December 1940, with the type entering service roughly a year later. Upon the first flights of the prototype, serious problems with flutter were encountered, forcing the IJN not using the type as a dive bomber (as flutter would be catastrophic there), but as a reconnaissance plane, where its long range and high speed were favorable and the missions themselves were not imposing serious stresses to the airframe.
Flutter problems were solved by mid-1943, at about the time where the increasing losses of the D3A dictated the D4Y’s operational entry as a dive bomber. At about the same period, (and justifying the initial design critiques of the inline engine), the unreliability of the Atsuta power plant led to the fitting of the proven Mitsubishi MK8P Kinsei 62, 14-cylinder two-row radial. The new engine offered improved ceiling and rate of climb, but its higher fuel consumption resulted in reduced range and cruising speed. Also, its width obstructed the forward and downward view of the pilot, hampering carrier operations.
 Lacking
armor and self-sealing fuel tanks, the Suiseis did not fare well against Allied
fighters. They did, however, cause considerable damage to ships, including the
carrier USS Franklin which was nearly sunk by an assumed single D4Y and the
light carrier USS Princeton which was sunk by a single D4Y.
Lacking
armor and self-sealing fuel tanks, the Suiseis did not fare well against Allied
fighters. They did, however, cause considerable damage to ships, including the
carrier USS Franklin which was nearly sunk by an assumed single D4Y and the
light carrier USS Princeton which was sunk by a single D4Y.
An interesting version was the D4Y4 Special Strike Bomber, a single-seat kamikaze aircraft, capable of carrying one 800 kg (1,800 lb) bomb partially fitted in the bomb bay. Equipped with three rocket boosters for terminal dive acceleration, this aircraft was an almost ideal kamikaze model, exhibiting a combination of speed (350 mph), range (1,550 mi) and payload, probably not matched by any other Japanese aircraft.
The Judy seems to be a classic example of an otherwise well designed and evolved plane that was hampered by some not well aimed requirements, in this case the choice of absolute endurance over armor plating and fuel tanks self sealing, the lack of which severely compromised its resilience against enemy fire, preventing it to show its full potential. Ultimately, 2,038 of all variants were produced.
| THE KIT |
This is the initial release radial engined (D4Y3) version of the very nice AZ 1/72 Judy family, which started hitting the shelves in 2012 and with all versions regularly reboxed ever since. By all means very γοοδ kits, offering plenty of detail, requiring their usual extra attention during construction due to their high-end limited-run nature. The specific kit was yet another gift from my good Polish friend Bernard Sobczyk and for a more in-depth look at its contents you might read its preview found at the MM archives.
| CONSTRUCTION |
I started by putting together the well detailed interior, consisting of a long floor onto which the various elements are attached, then trapped it between the fuselage halves. Basic cockpit color was Hu78 Interior Green, whereas the telescopic sight, stick grip and various consoles/boxes were painted black and the oxygen bottles yellow. For the instrument panel I used the pre-painted part of the supreme Beaver PE offering, whereas the seats received seat belts made from masking tape, as the ωερυ νιψε Beaver PE pre-painted ones included in the above fret were far too delicate to be handled by my brutal hands.
A few items like the
seats, control stick and telescopic sight were left off, to be attached at
later stages. The rear wheel assembly was also left off, as its chances to
withstand my less than delicate handling were minimal, only hoping to be able to
attach it at end stages. Finally, the small downward looking transparency was
also omitted, planning to replicate it with white glue later on.
The nice main bays were attached to the lower wing half, with the assembly then
attached to the fuselage, followed by the upper wing halves. Those were first
glued to the wing roots, then let rest on the lower half and "secured" by water
thin glue via capillary action. This was done in order not only to minimize the
nasty w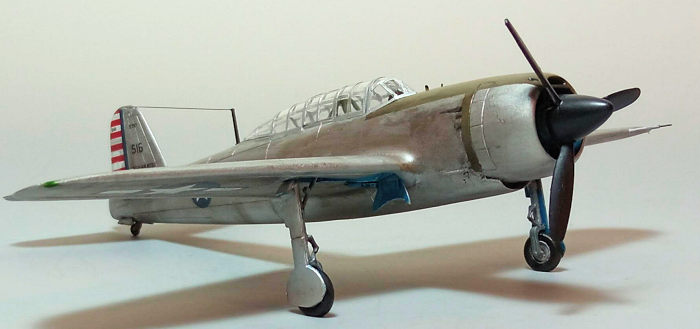 ing-to-fuselage
gaps, but also to insure that the wing dihedral will not be compromised, as, in
some cases, the assembled wing might be “pushed-open" by the fuselage once
inserted in position.
ing-to-fuselage
gaps, but also to insure that the wing dihedral will not be compromised, as, in
some cases, the assembled wing might be “pushed-open" by the fuselage once
inserted in position.
The tail planes had their elevators separated by carefully running the back side of my hobby knife many times in the hinges, in order to be posed drooped, offering more dynamic looks. The horizontal stabilizers were then attached in position, followed by the correct for my version fin. The two piece front fuselage part with the delicate radiator inlet lip underneath were also attached at this time.
The nice looking engine had its crankcase glued on and was attached in position, followed by the cowling lip. The crankcase was painted a light gray, the cylinders black, then heavily dry brushed with silver, whereas the cowling innards were painted with my home brewed mixture of clear blue with some clear yellow, in order to represent the “aotake” shade.
Concluding basic assembly, the gaps were initially spot-treated with liquefied styrene, followed by normal puttying and sanding. Overall fit, while not “Tamiya”, was still good at most places, just make sure you carefully scrape off the tiny lumps where the sprue gates penetrate to the mating surfaces.
I was ready to take the bird to the paint shop when, by looking at the nice box art, I realized something was not right: yes, I had managed to glue the cowling lip upside down. Thankfully, it could be separated relatively uneventfully and glued right side up, filled, sanded smooth and reminding me to occasionally do the radical act of reading the instructions or, at least, gaze at the box art! Off to the paint shop then!
| COLORS & MARKINGS |
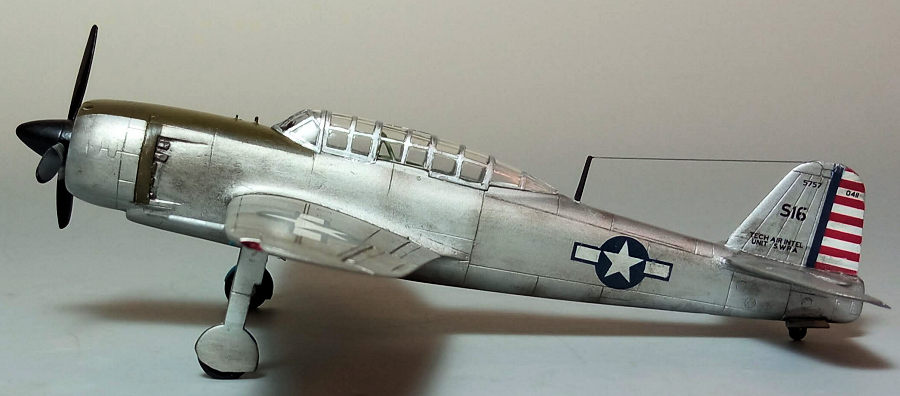
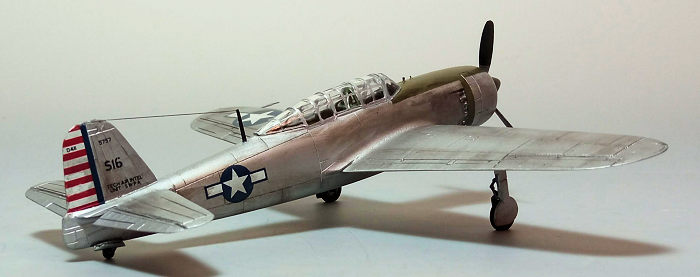
 I
decided to go for the third option of the kit provided markings, which is a
very interesting looking captured Judy, as it stood at Clark Field, Manila
by June 1945, shortly after being captured and refurbished by the “Technical
Air Intelligence Unit - South West Pacific Area”. Instructions call for an
overall IJN Gray color with Olive Drab front anti glare area, however, by
consulting net available photo evidence for the specific plane, I leaned
towards an overall aluminum shade, which I decided to replicate.
I
decided to go for the third option of the kit provided markings, which is a
very interesting looking captured Judy, as it stood at Clark Field, Manila
by June 1945, shortly after being captured and refurbished by the “Technical
Air Intelligence Unit - South West Pacific Area”. Instructions call for an
overall IJN Gray color with Olive Drab front anti glare area, however, by
consulting net available photo evidence for the specific plane, I leaned
towards an overall aluminum shade, which I decided to replicate.
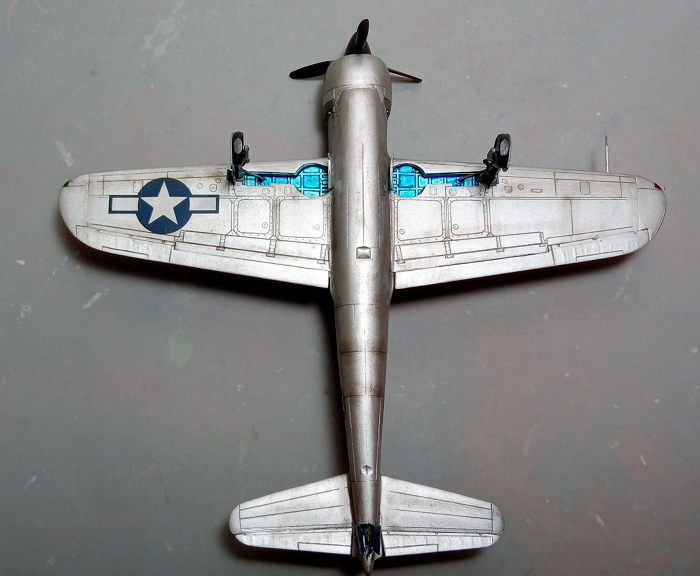
I first gave the front anti glare area a coat of Hu155 Olive Drab, then masked it off and gave the whole model a coat of Hu11 Silver (planning to tone it down with a matt coat at final stages). Though Hu11 is by specification non-buffable, I lightly buffed it with a soft cloth, which added some extra “depth” to the shineness, then headed to the decal shop, where I used the kit decals in order to represent the aforementioned captured example. Decals worked beautifully, no remarks whatsoever (well done AZ!), with a coat of Future sealing them.
| FINAL CONSTRUCTION |
The nice looking main landing gear was attached in position, followed by the wheels and doors. The main wheels were tad filed to look weighted. The one piece rear wheel/strut was tweaked in position, with the charming bird proudly standing on its feet. Following the instructions, gear legs were painted a light gray, bays and door innards were painted “aotake”, the wheels had black tires with silver hubs and oleos were highlighted by my fine tip silver pen. Since this had been a refurbished captured machine, there is always the possibility of some landing gear parts or areas to have been repainted with other shades than the above “typical” ones, so, unless solid photo evidence is available, there might be some room for speculation here.
The correct for my version prop was assembled, painted and attached in position. Instructions called for the typical Japanese brownish “propeller color”, however pictorial evidence showed the whole prop painted a very dark (presumably black) color with only a small rear portion of the blades left "silver" at the root area. Though you can never be absolutely sure with b/w pics, I concluded that there were good chances of the prop being painted black with the rear blade root areas left unpainted steel, so I went for this option.
 Onto
weathering, I first gave the complete model a black wash that not only brought
out all nice engraved detail, but also gave some specific areas (like the
landing gear) a used, oily look. I then applied dark brown and black dry
pastels, in order to represent some dirty or sooty areas and to add some
“flavor” to the monotonous unrealistic silver, with an almost matt clear coat
toning down the shineness and giving the bird its final finish.
Onto
weathering, I first gave the complete model a black wash that not only brought
out all nice engraved detail, but also gave some specific areas (like the
landing gear) a used, oily look. I then applied dark brown and black dry
pastels, in order to represent some dirty or sooty areas and to add some
“flavor” to the monotonous unrealistic silver, with an almost matt clear coat
toning down the shineness and giving the bird its final finish.
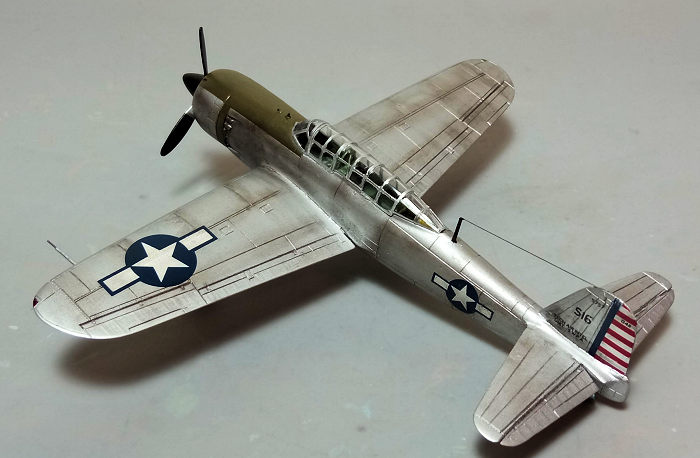
The transparencies had their excellently defined frames hand painted and attached in position. Fit was good with the tiny gaps treated with white glue. The downward looking belly window was replicated with white glue which dried transparent. The externally mounted ring and bead gunsight had been removed from this captured example, leaving only its small mounting lugs on the front top anti glare area, which were replicated with tiny pieces of stretched sprue. Regarding the method for painting the extensive canopy framing, going for a set of masks is the natural and wise thing to do, with the hand painting courtesy of Yours Truly only justifying that I am a glutton for punishment, unwilling to change the habits of a lifetime.
The antenna mast was attached at the position where pictorial evidence depicted it (was reattached aft of the canopy at the captured example) and thin stretched sprue was run from its tip to the rudder top, to represent the aerial wire. The pitot was attached in position, with its main body painted fuselage color and its tip burned metal, the latter shade also used to carefully paint the tiny exhausts that protrude bilaterally of the cowling. Tiny blobs of red and green clear paint represented the wingtip lights, before calling the captured Judy done!
| CONCLUSIONS |
This is by all means a quality kit of this important plane. General shape looks correct, as does the surface detailing, with the key areas of cockpit, engine and landing gear looking realistically busy and molding, apart from the tiny sprue nibs penetrating some mating surfaces and needing scraping-off, being very good. Transparencies are nice and decals are great, as are the instructions, with the supplied PE fret being the icing of the cake.
 Being a
high-end limited-run kit, means taking care of the latter, in order to achieve
the former, in this case cleaning the tiny sprue nibs that slightly penetrate
the mating surfaces and test fit everything before applying glue. Nevertheless,
construction is straightforward and can be positively tackled by anyone but the
novice.
Being a
high-end limited-run kit, means taking care of the latter, in order to achieve
the former, in this case cleaning the tiny sprue nibs that slightly penetrate
the mating surfaces and test fit everything before applying glue. Nevertheless,
construction is straightforward and can be positively tackled by anyone but the
novice.
Out of the box a really nice model can emerge,
which can be even further improved by using aftermarket stuff, like the
aforementioned superb Beaver PE fret (I admit I only used a few parts of it as I
am not really good with PE). Regularly reissued, offered at very sensible prices
and only requiring some extra attention due to its limited-run nature, this is
an excellent kit of the important Japanese dive bomber that can be
wholeheartedly recommended.
Happy Modeling!
3 October 2023
Copyright ModelingMadness.com. All rights reserved. No reproduction in part or in whole without express permission.
If you would like your product reviewed fairly and fairly quickly, please contact the editor or see other details in the Note to Contributors.