Hasegawa 1/48 Ki-27 'Nate'
| KIT #: | J 008 |
| PRICE: | @15 Euros |
| DECALS: | One option |
| REVIEWER: | Spiros Pendedekas |
| NOTES: | “Initial release” nice resin main wheels included |
| HISTORY |
The Nakajima Ki-27 (九七式戦闘機, Kyūnana-shiki sentōki, or Type 97 Fighter) was the main fighter aircraft used by the Imperial Japanese Army Air Force up until 1940. Its Allied nickname was "Nate", although it was called "Abdul" in the "China Burma India" (CBI) theater by many post war sources; Allied Intelligence had reserved that name for the nonexistent Mitsubishi Navy Type 97 fighter, expected to be the successor to the carrier-borne Type 96 (Mitsubishi A5M) with retractable landing gear and an enclosed cockpit.
 The Ki-27 made its first flight on 15
October 1936. Although it had a slower top speed and worse climb performance
than its competitors, the Army chose the Nakajima design for its outstanding
turning ability granted by its remarkably low wing loading. The Army ordered 10
pre-production samples (Ki-27a) for further testing, which featured an enclosed
cockpit with sliding canopy and larger wings.
The Ki-27 made its first flight on 15
October 1936. Although it had a slower top speed and worse climb performance
than its competitors, the Army chose the Nakajima design for its outstanding
turning ability granted by its remarkably low wing loading. The Army ordered 10
pre-production samples (Ki-27a) for further testing, which featured an enclosed
cockpit with sliding canopy and larger wings.
The type was officially accepted into service in 1937 as the Army Type 97 Fighter. In addition to Nakajima, the Ki-27 was also manufactured by Tachikawa Aircraft Company Ltd and Manshukoku Hikoki Seizo KK, with a total of 3,368 built before production ended in 1942. It proved its excellent qualities during combat service in China and along the Khalkhin-Gol river area.
At the outbreak of the Pacific war, it was the basic IJAAF fighter, seeing service in Indochina, Malaya, the Philippines, and Burma, as well as in defense of the Japanese Islands. On being superseded in first line units by more state-of-the-art successors, it continued in service until the end of the war in training units and pilot schools. In the final months of the war, desperate lack of aircraft forced the Japanese to utilize all available machines and the Ki-27s were no exception. Some were equipped with up to 500 kg (1,100 lb) of explosives for kamikaze attacks, but some were redeployed as fighters, suffering terrible losses
Outside Japan, it served with the air forces of Manchukuo and Thailand. In Thai service, Ki-27s shot down one Lockheed P-38 Lightning and one North American P-51 Mustang.
| THE KIT |
 This is the ex-Mania kit, firstly
introduced in the mid-70s. After Mania went out of business, it has been reboxed
by Hasegawa at least 15 (!) times with no changes in the molds whatsoever, just
differing scheme options (extended info regarding Mania and kit contents can be
read at Editor’s preview here and
review here).
This is the ex-Mania kit, firstly
introduced in the mid-70s. After Mania went out of business, it has been reboxed
by Hasegawa at least 15 (!) times with no changes in the molds whatsoever, just
differing scheme options (extended info regarding Mania and kit contents can be
read at Editor’s preview here and
review here).
My kit was the XXXXXXX issue, including “initial release” lovely resin main wheels. It comes at the usual excellent Hasegawa top opening box, with also the usual amazing and dramatic Koike Shigeo boxart, portraying a Nate confronting a Chaika, somewhere over China.
Upon opening the box, you are greeted with the familiar Hasegawa packaging practice, i.e. all sprues together in one bag, with decals and clear parts in a separate bag. The molds look crisp (mine is the 1998 release), with nice recessed details, including lovely extensive riveting. The cockpit is well executed, though there’s room for extra detailing.
The prominent “copper” oval shaped oil cooler is also well executed. Interestingly, two “Kotobuki” engine nicely cast blocks and front “cabanes” are provided: one set with the correct hollow center, in order for the prop shaft to pass through, and one set with solid centers, which I did not throw away, but used it as a basis to construct a Mitsubishi Kinsei for my 1/48 Nichimo Jake, to replace the Nichimo supplied toy-ish one!
 Two external “conformal” wing
tanks, a port wing top mounted camera, as well as two starboard underwing smoke
generators are provided, with their corresponding wing mounting holes already
opened. Those items (especially the camera and the smoke generators) were rarely
carried and you may wish to leave them off and fill the mounting holes.
Two external “conformal” wing
tanks, a port wing top mounted camera, as well as two starboard underwing smoke
generators are provided, with their corresponding wing mounting holes already
opened. Those items (especially the camera and the smoke generators) were rarely
carried and you may wish to leave them off and fill the mounting holes.
The transparencies are nice and clear, with two different canopy styles provided, the only complaint being that the gunsight opening seems to be a hole in reality and not a notch, as depicted at the kit transparency (anyway, it is under the gunsight, barely visible). A pair of nicely cast resin main wheels is included in a small bag. They are properly weighted and will definitely enhance the Nate looks. The decals are “old school” Hasegawa, where the white is actually represented as ivory, but look to be of excellent quality. Instructions are the typical pamphlet Hasegawa style, meaning nice and clear.
| CONSTRUCTION |
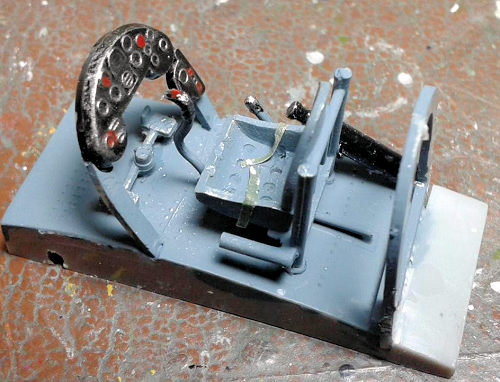
I started by assembling the nicely
appointed cockpit, which consists of instrument panel, three piece seat, stick,
foot pedals, a control lever, rear bulkhead and what seems an oxygen bottle.
There have been quite a few discussions about the base cockpit and sidewalls
color. A friend provided
 me with very detailed research, upon
which I decided to paint it a light blue gray color (Hu144), which has a good
chance of being correct for the specific plane on the specific period. Looks
great to the eye, too!
me with very detailed research, upon
which I decided to paint it a light blue gray color (Hu144), which has a good
chance of being correct for the specific plane on the specific period. Looks
great to the eye, too!
Instrument panel, stick and side lever grips were painted black, drybrushed in silver, with red, white and yellow “knobs” accordingly “painted” with a 10/0 brush. Seat belts were added from khaki doped masking tape, their buckles made with my PILOT silver pen.
I then glued the fuselage halves together and the one piece bottom wing part, with the cockpit trapped between them. Fit of the fuselage halves was great, with a minor complaint regarding the not totally positive positioning of the cockpit. The finished cockpit looked very nice and busy under the small cockpit opening. The top fuselage area behind the canopy, was painted the same cockpit base color, too.
In order to avoid the usually created wing root gaps on attaching the top wing halves, I first glued the top wing halves at the fuselage “root” connection point, ensuring a gap free root. Having cut the locating pins beforehand, to allow free placement of the wing halves on the lower wing part, I glued the wings together, using the capillary action of very thin glue. The result was gap free joints allover!
I filled the camera and smoke generator wing locating holes with thick stretched sprue. The horizontal stabilizers were attached at that time, too, as well as the two piece spats that had been beforehand assembled and had their innards painted light blue-gray.
 The fine engine representation
included cylinder blocks with nicely molded spark plug wires, crankcase with
attached pushrods and distribution ring. It was assembled, painted black and
heavily drybrushed in silver. The oval shaped oil cooler was painted “copper”,
black washed to bring out its fine recessed detail and attached in front of the
engine. A bit of attention is needed here, as there is no positive location for
it. Studying reference pics and front view drawings is strongly recommended.
The front cowling was assembled at
this time, consisting of a front and rear part, and had its inner side painted
the same blue-gray cockpit color.
The fine engine representation
included cylinder blocks with nicely molded spark plug wires, crankcase with
attached pushrods and distribution ring. It was assembled, painted black and
heavily drybrushed in silver. The oval shaped oil cooler was painted “copper”,
black washed to bring out its fine recessed detail and attached in front of the
engine. A bit of attention is needed here, as there is no positive location for
it. Studying reference pics and front view drawings is strongly recommended.
The front cowling was assembled at
this time, consisting of a front and rear part, and had its inner side painted
the same blue-gray cockpit color.
As said above, fit was very good to excellent. Most, if not all of past builders used no putty at all. Yours truly, not changing the habits of a lifetime, managed to create the need (even if a small one…) for using putty at the quarterscale Hasegawa Nate! A progressive 400 t0 1500 grit sanding produced a good result. I attached the correct antenna (for the version I was building), behind the pilot’s headrest, then attached also the correct canopy (which I had masked beforehand with masking tape) with small amounts of glue, and headed to the paint shop.
| COLORS & MARKINGS |
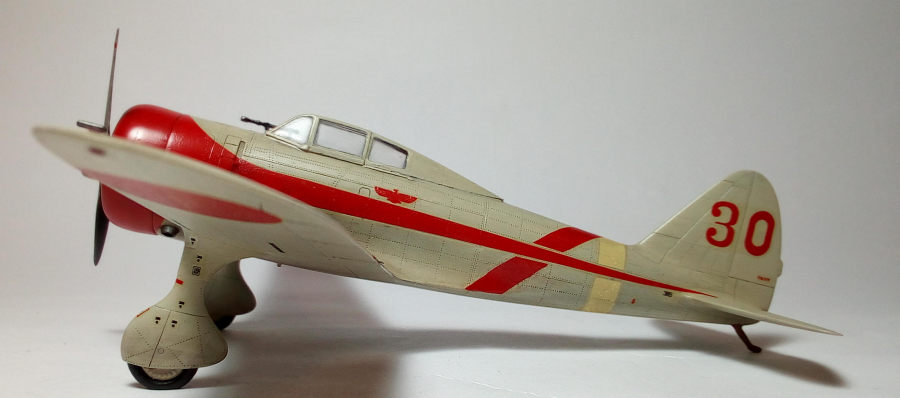
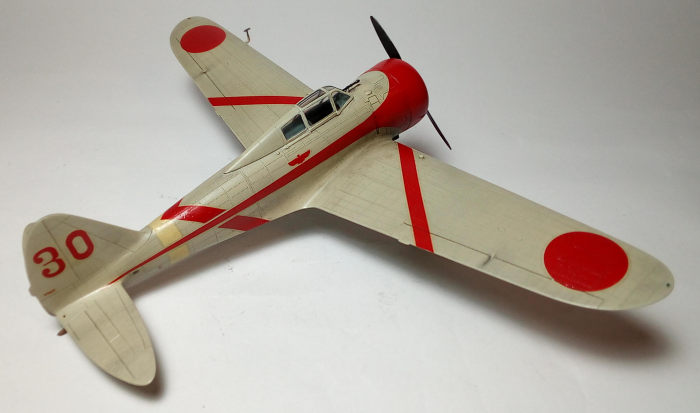
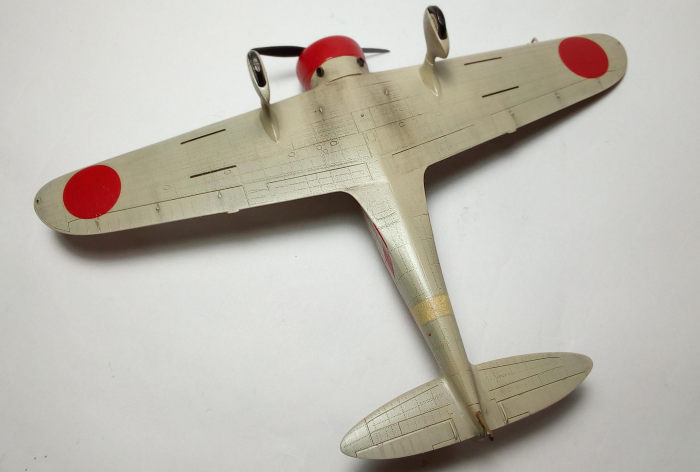
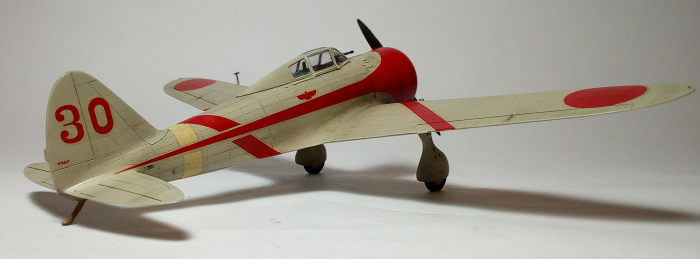
I applied Humbrol 196 allover for the “IJN Gray”, followed by a protective and glossing coat of Future. I then applied the quite extensive kit decals, which behaved nicely, despite their age. The white band decal at the back of the fuselage is actually ivory, but does not look out of place. I used Mr Mark Softer to help the decals snuggle in every nice engraved and riveting detail and the result was very good! A coat of Future sealed the decals.
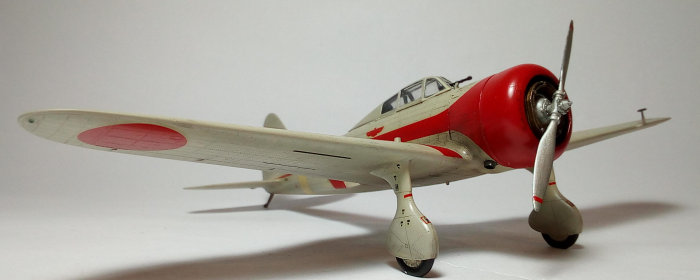
The cowling was hand painted Humbrol 60 “Scarlet Red”, which, to my luck was almost perfect match to the decals red color! The prop was painted matt black at the rear and Testors Steel at the front and hub. I used the two red kit supplied decal warning stripes at it.
| FINAL CONSTRUCTION |
I inserted the famous “polycap” in the corresponding hole at the engine rear, attached the engine in the cowling and glued the assembly in place, followed by fitting the propeller. The two small nice exhausts were painted Testors Burned Metal and attached in place (already drilled out to provide sens of “depth”), as well. The port wing pitot was attached, painted IJN gray with burned metal tip. Finally, the tail skid tip was painted gun metal.
 The nice resin wheels were painted
silver with black tires. In order to install them in the spats, I cut and
removed a triangular piece of them, from the part that is not seen (hidden in
the spat). After a test fit, I applied a blob of thick cyano at their centers,
installed them carefully in the spats and let the model rest on this landing
gear, the weighted part of the wheels nicely taking its correct position. This
nice trick was also provided by the same above friend!
The nice resin wheels were painted
silver with black tires. In order to install them in the spats, I cut and
removed a triangular piece of them, from the part that is not seen (hidden in
the spat). After a test fit, I applied a blob of thick cyano at their centers,
installed them carefully in the spats and let the model rest on this landing
gear, the weighted part of the wheels nicely taking its correct position. This
nice trick was also provided by the same above friend!
The canopy front joint to the fuselage presented some large gaps. Following Tom Cleaver’s advice, I faired them with white glue, which nicely “takes” the surrounding color shape and shade upon drying, needing no paint touchup. The already gloss black painted (with a "silver" blob as front lens) gunsight was inserted through the windscreen opening and carefully had its front support glued onto the fuselage.
For weathering, I first gave the model a black wash. This brought out all the nice engraved detail. I then used brown and black dry pastels to recreate engine stains, mud and dirt (especially at the tires and surrounding area) in general. Some hint of brown artist’s oil was used to recreate grease stains at moving surfaces hinges. Light chipping was performed at the black port wing walkway and the back of the propeller. A final and uneven satin (towards gloss) coat (custom mix Humbrol enamels) sealed everything in and gave the Nate its final look of a well-used plane that started its life being painted gloss. I represented the wingtip lights with tiny blobs of red and green clear paint, and called this beautiful plane done!
| CONCLUSIONS |
This is a very good kit of an important and beautiful plane. It is well molded with nice recessed exterior details, riveting included, adequate cockpit, easy to build with correct overall shape. Even the most novice modeler will not face difficulties in putting it together and produce a nice result. The experienced modeler can work himself out to produce a masterpiece.
The kit is regularly reissued by Hasegawa with some very interesting schemes and with excellent quality decals, where “white” is white. Don’t be deceived by the kit’s 1977 origins: if you haven’t built one so far, grab one and do so. You’ll be guaranteed with a pleasant build and a nice result!
Happy modeling!
| REFERENCES |
Wikipedia
Scalemates
J-aircraft
Various internet sites (pics, info and models built)
5 July 2021
Copyright ModelingMadness.com. All rights reserved. No reproduction in
part or in whole without express permission.
If you would like your product reviewed fairly and fairly quickly, please contact the editor or see other details in the
Note to
Contributors.