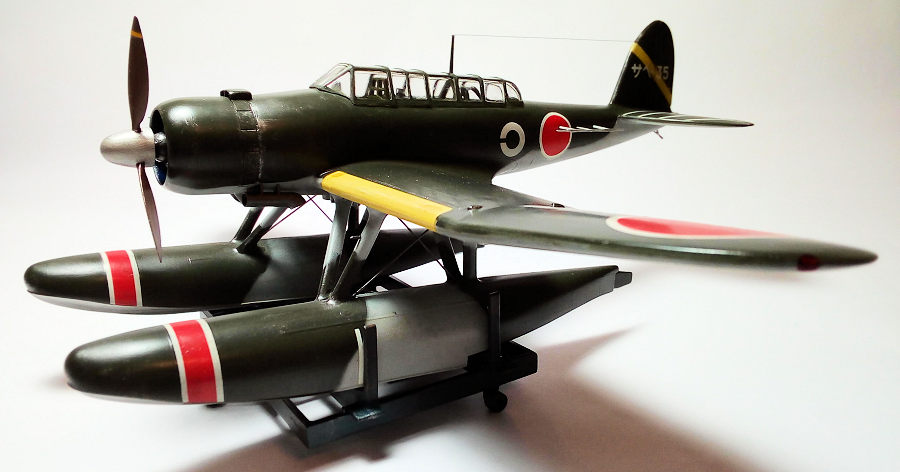
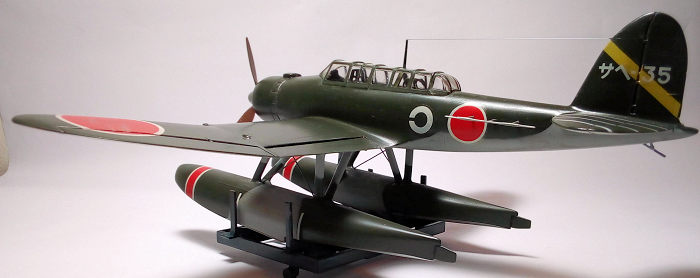
Nichimo 1/48 E13A1 'Jake'
| KIT #: | 4803 |
| PRICE: | around 12 Euros in 2002 |
| DECALS: | Ten options |
| REVIEWER: | Spiros Pendedekas |
| NOTES: | Cockpit and engine built from scratch |
| HISTORY |
The Aichi E13A (Allied reporting
name: “Jake”) was a long-range reconnaissance seaplane used by the Imperial
Japanese Navy (IJN) from 1941 to 1945. Numerically the most important floatplane
of the IJN, it could carry a crew of three and a bomb load of 250 kg (550 lb).
The Navy designation was “Navy Type Zero Reconnaissance Seaplane”.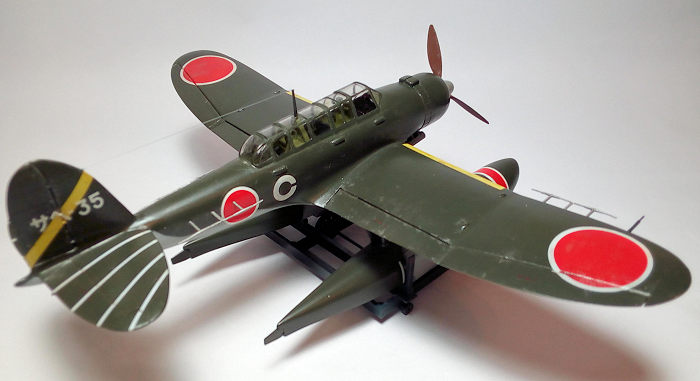
In China, it operated from seaplane tenders and cruisers. Later, it was used as a scout for the Attack on Pearl Harbor, and was encountered in combat by the United States Navy during the Battles of Coral Sea and Midway. It was in service throughout the conflict, for coastal patrols, strikes against navigation, liaison, officer transports, castaway rescues, and other missions, along with some kamikaze missions in the last days of war.
One Aichi E13A was operated by Nazi Germany alongside two Arado Ar 196s out of the base at Penang. The three aircraft formed the East Asia Naval Special Service to assist the German Monsun Gruppe as well as local Japanese naval operations.
Eight examples were operated by the French Navy Air Force during the First Indochina War from 1945-1947, while others were believed to be operated by the Naval Air Arm of the Royal Thai Navy before the war. One example captured by New Zealand forces was flown by RNZAF personnel in theatre, but sank and was not repaired after a float leaked.
No intact plane survives today.
| THE KIT |
Back in 2002, I found this beauty, together with the 1/48 Nichimos Kate and Nick, sealed and forgotten at shelf of a toy/hobby shop in my hometown. Bought them all for 35 euros!!!! Isn’t life a miracle?
According to Scalemates, this kit is actually 1/50 and first appeared in....1963, under the Marusan brand. It was twice reboxed by UPC in late 60's and three times by Nichimo, one in the 70s, one in the 80's and finally at about 2000. Mine seems to be the 80's release. There's an attractive boxart of a Jake taking off from a catapult.
Inside the box you find seven light grey styrene sprues with nice (if not a tad on the heavy side) raised panel lines.
Engine is a joke, only a decorated circular plate, as
the kit is the motorized version, with the micromotor supposed to be fitted
behind the plate (but no motor is included.....). Also, the cowling is a two
piece affair, needing filling and sanding after assembly.
 The
cockpit is a joke as well, being shallow, hosting the micromotor batteries under
it. It is comprised of three undercsale figures and minimal generic details. It
WILL look toyish, even under the closed thick (but clear) canopy provided.
Canopy is a two piece affair, the second piece being the rear gunner’s part,
(good for me, as I usually build my planes with closed canopies, so that I don’t
have to detail cockpits that much….. ……EEEERRRRR, SORRY: so that I preserve the
aircraft lines……).
The
cockpit is a joke as well, being shallow, hosting the micromotor batteries under
it. It is comprised of three undercsale figures and minimal generic details. It
WILL look toyish, even under the closed thick (but clear) canopy provided.
Canopy is a two piece affair, the second piece being the rear gunner’s part,
(good for me, as I usually build my planes with closed canopies, so that I don’t
have to detail cockpits that much….. ……EEEERRRRR, SORRY: so that I preserve the
aircraft lines……).
The rest of the parts are reasonably detailed, raised panel lines allover (no problem for me), but quite a few sink marks were noted. All moving surfaces (flaps included) are provided separately, a nice thing if you like to pose them in other than neutral positions.
A well detailed dolly is provided, it being a small model by itself. Some ejector pin marks are apparent there and have to be dealt with.
Decals are very old, yellowed by
the years, but otherwise look useable. The yellowing problem will be addressed
by taping the sheet at the inner side of a sunny window and let it be treated by
the Greek sun for 4-5 days (have read it here, in MM, done it many times in the
past with excellent results!).
Instructions are a well composed pamphlet in Japanese, with translation separately provided. However the same pamphlet is existing with English captions, making your life easier. I downloaded mine from Scalemates.
The kit was lying in my SoD all
these years, me being reluctant to build it, due to the cockpit and engine
severe limitations; and even more so, as no intact example survives today (just
relics) and the info/pic references are scarce. There may be some aftermarket
solutions for the engine (just look up for a Kinsei). I also knew a resin
correction set existed (made by Lone Star Models, I think), but I don't think is
currently available (and if so, I can imagine it will be not cheap)...
Anyway, a group build emerged and this funny idea stroke me: why not scratchbuild the kit’s omissions? How hard could it be? So I decided to give it a go.
| CONSTRUCTION |
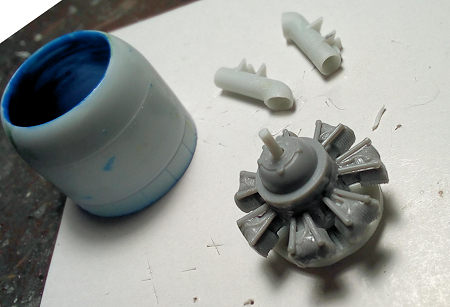 I
first dealt with the engine problem. The Jake wears a Mitsubishi MK8 Kinsei 43,
a 14-cylinder air-cooled radial piston engine. This means two 7-cylinder rows.
Had an extra Nakajima Ki-27 Ha-1 Kotobuki Otsu 9-cylinder air-cooled radial,
left from a Hasegawa Nate build (Hasegawa provided two nice identical engines,
one with central axle and one with a hole – to fit the famous polycap).
I
first dealt with the engine problem. The Jake wears a Mitsubishi MK8 Kinsei 43,
a 14-cylinder air-cooled radial piston engine. This means two 7-cylinder rows.
Had an extra Nakajima Ki-27 Ha-1 Kotobuki Otsu 9-cylinder air-cooled radial,
left from a Hasegawa Nate build (Hasegawa provided two nice identical engines,
one with central axle and one with a hole – to fit the famous polycap).
What I did was to cut away the 9 cylinders from their
block, file 7 of them down to reduce their height (as the Kinsei is narrower)
and reglued only 7 of them circumferentially to the block. I removed the 18
pushrods from the cabane and glued the cabane on the crankcase; after
circumferential smoothing the cabane accepted its now 14 pushrods (two per
cylinder). I drilled the cabane center and passed the propeller shaft.
The Nichimo engine plate was then glued at the back of
the engine, trapping the shaft, so I can have a rotating propeller.
The back engine plate gave a nice simulation of the back
row cylinders.
As for the cowling, I removed the blank offending plates from the cowling halves and ground their inner part to allow for some extra room. The cowling halves were then glued together, sanded smooth and painted “my” Aotake rendition (clear blue over silver, with a smear of clear yellow...).
The engine was painted steel, heavily stained with black wash. It was then inserted and secured in the cowling. The result was much more believable than the Nichimo provided plate.
I then glued the two fuselage halves, leaving the top off to start my cockpit creation attempt. Fit is not bad, but some sink marks were very apparent.
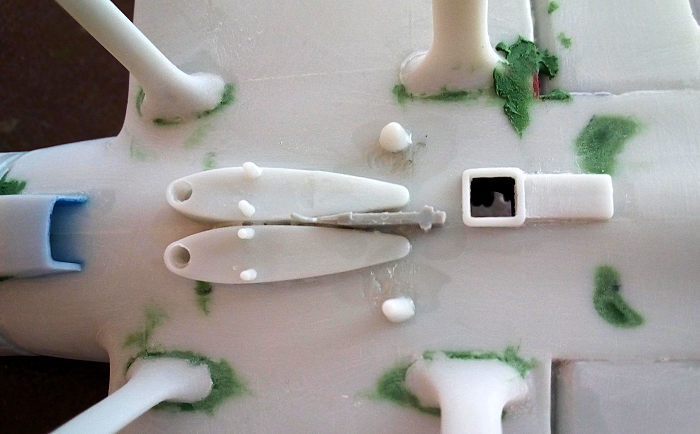
Glued the float halves, leaving their front off to determine if and how much weight I would have to put, as the model looks very tail heavy. I stuffed as many tiny fishing weights as I could in the float noses, securing them with my sons’ modelling clay, and then glued the float noses. Fit here is “Early Classic Airframes Fit”, meaning not existing. I hope liquified styrene, 220 sandpaper and finally Green Stuff with 800 and 1500 grit will help me here…..
 Glued the
wing halves, leaving off the toy looking folding mechanism. Fit is good, if you
take your time cleaning those old molds.
Glued the
wing halves, leaving off the toy looking folding mechanism. Fit is good, if you
take your time cleaning those old molds.
Glued the wings to the fuselage. Fit was relievingly good here
The wings mounting lugs that protruded well enough inside the empty cockpit area, were used as base supports for the scratchbuilt cockpit.
On to the cockpit: I was not able
to find adequately clear shots or drawings, regarding the Jake's cockpit. So,
after reading build reviews and browsing extensively at the net I came to the
conclusion that the Jake cockpit layout would look NOT very different from the
Val (bearing of course in mind that the Val had a crew of two, whereas the Jake
had a crew of three).
Indeed, given the fact that they were both Aichis
with broadly (ok….very broadly…) similar roles, designed and developed at
broadly the same time frame, one may asume that there would be quite a few
similarities between the two cockpits. I thus felt happy to conclude that trying
to replicate a Val cockpit layout in the Jake might be passable under a closed
canopy.
So, with a (previously built) Hasegawa Val instruction sheet at hand, I was off
to my leftover kit bits dungeon to see what useful “bits and pieces” I could
use. I then started to scratchbuild the cockpit.
First, the offending shallow floor from the cockpit top cover was removed. I formulated a two level floor, from two Hasegawa sign plates that used to come with their older kits and glued it in place. A hole was drilled for the observer/bomber to “see”the under fuselage window. For the cockpit walls, I used flat parts from my sons’ party dishes, augmented with horizontally glued stretched sprue, for busier looks.
I glued a backwall and an engine firewall (from leftover plates). I also fabricated an instrument panel back plate and glued it “in place”
I then glued the top cockpit part. Fit was so so, specially at the edges. I made an initial filling of those big gaps with liquified styrene, to double act as bonding material, since I had my doubts about the assembly’s strength.
The front instrument panel was a modified……F-104 one (!). Control stick, rudder pedals, a suitcase, various boxes (ie radio transmitter), throttle quadrant, ammo magazines and the like, were all scratchbuilt, using relevantly looking styrene bits, block/sheet styrene, stretched sprue and a lot of imagination.
 Seats
were fabricated from sheet styrene and drilled a as per the Val fashion. Seat
belts were added from masking tape.
Seats
were fabricated from sheet styrene and drilled a as per the Val fashion. Seat
belts were added from masking tape.
I glued an 1/32 ....Trumpeter MIG-17 instrument panel at
the Navigator's “deck”, which would act as a console. Well, as gargantuan for an
instrument panel the Trumpeter panel is, it looks very suitable (console-ish)
for the Jake’s Navigator “office”.
I scratchbuilt a supporting frame for the gunners seat, the seat glued in stowed position.
I fabricated a compass from cylindrical styrene piece and two miniscule clear plates glued on top (took the pattern from Val cockpit photos), painted its base black and glued it on top of the bomber/navigator's panel. The bomber’s / navigator’s office, received a leftover Type 90 bombsight, which was typically used at planes of that era.
I also squeeze-glued a dashboard (sheet styrene) behind the navigator/gunner separator frame and glued a loop antenna on it (as per Jake profiles), made of stretched sprue, rolled around my mini file’s circular chunk to become itself circular.
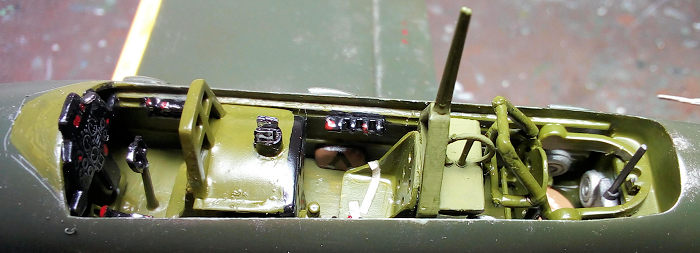
So, cockpit was more or less finished. It was painted interior green (Hu226), the various boxes black with details drybrushed in silver and various knobs picked up in red, white and silver; the suitcase was painted leather with black straps and the magazines steel.
Finally the cockpit looked convincingly busy in its fictitious reality!
 After
addressing those two main areas of concern (engine and cockpit), I felt
comfortable to proceed with the rest of the build. I glued the flaps, ailerons
and rudder in neutral position (I prefer them “neutral” than “lively”). I also
assembled the 4-piece tailplane, which is then nicely inserted in the
corresponding tail slot.
After
addressing those two main areas of concern (engine and cockpit), I felt
comfortable to proceed with the rest of the build. I glued the flaps, ailerons
and rudder in neutral position (I prefer them “neutral” than “lively”). I also
assembled the 4-piece tailplane, which is then nicely inserted in the
corresponding tail slot.
Fit of all the above was generally good (not perfect). Then it was float fitting
time.
I glued the vertical struts at the floats and the inclined struts at the
fuselage; then I attached all of them together: fit was not perfect, but
manageable. I took my time here, twisting and checking, as to have the above
structure decently aligned. It was quite an imposing sight for my Jake standing
on her feet!
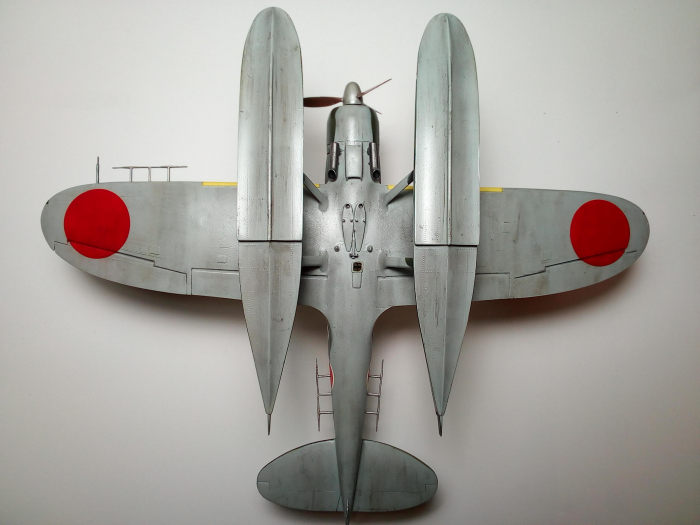
I glued the two underbelly magazine covers, beside
the oil cooler.
There’s an uninspiring hole a bit further back to secure
the crude bomb provided at the kit (which I am not going to use….). I closed it
with styrene rod and fitted a modified leftover mini pylon there. I then glued
the navigator’s down looking window frame just aft. The whole area there looks
acceptable.
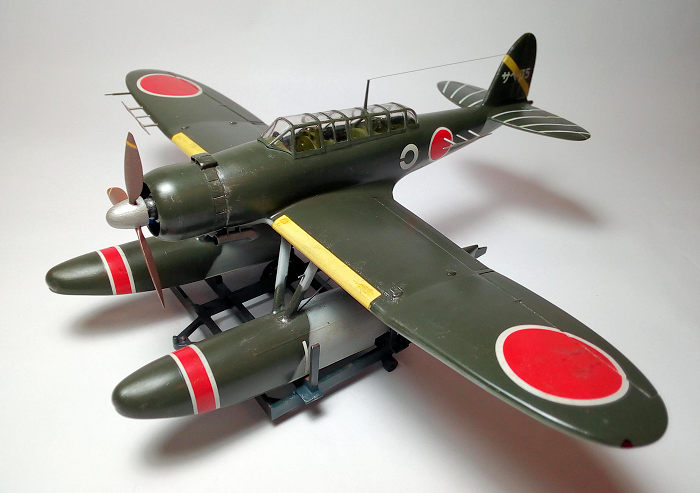
The Jake has three prominent air scoops beside the canopy at the starboard side. Those were poorly represented at the kit (and, wrongly, at both sides), so I sanded them off and starboard-glued three half cylidrical styrene pieces. Once cured, they were drilled and aerodynamically smoothened. They look believable now.
I finally glued the cowling (with the engine in it) at the front.
It was then time for some (a lot!) filling and sanding. It took magician hands to reach those strut attachment points. After many back and forth sessions, I gave the whole model a very light 1500 grit sanding to tone down the raised rivet detail.
| COLORS & MARKINGS |
I painted the top sides my interpretation of Nakajima green (Hu75 – close enough?). Upon drying, I gave it a coat of Future, to seal and protect the sensitive matt green. I then proceeded to the masking session.
I used UHU tac at the paint edges (to obtain realistic looking “hardsoft’ demarcation lines) and masking tape for the rest. The process became a bit tedious at those hidden struts areas, but I used the “magician hands” method and finally did it.
I gave the underside a coat of Hu127
US Ghost Grey, as to my eyes it looks an acceptable representation of the IJN
underside grey. It took some delicate movements of my Revell Masterclass
airbrush for the grey to reach all those blind spots between the float struts.
After drying, the masks were removed and some tou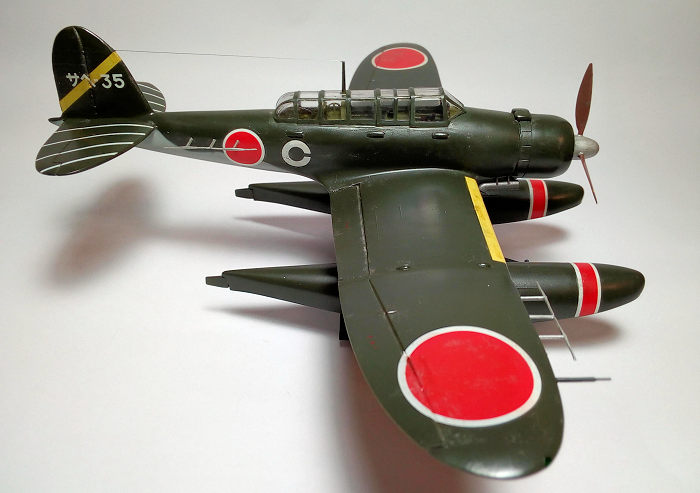 chups
were done. The grey areas then received a coat of future as well (Hu127 is
supposed to be satin, but usually dries towards “matt” at my hands….)
chups
were done. The grey areas then received a coat of future as well (Hu127 is
supposed to be satin, but usually dries towards “matt” at my hands….)
I used the kit decals to represent, as far as my research went, a machine belonging to Saeki Naval Air Group (佐伯海軍航空隊), probably at 1945.
The decals were very old and had yellowed over the years. To remedy them, as above said, I taped them at the inside of a window, facing the Greek sun. After a week, the yellowness almost disappeared!
Soaked in hot water, they took ages to get detached from their backing paper, but behaved really well afterwards. A coat of my favorite Mr Mark Softer made them snuggle down nicely and no silvering was observed.
Then it was weathering time. I used dry pastels (blacks, browns and greys) to represent dirt, grim, engine staining etc. Tiny amounts of brown/black tempera were used to represent fluid leaks. Hu113 was used to represent rust where appropriate, especially at the dolly.
Then, some chipping here and there was performed with a 00 short hard brush and some silver paint a-la-pinpointing. So, do not throw away your worn 00 brush, just cut it short and use it as a chipping “special tool”!!!!).
When I felt comfortable with the weathering result, I gave my Jake an uneven satin (with a matt hue) coat (a mix of Humbrol Gloss and Matt varnish), to seal everything in, and also to represent the “cut” paint effect due to harsh environment exposure.
Dolly
The dolly was a small model by itself. It was assembled after I cleaned its parts from those monstrous mold lines. It was painted Hu77 “Navy Blue”, with its two main wheels outer portions black. Its “pads” (for the Jake to rest upon) were painted stained wood (Hu110 with black drybrushing). It received a good weathering with a lot of pastels and rust colour, to represent rust and grim, coated with the same above varnish, resulting in a cool looking well used dolly!
| FINAL BITS |
There’s heavy duty wire rigging that cross-connects the outer struts. This was done with thick stretched sprue, painted gun metal; it was funny-towards-graphic to drill the holes and fit the wires at those awkward points…
The three radar antennas (painted Testors steel) and the good looking pitot were installed.
There is also a peg in each front strut, probably for the crew to climb up. Having bravely shaved the existing ones at the start of my build, I fitted new ones made out of stretched sprue, painted gun metal as per the boxart drawing.
 The canopy
was thick and with scratches. It was a two piece affair, the second piece being
the gunner’s part. After cleaning it as best as I could and gave it a coat of
future, it looked transparent enough, not too distorting and the scratches were
less evident. I called the situation “acceptable”, hand painted it (why changing
the habits of a lifetime?) and installed it with a minimal of polystyrene glue.
The fit was less than average, and I ended up using white glue as a filler to
make the joint look smoother (but not smooth!), with the necessary paint touchup
afterwards.
The canopy
was thick and with scratches. It was a two piece affair, the second piece being
the gunner’s part. After cleaning it as best as I could and gave it a coat of
future, it looked transparent enough, not too distorting and the scratches were
less evident. I called the situation “acceptable”, hand painted it (why changing
the habits of a lifetime?) and installed it with a minimal of polystyrene glue.
The fit was less than average, and I ended up using white glue as a filler to
make the joint look smoother (but not smooth!), with the necessary paint touchup
afterwards.
The rear bumper, as shown in existing photos, is different than the one Nichimo provides: it was made of stretched sprue and installed.
I run an aerial thread made out of stretched sprue, tightened with my wife's hairdryer.
The assembled propeller, which looks very nice and crisp, was painted “propeller colour” (Hu113 – yes! It's the rust shade of Humbrol!) with steel hub, as per research. Yellow stripes were added to the prop blades from leftover decals and some weathering was done by steel drybrushing. It was then glued to the front.
The bomber's /navigator's down looking window transparency was done with Humbrol Clearfix, a fine product indeed.
A final “walkaround” visit to the model resulted in minor touchups and fixations.
I then called this baby done!
| CONCLUSIONS |
Despite the engine and cockpit toyish oversimplification (due to the intended battery operated micromotor) this is an adequately detailed kit. OOB can be put together by an average modeler and result in a beautiful and most imposing model. In fact, let apart the above intended oversimplification, the rest of the kit, (bearing in mind that it's a '60s kit and no surviving aircraft existed, only relics and scarce grainy pics), is extremely well researched and executed.
Should an experienced modeler be lucky and get his hands on aftermarket cockpit and engine, a masterpiece will emerge. I walked my lonely road of scratchbuilding and modifying the cockpit and engine, using whatever I had in hand, the result awaiting for you to judge. At least those areas look busy. It is obvious that a new tool 1/48 Jake is urgently needed. According to the Murphy's Modelling Law it will be announced shortly, now that my Jake is finished! As for me, I (bizarrely maybe), liked dealing with this old kit and bring the Jake to life.
| REFERENCES |
https://en.wikipedia.org/wiki/
Various internet sites (scarce photos, vague info, color profiles and models built)
24 November 2020
Copyright ModelingMadness.com
If you would like your product reviewed fairly and fairly quickly, please contact the editor or see other details in the Note to Contributors.
Back to the Main Page Back to the Review Index Page Back to the Previews Index Page