| KIT #: | A603 |
| PRICE: | $20.00 or so 'used' |
| DECALS: | Four options |
| REVIEWER: | Joe Essid |
| NOTES: | Kit is actually 1/75 scale |
| HISTORY |
Combat history: We cannot confirm any combat victories for the aircraft, designed to hit Boeing's Superfortress at altitude with a 75mm cannon. When the plane was ready in numbers for service, the Superfortress raids had switched to low-down and deadly.
The Ki-109's 75mm gun was so powerful (so the long-lost LS instruction sheet informed me) that on testing it every window shattered in the aircraft's forward section. Those old instructions also claimed that one plane downed a Superfortress on the first combat flight, with a single shot. My current kit's instructions give more details, noting that on 13 March 1945, trial machines 1 and 2 took off on flight tests and intercepted a bomber formation in the Nagoya area. Machine 2 had fired all its ammunition during ground tests that day, but Machine 1 had two shells remaining. The kit instructions claim that the first shot, fired at 1000 meters, took the wing off a B-29, and the second shot struck above another Superfortress, forcing it to lose altitude and fall into the sea.
Official histories and USAAF accounts have never validated these claims. Wikipedia notes attacks on Nagoya March 11-12 but not on the 13th. Another source records one plane lost in the Nagoya raid of March 11-12; a raid on Osaka on the 13th resulted in the loss of two B-29s. Osaka and Nagoya are 178 km apart, not far as the Superfortress flies. What does "in the Nagoya area" mean? Thus, We may never know if any Ki-109s downed any American bombers.
 Whatever the
accuracy of the kit's instructions, they add a fascinating "might have been":
Ki-109s were being held back to attack landing craft during Operation Olympic,
the planned invasion of Kyushu. Given what the B-25 did to shipping, had any
Ki-109s survived the Allied CAP over the beaches, the planes' guns could have
been devastating. My father was training to be an LST pilot for Olympic, so I'm
very happy that Ki-109s never flew those particular sorties. My late modeling
buddy, Gary Braswell, had a father who manned a Bofors 40mm AA gun on CVE-93 USS
Makin Island, a ship that saw a lot of action off Luzon, Iwo Jima, and Okinawa.
Gary always said that his father, who kept a piece of control-surface fabric
snipped from a wrecked Kamikaze aircraft as a good-luck charm, feared what would
happen during Olympic. His story, as well as the rules for an SPI board game
called Operation Olympic, described kamikaze attacks planned on an unprecedented
scale at Kyushu, calling them a name we had never encountered: Tokko. It
terrified and fascinated a pair of geeks obsessed with WW 2 history.
Whatever the
accuracy of the kit's instructions, they add a fascinating "might have been":
Ki-109s were being held back to attack landing craft during Operation Olympic,
the planned invasion of Kyushu. Given what the B-25 did to shipping, had any
Ki-109s survived the Allied CAP over the beaches, the planes' guns could have
been devastating. My father was training to be an LST pilot for Olympic, so I'm
very happy that Ki-109s never flew those particular sorties. My late modeling
buddy, Gary Braswell, had a father who manned a Bofors 40mm AA gun on CVE-93 USS
Makin Island, a ship that saw a lot of action off Luzon, Iwo Jima, and Okinawa.
Gary always said that his father, who kept a piece of control-surface fabric
snipped from a wrecked Kamikaze aircraft as a good-luck charm, feared what would
happen during Olympic. His story, as well as the rules for an SPI board game
called Operation Olympic, described kamikaze attacks planned on an unprecedented
scale at Kyushu, calling them a name we had never encountered: Tokko. It
terrified and fascinated a pair of geeks obsessed with WW 2 history.
In retrospect, the history of the Manhattan Project seems very cut-and-dry, but had one accident at Los Alamos delayed the Atomic Bomb, guys like my dad would have gone ashore in November, 1945 while men like Gary's dad manned 40mm guns to fend of waves of suicide attacks.
As for the Ki-109's definitive combat history? Unless you read Japanese and have time to explore their archives, all available information remains in the realm of speculation.
| THE KIT |
I spotted an LS kit in the early 70s at Bob's Hobby Center in Richmond, VA. To a tween in then-sleepy Richmond, whose neighborhood was filled with WW 2 vets who rarely talked about what they saw and did, the Ki-109 appeared very cool indeed. I was already a sucker for HS-129s, Ju-87s, and B-25s with cannon. The Japanese plane had a big gun and cool paint job. I bought it.
 I've no idea
where that kit went during my high-school and college years. Probably broken up
and used to scratch-build spacecraft for tabletop wargaming. Gary kept after me
for decades to build another. I lost Gary in 2012, but a decade later I scored
another LS Ki-109 for a massive trip down nostalgia lane.
I've no idea
where that kit went during my high-school and college years. Probably broken up
and used to scratch-build spacecraft for tabletop wargaming. Gary kept after me
for decades to build another. I lost Gary in 2012, but a decade later I scored
another LS Ki-109 for a massive trip down nostalgia lane.
As our editor made clear with a ruler, whatever the box says the LS kit measures up as a 1/75 scale model. Still, hunting down some memories, I decided to chase the LS kit, not Hasegawa's more expensive (and truly 1/72) issue.
My original 1970s kit featured different and far less dramatic artwork than the box I scored on-line. My current boxing shows a B-29 called "Can Do" going down in flames, wing blown off, as a Ki-109 slips away. Earlier boxings, back to the 1960s, had similar themes, dramatic if violent artwork to get a kid to part with a few paper-route dollars. Remember paper routes? Remember newspapers?
My later 1970s issue found on auction was nicely packed, so nothing broke loose from the sprues to get damaged.
| CONSTRUCTION |
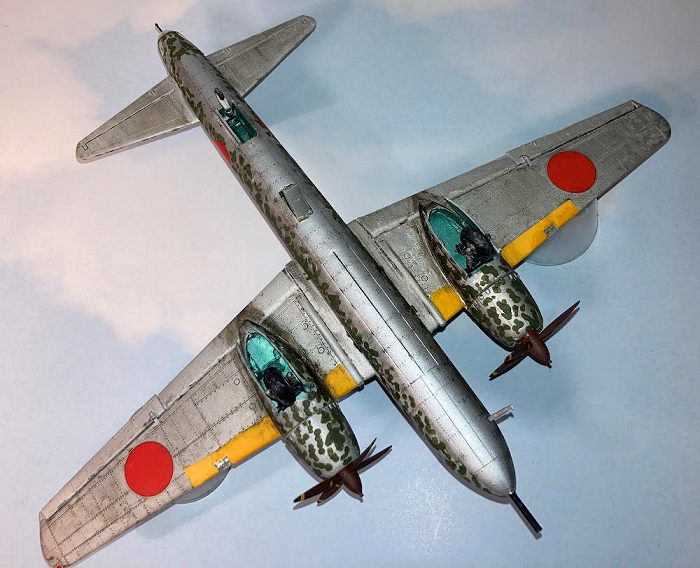
As one does, I began with what was for its time a detailed cockpit. The kit comes with a clear fuselage and cowling half, if you wish to show all the building you'd otherwise seal up inside the plane. I opted to not build anything that would not show, and let it go at that. Parts fit was acceptable and the instructions, though detailed, tended to show approximate locations. Areas that caused trouble for me included the landing-gear housings that attach to the lower wings, as well as the bottom seam where the fuselage halves join under the tail turret. CA and sanding followed. Seams otherwise needed moderate filling and sanding, followed by re-scribing some panel-lines. Some others in odd places or curved surfaces simply got drawn on with a mechanical pencil at the very end. The issue with fitment boils down to this: The deck for the interior must be precisely fitted or the halves won't mate properly. Test fit and test fit again.
 The cockpit
is spartan by modern standards, so I made the best of it, painting all a medium
brown, mixed up from Tamiya and Vallejo browns. I then added oxblood seat
cushions, masking-tape seat-belts, plus black boxes with a few dials and
controls. I used a few interior photos of a Ki-67 from a 1982 Japanese
publication to guide me; if you find an actual Ki-109 in the corner of some
overgrown airbase or your crazy Uncle Elmer's back 40, send corrections my way.
Aotake for wheel wells and internal bracing came from a bottle of Poly-S acrylic
metallic green. The company once had an entire line of metallics that were
superb for painting wargaming figures. It's a brand I really miss, another
province of Testors' empire hoovered up by Rustoleum and now discontinued.
The cockpit
is spartan by modern standards, so I made the best of it, painting all a medium
brown, mixed up from Tamiya and Vallejo browns. I then added oxblood seat
cushions, masking-tape seat-belts, plus black boxes with a few dials and
controls. I used a few interior photos of a Ki-67 from a 1982 Japanese
publication to guide me; if you find an actual Ki-109 in the corner of some
overgrown airbase or your crazy Uncle Elmer's back 40, send corrections my way.
Aotake for wheel wells and internal bracing came from a bottle of Poly-S acrylic
metallic green. The company once had an entire line of metallics that were
superb for painting wargaming figures. It's a brand I really miss, another
province of Testors' empire hoovered up by Rustoleum and now discontinued.
The kit's rather fiddly floor fits into slots in the fuselage halves, so I painted the slots Aotake since they might be visible. I've read that spars and braces retained the anti-corrosion finish while working surfaces were painted in a variety of hues, depending on the maker and time period. Japanese interior colors remain an arcane area of debate.
Next I put on the wings and land-gear housings, plus the engine cowls. These were another trouble spot, requiring work with a Dremel to get the surfaces to match to the cowlings would fit properly. Putty, CA glue, and lots of swear-words were involved. Eventually, it all came together without gaps visible from several feet away. The clear bits got dipped in Future, which would later cause additional issues.
After masking the canopy and side windows, I stuffed all orifices with damp tissue paper and went to get the air brush.
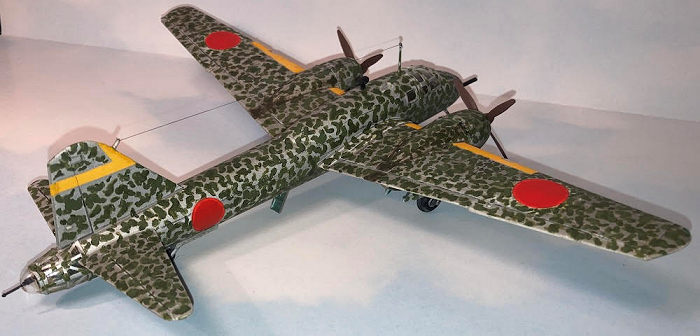
| COLORS & MARKINGS |
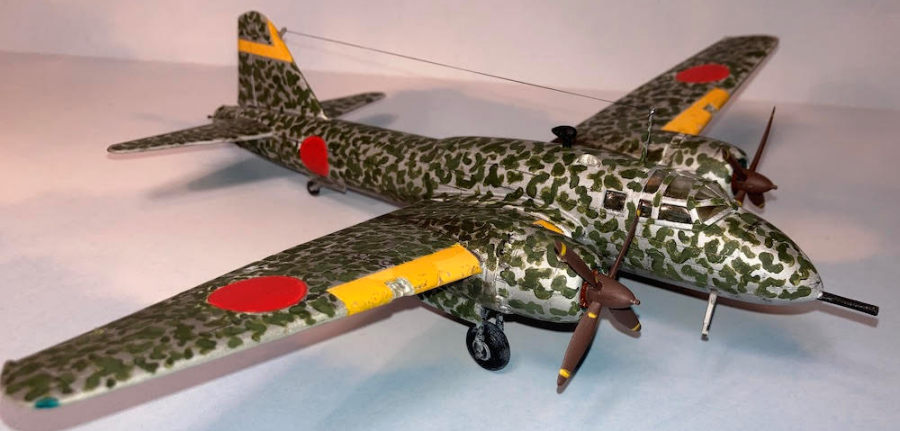
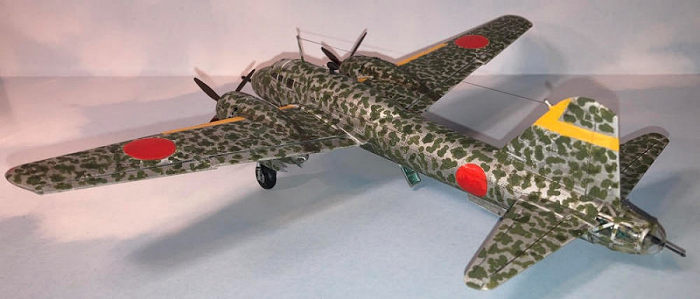
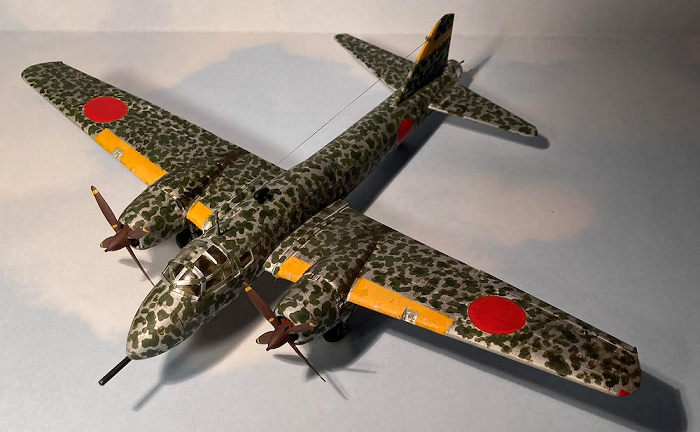
I figured these aircraft would have looked new when deployed, so it would get none of my preferred heavy weathering. I also knew that palm-fronds were right out this time around, but I got inspired by Ryan Grosswiler's Ki-49 build featured here at and wanted to try the painting technique he used.
My goal? A Tokko-attack raider for Operation Olympic, the sort of aircraft that would have shot at my dad and his friends as they came ashore at Kyushu.
Using a Hasegawa Ki-84 Frank as a painting mule, I airbrushed the kit with Mission Models Duraluminum and when that dried overnight, I shot the kit with Tamiya Flat Clear, then used Mission's Russian Green and a round-tip artist's brush to paint mottles. I thinned the paint slightly with Mission's airbrush thinner. Experiment on a mule before you try this! With the flat coat to protect the metal finish, any errant green squiggles can be removed with a damp cotton swab. Usually. Read on.
A problem emerged on this big bird because after I sprayed Mission's white primer correctly and shot the Duraluminum, I then stupidly decided to skip the flat coat because...I think I wanted the aluminum shiny. This dumb decision would cause minor havok later when I applied decals.
 The LS kit
has raised hinomaru-circles molded into the plastic. They are not so tall as to
require removal, in my opinion. I wanted to put down all decals over the
aluminum finish before adding the squiggles, the way it would have been done in
the field. The antique decals did fine in warm water with a bit of dish soap,
but Mission paints will brook no water or dampness. Moving the decals to conform
to the molded circles lifted the aluminum to reveal the durable white primer.
I've since (thank you forum members) begun adding Mission's poly additive to
harden their paints. Why that is not already in the paint escapes me. Maybe to
make weathering easier without the additive?
The LS kit
has raised hinomaru-circles molded into the plastic. They are not so tall as to
require removal, in my opinion. I wanted to put down all decals over the
aluminum finish before adding the squiggles, the way it would have been done in
the field. The antique decals did fine in warm water with a bit of dish soap,
but Mission paints will brook no water or dampness. Moving the decals to conform
to the molded circles lifted the aluminum to reveal the durable white primer.
I've since (thank you forum members) begun adding Mission's poly additive to
harden their paints. Why that is not already in the paint escapes me. Maybe to
make weathering easier without the additive?
Back the kit went to the paint booth for more airbrushing and, this time, a shot of Tamiya semi-gloss over the areas where the "meatballs" would sit. Then it was time for the "squiggles," which soon became "mottles." After all that, late in the build, the old problem reared its head as I put on Flory dark washes to show the recessed rivets and panel lines. Up again came the Mission paint and bits of hinomaru! I brushed these with Armory "Blood Red," using a fine-bristle artist's brush that shows no strokes. Then I masked off the mottles with low-tack Frog Tape (the yellow variety) and sprayed the kit's belly with Tamiya Aluminum out of a rattle can. THAT is durable stuff. Of course the tape ruined another hinomaru, but Armory Paint again saved the day.
Between mottles and meatballs, I was reminded how tranquil an occupation brush-painting can be. If done with Ryan's method, the results can be truly stunning. My Badger Patriot airbrush cannot replicate fine lines like that, plus with an artist's brush, I can work right at the kitchen counter. There's a real nostalgic connection then to how I built kits 50 years ago, hunkered over my parents' dining-room table as they watched Walter Cronkite.
With two passes of paint I had the mottles right on the Frank, so I decided I'd try to replicate with process using even finer lines with the Ki-109. My colors were US Dark and Medium Green, again from Mission. Mission's paints are thin, which works really well for this sort of brush-work, where demarcations between camo patterns would be rather sloppy so the aircraft's metal surfaces might show through.
I was less after replicating the one image of a camo Ki-109 as shown in a single black and white photo. Instead, I would try a "what if" paint scheme based on Ryan's build and several books I have about Japanese aircraft. The prototype K-109s did wear green over natural metal, but not in the pattern I wanted. Sadly, the mottles I painted just did not stand up to close scrutiny. I posted a photo to our forums and our editor suggested that I try making the mottles more fuzzy by going over the spots with a micro-brush. My wife had purchased a set for me at a craft store; they look like minute cotton swabs.
With those little brushes everything changed, and the paint-job came together so the kit suddenly looked less like a toy and more like the real thing. In an odd but pleasant way, I was reminded of my childhood kit's palm fronds.
The antique decals again kicked me in the seat of the pants, as I applied the leading-edge identity stripes. These cracked and peeled during the build, making me wish I'd simply masked and airbrushed on my own stripes. I made lemonade out of those particular lemons with some nearly-gone Poly-S yellow acrylic paint. Like my other Poly-S survivors, I hoard it against the inevitable day it runs out. Their yellow proved a perfect match; it brushed on well but I left some chips from the fractured decals and added a few more with a Prismacolor silver pencil as I weathered the plane.
| FINAL CONSTRUCTION |
Weathering proved interesting. Flory washes have always worked well for me, but I think I did not let my paint cure sufficiently before applying it this time. The underside came out well, with recessed rivets showing fine with dark-dirt wash. Topside was another matter. Some mottles wiped off, despite being under a coat of Tamiya flat. I renewed them with microbrushes. For rivets lost during sanding, I made dots with a mechanical pencil and rescribed a couple of panel lines, then did more touch up.
 A Future-Wax
problem nearly wrecked the front canopy. I'd only let it dry 24 hours (and a few
more) before masking and airbrushing. When I pulled off the masking I found some
minor bleeding under the tape, but removing it with a toothpick led to the
Future getting scratched or coming up. In the end I removed the canopy,
stripping all paint and Future with ammonia. I then brushed it with Future, and
after a longer drying time redid the framing with strips of low-tack Frog Tape
that had been painted with Humbrol silver enamel. A dab or two of Mission Medium
Green with a microbrush made the camo pattern come out fine. I used the same
technique with the fiddly, four-part tailgunner's station. The low-tack tape is
so thin it looks fine; when in doubt about it sticking, I put down a dab of
Testors' clear-parts cement in corners or crossings of two strips of tape, then
dabbed on a green mottle.
A Future-Wax
problem nearly wrecked the front canopy. I'd only let it dry 24 hours (and a few
more) before masking and airbrushing. When I pulled off the masking I found some
minor bleeding under the tape, but removing it with a toothpick led to the
Future getting scratched or coming up. In the end I removed the canopy,
stripping all paint and Future with ammonia. I then brushed it with Future, and
after a longer drying time redid the framing with strips of low-tack Frog Tape
that had been painted with Humbrol silver enamel. A dab or two of Mission Medium
Green with a microbrush made the camo pattern come out fine. I used the same
technique with the fiddly, four-part tailgunner's station. The low-tack tape is
so thin it looks fine; when in doubt about it sticking, I put down a dab of
Testors' clear-parts cement in corners or crossings of two strips of tape, then
dabbed on a green mottle.
Before I closed up the tail gun, that area got dressed up with some strip plastic sheet with holes drilled and a coat of Aotake, to frame the machine gun. With a masking tape strip painted black then striped with gold paint, I had an ammo belt. I added some struts to the gear, using what I found in my parts box, to replicate the gear I've seen in Ki-67 Hiryu bombers, including our editor's build . The LS kit simplifies the landing gear too much, providing only the main struts so a child can retract the gear and close the doors.
Finally, with a pitot tube, radio mast, EZ-Line aerial, and propellers in place, I called the Ki-109 done.
| CONCLUSIONS |
I don't recommend the under-scale LS kit unless, like me, you are interested in a nostalgic experience. While the recessed rivets and panel lines commend it, fitment can be difficult. I do not recall that the parts that made me cuss--the engine cowls and landing-gear housings--came together as poorly in my original kit as these did this time around. Then again, at age 12 or so, my standards were different.
If you must have a Ki-109, find the Hasegawa kit or be prepared for a challenge.
| REFERENCES |
Center for Research, Allied POWs Under the Japanese. http://www.mansell.com/pow_resources/b29-missions.html
25 August 2023
Copyright ModelingMadness.com. All rights reserved. No
reproduction in part or in whole without express permission.
If you would like your product reviewed fairly and
fairly quickly, please
contact
the editor
or see other details in the
Note to
Contributors.