| KIT #: | CP-111 |
| PRICE: | $25-$45 from various sources |
| DECALS: | One option |
| REVIEWER: | Ryan Grosswiler |
| NOTES: |
| HISTORY |
In the spring of 1942 a mysterious new Japanese bomber appeared in the skies of the southwestern Pacific, previously unknown to Allied intelligence. Caught off guard by its unusually heavy firepower directed aft, American and Commonwealth fighter pilots gave the new enemy bomber the code name “Helen” and rated it very highly as an opponent owing to this surprising attribute. Little did they know at the time that the Helen’s own operators were already just about to give up on it.
 The new
type was Nakajima’s Ki-49 Donryu. While a successful firm in the single-engine
market, Nakajima had badly wanted in on the lucrative big bomber contracts so
far monopolized by Mitsubishi. Having earlier received an order to
license-produce their competitor's Ki-21 as a booby prize after losing that
competition, Nakajima's engineers studied the Mitsubishi bomber carefully and
were ready in 1938 with a fresh design. Reports were coming out of China
regarding the Ki-21’s lack of adequate defensive armament and an all-new
replacement was specified by the Army—with even better performance, to boot.
While Mitsubishi’s design staff duly went right back in gear and struggled with
design studies, Nakajima whipped out a proposal and mockup within a suspiciously
short period. Mitsubishi saw that it had been outfoxed and bowed out of this
competition.
The new
type was Nakajima’s Ki-49 Donryu. While a successful firm in the single-engine
market, Nakajima had badly wanted in on the lucrative big bomber contracts so
far monopolized by Mitsubishi. Having earlier received an order to
license-produce their competitor's Ki-21 as a booby prize after losing that
competition, Nakajima's engineers studied the Mitsubishi bomber carefully and
were ready in 1938 with a fresh design. Reports were coming out of China
regarding the Ki-21’s lack of adequate defensive armament and an all-new
replacement was specified by the Army—with even better performance, to boot.
While Mitsubishi’s design staff duly went right back in gear and struggled with
design studies, Nakajima whipped out a proposal and mockup within a suspiciously
short period. Mitsubishi saw that it had been outfoxed and bowed out of this
competition.
Engineers Tei Koyama and Hideo Itokawa were assigned the project. Problems were to begin here, however, as both men were already heavily involved with Nakajima’s Ki-43 and -44 fighters being developed in parallel and their talents spread thin. A prototype of the new bomber was nonetheless flying within a year, followed shortly by pre-production airframes. But the flight test program progress was distracted for another year by wasteful development efforts to produce escort fighter and command variants of the new airplane. The first production aircraft were finally trickling off Nakajima’s lines to at least get the new type to advanced training units in autumn of 1941. But time ran out to resolve handling problems and shortcomings—war came in December 1941 and the Ki-49 needed to be thrown into the fight, ready or not.
The initial production variant, the Ki-49-I, reached IOC just in time for the raids on northern Australia and, where its performance and handling shortcoming finally made themselves known; the hot-and-humid takeoff conditions at their New Guinea bases could not have helped. Production was shortly switched to the -II with slightly more powerful engines that only partially addressed the problem, and these only reached the front as the strategic situation had tilted against the Japanese. Most would be shot down in their ferry flights, working as transports, or ignonimously caught on the ground.
 After
all that thought, maneuvering, and sweat, Nakajima and the IJAAF had ended up
with a bomber with about the same capabilities as the one it was supposed to
replace! The aircraft had poor handling and was simply underpowered. The most
damning testimony against the Ki-49 was the fact that it never actually
supplanted the aircraft it was intended to succeed and the Ki-21 continued to be
produced—and ordered—alongside its intended replacement. The Ki-49 had probably
the shortest voluntary career of any WWII bomber, being pulled from production
at the end of 1944 and repurposed for secondary roles and suicide attack, where
it finally found some success.
After
all that thought, maneuvering, and sweat, Nakajima and the IJAAF had ended up
with a bomber with about the same capabilities as the one it was supposed to
replace! The aircraft had poor handling and was simply underpowered. The most
damning testimony against the Ki-49 was the fact that it never actually
supplanted the aircraft it was intended to succeed and the Ki-21 continued to be
produced—and ordered—alongside its intended replacement. The Ki-49 had probably
the shortest voluntary career of any WWII bomber, being pulled from production
at the end of 1944 and repurposed for secondary roles and suicide attack, where
it finally found some success.
Doggedly, Nakajima expended further effort on the Ki-49 III, a major upgrade with a complete engine replacement to the 50% more powerful Ha-109. This was the final bid to bring the performance of this obstinately milquetoast airplane up to snuff and with such a power increase it might have worked. However, in the meantime, Mitsubishi—probably still smarting from the loss of the earlier competition—had cleared their drafting tables and came up with the outstanding Ki-67 Hiryu, finally giving the JAAF the high-performance medium bomber that it had needed so badly all along. Less easy to resolve in 1944 was the rapidly-draining pool of competent aircrew.
In the end, the old Ki-21, the bomber which all this drama had been revolving around, remained in front-line service through the conclusion of the war. Having also failed along the way with the Douglas-based G5N, Nakajima might finally have poked into the Big Bomber market it craved with the promising and quite advanced G8N Rita prototyped for the Navy, but the story got cut short there.
There are still several Ki-49s surviving as wrecks in Papua New Guinea. One, missing its outer wings panels and nose but otherwise surprisingly intact and complete, stood on its gear at the edge of its overgrown old airfield until around 2006 when a tree fell and squashed it.
| THE KIT |
This product was released among Hasegawa's late ‘90s frenzy of WWII multiengine Japanese subjects, part of a seeming effort to replace and improve upon the old Revell/Takara line of molds lost at sea. It shares typical Hasegawa characteristics: sharp, clean moldings in hard dark-gray plastic, the mandatory recessed panel lines with fabric effect where applicable, sparse interior detail, and a single marking option on a big light-blue decal sheet. Dry fitting reveals good fit everywhere.
 There
are, however, signs that the research and molds were done in a hurry. The
largely absent interior detail is typical Hasegawa 1/72 and a matter of personal
taste. However, the same inspection of the sprues will reveal a few little
flaws: all clear parts suffer from significant distortion, and the Donryu's
massive single-pipe engine exhaust stacks are depicted 1960s-style as little
more than deep engravings. The waist gunner’s windows are incorrect for all
versions.
There
are, however, signs that the research and molds were done in a hurry. The
largely absent interior detail is typical Hasegawa 1/72 and a matter of personal
taste. However, the same inspection of the sprues will reveal a few little
flaws: all clear parts suffer from significant distortion, and the Donryu's
massive single-pipe engine exhaust stacks are depicted 1960s-style as little
more than deep engravings. The waist gunner’s windows are incorrect for all
versions.
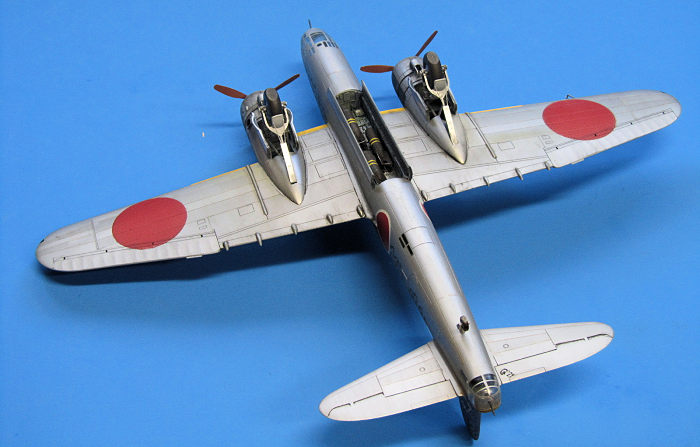
My release depicts a single natural-metal option for a radar-equipped trainer based in Japan in 1944. Other releases of this kit cover an interesting array of operational bomber, patrol, and suicide-attack versions of this airplane, usually with at least two marking options. A separate, duplicated sprue for the propeller and oil cooler covers the differences between -I and -II versions.
| CONSTRUCTION |
Hasegawa's instructions follow a reasonably logical assembly sequence. As usual, just deviate from it in leaving off the various sticky-outy things until completion. The only potential pitfall: Take care when you fit the cockpit/bomb bay assembly from Step 1 into the fuselage half during Step 2: the aft end of the assembly needs to slide beneath a corresponding tab in the fuselage. Failing to do so means you'll end up with the aft end of the bomb bay box 'levitating' a little above where it's supposed to be! Also, I found the wing-to-fuselage joint to not be very positive and had to prop up the wingtips to the correct dihedral angle as it cured, with a bit of filler required afterward at the root.
 Other
than that, there are three problems which really need to be dealt with in some
way:
Other
than that, there are three problems which really need to be dealt with in some
way:
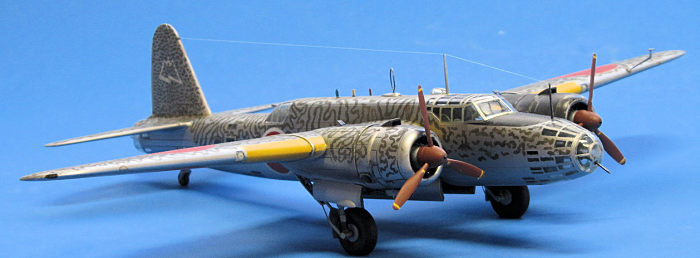
The nose glazing. This part (J17) is molded in one piece and leaves a really obvious joint line where it meets the fuselage: both should instead look like a smooth, continuous structure. There's no way to fix this except for the usual tedious mantra of filling, sanding, priming, sanding, and polishing in several iterations. I don't know that Hasegawa could have satisfactorily engineered the kit in any other manner, but I nonetheless spent about 20% of the total construction time on this 'feature'.
Waist windows. What we are given on the left side is the final configuration, that of a late -IIb as deployed to New Guinea and elsewhere. And on the right? All earlier production. Takeaway: if depicting a late aircraft with those extra windows flanking the waist gunner’s port, open up and add another window on the right mirroring the most forward one on the left. If depicting an earlier airframe, fill and sand the two flanking windows on the left, blending their surface into the fuselage surface like you did at the nose.
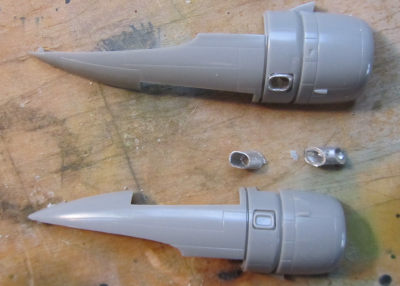 Those
weak exhaust stacks. These could probably be spruced up adequately with a
little clever painting, but I chose to squage some K&S aluminum tubing to a
squarish section, then cut and shape it to an angle. The metal pipes were
then seated into openings cut following the kit's scribing and the interior
ends plugged.
Those
weak exhaust stacks. These could probably be spruced up adequately with a
little clever painting, but I chose to squage some K&S aluminum tubing to a
squarish section, then cut and shape it to an angle. The metal pipes were
then seated into openings cut following the kit's scribing and the interior
ends plugged.
I had both the Eduard photoetch and canopy masking sets, purchased when they were much less expensive than they are today. Both were used from the very get-go on the interior, as the masking set is handy when spraying the interior color for protecting the dozen little windows scattered around the fuselage. These were then peeled off and reused as intended on the outside. I added an extra seat facing sideways aft of the pilots; the rear of the cockpit is suspiciously bare and Japanese bombers usually had a radio operator in this position. There are no known surviving wartime photos of the Ki-49's cockpit so a little hypothesizing is a must if you want to treat this area with any extra attention.
The distorted transparencies (which tend to moot any extra work done on the cockpit, anyway) were taken care of by painting the interior a dark color and doing very little highlighting paintwork. This combined with the extensive canopy framing serves to effectively conceal the problem.
 More
worthwhile is adding extra detail to the bomb bay. A firewall, oil tank, and
some cursory extra detail were also added to the main landing gear bays to deal
with the yawning void which is otherwise there, following glimpses posted online
of those areas on the PNG wrecks. Where the Eduard set really delivers is a
beautifully detailed set of bomb bay door interior faces to cover the blank
surfaces provided in the kit. Whether this worth the $30 Eduard now asks for
this set is up to you.
More
worthwhile is adding extra detail to the bomb bay. A firewall, oil tank, and
some cursory extra detail were also added to the main landing gear bays to deal
with the yawning void which is otherwise there, following glimpses posted online
of those areas on the PNG wrecks. Where the Eduard set really delivers is a
beautifully detailed set of bomb bay door interior faces to cover the blank
surfaces provided in the kit. Whether this worth the $30 Eduard now asks for
this set is up to you.
For stores, the kit provides two 250kg IJAAF bombs. I wanted a more interesting internal load, so I took one of them, graced it with a thinner set of fins cut from sheet styrene and a bit of rivet detail, then cast three copies of this master in resin. Fitting all three took some rearranging of the slots in the bomb bay. As I finished this time-consuming foray I discovered that Bren Gun currently offers a similar set of bombs in resin for a reasonable price.
I lost one of the main gear position indicators (D5) to the carpet monster. I felt these were a bit heavy-handed anyway, so were replaced with finer ones of bits of styrene sheet and sprue. Antennas and pitot were as usual replaced with stronger ones of brass rod laminated with strip styrene, encased with CA, and sanded to shape. A quick final sanding and the Helen was off to the paint shop.
| COLORS & MARKINGS |
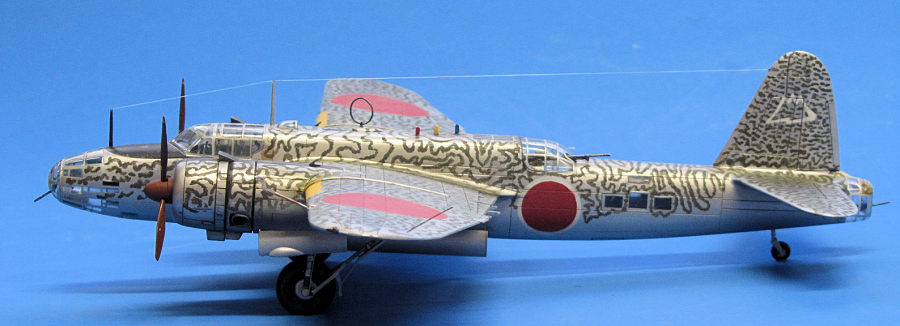
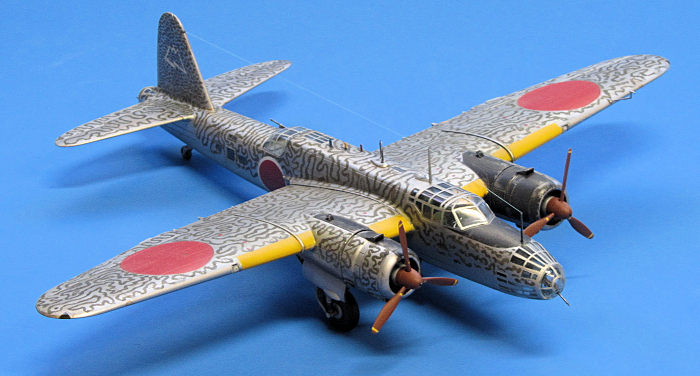
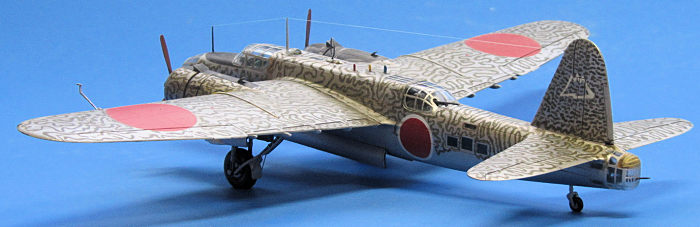
Despite its lame service record, the Donryu makes a fun modeling subject because it saw action in virtually every type of camouflage finish ever dreamt up. Choose from simple mono- and two-tone green over gray, natural metal, the stripey 'palm-frond' finish, grey with green blotches, or something like the Luftwaffe wellenmuster squiggles. I chose the latter, based on a commonly seen illustration of an aircraft from the 1st Chutai, 7th Sentai in New Guinea, 1944.
Photos show that the camouflage was applied over a natural metal finish, so the base color was Alclad II White Aluminum. Having had rotten luck with Alclad’s own primer and unsatisfactory results with various gloss black enamels, I this time fell back on Pledge/Future applied in several medium coats and one heavy one. Worked much better.
 No
way, no how could I airbrush that squiggle pattern so tightly and densely in
1/72 and keep it consistent. So brush painting it would be! Going this
route, there are three things you must do to avoid the “brushed” look: 1)
paint thinned below that of airbrushing consistency, 2) a 000 round brush or
smaller, and 3) use of a stippling motion, with the brush held nearly
vertical to the surface, and very little paint. Lay down the pattern with a
light first pass, then go back to fill it in and make the width consistent
with another 2-3 passes.
No
way, no how could I airbrush that squiggle pattern so tightly and densely in
1/72 and keep it consistent. So brush painting it would be! Going this
route, there are three things you must do to avoid the “brushed” look: 1)
paint thinned below that of airbrushing consistency, 2) a 000 round brush or
smaller, and 3) use of a stippling motion, with the brush held nearly
vertical to the surface, and very little paint. Lay down the pattern with a
light first pass, then go back to fill it in and make the width consistent
with another 2-3 passes.
Work on a small area at a time in this way, say the rear fuselage or an outer wing panel, then go out and rake the leaves. Come back in and do the left wing center section. Go back out and play with the kids or throw the ball for the dog. And so on. Work slowly and unhurriedly. I got the pattern as shown done in about seven cumulative hours over a Saturday morning to late afternoon.
The Hinomaru decals in the kit dried with a lot of tiny air pockets beneath for some reason, so were peeled with packing tape and replaced with masked and airbrushed national markings courtesy my DSPAIE circle cutter. The 2nd Chutai’s stylized Mt. Fuji motto was similarly masked and sprayed, and if I were to do it again I would have started by spraying and masking those yellow leading edge ID markings, too—the decals proved vulnerable to all the subsequent work going on around them.
All paintwork was touched up and sealed with more sprayed Future/Pledge/Johnson’s. Weathering followed, just a simple enamel wash and some exhaust streaks.
| CONCLUSIONS |
| REFERENCES |
Not much is out there catering to this unloved aircraft type. Most surprisingly, I am not aware of a monograph other than the Schiffer book mentioned below or much worthwhile complementary information from Japanese sources (though the Monogram book incongruously has an exceptionally clear set of three photographs of the Ki-49’s waist compartment). You’ll have a hard time finding both interior detail and detailed three-views. I leaned heavily on that Schiffer book and online photos of the PNG wrecks throughout the build.
Bueschel, Richard M. Nakajima Ki-49 Donryu in Japanese Army Air Force Service. Schiffer Military, Atglen PA. 1997
Francillon, Rene J. Japanese Aircraft of the Pacific War. Naval Institute Press, Anapolis, MD. 1970
Mikesh, Robert. Japanese Aircraft Interiors 1940-1945. Monogram Aviation Publications, Sturbridge, MA. 2000
14 July 2022 Copyright
ModelingMadness.com. All rights reserved. No reproduction in part or in whole
without express permission. If you would like your product reviewed fairly and fairly quickly, please
contact
the editor or see other details in the
Note to
Contributors.