SMER 1/50 Re.2000 Falco
| KIT #: | 0817 |
| PRICE: | Less than €5 in 2007 |
| DECALS: | Two options |
| REVIEWER: | Spiros Pendedekas |
| NOTES: | Marketed at 1/48; actually 1/50 |
| HISTORY |
The Re.2000 was
intentionally designed to compete for orders under “Programma Erre”, a
comprehensive effort launched in 1938 targeting towards the enactment of
several improvements throughout the Regia Aeronautica.
Despite having very little time, Officine Meccaniche Reggiane SpA, under the
influence of aeronautical engineer Giovanni Battista Caproni, came with a design
strongly influenced by the Seversky P-35 but nevertheless fresh, with its
aerodynamic characteristics greatly benefiting from a series of wind tunnel
tests held at Caproni's facility in Taliedo, Milan.
The resulting Re.2000 was a modern, highly streamlined design, featuring a
sophisticated elliptical wing. Construction, save the control surfaces, was
all-metal and of stressed skin, landing gear was retractable with pneumatic
brakes, the tail wheel was both retractable and steerable and the canopy was
designed to provide good all-round visibility.
 Flight tests commencing in mid-1939 quickly demonstrated the type's favorable
flying attitude with good speed and high maneuverability, only needing minor
modifications to refine the design. The prototype proved its worth even further
upon being delivered to the Experimental Establishment of the Regia Aeronautica
by August 1939, outperforming even modern fighters such as the MC 200 and even
the Bf 109E.
Flight tests commencing in mid-1939 quickly demonstrated the type's favorable
flying attitude with good speed and high maneuverability, only needing minor
modifications to refine the design. The prototype proved its worth even further
upon being delivered to the Experimental Establishment of the Regia Aeronautica
by August 1939, outperforming even modern fighters such as the MC 200 and even
the Bf 109E.
However,
together with the great performance, some shortcomings started to arise. A
technical report produced by the Air Ministry, judged the placing of the
integral fuel tanks within the wings to be highly vulnerable and prone to leaks,
as well as posing manufacturing challenges. The negative conclusions of the
report were catastrophic for the project, as they directly led to the immediate
cancellation of their 12 pre-production frames, along with the instruction given
to Reggiane to prepare the necessary tooling for a wider production run aiming
to 188 aircraft.
Still, the Italian government authorized Reggiane to promote the type for sales
on the global market, effectively offering the programme a reprieve.
Rejuvenated, the company decided to privately proceed with the production of the
original batch of 188 fighters that had been canceled, so that immediate
delivery could be offered to foreign customers.
Marketed towards various interested countries, many of which had been
incentivised towards such purchases as a consequence of the war breaking out,
the type attracted some potential customers. In the end, Hungary ordered 70
aircraft and Sweden opted to procure a batch of 60 machines, with the plane
accordingly used much more prominently by those air forces than by the Regia
Aeronautica at home. In fact, 80 per cent of the total Re.2000 production went
to these two countries. Other countries had also exhibited interest in the
aircraft, but ultimately did not place orders.
Though the Swedish appreciated the plane’s performance, especially under harsh
conditions, they were put aside by its mechanical reliability, normally spending
a great deal of time in maintenance.
The Falco had a more engrossing life in the Hungarian Air Force, which became a
significant purchaser of Italian aircraft in general, following Germany’s
reluctance to supply them with their own planes. Becoming the main operator of
the Re.2000, Hungary not only bought 70 examples, but also acquired the
license-production rights to produce a total of around 200 aircraft (170-203,
according to various sources), known as MÁVAG Héja (Hawk) II. The machines were
built between 1940 and 1942 and featured a different engine and Hungarian
machine guns.
With its flight characteristics markedly different from the Fiat CR.32, from
which Hungarian pilots frequently converted, the Falco was much more prone to
handling difficulties, especially stalls
 and spins,
let alone reliability issues, so accidents were common. After a steel plate was
added behind the cockpit for pilot protection, the resulting shift in the
aircraft's center of gravity only made things worse, leading to more frequent
accidents.
and spins,
let alone reliability issues, so accidents were common. After a steel plate was
added behind the cockpit for pilot protection, the resulting shift in the
aircraft's center of gravity only made things worse, leading to more frequent
accidents.
Nevertheless, the determined Hungarian pilots, backed up by the equally
determined Hungarian engineers who were essentially dealing with an endless
maintenance challenge, kept on flying combat missions and scored a number of
kills against the Soviets.
Reggiane further developed the Re.2000 to the “GA” (Grande Autonomia) version.
Featuring additional 340-liter fuel tanks, which was primarily achieved by
sealing off the cells of the outer wing structure, the type's purpose was to
function as a modern long range reconnaissance aircraft for the Regia Marina.
Though heavier, slower and expectedly more unreliable compared to the original
Re.2000, this version was interestingly favored by the Air Ministry. Intended to
have been used to reach Eastern Africa, it was not ready to enter operational
service until after the Armistice of Cassibile (Italy's surrender to the Allied
Powers) came into effect.
The final derivative was the Re.2000bis, featuring a more powerful engine and
was only manufactured in small numbers. While some consideration was made at
Reggiane towards the adoption of a more conventional three-spar wing with normal
fuel tanks instead, only a prototype conforming to this configuration was
authorized and this would subsequently become the basis for the Re.2002 ground
attack aircraft and the formidable Re.2005 Sagittario.
| THE KIT |
Though marketed as
1/48, this is actually the 1/50 ancient (70s) Artiplast mold, that has been
regularly reboxed by SMER ever since with occasionally different decals and
offered at very low prices. By all means a basic kit, plain in details, with the
molds showing their age and the transparencies not looking great at all, but
with the decal sheet saving the day, it stands for a simple, uncomplex
construction (but “uncomplex” does not always mean ”uncomplicated”).
The subject kit is the mid-2000s edition, bought from my usual hometown’s
toy/hobby shop in 2007, featuring nice but temperamental Propacteam decals. For
a more in depth view of the contents, you may refer to the kit’s preview at the
MM archives.
| CONSTRUCTION |
I started by assembling
the 5-piece wing. Since the main bays are void of detailing, I glued a piece of
fine mesh onto each inner top wall, to make it look more interesting. Once the
wing was assembled, I attached the cockpit tub onto the wing central section.
The two fuselage halves were then joined, with the instrument panel trapped
between them, and the assembled fuselage was attached onto the wing, followed by
the tail planes. The seat, stick and what looked like a cockpit-fitted oxygen
bottle were left off, to be attached at later stages.
Moving onto the 2-piece engine, I decided to beef up its simplistic looks. By
consulting net pics of the Piaggio P.XI engine, I noticed the 28 pushrods in
total emerging in pairs circumferentially from the middle of the crankcase and
heading towards the cylinder heads in a very distinctive, “angled” manner. To
replicate it I drilled 14 holes onto the crankcase and inserted two pieces of
fine stretched sprue at each hole, then drove each pair of those pieces to the
corresponding cylinder head and secured them with glue. The engine was painted
black, then heavily dry brushed with silver, with its crankcase painted light
blue-gray. While the above “improvement” was tad time consuming, in the end the
engine looked “busier” and closer to the real thing.
 Off to the
cowling, I first drilled out the upper(carburetor) and lower (oil cooler) air
inlets, then attached the carburetor intake front and smoothed everything out. A
“splitter” type mini strut, located to the central part of the carburettor
intake, was replicated with stretched sprue.
Off to the
cowling, I first drilled out the upper(carburetor) and lower (oil cooler) air
inlets, then attached the carburetor intake front and smoothed everything out. A
“splitter” type mini strut, located to the central part of the carburettor
intake, was replicated with stretched sprue.
A small faired air outlet is located at the starboard fuselage side at the
cockpit height, which I replicated by attaching there a semi cylindrical styrene
piece, where I faired its front by sanding and drilled a small hole at its rear
end.
As a side note, the kit features two odd looking rectangular style panels that
have to be attached at the wing undersides. Also, two equally odd looking
protrusive pieces have to be attached to the fuselage sides just atop of the
wing trailing edge. No matter how I searched the net, I could not find any pic
depicting the above “oddities”, so I left them off and filled the corresponding
holes.
Despite cleaning all parts from the vast amounts of flash, overall fit was
so-so, with the gaps initially treated with liquefied styrene and then with a
couple of rounds of “normal” putty. After a final 1000-grit sanding I took the
elegant Italian fighter to the paint shop!
| COLORS & MARKINGS |
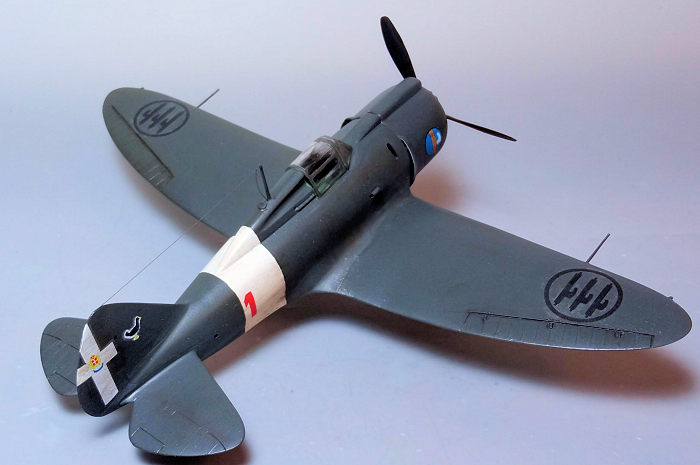
 I first
painted the mid-fuselage band Hu130 White, then masked it off and sprayed the
topsides Hu66 Dark Drab. After also masking the topsides, I gave all undersides,
including gear doors, a coat of a leftover Molak 1126 Medium Gray, with a coat
of Future preparing the bird for decaling.
I first
painted the mid-fuselage band Hu130 White, then masked it off and sprayed the
topsides Hu66 Dark Drab. After also masking the topsides, I gave all undersides,
including gear doors, a coat of a leftover Molak 1126 Medium Gray, with a coat
of Future preparing the bird for decaling.
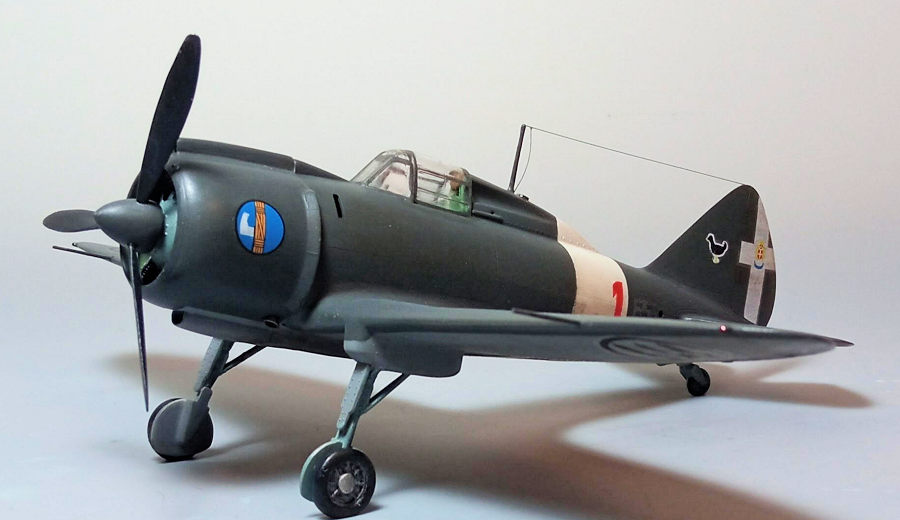
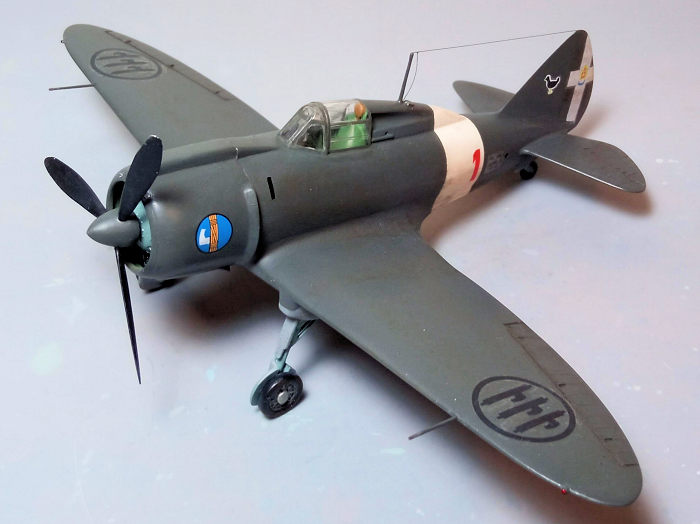
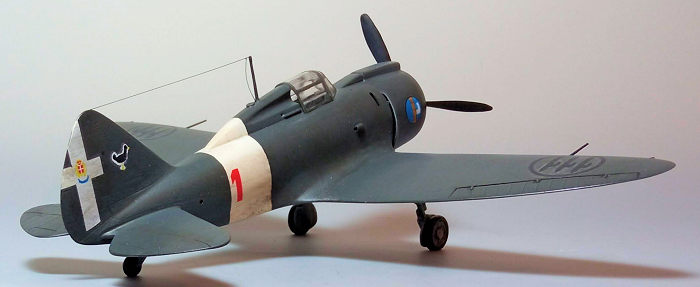
I used the kit decals, in order to represent a bird belonging to 1 Squadriglia
of Aviazione Ausillaria per la Regia Marina, as it stood in 1942. The ultra thin
and temperamental (folding easily to themselves and not withstanding too much
repositioning) Propacteam decals were usable, despite being almost 20 years old.
They did exhibit some silvering (probably Yours Truly fault) and a tendency to
shatter once repositioned. Nothing really serious, with some decal softening
solution and some touch ups coming to the rescue. A coat of Future sealed the
decals.
| FINAL BITS |
I attached the seat,
stick and what looks to be an oxygen bottle in the pilot’s office. The seat
received two side handles from stretched sprue and seat belts made from masking
tape.A simplistic gunsight was added from a piece of clear sprue. Basic cockpit
color was Hu120 (for the Italian Interior Green). The instrument panel, front
anti-glare area, stick grip and various cockpit boxes/consoles were painted
black. The instrument panel was dry brushed with silver and had some “knobs”
done with red paint and a very fine brush, with like “knobs” done onto the seat
handle ends. A head cushion was fabricated from a thin cylindrical styrene
piece, painted “leather” and attached.
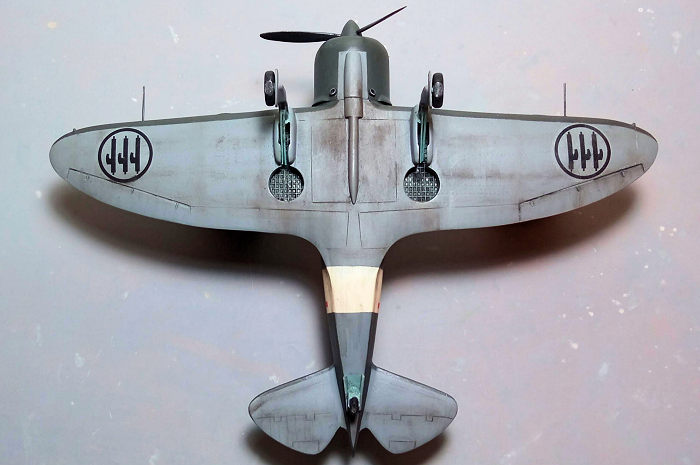
Moving to the landing gear, I attached the main legs, followed by the doors and
main wheels. The kit provided twin retraction links were too crude and were
replaced with stretched sprue pieces. By consulting reference pics, brake lines
were added from stretched sprue and accordingly routed. No housing was provided
for the rear wheel, which had to directly be glued to the fuselage. Whereas the
looks of this setup are odd, I deemed the work needed to create a housing too
much, so I just attached the rear wheel in position, followed by the two doors,
which partly blanked the inconsistency.
All landing gear parts, including bays and door innards were painted Hu87 Steel
Gray (actually dried to a nice medium blue gray), tires and brake lines were
painted black, whereas rims had their visible (once retracted) side painted
underside color and the other side painted “steel”. The tires were filed to look
weighted and the rims had two leftover circular riveted styrene pieces attached
to their hubs, which were crude looking.
After fitting the engine to the cowling, I attached the completed assembly to
the main model. The kit provided exhausts were crude, so I used two pieces of
plastic cotton bud stems, accordingly cut. I attached two small pieces of
stretched sprue into the cowling gun holes, to replicate barely protruding
barrels (though I am not sure if they protruded at all…). Cowling innards were
painted the same Hu120 interior green, whereas exhausts and gun barrels were
painted Testors Burned Metal.
 The one
piece prop needed not only a lot of cleaning, but also rebuilding one of its
tips (basically building up with liquefied styrene, letting dry, sanding and
repeating), as the sprue gate had unmercifully penetrated into. The prop had
upper camo color spinner and black blades.
The one
piece prop needed not only a lot of cleaning, but also rebuilding one of its
tips (basically building up with liquefied styrene, letting dry, sanding and
repeating), as the sprue gate had unmercifully penetrated into. The prop had
upper camo color spinner and black blades.
It was then time for some weathering, which included a black wash at all hinge
lines and more heavily at the landing gear area, followed by dark brown and
black dry pastels applied at all places where dirt, grim, or even engine
staining would reside. Some silver dry brushing was applied at blade tip leading
edges and wing roots. A satin coat gave the bird its final finish.
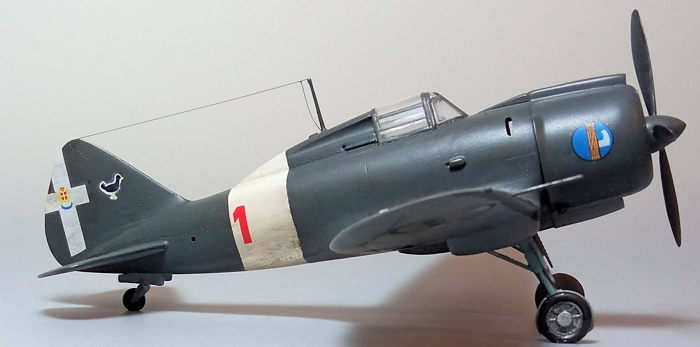
The crudely molded transparencies were cleaned and had their frames hand
painted. The windshield front framing featured an arc shaped top section which
is wrong, as all pics and drawings showed it to be rectangular in shape. Also,
the canopy transparency featured two crudely molded internal frames that did not
make any sense, apart from, possibly being guides for sliding the canopy back.
Nevertheless, I did not even consider sanding down all the above wrong framings,
as the transparencies, despite being thick, looked overly brittle. All I did is
to paint the front frame lines correctly, even if it meant overlapping in the
wrongly molded framing, whereas I left the rear canopy bracing as is. This means
that getting closer than 4 feet will easily reveal the transparencies misfire…
The two wing mounted pitots were long sanded away and were replicated by
stretched sprue pieces. Same for the distinctive looking wing tip lights, them
being replicated by small pieces of stretched sprue, “pinned” with my fine tip
silver pen, followed by tiny blobs of red and green clear paint.
The antenna mast was attached and thin stretched spue was run from the fin top
towards it, then a smaller piece from there to the fuselage. A small circular
styrene piece, painted fuselage color, was attached behind the front mast and
slightly offset to the left, to represent the fuel filler cap, before calling
the Falco done!
| CONCLUSIONS |
If you want an accurate
quarter scale representation of the iconic Italian fighter, you should really
look no further than the 2020 Special hobby offering, Being all styrene, very
sensibly priced, featuring great detailing, nice decals, limited in nature but
“as mainstream as it can get” and with three boxings covering all versions, this
is adamantly the way to go.
 The
Classic Airframes offered a very nice multimedia kit back in 2001, which Tom
Cleaver built and came with a wonderful result. This
kit is almost impossible to find nowadays, but, if by luck you came across one,
it is still worth building.
The
Classic Airframes offered a very nice multimedia kit back in 2001, which Tom
Cleaver built and came with a wonderful result. This
kit is almost impossible to find nowadays, but, if by luck you came across one,
it is still worth building.
This leaves the elderly Smer/Artiplast mold by far in the the last place:
crudely molded with lots of flash and even mold shift, sparse in details,
challenging in building with gaps and mismatch in quite a few areas, less than
perfect transparencies and at a scale (1/50) which might bother a number of us,
this old fellow tries to counteract the above shortcomings with its low price,
nice decal sheet and simple construction (but not uncomplicate, as, in fact, it
must be treated as a limited run kit in every respect).
If you are on a budget, or already own this kit, or like to challenge yourself
with an old, less than perfect mold, or a combination of the above, you might
consider tackling it and, with some extra effort, come up with a good looking Falco.
Happy modeling!
25 April 2023
Copyright ModelingMadness.com. All rights reserved. No reproduction in
part or in whole without express permission. If you would like your product reviewed fairly and fairly quickly, please contact the editor
or see other details in the
Note to
Contributors. Back to the Main Page
Back to the Review
Index Page
Back to the Previews Index Page