|
KIT: |
Classic Airframes 1/48 Re.2000 Falco |
|
KIT # |
419 |
|
PRICE: |
$34.95 |
|
DECALS: |
See review |
|
REVIEW & |
|
|
NOTES: |
|
HISTORY |
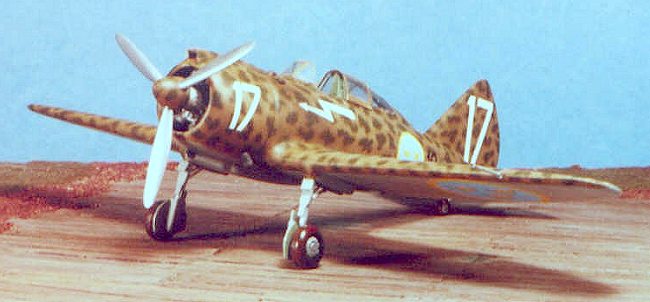
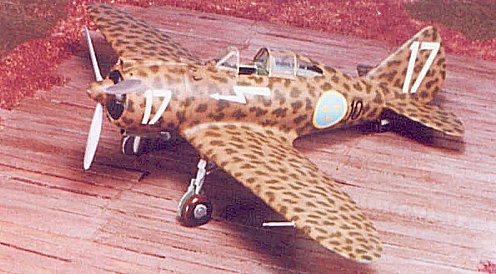
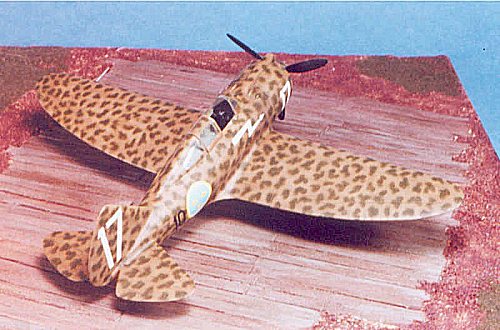
The Swedish Neutrality Fighter:
For a general history of the development of the Reggiane Re.2000, I refer you to the First Look Review of this kit.
The Swedish Air Force really liked the first Seversky fighter. They were the only other nation to use the basic P-35, receiving 60 Seversky EP1-106s as the export version was known, and would have used more of them had the 60 EP2-106S - later known as P-35As - not been sequestered by the American government to provide fighters for the USAAC in the Philippines during the prewar buildup of forces that began in 1940.
Fortunately there was another "P-35 type" available, the Reggiane Re.2000, which had even better performance than the original Seversky fighter. Having been turned down by the Regia Aeronautica, the Reggiane Company had received permission to solicit foreign orders for their airplane. The Hungarian Air Force had ordered 70 Falco's, and the Swedes changed their order for 60 P-35As to one for 60 Re.2000s on November 25, 1940.
 The sixty Re.2000s began
to arrive in 1941, and were assigned to the F 10 Fighter Wing, stationed at
Bulltofta and Rinkaby. The pilots took an immediate liking to the airplane, with
its overall excellent maneuverability and outstanding climb rate. Ground crews
did not share the same enthusiasm, inasmuch as there were difficulties with the
two synchronized machine guns, and the engine was even more troublesome in the
cold of the Swedish winter than it had been in Italy.
The sixty Re.2000s began
to arrive in 1941, and were assigned to the F 10 Fighter Wing, stationed at
Bulltofta and Rinkaby. The pilots took an immediate liking to the airplane, with
its overall excellent maneuverability and outstanding climb rate. Ground crews
did not share the same enthusiasm, inasmuch as there were difficulties with the
two synchronized machine guns, and the engine was even more troublesome in the
cold of the Swedish winter than it had been in Italy.
The Swedes knew the Re.2000 as the J20. The outstanding climb characteristics would be put to frequent use in the next four years, as the aircraft rose to intercept both Allied and Axis aircraft that entered Swedish air space throughout the Second World War. Bulltofta was the goal of the 131 American bombers, heavily damaged over Germany, that sought sanctuary in Sweden. The Swedes also intercepted German aircraft, including a Ju-88G-1 night fighter in October 1944.
The sole combat loss of a J20 occurred on April 3, 1945, when J20 2331, flown by Erik Nordlund, intercepted a Do-24 flying boat over Hanobukten. Hit in the engine by the Do-24's gunner, Nordlund attempted to return to Angleholm, but was killed with the aircraft exploded in mid-air. A total of 16 other J20s were lost during the war to pilot error or technical malfunctions; 18 additional aircraft were damaged. The last surviving J20 was taken off active service in 1955.
One J20, serial number 2340 - likely the only surviving Re.2000 - is on display at the Swedish Air Force Museum in Linkoping.
|
THE KIT |
Prior to the release of this kit, the only other kits of the Re.2000 made were a 1/72 kit by SuperModel and a 1/50 kit by Artiplast, both released in the late 1960s and early 1970s. For their time, they were not bad. As stated in the first-look review, this new kit from Classic Airframes is the second in their line to be produced in metal molds, which results in surface detail that is competitive with anything from Tami-gawa, while the parts themselves are crisp (if a bit thick) and almost completely flash-free. The kit includes two vacuformed canopies to make the Serie I, and a solid resin replacement for the rear canopy, to make the Serie II and Serie III Falco.
|
CONSTRUCTION |
This is a model that starts with the cockpit. I painted the resin sidewalls, floor, seat and plastic rear bulkhead with Gunze-Sanyo H-312 "Light Green." I then over-painted that with Tamiya "Smoke" to pop out detail. I painted the seat pad brown and the seatbelts with a light tan, then shot it all with coat of Dullcote to protect it. The instrument panel was painted semi-gloss black and I used instrument face decals from a Pro-Modeler instrument decal sheet to finish off the panel.
 The kit instructions say to
assemble the cockpit and then install it in the fuselage. I learned with the
Re.2001 kit that it is easier to put the cockpit in before assembling the
fuselage, starting with the rear bulkhead, then gluing the cockpit side walls in
position, then the instrument panel. I then glued the fuselage halves together,
and finally installed the cockpit floor with the control stick and seat in
position.
The kit instructions say to
assemble the cockpit and then install it in the fuselage. I learned with the
Re.2001 kit that it is easier to put the cockpit in before assembling the
fuselage, starting with the rear bulkhead, then gluing the cockpit side walls in
position, then the instrument panel. I then glued the fuselage halves together,
and finally installed the cockpit floor with the control stick and seat in
position.
I then cleaned up the wing parts and the cowling halves. I had to cut away several injection pins on the inner surfaces of these parts, which was not a problem. I found when I attached the resin wheel wells that I had to sand them down very thin to the rear, so that they would fit within the wing when it was glued together. I also glued the horizontal stabilizers to the fuselage at this point.
While these sub assemblies were setting up, I cut off the resin cylinders for the engine and attached them to the crankcase. I pained the engine in a variety of metal shades, then started test-fitting it inside the cowling. I found I had to sand down the cylinder heads so the engine would go inside the cowl. This is not a problem, as that area of the engine isn't really visible once it is in position.
I then attached the engine in position, and glued on the cowling. The wing presented a small amount of difficulty, until I trimmed the fuselage where it joins with the trailing edge of the wing. With the model assembled, I covered all the joints and seams with Mr. Surfacer 500 and put the model aside for the evening.
Mr. Surfacer creates a very hard surface with no shrinkage, and all the seams and joints disappeared under light sanding. I rescribed panel lines where necessary. I had Futured the canopy and cut it open, so at this point I attached the windshield and the rear canopy section, and filled in these joint lines with Mr. Surfacer. With all this done, the model was ready to head to the paint shop.
|
PAINT & DECALS |
Painting:
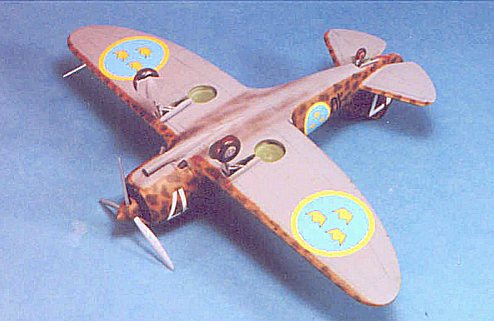 I "pre-shaded" the panel
lines with flat black. When that was dry, I painted the lower surface with
Tamiya XF-19 "Sky Grey." I painted the upper surface with Gunze-Sanyo H-72 "Dark
Earth" and then did the green mottle with Gunze-Sanyo H-64 "RLM Dark Green"
(RLM71). When all was dry I gave the model two coats of Future.
I "pre-shaded" the panel
lines with flat black. When that was dry, I painted the lower surface with
Tamiya XF-19 "Sky Grey." I painted the upper surface with Gunze-Sanyo H-72 "Dark
Earth" and then did the green mottle with Gunze-Sanyo H-64 "RLM Dark Green"
(RLM71). When all was dry I gave the model two coats of Future.
Decals:
Classic Airframes uses Micro-Scale decals nowadays, and there is nothing to say other than they went down as well as one expects of Micro-Scale decals, setting right into position with a coat of Micro-Sol.
Final Finish and Assembly:
I washed the model, then gave it another coat of Future. I topped that off with two coats of thinned Dullcote, then airbrushed the exhaust stains. I then unmasked the canopy and put the sliding portion in position with white glue. The landing gear and prop went on, and the model was finished.
|
CONCLUSIONS |
This is the best Classic Airframes kit to date in terms of ease of assembly. It wasn't quite a Tami-gawa shake 'n' bake, but it was pretty darn close for a limited-run Eastern European kit. The model looks very nice sitting next to its Re.2001 stable mate. I could see myself doing another one, which gives you an idea of how much I liked doing it.
Thanks to Classic Airframes for providing the review copy.
If you would like your product reviewed fairly and quickly by a site that has thousands of visits a day, please contact me or see other details in the Note to Contributors.