Airfix 1/72 J2F Duck
| KIT #: | 03010 |
| PRICE: | $5.00 'used' |
| DECALS: | Two options |
| REVIEWER: | Joe Essid |
| NOTES: | Lots of fun for small money |
| HISTORY |
The role of Grumman’s Duck in the Second World War and after does not appear to have the coverage of the Curtiss Seagull or the Vought Kingfisher, which is a shame. The Duck served from carriers, crude beach heads, and airstrips. It spotted for gunnery, attacked submarines, and rescued pilots who ditched at sea.
 Built around a large
central float integrated into the fuselage, something common to other Amphibians
designed by Grover Loening, the Duck could pack in passengers or cargo below its
flight deck.
Built around a large
central float integrated into the fuselage, something common to other Amphibians
designed by Grover Loening, the Duck could pack in passengers or cargo below its
flight deck.
That feature helped the career of the most famous J2F of all, “Candy Clipper,” a -4 put back into flyable condition from a plane sunk in a lagoon, then used during the battle for Bataan. The plane brought in supplies and took out evacuees crammed into the cargo and passenger compartment in its float. It was the last plane to leave Bataan before Allied forces surrendered to the Japanese.
Those of you who saw Murphy’s War as kids likely fell in love with the strangely graceful Grumman. It saw service not only on-screen but also as a rescue aircraft with the US and other militaries long after World War II ended. You’ll see Ducks at airshows today, many of them the final J2F-6 model that Airfix’s 1969 kit depicts. The US Army even got into the business, having an OA-12 rescue aircraft in its ranks.
| THE KIT |
I’m sure other such aircraft existed, but an amphibian with a tail hook for carrier ops seemed too interesting for me to resist. And though the landing gear proved a weakness of this kit, it looks very much like the Wildcat’s, one of my favorite aircraft.
Getting this kit will not break the budget. Robert Schockley has covered this Airfix J2F-6, before, but he took a somewhat different approach than I did to the subject matter, so I thought a second build-review might be worthwhile.
 Robert got his kit for $8.50 US; I found my 1975
issue for $10 cash at an antique mall. My ten bucks, cash money (watch a
dealer’s eyes light up!), included an Airfix Kingfisher I reviewed
here in 2023
Robert got his kit for $8.50 US; I found my 1975
issue for $10 cash at an antique mall. My ten bucks, cash money (watch a
dealer’s eyes light up!), included an Airfix Kingfisher I reviewed
here in 2023
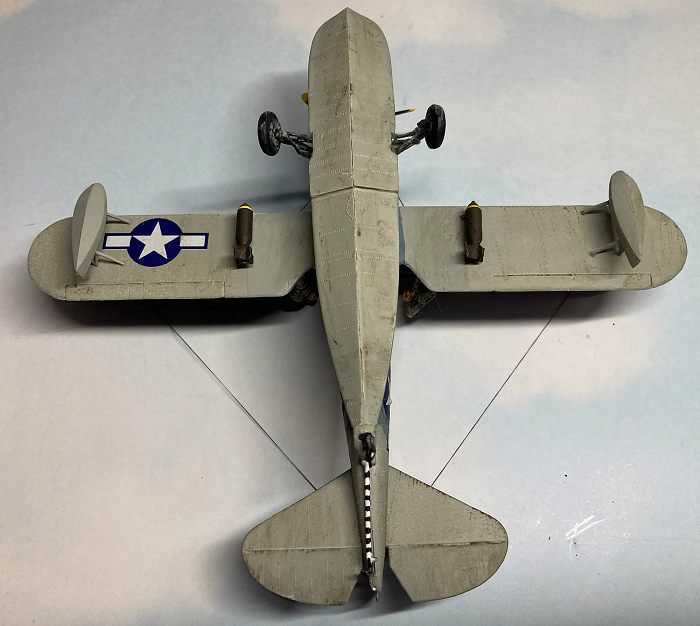
Opening the box, you find a simple kit modeled in gray plastic. It lets you build a wartime Duck in three-color USN camo or a Postwar rescue aircraft in a striking silver-and-red scheme. I have decals for Candy Clipper, but I’d need a different cowling.
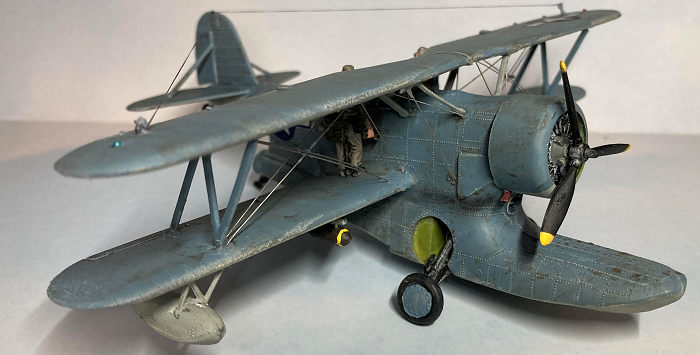
This kit, like the Kingfisher, is old-school Airfix in both good and bad ways. The canopy is so thick that, scaled up to life-size, it might prove provide a Duck’s crew with a foot of Perspex to protect them from bullets and the elements. Raised rivets abound, but I like the effect. Parts count is very low, with crew and cargo compartments are more notional than accurate. As Robert found out, the landing gear are spindly in the extreme. I broke one while still on the sprue and lost the missing bit.
I decided to fabricate a strut out of stainless rigging wire bent to shape and coated it with CA. As it would not show when installed, thus proving both sturdy and expedient.
| CONSTRUCTION |
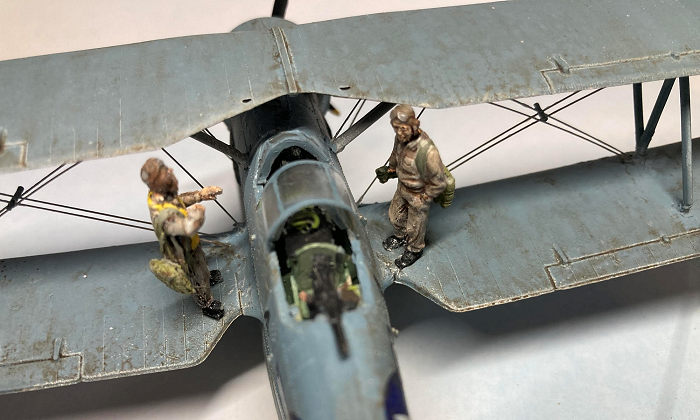
I began with the spartan crew compartment, where scratch-building became my order of the day.
After painting all with interior green or my homebrew zinc chromate, I added masking-tape lap-belts and a directional loop antenna made of jeweler’s wire twisted around a toothpick. This sits on a tiny black box of Evergreen. On the sidewalls of the fuselage I added more panels of Evergreen and drew on a few controls, using a very sharp Prismacolor silver pencil, to loosely match what I could find in photos. Bits and bobs on control surfaces got specks of white, yellow, or red paint.
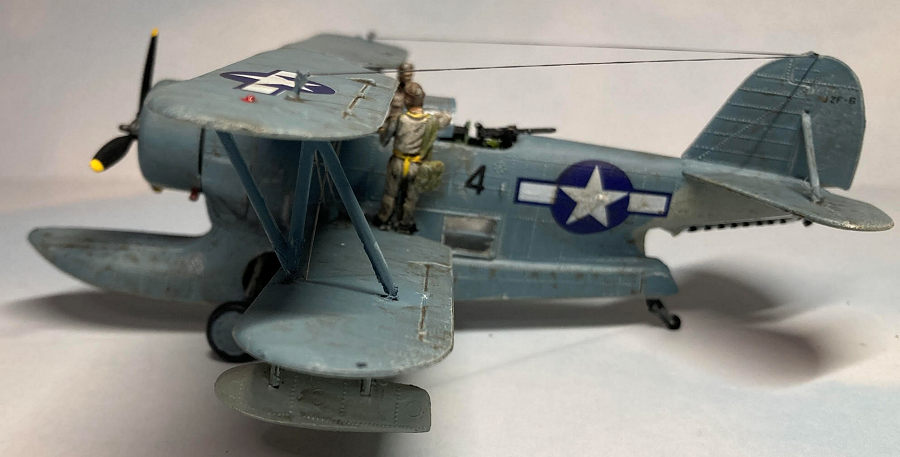
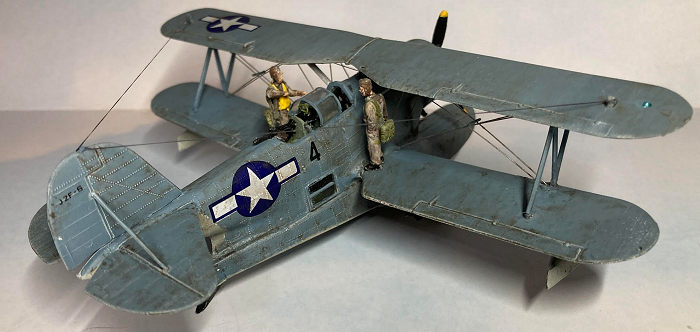
Pilot and gunner seats got reshaped, as they are not even close to the originals. With these seats empty of the little plastic mummies that Airfix supplies, I planned to use two resin figures remaining from a CMK set of Pacific theater USN pilots. I’d gotten three figures but only used one for the Kingfisher. For the Duck, I wanted two crewmen chatting on the wing after a mission, having beached the Duck at low tide up some muddy creek in New Guinea.
The kit’s .30 MG for the rear compartment looked so basic that I fabricated one by cutting down a .50 from my spares box and adding an ammo box to one side.
 The engine looks pretty
good for a kit this age, miles ahead of the terrible engine that Airfix provided
with an original Gladiator kit I built to teach myself something about rigging
biplanes. As I do for basic engines, I primed it with Mission black primer, then
hit the highlights with silver pencil. The hub got some dark gray paint and all
was buttoned up in the cowling.
The engine looks pretty
good for a kit this age, miles ahead of the terrible engine that Airfix provided
with an original Gladiator kit I built to teach myself something about rigging
biplanes. As I do for basic engines, I primed it with Mission black primer, then
hit the highlights with silver pencil. The hub got some dark gray paint and all
was buttoned up in the cowling.
Fit was not good for the fuselage behind the cowling or at the wing roots, and putty, mild curses, and sanding sticks came into play. Still, it was so easy that I almost forgot I was building a biplane!
I developed a rigging technique for the Gladiator I used again. I pre-drilled holes for .2mm stainless wire (probably big for scale but it looks fine to me). Once the top wing was down and the glue dry, I started with the wires that attached to the fuselage and worked my way out, slipping bits of wire into the pre-drilled holes and then sealing the work with a dot of CA applied with a sharpened toothpick.
This go round, as compared to the Gladiator, I dropped fewer wires on the floor, as well as fewer F-bombs. My measuring was far better, thanks to a set of divider-calipers I grabbed for small money from Amazon, just before the ridiculous tariffs went into effect. The dividers saved me hours, since I could use a cutting board with the rigging wire held down by tape, double-check my measurement, then snip with a pair of titanium scissors.
Very late in the build I discovered that the multi-part canopy would never nest properly, and I wanted it posed open. I used the kit’s center panel, plus the front windscreen, then tried and failed at a few alternatives from the spares box. I was considering my vacuform machine when I found a blister-pack of clear plastic and cut some panels from it, then hand-painted frames on them once they dried from a dip in Future. I cheated here, in the end only using one canopy panel. In 1/48 or 1/32 I’d never get away with that.
This new canopy part was not exactly the right shape so I had to force it to stick down at the bottom with CA, which resulted in some minor hazing to the plastic. Call it salt-spray and move on!
| COLORS & MARKINGS |
These aircraft and their crew served hard, doing tough and often thankless jobs, at least until they rescued someone! My Duck would be part of my New Guinea squadron, an early 1943 aircraft in two-color camo. I used decals from an Academy Wildcat to represent a well-loved aircraft working out of some muddy estuary as the Allies advanced up the north coast of the island.
I’d planned a three-color scheme from later in 43 originally but lacked one color. That omission gives me room to build another J2F-6 as well as Candy Clipper!
When I went to the paint shop, I wiped the kit down with rubbing alcohol, sprayed it with Duplicolor plastic-prep spray (an automotive product) then shot Mission White primer. When that cured, I airbrushed the top wing before installing it. It got its lower surfaces airbrushed with US camo gray from Mission, with a little of their additive included to keep the paint from being fragile, a constant issue with many of their colors.
 When the gray dried, I
airbrushed Mission blue-gray topsides, using some low-tack yellow Duck (hah!)
brand painters tape for masking. I was delighted to see very little bleeding
around the edges, since I’d pressed down the tape with cotton buds to get a good
seal. Mission touches up easily; I only had one place on the top wing where the
touchups showed until I finished weathering.
When the gray dried, I
airbrushed Mission blue-gray topsides, using some low-tack yellow Duck (hah!)
brand painters tape for masking. I was delighted to see very little bleeding
around the edges, since I’d pressed down the tape with cotton buds to get a good
seal. Mission touches up easily; I only had one place on the top wing where the
touchups showed until I finished weathering.
That was done heavily, to reflect the muddy tropical setting. I used Flory washes of white on the mismatched spot and grime all over, most of which I removed. I left some heavy spots where the wash beaded and dried. The resultant finish captured what I was after: dulled, dirty, hard-working like a farm tractor. I chipped the wing roots, fuselage around the canopy openings, and walk-areas on the main float with silver Prismacolor pencil. The tires got wear and the exhaust got staining with artist’s pastels.
I installed the landing gear, which proved tedious. Finding any positive spots to cement it into place was guesswork. Eventually, with CA glue and patience, I had the Duck sitting on its wheels.
The two underwing bombs and the prop-tips let me experiment with pink primer, before I put down any yellow. I’m sold on pink primer now. All that remained was to paint landing lights and stretch some EZ-line for the radio aerials. The final step involved posing the two figures on the aircraft.
| CONCLUSIONS |
Who doesn’t love a Grumman Duck? It’s an interesting aircraft with an interesting history. I’d have liked a kit with better canopies, sturdier landing gear, and a bit more detail inside, but the old Airfix kit is still worth a few dollars as it invites scratch-building.
I will be on the lookout for more Ducks and may just live with the canopy closed next time. If I see the Valom kit at a show, I may give that a go, too.
If nothing else, this kit increased my confidence to build more of the 1/72 biplanes in the stash.
| REFERENCES |
Naval Encyclopedia, “Grumman J2F (1936).” https://naval-encyclopedia.com/naval-aviation/ww2/us/grumman-j2f-duck.php
16 September 2025
Copyright ModelingMadness.com. All rights
reserved. No reproduction in part or in whole without express permission from
the editor. If you would like your product reviewed fairly and fairly quickly, please contact the editor
or see other details in the
Note to
Contributors. Back to the Main Page
Back to the Review
Index Page
Back to the Previews Index Page