Airfix 1/72 J2F-6 Duck
|
KIT # |
3031 |
|
PRICE: |
$8.50 |
|
DECALS: |
NAS Patuxent River ('43); OA-12 USAF Rescue Sqd, Elmendorf Alaska ('48) |
|
REVIEWER: |
Robert Shockley |
|
NOTES: |
Decals: MicroScale, item# 72-448 (Grumman J2F-1/4/6), 4 different options |
|
HISTORY |
Dawn rises on a pimply faced kid of 19, bobbing along in a raft on a 2 foot ocean swell, whipped up with whitecaps in a choppy breeze somewhere in the middle of the south Pacific ocean. "I am SO screwed..." he thought. Still suffering from the ditching of his own aircraft the previous
afternoon, and now, surrounded by sharks, and facing the prospect of floating off to Eternity, he pondered his fate. At first, he thought the droning in his head was coming from the gash in his forehead, were he'd smacked it on the
gunsight.
But then it loudly rose to the point that he was sure that what he was hearing, was in fact, a single radial-engined aircraft roaring-in on his raft. Waving his arms wildly,
screaming for joy at being saved, he nearly fell out of the raft as a biplane relic of the 30's roared overhead, already turning into the wind to make a landing.
Everyone loves the fighters and bombers of WWII. But serving alongside all those beautiful Lightnings, Mustangs and Corsairs, were the 'Ducks'.....literally. The Gruman J2F Duck plucked
luckless aviators and sailors from the sea, got the beans and bullets to the fight serving as early COD aircraft, and flew thousands of miles of aerial recon/photo, ASW,
coastal patrol, target-tug, convoy escort and VIP missions. Designed in 1933, over 600 Ducks were produced and they served with all branches of the military from the mid 30's into the early 50's.
Though 'short-legged' with a combat radius of only a 188 miles (780 max. range), the Duck was able to island-hop it's way across the Pacific and served along each coast. (I was
unable to find out if Ducks made it to the ETO). From what I was able to find out, they were also credited with sinking and/or damaging at least 2 U-boats and also managed to
down a Zero fighter. At the end of it's production run (J2F-1 thru -5), Columbia Aircraft took over from Grumman, made a ton of -6's, and came up with an interesting varient, the XJL-1, a
monoplane version of the Duck. The Duck had seen it's Day though, and the XJL-1 went the way of most 'X'-planes, which was to the scrap heap I would imagine.
A pic of this plane can be seen at http://www.pimaair.org/columbi.htm (at the time of this review, 01/24/00).
Modelers can choose from either this Airfix kit, or from an earlier Glenco J2F-2 in 1/48th scale. You can also rent the movie "Murphy's War" which stars a Duck.
|
CONSTRUCTION |
As with any kit, I always start with the ordnance, in this case (2) 250 lb bombs. (...this way, when you run into glitches during the rest of the construction, you can at least 'fly' your bombs thru the air while making 'whistling' noises...). Going together with no problems, I finished the bombs off by using yellow decal sheet to provide for the yellow 'H.E.' stripes at the nose of the bomb. It was certainly easier than masking each bomb, and this way I didn't have to worry about using yellow paint, which for me has always been my nemesis. The kit is pretty decent externally: medium grey colored with raised rivets (I lightly sanded these), raised wing-rib lines (not raised enough if you ask me, couple of coats of paint and they're gone), not too much flash and only a couple of sinkmark 'dimples'. The interior is a joke, though the bulkhead is a sound unit to stick lots of stuff onto for detailing.
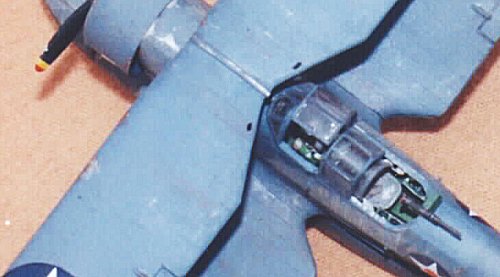 A friend provided me with some great interior shots of the real thing , but being such a small scale, it was quite difficult to put all the detail into such a tiny fuselage. I opted to
scratchbuild the gunners seat, put seat cushions on the pilots seat, drill 'lightening holes' on the pilots seat frame, add ammo racks for the gunner, scratchbuild a radio and make some basic interior detail out of sheet styrene. The pilots seat cushions were an easy job, just using white Squadrons Putty, shaped when semi dry. The Eduards' seat belts really help, though I lost quite a few pieces in the carpet. Fortunately, there are plenty provided, and should be enough to do several different planes. This was my first time using them, and I'm
A friend provided me with some great interior shots of the real thing , but being such a small scale, it was quite difficult to put all the detail into such a tiny fuselage. I opted to
scratchbuild the gunners seat, put seat cushions on the pilots seat, drill 'lightening holes' on the pilots seat frame, add ammo racks for the gunner, scratchbuild a radio and make some basic interior detail out of sheet styrene. The pilots seat cushions were an easy job, just using white Squadrons Putty, shaped when semi dry. The Eduards' seat belts really help, though I lost quite a few pieces in the carpet. Fortunately, there are plenty provided, and should be enough to do several different planes. This was my first time using them, and I'm
happy with the results. The gunners seat is made from 3 sizes of styrene and came out looking just like the real thing. The kit supplied seat looks like an ugly thick "L", and should be replaced. Only lap belts were used with this type of seat.
The pilots seat-back serves as the locating point for the radio, which is basically just a styrene 'box', that I drilled holes into to
represent the dials. It's partially covered by armor plate, so detail accuracy was sacrificed a bit. You really have to look to be able to see the thing at all, but it does help to fill-in the interior between the two seats. I wish some good 1/72nd scale .30 & .50 cal. machine guns were available, as most 1/72 handheld machine guns are basically just a length of rectangular
plastic with a 'barrel' sticking out of one end. I added a scratchbuilt ammo can to mine. An interesting feature of the Duck was that there was a hinged panel just aft of the machine gun,
that allowed the ammo can to be left on the gun when the gun was in its 'stowed' position. I briefly thought of recreating this feature, but sanity
prevailed and I modeled the gun in
the 'ready' position. (I would have done it with that Glenco 1/48 Duck though). 'T' & 'L' shaped
Plastruct styrene strips were used on the cockpit floor, and a set of rudder pedals were added.
Happily enough, the kit decals provide for a nice control panel. Should you decide to add figures, a decent pilot is included, though you'd have to scratchbuild a new stick to get it
to his hand. The gunner is a 'upper-half torso' type. Typical of the era, but in any case, there's NO room for a gunners legs, so it's no surprise the figure was designed as such. The
cargo area rests just under the gunners position, and comes with two rough seats resting against the rear bulkhead. The only modifications were to run some
Plastruct angle strips down the deck. The best way to see into the interior is to shine a light from the opposite side window. Diorama People could really make something work with in this area; ...
I'm thinking "Sailors offloading a couple of cases of beer on a beach...".
The last job to be completed before I sealed the fuselage was to do the prep work for the wing rigging wires. This is my first attempt at rigging a biplane and I came up with the theory
that the stronger I could make it, the better. My models tend to get 'knocked-about a bit', (dogs usually), so I wanted this thing to be super-strong.
I first drilled tiny holes thru the fuselage at the locating points for the wires (I found 3 or 4 Duck pictures on the web, none of which however were combat shots).
Using 1lb test fishing line, I then drilled another small hole thru a small piece of styrene, and knotted the line thru the piece, which was then glued inside the interior of the fuselage with the lines
coming out of the locating points. This technique works really well as far as strength is concerned. I'd consider doing this for hanging large scale model planes. The drawbacks are;
first, during the rest of the construction, you'll have 6 lengths of wire bobbing about that do tend to get in the way; secondly, you must carefully check the fit of the cockpit assembly and the
wire-line backings; and finally, as you paint the fuselage, paint will accumulate on the wires which can ruin the effect. I'd recommend either masking the lines or cleaning them after each painting application.
The locating pins messed-up the alignment of the fuselage halves, so these were cut off.
|
PAINT & DECALS |
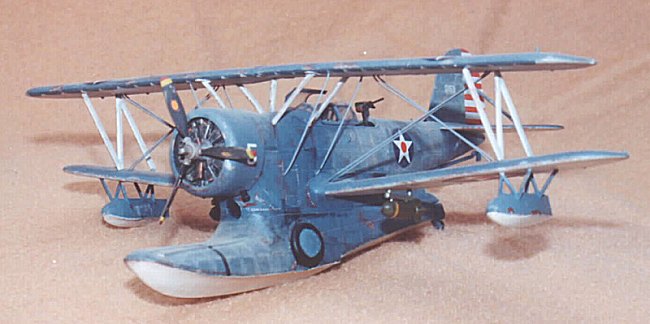
 With the fuselage together and the only bad seam filled (upper seam on the float), I decided to paint the aircraft before adding the wings. Test fittings showed that the fit of the wings was snug, so I didn't anticipate having to fill-in any seams (this proved to be only half-true). There are some pretty colorful variants of Ducks to choose from;
aluminum & yellow, aluminum & red, glossy blue & silver, and several other variations. This being a 'bombed-up' Duck, I went with a wartime Intermediate Blue (Modelmaster FS 35164) over Testors Flat White, all heavily weathered with black washes, rust washes, paint chipping, and pastel
drybrushing.
With the fuselage together and the only bad seam filled (upper seam on the float), I decided to paint the aircraft before adding the wings. Test fittings showed that the fit of the wings was snug, so I didn't anticipate having to fill-in any seams (this proved to be only half-true). There are some pretty colorful variants of Ducks to choose from;
aluminum & yellow, aluminum & red, glossy blue & silver, and several other variations. This being a 'bombed-up' Duck, I went with a wartime Intermediate Blue (Modelmaster FS 35164) over Testors Flat White, all heavily weathered with black washes, rust washes, paint chipping, and pastel
drybrushing.
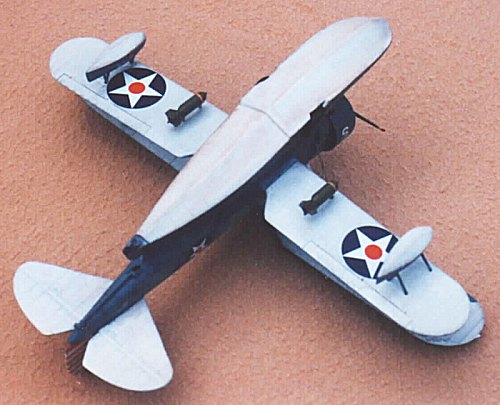
The upper-wing blue 'scallops' over the leading edge onto the underside of the upper wing slightly. This was done with regular masking tape and careful trimming with an exacto knife. Before the wings were installed, I added the floats (very sturdy little things, nowhere near as spindly as I thought they'd be), and drilled out the holes for the rigging wires. With the wings being solid, one piece items, I planned to finish the rigging process thusly: pull the wires snugly thru the wing holes, glue them in, snip the ends off, fill, then sand and repaint the holes. And what do ya know, the darn thing worked! Sturdy as can be, and with good dimensions (I could've gone with a thinner line, but this works). I did manage to wipe-out some ribbing detail, but not too much.
The only thing I should've done was wait to install the wing floats, as the wires came out pretty close to the float struts. I also should have test fitted the upper wing before installing it. The strut that sits along the centerline of the fuselage, just in front of the canopy, is a tad too tall, which resulted in a slightly 'bent-upwards' lower wing. I could see this happening as I installed the wings, but was
powerless to prevent it without tearing the plane to bits in the process. Another test fit that I should have done (you would think
I would have gotten the point by now), was with the struts going from the tail to the tail-planes. These also were too long, resulting in a slight downward angle of the tail planes. The canopy is a one-piece item with a hinged pilots window. I cut off the rear canopy (normally,
this was stowed between the gunner & pilot during flight, but the kit piece stuffed in there would look like junk, so I ditched it). I sawed off the gunners window (too thick and blurry), and fashioned a new one from some clear plastic and masking tape
frames. To get the pilots canopy firmly secured (should you model it 'open'), you'll need to file an appropriate angle on the
separate piece, so you'll have two good surfaces to cement together. The only other body-mods were to snip-off the snub of plastic connecting the arrestor hook to the body, and drill-out the exhaust pipes.
Ducks easily spent as much time parked on land as they did floating on the water, so doing this plane with the wheels down is entirely appropriate.
I fully intended to do just that, put the wheels 'down', that is, until I broke the left gear leg (they ARE spindly). This is good though, as I am now forced to build a water-diorama to display this
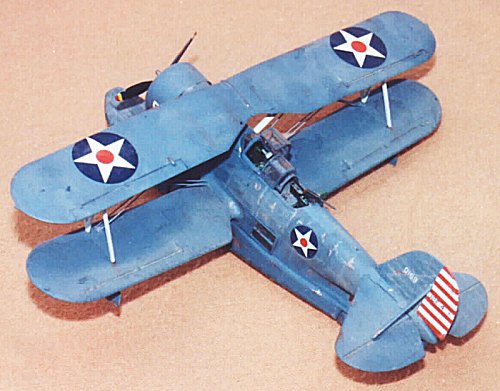
thing, right? For the decaling, I chose to represent a worn mid-war Duck that has yet to have it's pre-war National insignia repainted. In spite of all the time spent on research, looking for a particular aircraft to depict, I decided to use a variety of markings provided by the Microscale sheet that I felt looked 'right', so detail-people, please forgive me. The propeller tips
(minor touch-up painting required here), and the tail fin markings also require a little trimming. Micro Set & Sol was used liberally to get everything down nice and
snug.
|
CONCLUSIONS |
 The first of a series of floatplanes I've started upon, the Duck turned out to be quite a project to get a decent model out of. I like the subject matter, as it is a rather uncommon
aircraft. It also provided me with a testing ground of sorts to try out some new techniques, and I learned quite a bit during the research phase. For instance, everywhere I looked, stats were saying
that the Duck (and just about every other type of patrol bomber of the era as well) could be fitted with two 325lb depth bombs. It took me weeks to learn that out of all the model planes
ever built, maybe 3 or 4....(can you believe it?)...have 'depth bombs' as a feature. Anyway, I finally found a picture of the things (they look sort of like miniature 'Little Boy' atom bombs. Accurate Miniatures 1/48 Atlantic Avenger has an excellent pair. I wonder if their B-25 'sub-hunter' version due out this year will have a belly-full of them?).
It'll be a tricky scratchbuild in 1/72nd scale, should you decide to try.
The first of a series of floatplanes I've started upon, the Duck turned out to be quite a project to get a decent model out of. I like the subject matter, as it is a rather uncommon
aircraft. It also provided me with a testing ground of sorts to try out some new techniques, and I learned quite a bit during the research phase. For instance, everywhere I looked, stats were saying
that the Duck (and just about every other type of patrol bomber of the era as well) could be fitted with two 325lb depth bombs. It took me weeks to learn that out of all the model planes
ever built, maybe 3 or 4....(can you believe it?)...have 'depth bombs' as a feature. Anyway, I finally found a picture of the things (they look sort of like miniature 'Little Boy' atom bombs. Accurate Miniatures 1/48 Atlantic Avenger has an excellent pair. I wonder if their B-25 'sub-hunter' version due out this year will have a belly-full of them?).
It'll be a tricky scratchbuild in 1/72nd scale, should you decide to try.
Pro's: Unusual subject matter, pretty decent packaging by Airfix (back side of the box features a few pictures of real Ducks), cheap price, relatively good molding with little flash or
sinkmarks. Interior bulkhead assembly is 'detail-capable', though a tight fit. Good diorama appeal (as all COD or Utility aircraft are).
Con's: Poor canopy, no interior to speak of, fragile main landing gear, inaccurate
fuselage & tail struts, limited decal options, crude instructions. Trailing edge of cowling is too thick, shows hollow cowling interior.
If you would like your product reviewed fairly and fairly quickly, please contact the editor or see other details in the Note to Contributors.