
Tamiya 1/32 F4U-1A Corsair
| KIT #: | 60325 |
| PRICE: | $120.00 or so |
| DECALS: | Three options |
| REVIEWER: | Donald Zhou |
| NOTES: | Advantages: Well detailed, Accurate (mostly), Big and Choices of bomb or drop tank. Disadvantages: engine still wrong for this particular model of the Corsair, small detail discrepancies here and there. |
| HISTORY |
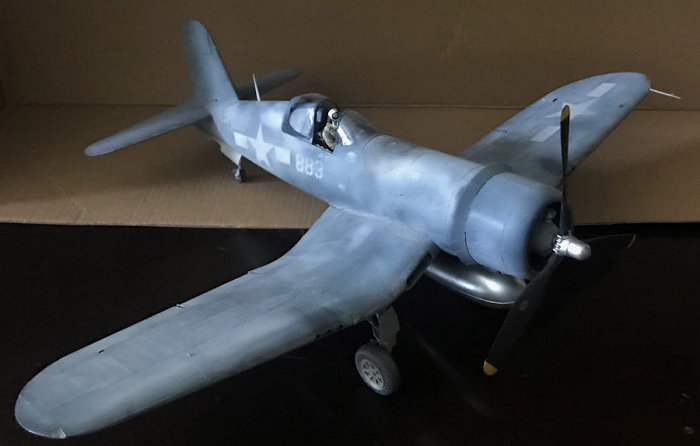
Umm….I’ll refer you to Mr. “History Reviewer” Tom Cleaver and one of his many reviews on the said plane…..See a particularly nice example here. But ahh yeah, the only reason why I bought this kit was it contained markings for one of my favorite personalities of the whole entire WW II campaign, one Gregory “Pappy” Boyington, in this case, Corsair side number 883. A plane he flew and got at least one kill with while completely hung over! Believable if you know anything about the man! I won’t delve too much into him. Google have PLENTY of information on this fascinating and sometime will have you blow your drink out of your nose man who loved his booze about as much as his Corsairs and the men that served in his Ba Ba Black Sheep!
| THE KIT |
Again, Tom Cleaver has detailed description of the kit in his reviews so go check it out. Short of it, before Tamiya made their 1/32 Corsairs, the only option was the so very ancient Monogram/Revel version that’s skimp on details and not very accurate. Trumpeter in 2003 tried with their F4U-1D. It was fairly accurate but plagued with detail mistakes, the worst being the very dodgy cowl flaps that was not accurate at all and required aftermarket to fix. They later released an F4U-4 that finally cured the cowl flap mistake. I built that in China so many moons ago. It did not survive the journey here but I was able to salvage the prop to use with my Trumpeter 1/32 P-47D.
 Finally,
in 2013, Tamiya released their 1/32 Corsair starting with the
“birdcage”…..Which I’ll finish one of these days. Later, they released this
version, the -1A. Like any other so called Tamiya “uber” kit, it’s accurate,
full of detail, that cockpit will put many aftermarket companies out of
business, and more options than you can shake a stick at including folding
or unfolded wings (in fact, the instructions is divided into two sections at
this point so it can show clearly what is what without fuss), sliding
canopy, two pilot figures, one sitting, one standing (a detailed harness is
provided if you leave the seats empty), your choice of a belly tank or a
500lbs bomb, and if you choose the wheels “up” version, you can put the
plane on a nice display stand.
Finally,
in 2013, Tamiya released their 1/32 Corsair starting with the
“birdcage”…..Which I’ll finish one of these days. Later, they released this
version, the -1A. Like any other so called Tamiya “uber” kit, it’s accurate,
full of detail, that cockpit will put many aftermarket companies out of
business, and more options than you can shake a stick at including folding
or unfolded wings (in fact, the instructions is divided into two sections at
this point so it can show clearly what is what without fuss), sliding
canopy, two pilot figures, one sitting, one standing (a detailed harness is
provided if you leave the seats empty), your choice of a belly tank or a
500lbs bomb, and if you choose the wheels “up” version, you can put the
plane on a nice display stand.
Still, as Tom described it, the greatest detail fault of this kit is the engine. 1. it’s really not at all home to write about. I have built too many Trumpeter R-2800, each of them a labor of love since they have far more parts than this and much more detailed with far more options, including different magnetos since this one, it’s only accurate for a -1D version onward, not the earlier “Birdcage” or “-1A”. Still, this is THE best interpretation of a Corsair at this scale so if you want one, this is the best option!
| CONSTRUCTION |
The kit begin with the complex and well-engineered
cockpit. The cockpit is correct without a cockpit floor (which Trumpeter goofed
with the F4U-1D kit). There are a LOT of parts, some very small that goes in
here so take your time and constantly check your references for colors. Do check
your instruction carefully so you do not get the parts mixed up since the
“Birdcage” parts are still here. This is especially true for the back seating,
with the raised seat and associated parts. Basic colors is green zinc chromate
for the general color, black for the instrument panels, with various red and
other color buttons. For the main instrument panel, a decal is put
 to
the rear of the clear bezels first. Tamiya has engineered the panel decal
reverse so you can just slide it right onto the clear part Q5. For seat belt, I
chose the clipped belt since I’ll be putting in the good looking seated pilot
figure. I tossed photo-etch part a-26 since that look like it will interfere
with the pilot’s buttock.
to
the rear of the clear bezels first. Tamiya has engineered the panel decal
reverse so you can just slide it right onto the clear part Q5. For seat belt, I
chose the clipped belt since I’ll be putting in the good looking seated pilot
figure. I tossed photo-etch part a-26 since that look like it will interfere
with the pilot’s buttock.
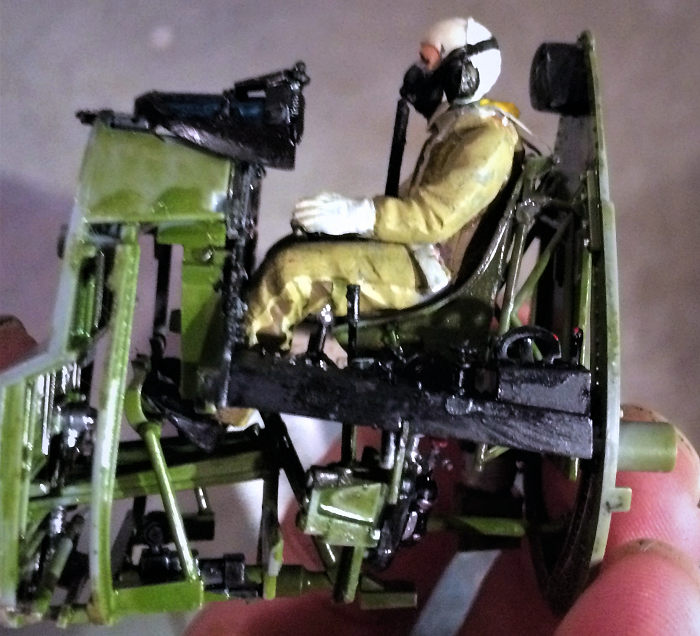
Next up is the pilot. Checking through the rest of the pages, don’t think the pilot will go in the cockpit after the fuselage halves comes together so I made and painted him now. Main paint is dark yellow uniform, tan leather helmet with clear googles with black rims and yellow Mae West. Follow the instruction carefully, do not, repeat DO NOT cement on the pilot’s left arm as this will interfere with the cockpit pieces later. Afterwards, I put him on the rear bulkhead (again, be sure to use the correct, taller, higher one). Notice the stick is trapped between the instrument and the rear bulkhead with the pilot. I carefully guided the pilot’s right hand onto the stick and only then, put on the pilot’s left arm.
The aft tail wheel well and various cockpit side wall details are next. I painted the cockpit sidewalls with green zinc chromate and the tail wheel well with Rot Brown, closest to the color involved. Finally, the fuselage halves are closed up after various bulkheads are added.
Next major assembly is the engine. Since the engine really is not correct for this version, I’ll close up shop. I bought this early when the kit first came out in 2013 and thus, has the clear engine parts but canned them for the above reason. Now I do have the Trumpeter 1/32 P-47D and have the correct magnetos left over so may show the “Birdcage” with the engine panels open. The assembly begin with the exhaust collector ring, and various panels on top of the nose, including the separate round main fuel opening. Engine was assembled according to the instructions, since I’ll be adding the landing gears, I chose the open cowling flaps. The engine was haphazardly painted since even with the open cowl, it’s hard to get a close look in there. I skipped a couple steps and added on the closed inspection panels.
The tail stabilizers are next. I assembled them according to the instructions without fuss. I skipped the tail wheel assembly for later so it would not get in the way of the painting later on.
 Next part,
you have to decide between extended or folded wings. Unlike Trumpeter example,
like the previous F4U-4 I built, Tamiya one is sturdy and won’t sag. However,
you only have the choice of “or” and not “and” so you have to pick. For this
version, I chose to build it with the wings extended. For the Birdcage, that
will be folded.
Next part,
you have to decide between extended or folded wings. Unlike Trumpeter example,
like the previous F4U-4 I built, Tamiya one is sturdy and won’t sag. However,
you only have the choice of “or” and not “and” so you have to pick. For this
version, I chose to build it with the wings extended. For the Birdcage, that
will be folded.
The assembly begin with the two wing root air scoops. It’s the air being rammed down these scoops that gave the bird the nickname of “Whistling Death”. Afterward, these are put in place on the main lower fuselage central part.
Next is the main wing spar assembly. It’s here that if you chose the extended wings, parts N19 and N20 are used to support the outer wing parts. These provide a strong support to prevent sagging. Afterwards, the main ailerons and wheel wells details are made before the upper “down slant” wings are put on top and various details added. Becareful with the bottom viewing window. On this version, a metal plate have long since blocked the clear viewing window, denoted Q1 on the part list so use that instead. Afterward, the whole entire assembly is shoved onto the fuselage. I used superglue in place to really help it stick and left the entire assembly for a whole day to dry.
Main landing strut and wheel assembly is next. Again, I didn’t do this until after painting is completed. A lot of parts goes in here and Tamiya got the small leading door shape correct, which Trumpeter missed. I also waited on the main gear door assembly.
Next major assembly are the ailerons. You have to make a choice since these can be posed either lowered or stowed. I chose stowed for this version.
I left the canopy and windscreen assembly until the very end of major assembly and tackled both outer wings next. For support, parts N58 and N51 are added to prevent the wings from drooping. Again, both the outer wing ailerons and flaps can be posed lowered or stowed. Again, I chose all stowed version. I left the prop assembly until final assembly and made the windscreen and canopy. A set of self-adhesive masks were provided so I used those to mask up the clear parts. To the paint shop we go.
| COLORS & MARKINGS |
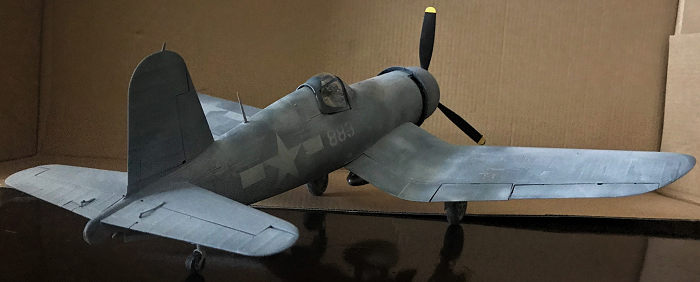
 Main colors
at this time and the marking I’m using are bottom, Light Grey. Fuselage sides,
Medium Grey, Top side, Dark Sea Blue. The problem is that this will be a Battle
of the Solomon bird, which means EXTREME sun fading and why it got put up on the
shelf of doom for so long cause I’m not quite sure about sun fading then. Now,
from most of the photos I saw of 833, it showed the birds as clean and in pretty
nice condition…But also heard a rumor that when those photo were taken, 833 was
repainted with precious coat of paint and livened up….I don’t doubt it! As at
that time, pilot heroes who had their photographs taken with “Their” birds are
either hanger queens (thus paint not quite heavily sun faded) or the bird has
recently been refurbished so they look clean and “presentable” to the press…Just
read any of Tom’s reviews on Solomon battle birds to see the tale! So yeah, I
think 833 might have been sun faded to HELL under the hot tropic sun! But how do
you do that? I read Tom’s reviews on both the Birdcage and his -1A and various
other articles but still can’t work up the courage to do this. Finally, it’s
when I saw an article telling how to use medium grey, and light grey on low
airbrush settings to sequentially achieve sun fading that I took a huge gulp,
and took a shot……
Main colors
at this time and the marking I’m using are bottom, Light Grey. Fuselage sides,
Medium Grey, Top side, Dark Sea Blue. The problem is that this will be a Battle
of the Solomon bird, which means EXTREME sun fading and why it got put up on the
shelf of doom for so long cause I’m not quite sure about sun fading then. Now,
from most of the photos I saw of 833, it showed the birds as clean and in pretty
nice condition…But also heard a rumor that when those photo were taken, 833 was
repainted with precious coat of paint and livened up….I don’t doubt it! As at
that time, pilot heroes who had their photographs taken with “Their” birds are
either hanger queens (thus paint not quite heavily sun faded) or the bird has
recently been refurbished so they look clean and “presentable” to the press…Just
read any of Tom’s reviews on Solomon battle birds to see the tale! So yeah, I
think 833 might have been sun faded to HELL under the hot tropic sun! But how do
you do that? I read Tom’s reviews on both the Birdcage and his -1A and various
other articles but still can’t work up the courage to do this. Finally, it’s
when I saw an article telling how to use medium grey, and light grey on low
airbrush settings to sequentially achieve sun fading that I took a huge gulp,
and took a shot……
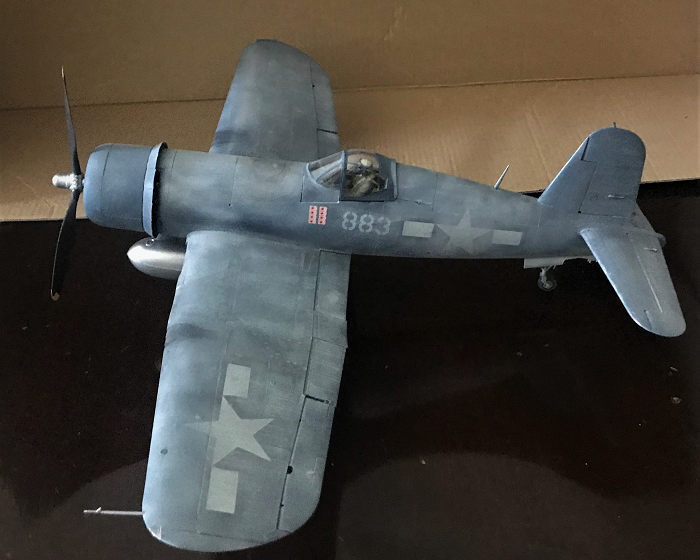
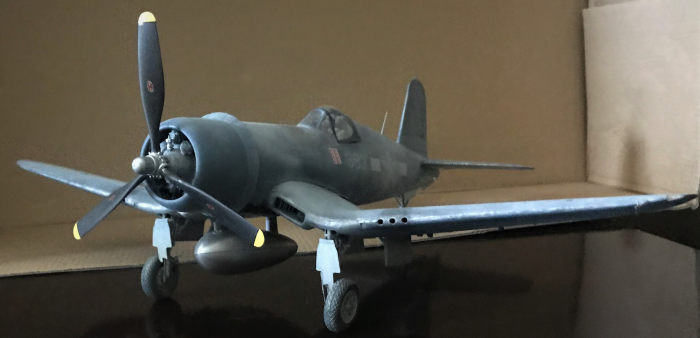
After the main painting and decaling is complete, I only put up the insignia and the fuselage number. From all the photos, 883 didn’t sport any stencils. Not surprising cause I would wager the majority wilted quickly away under the hot tropic sun. Afterward, I first took medium grey to the topmost dark sea blue, I kept PSI at 10 and turn the spray down to the minimum and haphazardly sprayed all over the top side. Coverage is haphazard, which is what it should be. You don’t want coverage to be even to highlight the fact the sun fading wasn’t even. Then light ghost grey was sprayed in the same style to the medium grey. Finally, light grey was sprayed in the same style over both to highlight the spots that are really sun faded.
The end result looked the part! The only thing wrong
was the demarcation edge lines between them are a little harsh, not natural. I
broke out my bottle of Apple Barrel artistic acrylic paint, light pavement blue,
and heavily dilute them and washed it all over the plane. This worked great in
knocking down the demarcation lines and made them look natural. It’s at this
point I also assembled and attached the landing gears so they could be weathered
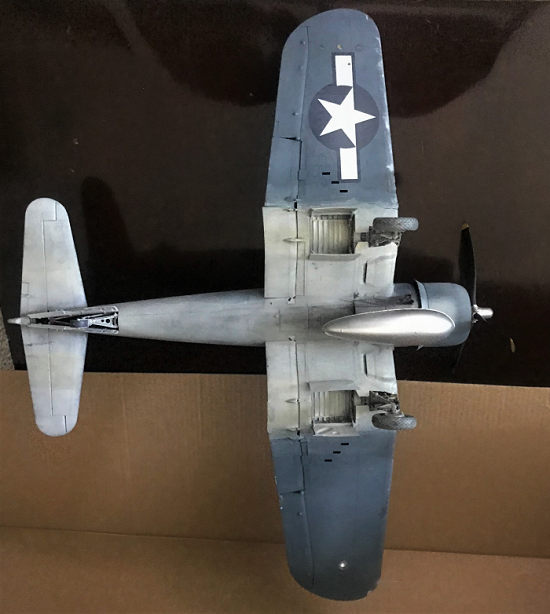
also. Per Tom’s review, Battle of Solomon birds were heavily sun faded, but not
at all dirty, maybe except the bottom of the birds where the landing gear threw
up all the mud generated by the “a free shower every single day whether you like
it or not” pop up rain storms that turned everything quickly into muddy hell
holes. So top side remained pretty clean, bottom however, I took Apple Barrel
cream and beachcomber beige, a very good name since it looks like the color of
crushed coral and applied liberally to the wheel wells, the landing gear struts
and following the airflow, the surrounding areas, including the bottom of the
vertical stabilizer. I t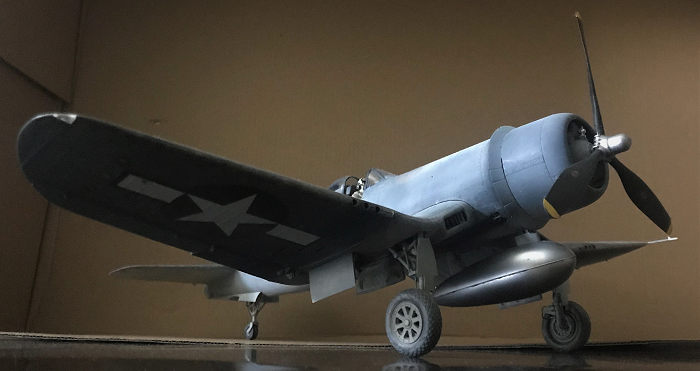 hink
it could still use a few more washes but the end result look like a plane that
kept on running itself into a muddy river, which is correct under the
circumstances!
hink
it could still use a few more washes but the end result look like a plane that
kept on running itself into a muddy river, which is correct under the
circumstances!
Next, I took some silver paint, dip a bit in thinner, then washed it on a paper towel till it’s almost dry, and dry brush it over areas like the ammo loading hatch areas, pilot boarding steps, and where the crew might walked all over doing maintenance. This is especially true along the leading edges of the wing since on those days where the runway was dry, as the plane goes full bore on its take off run, the big prop would churn up the dried coral dusts and the plane would slam into the cloud. The dusts quickly stripped away the leading edge paint, showing the silver underneath. After the silver paint was applied, I used, once again, light pavement blue to tone the brightness of the silver paint down a bit and make the paint edges softer and more natural.
Finally, I took some burnt metal, gunmetal, and jet black paints, thinned them, before wiping most of it away on a cloth, and carefully smudge the end result onto the six machine gun firing ports to denote the fact these area have been fired plenty of times but not cleaned up. The same mixture were also applied to the bottom, where the exhausts are but much more heavily. This also goes for the round main fuel tank opening in front of the windscreen. Many Corsairs had this area almost stripped down to bare metal due to the fact crews would add fuel to the forward tank, and not care a whit about leaking gasoline pouring out and the caustic fluids eventually would wear away the paint underneath.
After all of this, what I got is an aircraft that almost seen better days. The markings are almost all faded, large areas, the paint have faded to almost bare white. The only areas I forgot was the canopy and the prop. After a while, I decided not to fade or weather them, as if the plane received a new prop and canopy to show maintenance on these things were haphazard at best. The final detail are the kill markings. I know I should’ve cut the marking down at least by half cause Pappy didn’t get too much kills in this bird but decided to keep all eight markings cause it just look nicer! This is the only decal that did not go through the weathering winger cause I would wager the crews kept the kill marking as clean and as nice as possible to boost morale and show the Japs what is up!
| FINAL CONSTRUCTION |
 Final
construction begin with the wheels. I used the kit ones. Some would just
go…WHAAAAAA!!! Vinyl wheels are a disaster waiting to happen!!!! However, the
“disaster” everyone is hanging on to are just the few DML ones in the 1990’s.
Afterwards, manufactures stayed the hell away from the formula that wrecked
those wheels. Again, I have that Trumpeter 1/32 F-14B Bombcat that’s now almost
10 years old and nothing is happening with its vinyl wheels. Wheels assembly was
easy. After it got its several coat of muddy washes, put in place. Next is the
canopy, which was unmasked. Again, forgot to weather it but decided not do
anything to it. I wanted to keep it open but then again, if I do, the cockpit
will get very dusty and with this one, not very easy to keep clean so I decided
not to cement it to keep it mostly closed but can be opened to show the cockpit
details. The prop was finished next. Again, thought about weathering it but
decided not to again to offer some contrast to the airframe. The final bit was
the belly. I decided to use the drop tank to denote as if pappy is ready for
another fighter sweep. Now, the belly of the fighter, especially where the tank
was hung is heavily weathered with exhaust stains. However, the tank itself was
kept clean because mostly, the moment these things were empty, they were dumped
into the ocean to lighten the Corsair’s weight so I sprayed it with silver and
then cemented it on. After that was dry, the antenna was added and that was
that, model done!
Final
construction begin with the wheels. I used the kit ones. Some would just
go…WHAAAAAA!!! Vinyl wheels are a disaster waiting to happen!!!! However, the
“disaster” everyone is hanging on to are just the few DML ones in the 1990’s.
Afterwards, manufactures stayed the hell away from the formula that wrecked
those wheels. Again, I have that Trumpeter 1/32 F-14B Bombcat that’s now almost
10 years old and nothing is happening with its vinyl wheels. Wheels assembly was
easy. After it got its several coat of muddy washes, put in place. Next is the
canopy, which was unmasked. Again, forgot to weather it but decided not do
anything to it. I wanted to keep it open but then again, if I do, the cockpit
will get very dusty and with this one, not very easy to keep clean so I decided
not to cement it to keep it mostly closed but can be opened to show the cockpit
details. The prop was finished next. Again, thought about weathering it but
decided not to again to offer some contrast to the airframe. The final bit was
the belly. I decided to use the drop tank to denote as if pappy is ready for
another fighter sweep. Now, the belly of the fighter, especially where the tank
was hung is heavily weathered with exhaust stains. However, the tank itself was
kept clean because mostly, the moment these things were empty, they were dumped
into the ocean to lighten the Corsair’s weight so I sprayed it with silver and
then cemented it on. After that was dry, the antenna was added and that was
that, model done!
| CONCLUSIONS |
Is Tamiya’s Corsair a winner? OH HELL TO THE BONE
YESSS!!!!! Is it perfect like the god they are? Not exactly! Especially to those
single celled brained freaks who seem to have a hard-on and “shoot their loads”
the instant anything Tamiya or Hasegawa is mentioned like they are the God of
all Gods and put down anything and everything Trumpeter does (even if the
Trumpeter kit is near perfect) simply cause they missed a few things…..Like the
engine in this kit……..Still though, this Corsair shows everyone else what NEEDS
to be done in a kit as it is accurate, fits like a dreamer and have enough
options to get your juices flowing but not confuse
 you. Those
choices are very well done no matter which route you may go. Finally,
FINALLY…..GRAH!!! This is why I HATED some Tamiya’s previous offerings, like the
P-51…..Which is a super kit but gave me nightmares due to their brain gas of
using magnets and photo-etch to make the panels and flaps etc movable…..Which by
the way, DOES NOT WORK!!!!!!!!!!!!!!!!!! This kit, and Tamiya should’ve realized
this like Trumpeter did with their Me-262 kits, done away with those childlike
gimmicks and just use standard plastic parts instead. Now, if only they would
come up with a F4U-4, which is different enough (that four blade prop!) from the
previous variants of the Corsair that if they do, I will jump again. Yes, Tamiya
did finally release a -1D version but after this and the Birdcage, I just feel
it’s not different enough to warrant another $120 purchase! Again, the only
other option for the -4 is the Trumpeter one. Although that is a good kit, still
does not measure up to this one! Hope Tamiya will bite and do this cause I think
it will sell very well if they do!
you. Those
choices are very well done no matter which route you may go. Finally,
FINALLY…..GRAH!!! This is why I HATED some Tamiya’s previous offerings, like the
P-51…..Which is a super kit but gave me nightmares due to their brain gas of
using magnets and photo-etch to make the panels and flaps etc movable…..Which by
the way, DOES NOT WORK!!!!!!!!!!!!!!!!!! This kit, and Tamiya should’ve realized
this like Trumpeter did with their Me-262 kits, done away with those childlike
gimmicks and just use standard plastic parts instead. Now, if only they would
come up with a F4U-4, which is different enough (that four blade prop!) from the
previous variants of the Corsair that if they do, I will jump again. Yes, Tamiya
did finally release a -1D version but after this and the Birdcage, I just feel
it’s not different enough to warrant another $120 purchase! Again, the only
other option for the -4 is the Trumpeter one. Although that is a good kit, still
does not measure up to this one! Hope Tamiya will bite and do this cause I think
it will sell very well if they do!
But AHHH!!! I have to do this! One reason I’m so in love with Greg “Pappy” Boyington is this little t.v. show…What….What is the name?......It’s named after his famous squadron of misfits and personalities, with him being the top sheep…Dog….or is that a bear?....Anyway…What is it called, stars Robert Conrad as Pappy and a theme that goes, “We are poor little lambs, who have lost our way….Baaaa…..Baaaa……Baaaaaaaaaaa!!!!!!”…..Could someone tell me the name of that show…I watched as a kid, and forevermore, became fascinated with the “Bent Wing Bird” and Pappy ever since!!!!
The upar of the cockpit that was fashioned from an offcut of plastic card.
26 January 2021
Copyright ModelingMadness.com. All rights reserved.
If you would like your product reviewed fairly and fairly quickly, please contact the editor or see other details in the Note to Contributors.
Back to the Main Page Back to the Review Index Page Back to the Previews Index Page