
Aoshima 1/72 F2A Buffalo
| KIT #: | |
| PRICE: | $5.00 or so |
| DECALS: | Two options |
| REVIEWER: | Joe Essid |
| NOTES: |
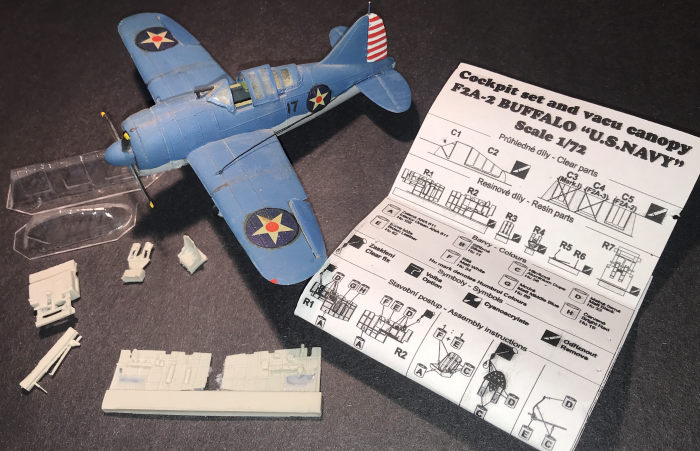
Pavla resin bits, Kit World decals. An awful kit. |
| HISTORY |
What can be said about the F2A-3 Brewster Buffalo used in the Battle of Midway that's favorable? Popular lore and most scholarship has it that the aircraft, so promising as a prototype, became a slug with armament and pilot protection added. The successful use of a different version by the Finns against the Soviets, or Pappy Boyington's praise for the early plane's maneuverability, do not offset the numbers: Japanese aircraft mauled the brave Dutch, RAF, and RAAF pilots they fought, and at Midway, they did the same of our Marine pilots of VMF-221. The operational history gets covered well enough at Wikipedia to send readers there.
 Brewster's
stumpy cigar did sometimes shoot down the enemy and, to be fair, many
experienced fighter pilots in Hurricanes and Spitfires found out the hard way
not to dogfight Zeros. Brewster pilots in Malaya, Burma, and the Dutch East
Indies may have enjoyed higher kill ratios than popular lore would have it, but
as Dave Rannals put it so well in his
Buffalo
review, victories like that become Pyrric when outnumbered 10:1.
Brewster's
stumpy cigar did sometimes shoot down the enemy and, to be fair, many
experienced fighter pilots in Hurricanes and Spitfires found out the hard way
not to dogfight Zeros. Brewster pilots in Malaya, Burma, and the Dutch East
Indies may have enjoyed higher kill ratios than popular lore would have it, but
as Dave Rannals put it so well in his
Buffalo
review, victories like that become Pyrric when outnumbered 10:1.
In any case, we'll never know for sure. Had the Buffalo's pilots more time to develop tactics like those of the AVG for P-40s or Thatch's famous "weave" for Wildcats, a different story might be told.
The best that can be said for the Brewster in the Pacific? Like Bell's Airacobra, it bought the Allies time in hard-fought campaigns against Imperial Japan's juggernaut. Every highly trained Japanese pilot lost in that war of attrition could not easily be replaced.
If you like an underdog who fights against impossible odds, especially a stubby underdog, look no further than the Brewster Buffalo.
| THE KIT |
Everyone reviewing 1/72 Buffalos here has been smart enough to avoid this kit, so I'll rush foolishly in. It may prevent you from buying one, though the old kit would be fine for teaching a child how to glue things together. I happened, however, to own one already from preteen years and I wanted to rebuild it. Again. I'd spruced it up 40 (!) years ago.
Memory is a cagey beast. I half-recall purchasing a bagged kit of a Buffalo in the early 1970s, but it may well have been boxed. Only during my 2021 rebuild (thanks, Internet!) did I confirm my kit was indeed Aoshima. In retrospect, I also picked a kit that garners nothing but scorn from serious modelers today. Back then? Only game in town, as Airfix Buffalos rarely appeared at Bob's Hobby Center and never elsewhere nearby that carried kits, such as toy stores, department stores, drug stores...times have changed.
Let's pause for a second, you young whipper-snappers, to recall a world where you could not mail-order kits easily. If the local shop didn't have it...it did not exist. On family vacations, you scoured local hobby shops for new fodder for the tube of Testor's. In any case, at age 12 or so I'd recently heard about Brewster's ill-starred bison and just had to build one. The rotten-horrible Aoshima is only one of three kits to survive from my childhood, along with a Monogram 1/72 P-36 Hawk and 1/32 Lee tank. The other two kits got done in my mid-teens and still present well. I have a palpable sense of how time rushes by when I see kits, the three I'd save first in a house fire.
 Enough
nostalgia. The resulting Brewster was good for sitting by the table when we
played Avalon Hill's old classic board game, Midway. In the 1980s, I worked it
over with a brush in a closer-to-spec Pactra medium blue over gray, adding an
aircraft number 17 painted by hand, painting around Aeoshima's early-war US
national insignia and hand-painting tail stripes incorrect for the Midway battle
but matching earlier schemes for aircraft on the island. I topped it off with a
gun sight in front of the canopy and, in thick black thread, stretched a radio
aerial from wing to tail. That marked my attempt to replicate Midway aircraft
No. 17, shown in Profile 217: The Brewster Buffalo. The book has the national
insignia and radio aerial for a pre-battle F2A-3. The Aeoshima radio mast is
correct, yet the kit's prop has the wrong spinner for a Midway bird.
Enough
nostalgia. The resulting Brewster was good for sitting by the table when we
played Avalon Hill's old classic board game, Midway. In the 1980s, I worked it
over with a brush in a closer-to-spec Pactra medium blue over gray, adding an
aircraft number 17 painted by hand, painting around Aeoshima's early-war US
national insignia and hand-painting tail stripes incorrect for the Midway battle
but matching earlier schemes for aircraft on the island. I topped it off with a
gun sight in front of the canopy and, in thick black thread, stretched a radio
aerial from wing to tail. That marked my attempt to replicate Midway aircraft
No. 17, shown in Profile 217: The Brewster Buffalo. The book has the national
insignia and radio aerial for a pre-battle F2A-3. The Aeoshima radio mast is
correct, yet the kit's prop has the wrong spinner for a Midway bird.
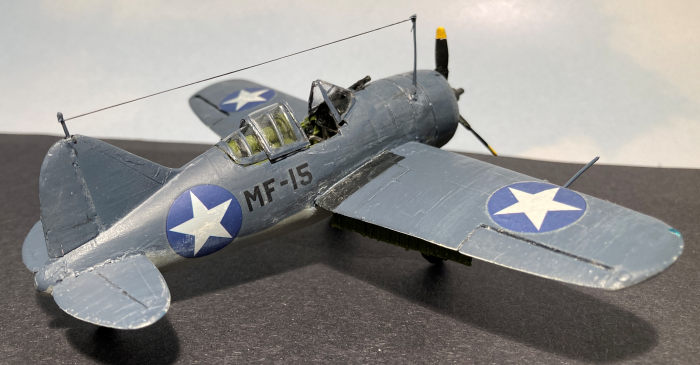
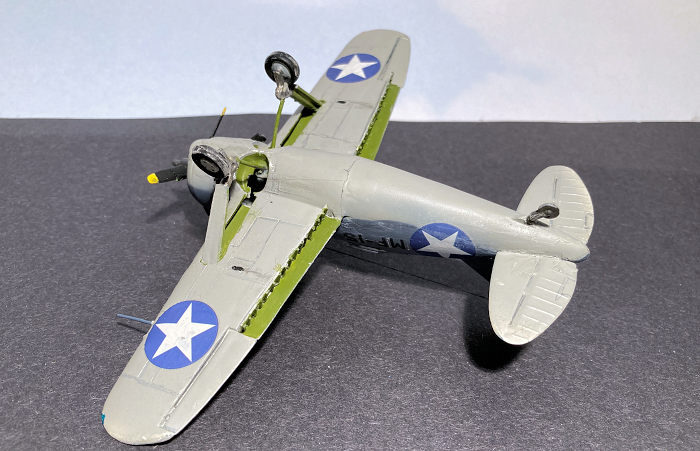
In any case, the prop on my kit had one broken blade, re-attached at a wonky angle. The radio mast? Just a stub. My plan at age 60 (where DID those decades go?): the third time building the same kit would be the charm. Magic of some sort would be needed: I would need to turn a pig's ear into something closer to a Hasegawa kit, if not a silk purse.
Aoshima provides a kit with raised panel lines, NO interior, and rivets galore. Add a toylike moveable prop and control surfaces on the wings, all to show the modeler the lack of detail beneath and inside the kit, and you have the worst kit I've ever built of reputedly the worst fighter of the Second World War. What could possibly go wrong?
This time around, I decided I wanted 1) to keep the kit for nostalgia's sake and not throw it against the wall 2) make it less toylike but not a perfect replica and 3) See if it would be worthy of what my late friend (and P-51 Mustang purist) Gary called the "Clunker Collection" on my bookshelf.
| CONSTRUCTION |
First, I had to disassemble the model. The old glue welds yielded easily to my hobby knife's ministrations, except near the front edge of the vertical stabilizer. I also found that my 1980s rebuild had one brilliant feature: the landing-gear struts, as fragile as a real Buffalo's, could be easily swapped for sturdy sewing pins. I replaced them with bits of galvanized wire for an electric fence, as I detailed the wheel wells. A light sanding enabled the wire to accept enamels.
Luckily, these modifications proved easy, as the actual plane's wells in the fuselage were pretty much gaping holes. I added three raised surfaces to flaps made from sheet polystyrene, using black thread dragged through white glue. Later I stretched sprue to make the radio mast and pitot tube.
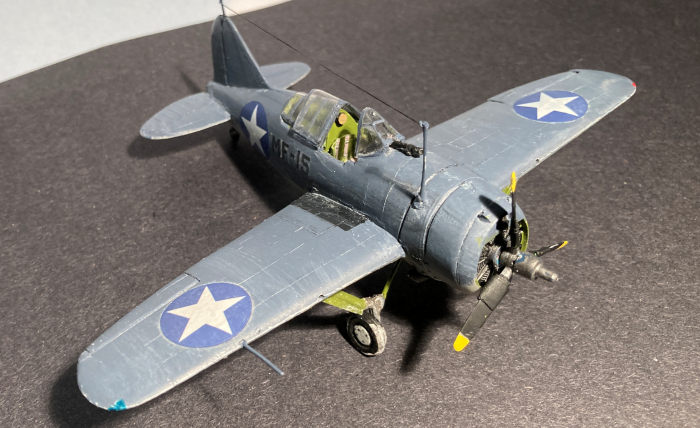
 The cockpit
was going to need a lot, just another hole to fill. Aoshima has the bulkhead
behind the pilot cut open with a large slot for...a sliding canopy? I filled
that in, to hold a life-raft container behind the F2A-3 pilot and under its
roll-over bar. Pavla does not include either part, nor (of course) did Aoshima.
I decided to scratch-build the cannister and roll-bars (later I forgot to
install the bar).
The cockpit
was going to need a lot, just another hole to fill. Aoshima has the bulkhead
behind the pilot cut open with a large slot for...a sliding canopy? I filled
that in, to hold a life-raft container behind the F2A-3 pilot and under its
roll-over bar. Pavla does not include either part, nor (of course) did Aoshima.
I decided to scratch-build the cannister and roll-bars (later I forgot to
install the bar).
That issue tackled, I went after the prop. The spares boxes did not yield a suitable propeller, but I had one close enough and the blades were the right size. I built up the hub using some left over parts from a Monogram kit and green Frog Tape to simulate the two-step propeller. I used Ian Robertson's excellent 1/32 scale build of this plane to guide me. Next I removed the atrocious exhaust openings on the kit and installed sprue I'd drilled out for exhaust stubs.
Pavla's aftermarket interior and canopy proved so nice
that I wondered whether or not to make a diorama with the Aoshima kit as a wreck
beside a nicer Brewster model sporting the Pavla parts. In the end, nostalgia
made me press on. Pavla's interior fit fine, with some sanding and fiddling,
though clearly it was intended for a Hasegawa Buffalo that I want badly to
build, now. Detail is crisp and close indeed to what I see in photos of actual
planes (a wreck pulled from a lake in Finland is to date the only extant
Buffalo). Pavla's small resin parts are quite fragile. I broke the control stick
and replaced it with a plastic rod after I put the cockpit in.
Other than the Pavla bits, parts fit was abominable. Gaps big enough to fly
Betty Bombers through appeared, and I used generous putty to eliminate a misfit
about 1/32" where the wing section simply would not mate with the fuselage.
| COLORS & MARKINGS |
It seemed really cool to have the tail stripes on the aircraft faintly appear, as well as the red "meatball" on the US star. Some artwork done of the Midway Marines' craft show that but I've not found it in a photo. Another option might be to have the rudder darker than the aircraft, as seen on a photo of a Wildcat on the ground at Midway, after being damaged during the battle. Ground crew painted over the plane's tail stripes to obliterate them, and the paint is far darker than the Grumman's sea blue upper surfaces.
A modeler must realize that markings varied, especially in the chaotic early days of the Pacific War, when the issue was very much in doubt for US forces facing Admiral Nagumo's highly trained (but ultimately fragile) carrier strike force. I recall when, in the 1990s, I built an Airfix Devastator with Midway markings. I asked about wheel-well colors on a forum online, there not being so many photos available in those early days of the Internet.
 A forum
member knew George Gay, the only survivor of Torpedo Eight. The story may be
bunk, but Gay told the person who answered me that, in effect, "I can't recall
that about the Devastator's colors. I was really busy with other things."
A forum
member knew George Gay, the only survivor of Torpedo Eight. The story may be
bunk, but Gay told the person who answered me that, in effect, "I can't recall
that about the Devastator's colors. I was really busy with other things."
So, in the end, what matters? Enjoying a kit and honoring men like Gay or Major Parks, who commanded VMF-221 and died in his Buffalo over Midway. I airbrushed the kit in Model Master's Intermediate Blue over Gull Gray, with Fun-Tac putty to give me a demarcation line. For panel lines, I used a mechanical pencil over the raised detail but that got lost, so I re-scribed many lines and did it all again, with a final spray. The blue looked darker than I'd like, so I applied a light gray wash to the upper surfaces.
Mistake! It dried fast and looks too heavy, as if the airframe has been sitting in salt spray for weeks. Well, I'm going to live with it. I reduced the effect somewhat by strategic uses of charcoal or pencil smears to mimic exhaust and oil staining.
There was nothing to be done about how the wash rendered transparent the otherwise excellent Kits-World decals (set KW172218). The set includes markings for the frequently modeled F2A-3 of Capt. John Humburg, who shot down two Japanese planes at Midway in his Buffalo, as close a vindication of the type as we'd get in US hands.
Pavla's canopies fit the Hasegawa kit, which I presume to have correct proportions. Aeoshima's are not even close. The canopies finally fit acceptably through my liberal use of Elmer's Clear School glue to close seams. In the process, I forgot the roll-bar bracing that went over the life raft in an F2A-3, behind the pilot's headrest and armor. Those bits got fabricated from sheet plastic and a nub of sprue. I decided to leave the roll bar out, as I'm not making a replica. It would hardly be visible with the canopy open.
 An interesting issue arose in my research: the canopy
in the F2A-3 had a sliding middle hood with only peripheral framing. It's not
really like a Malcolm Hood, as the hood consists of three Perspex pieces joined
and fused, without frames. In a larger scale kit I'd want those clear seams to
show. In 1/72 it's fine to have a clear bubble.
An interesting issue arose in my research: the canopy
in the F2A-3 had a sliding middle hood with only peripheral framing. It's not
really like a Malcolm Hood, as the hood consists of three Perspex pieces joined
and fused, without frames. In a larger scale kit I'd want those clear seams to
show. In 1/72 it's fine to have a clear bubble.
Aoshima's tires and wheels are horrid. I had nothing else close in the parts box, so I puttied and sanded the hubs smooth, painted them gray, then added four wheel lugs with a #2 pencil, giving a second light coat of gray over the hubs to show the lugs very faintly. Not bad in the end, for a wretched kit that will sit with others in the Clunker Collection.
Photos revealed that the aerial needs a bit of trim, which I did later. The weathering looks less pronounced when the model sits in the case; the photos under a stronger light make the hapless Brewster look like a weather-beaten, salt-streaked. beach buggy. Time for a fourth rebuild as wreck?
| CONCLUSIONS |
Lipstick on pig makes a better looking pig, not a Hasegawa kit. An Aeoshima's Brewster is not worth your while except as a wreck in a diorama or to teach a kid what this mad hobby is all about. Newer, better kits abound. If you do embark on a rebuild of an old example, bring your skills and patience.
| REFERENCES |
https://en.wikipedia.org/wiki/Brewster_F2A_Buffalo
Naval History and Heritage Command. F2A Brewster.
Robertson, Ian. "Czech Model's 1/32 Scale Brewster F2A-3 Buffalo" http://www.hyperscale.com/2008/features/f2a332ir_1.htm
9 November 2021
Copyright ModelingMadness.com. All rights reserved. No reproduction in part or in whole without express permission.
If you would like your product reviewed fairly and fairly quickly, please contact the editor or see other details in the Note to Contributors.