| KIT #: | 48032 |
| PRICE: | $42.00 SRP |
| DECALS: | Four options |
| REVIEWER: | Dale Rannals |
| NOTES: |
| HISTORY |
Ahhhh,
yes…..the Brewster Buffalo.
Mention the
 lighter
versions.
Throw in inexperienced
lighter
versions.
Throw in inexperienced
| THE KIT |
I was going to do a full preview of this kit but then Scott informed me
that the plastic was the same as the Classic Airframes Buffalo kits (they do
both a F2A-1 and a Model B-239) except for the fuselage, which is lengthened for
the F2A-3.
So instead I will send you
here for what’s in the box:
You do get all the extra parts from the common sprue
layout, including cuffed and uncuffed props, two types of tail wheels, two types
of fuselage tails, a propeller spinner, and a myriad of different fuselage
bottom glass and canopy styles.
Most of these parts are useless, due to the l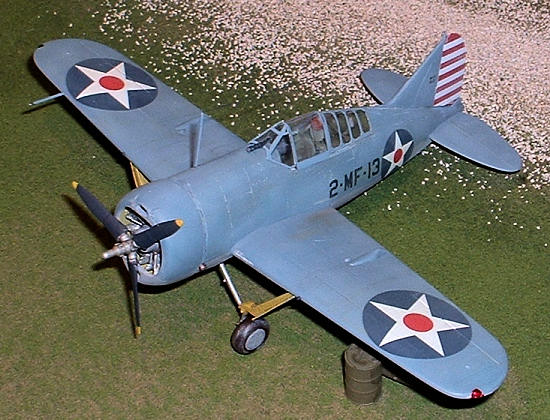 onger
fuselage of the -3, but I believe all is here to make a Model B-339-23 version.
(This was an export version of the -3)
onger
fuselage of the -3, but I believe all is here to make a Model B-339-23 version.
(This was an export version of the -3)
Interestingly, I also spied two pieces that to me look like 20mm
cannon for the wings, so one could make the one airframe, an F2A-3, so equipped
for testing this armament.
Easy enough to scratch build but a neat inclusion
nevertheless.
Instructions are standard Special Hobby. You get a small 12 page booklet
with a history, sprue layouts (and part number assignments), assembly drawings
and color callouts (in Gunze colors).
Component placement for some parts are vague, color
callouts in the assembly steps are rather generic, and part numbers were found
to be incorrect on a few.
The last three pages are devoted to the paint and decal
placement guides for the aircraft.
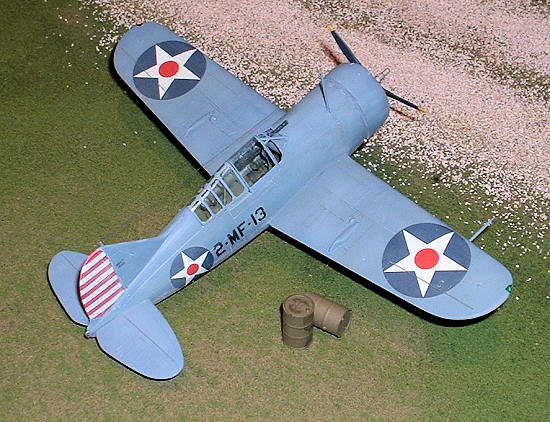
The decals, printed by Aviprint, include markings for three (well,
actually four) different aircraft, all non-specular blue grey over light grey.
You can do an aircraft from VF-2, USS Lexington,
November 1941; another from VMF-211 at Hawaii in April 1942 (this one has the
oversized upper wing insignia and red and white striped tail, so at least a bit
different from the norm); finally a USMC aircraft from VMF-221 at the Battle of
Midway. The forth aircraft is achieved by changing the “MF-15” side code of the
last aircraft to “MF-11”. Also,
a subtle difference in assembly that isn’t called out in the instructions is the
| CONSTRUCTION |
For this build the first thing I did was read Scott’s review of the
Classic Airframes Brewster B-239.
This is an excellent article on building this kit. I
recommend printing it out and keeping it handy while you are building.
http://modelingmadness.com/scotts/axis/239buffalo.htm
Thusly armed with this information, I dove in.
Construction starts, not with the cockpit but with the
wings.
Fairly straightforward…a couple of resin inserts for the wheel wells and
then the two top wings halves mate up with the single bottom piece.
The bottom glass blanking plate is attached here; its
fit leaves a lot to be desired.
I can only hope the glass piece itself fits better if
that’s the aircraft you choose to do.
Next on the agenda is the fuselage wheel well/accessory
bay forward of the cockpit.
This is actually a very nicely detailed area;
unfortunately it is also an area that will be hard to see once done.
Here is where I deviated quite a bit from the
instruction sequence.
I moved up a few steps and glued the aft cockpit
bulkheads and tail wheel insert into the right fuselage half and then taped the
fuselage halves together so I could check/adjust alignment of these parts.
 This I set
aside and let dry.
I then went back to the accessory package and started
assembling that.
Part placement here is a bit vague but in the end it came out
okay….again very little of this is going to be seen.
I left the two machine guns off this assembly for that
very reason.
While this was still drying, I glued the assembly into the wing
bottom and slipped my taped fuselage over and onto it, again to keep everything
in place and aligned properly.
Confused yet?
Don’t worry, this little plane is a confusing build and
it gets worse.
This I set
aside and let dry.
I then went back to the accessory package and started
assembling that.
Part placement here is a bit vague but in the end it came out
okay….again very little of this is going to be seen.
I left the two machine guns off this assembly for that
very reason.
While this was still drying, I glued the assembly into the wing
bottom and slipped my taped fuselage over and onto it, again to keep everything
in place and aligned properly.
Confused yet?
Don’t worry, this little plane is a confusing build and
it gets worse.
You see, the instructions would have you assemble the accessory bay,
fuel tank/cockpit floor, engine and engine mounts all to the wing assembly.
To this you glue the right fuselage half.
Then into the right and still unattached left fuselage
halves you attach the instrument panels and cockpit bits.
Then, with all these bits perfectly aligned (of course),
you then assemble the left fuselage half to button it all up.
Sounds like trouble to me.
Luckily for me there is a problem with this kit that actually makes
assembly easier.
As I mentioned above, the plastic for this kit is the same as
Classic Airframes F2A-1 and B-239 kits, except for the longer fuselage.
(The -3 had a 10” fuselage extension forward the wing
for center of gravity purposes.)
Well, the engine mount parts were not adjusted for this
extra length; they are still for the shorter fuselage.
So if one assembles according to instructions, you end
up with an engine that is about ¼” too far inside the cowling.
It was thus apparent to me that I could not mount the engine to the
mounts.
So I started working on an alternative.
I decided to mount the engine on the forward bulkhead as
a separate assembly.
I cut a piece of evergreen sheet to lay over the
bulkhead hole that the engine originally fits into…with the engine laying on,
instead of in, this bulkhead, and with the thickness of the evergreen sheet
itself, I had the length that it needed.
I painted the bulkhead Zinc chromate yellow and after
adding pushrods to the engine (with evergreen rod) I painted it steel and grey
and put a nice dirty oil wash over it to pop out the details.
 The
nice thing about this whole mess is that without the engine attached to the rest
of the mount and accessory bay, the fuselage could be glued together, the
cockpit panels assembled into it, and the whole thing slid over and attached to
the wing assembly.
Much easier.
So that’s the route I went.
I glued the fuselage halves together and started on the
cockpit bits.
I’m not real excited about the photo-etch over film over plastic
aspect of the instrument panels.
They were hard for me to get aligned.
Still, they turned out very nice, much nicer than a dry
brushed piece of plastic for sure.
After all the bits were assembled, painted, and
detail-washed, the cockpit looks very nice.
The
nice thing about this whole mess is that without the engine attached to the rest
of the mount and accessory bay, the fuselage could be glued together, the
cockpit panels assembled into it, and the whole thing slid over and attached to
the wing assembly.
Much easier.
So that’s the route I went.
I glued the fuselage halves together and started on the
cockpit bits.
I’m not real excited about the photo-etch over film over plastic
aspect of the instrument panels.
They were hard for me to get aligned.
Still, they turned out very nice, much nicer than a dry
brushed piece of plastic for sure.
After all the bits were assembled, painted, and
detail-washed, the cockpit looks very nice.
Dry fitting the fuselage to the wing showed an okay fit, but one that
left a pronounced lip at the bottom.
Rather than putty this area and sand it smooth I opted
to trim away an appropriate amount from the fuselage in the wing join area
instead.
Once this was satisfactory I glued the assemblies together and finally
had something that looked like a tubby little
The next little problem area is the life raft/headrest assembly.
Again, a fiddly assembly.
I got it together and glued to the rear cockpit decking
and it looked pretty neat, until a couple days later when I test fitted the rear
cockpit glass on and it didn’t fit.
The life raft assembly sat way too high.
Just great.
I carefully cut it back off and proceeded to cut down
the mounting legs till the canopy fir over it.
Okay….I think we’re ready for the paint booth. Well, almost. I dipped the correct canopy pieces in Future and after dry I proceed to mask the frames. One nice thing about the -3 is the sliding portion of the canopy has just an outside frame…..no frames between the clear panels. This was done to try to improve visibility and they just butted up the Plexiglas pieces against one another. There will be lines but no colored frame there, so that much less masking to do.
| COLORS & MARKINGS |
 There’s
not much difference in the color choices for -3’s…they’re pretty generic
looking.
I decided against the cover aircraft, as I figured most would do that
one.
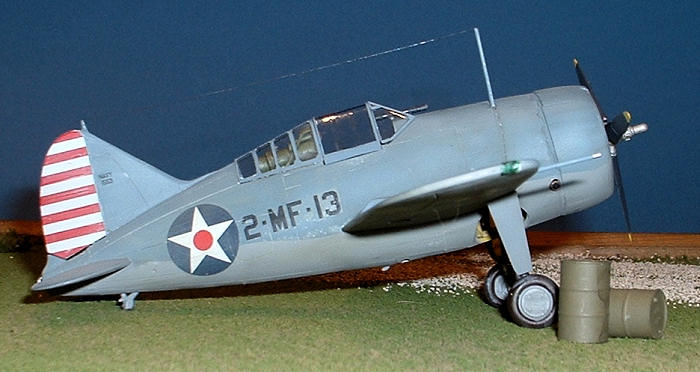
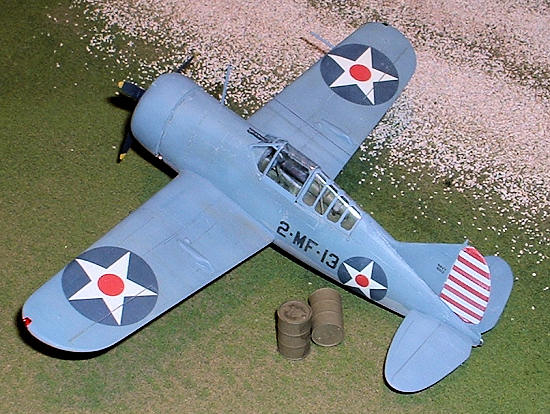
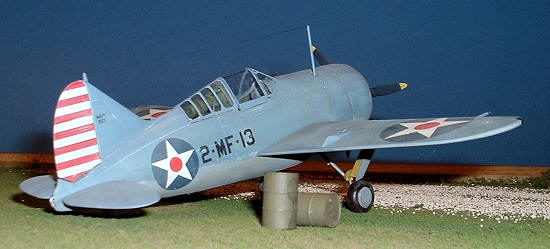
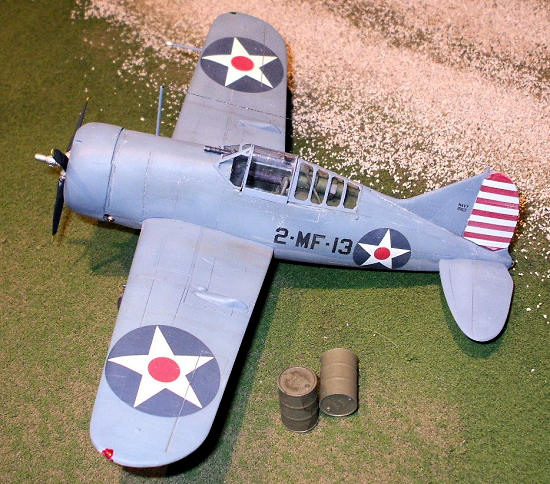
So I chose the
VMF-211 bird at
Hawaii, mostly because I liked the big wing insignia and the stripes on the tail
give it some color.
I first sprayed the entire aircraft light grey and when
dry checked all the seams for imperfections.
Of course I found none.
Ha ha ha ha ha ha ha ha ha ha ha ha ha ha ha!!!
So after puttying and sanding some more I touched up the
grey and highlighted panel and panel lines with lighter and darker shades
respectively.
Then I masked off the underside in preparation for the top color.
There’s
not much difference in the color choices for -3’s…they’re pretty generic
looking.
I decided against the cover aircraft, as I figured most would do that
one.
So I chose the
VMF-211 bird at
Hawaii, mostly because I liked the big wing insignia and the stripes on the tail
give it some color.
I first sprayed the entire aircraft light grey and when
dry checked all the seams for imperfections.
Of course I found none.
Ha ha ha ha ha ha ha ha ha ha ha ha ha ha ha!!!
So after puttying and sanding some more I touched up the
grey and highlighted panel and panel lines with lighter and darker shades
respectively.
Then I masked off the underside in preparation for the top color.
I sprayed the blue-grey and gave it the same highlighting treatment.
This I let dry for a couple days then gave it a gloss
coat of Future in anticipation of decals and further weathering.
I am thoroughly impressed with the decals; they applied
easily, were movable with no tearing, and snuggled down very well on their own.
One application of micro-sol and they achieved that
“painted on” look.
Very nice indeed.
The rudder stripes are a bit oversized, but trimming was
easy after they dried.
After the decals were on I broke out my artist oil
colors (the cheapest set I could find…doesn’t need to be anything fancy) and
proceeded to dot the surfaces with various colors.
Then I took a brush damp (not wet) with turpenoid (you
can use any mild thinner) and proceeded to blend the colors around, producing a
hue-changing color film and further breaking up the monotone of the base colors.
Nice thing about this is the slow drying time of the oil
gives you plenty of time to blend things around or completely wipe it off if you
don’t like the results.
Time for a dull coat and for me to almost completely screw this build
up.
Both this model and a 1/48 Eduard Tempest were ready for to dullcoat but
alas, my bottle of Tamiya flat base and Future was all used up and I needed to
mix up another batch. No problem, says Dale......except that a bolt of dumbs##t
hit me right about then and I mixed it up wrong.
Most would test
said mixture on some scrap, but not me. No, I merrily sprayed away. All looked
good until it started drying, then a lovely white cloudy coating enveloped on
both aircraft....somehow (er....stupidity) I mixed the flat mixture WAAAAAAAAAY
too strong. Both aircraft almost flew against the wall at that point.
But then I remembered a thread in the forums here at
Modeling Madness recently about clouded canopies. It was recommended to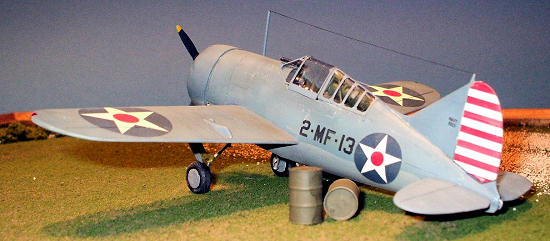 just re-dip the offended canopy in Future again and that should solve the
problem. I figured the same might work here. I gave both aircraft a light wet
sand with very fine sandpaper and then re-shot both aircraft with Future. And it
worked! After it dried I then re-shot both with a PROPERLY mixed up flat base.
The Tempest looks good and the Buffalo exhibits just a few tiny areas of white-ish-ness
(I'm sure that's a word) that I can easily pass off as dried sea-spray.
just re-dip the offended canopy in Future again and that should solve the
problem. I figured the same might work here. I gave both aircraft a light wet
sand with very fine sandpaper and then re-shot both aircraft with Future. And it
worked! After it dried I then re-shot both with a PROPERLY mixed up flat base.
The Tempest looks good and the Buffalo exhibits just a few tiny areas of white-ish-ness
(I'm sure that's a word) that I can easily pass off as dried sea-spray.
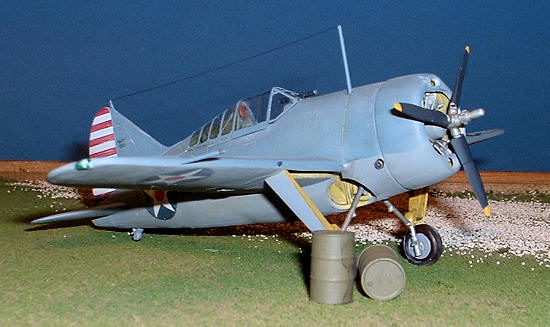
So saved from disaster, I added the canopy and all the final bits. Wasn’t sure about the landing gear color, so once again I erred on the side of colorfulness and painted the legs Zinc Chromate yellow. I also added an aerial of very fine stainless steel wire. This is something I won’t be doing again, as it steadfastly refused to accept any paint without blobbing up…back to stretched sprue or nylon thread for me.
| CONCLUSIONS |
Well, I now have a Buffalo in the collection.
Not a beginner’s kit by any measure, but to others I can
definitely recommend it.
It is an odd build and not without it’s problems, but it
turns into a fine model of an often overlooked and derided fighter.
| REFERENCES |
Squadron Signal #81 F2A Buffalo in Action
Wikipedia
http://en.wikipedia.org/wiki/Brewster_Buffalo
Annals of the Brewster Buffalo http://www.warbirdforum.com/buff.htm
September 2009
Copyright ModelingMadness.com. All rights reserved. No reproduction in part or in whole without express permission.
If you would like your product reviewed fairly and fairly quickly, please contact the editor or see other details in the Note to Contributors.
Back to the Review Index Page 2022