Revell 1/72 P-70 Nighthawk
|
KIT #: |
03939 |
|
PRICE: |
€25.00 when new |
|
DECALS: |
Two options |
|
REVIEWER: |
Spiros Pendedekas |
|
NOTES: |
Reboxed MPM/SH kit. |
The 481st Night Fighter Operational Training
Group (481 NFOTG) was the primary night fighter Operational/Replacement
Training Unit (OTU/RTU) of the Army Air Forces during World War II. Its
mission was to train either new graduates of Training Command advanced
flying schools or transition experienced pilots into the P-61 Black Widow.
The Group’s history can be traced back to March 1942, where the Air Corps
observers returned from England prior to the United States' entry into World
War II. Upon review of their recommendations, the Air Defense Operational
Training Unit was established by Third Air Force on 26 March, re-designated
as the Interceptor Command School on 30 March. Initially based at Key Field,
Mississippi, the school was moved to Orlando Army Air Base, Florida. The
first aircraft received were a B-18 Bolo and a number of Douglas P-70s to
initiate the program, with the unit basically using what they had in hand,
till the arrival of the YP-61s in early 1944.
In January 1943 the school was expanded from Orlando to Kissimmee Army
Airfield, where the first operational night fighter combat squadrons were
activated (414th and 415th NFS) and operational training was carried out.
Once accepted, the student received eight weeks of training in DB-7s or
P-70s. Subjects included instruments, airborne radar, night navigation,
meteorology, aircraft recognition, searchlight coordination, and ground
control radar coordination.
 The
first graduates were deployed to England as the 414th, 415th, 416th and
417th Night Fighter Squadrons. While they were sent with the P-70s they
trained in, they were immediately re-equipped with radar-carrying
Beaufighter Mk VIFs. From there they were deployed to their combat
assignments with Twelfth Air Force in North Africa to provide protection for
the combat airfields in Algeria and Tunisia against Luftwaffe night attacks.
The
first graduates were deployed to England as the 414th, 415th, 416th and
417th Night Fighter Squadrons. While they were sent with the P-70s they
trained in, they were immediately re-equipped with radar-carrying
Beaufighter Mk VIFs. From there they were deployed to their combat
assignments with Twelfth Air Force in North Africa to provide protection for
the combat airfields in Algeria and Tunisia against Luftwaffe night attacks.
With the arrival of the P-61 Black Widow, the school moved to California. In
the meantime, the AAF gradually came to conclude that standard military
units, based on relatively inflexible tables of organization, were proving
less well adapted to the training mission. Accordingly, a more functional
system was adopted in which each base was organized into a separate numbered
unit during a reorganization of units in the United States. This proved to
be the end of the school, which was disbanded on 31 March 1944.
The well used by the school Douglas P-70, while being a stop gap measure
that had its limitations (and, expectedly, achieving limited access in
combat), proved to be a solid asset to the school, being there and offering
its valuable training services when little else was available: an unsung
hero in its own manner.
 The
A-20 family has been quite extensively served in 1/72 from as back as the
early 40s, with the Comet, Airyda, Grace, AMCO, Strombecker, Skyleada and
Silverwing offerings, then, from the 60s onwards with the more “mainstream”
Airfix, Frog, Revell and Matchbox kits. High Planes came in the late 90s
with a modern, but absolutely limited run in nature multimedia kit, with
MPM/Special Hobby presenting their very detailed A-20 family members, done
in full styrene, from 2007 onwards.
The
A-20 family has been quite extensively served in 1/72 from as back as the
early 40s, with the Comet, Airyda, Grace, AMCO, Strombecker, Skyleada and
Silverwing offerings, then, from the 60s onwards with the more “mainstream”
Airfix, Frog, Revell and Matchbox kits. High Planes came in the late 90s
with a modern, but absolutely limited run in nature multimedia kit, with
MPM/Special Hobby presenting their very detailed A-20 family members, done
in full styrene, from 2007 onwards.
This is the Revell 2016 rebox of that MPM offering. Though limited run in
nature, meaning test fit three times before gluing once, this is a very fine
and well detailed kit. Whereas the MPM instructions and decals were
nevertheless great,in the Revell reboxing you are greeted with the very
thorough “new style Revell” instructions and a nice decal sheet.
The specific kit was a gift sent from my Polish friend and supreme modeler
Bernard Sobczyk, who was even more generous by including a set of Eduard
masks and Armory resin wheels in the box! For a more in-depth review of this
fine kit’s contents, you may read its preview, whereas a somewhat more
detailed history of the P-70 itself can be found at the AMT
1/48 P-70 build review, all
found at the MM archives.
I started by assembling the very detailed 11-piece cockpit (including the
nose bay and front bulkhead) and the 15-piece navigator’s office, then
trapped them between the fuselage halves. Both cockpits needed some trial
and error trimming, in order for the fuselage halves to close unstressful,
but nothing too intense. A small clear styrene piece replicated the gunsight.
I could not resist adding a scratch built life raft from leftover bits at
the compartment aft of the pilot’s head. Though the raft looks rudimentary,
only the front part would be visible, more or less looking acceptable, as I
would go for “closed” canopies.
Basic interior color was Hu226 Interior Green, with instrument panel, yoke,
various consoles and front anti-glare area painted black. The control column
boot and navigator’s seat were painted “brown leather”, the various
instruments and switches were highlighted by silver dry brushing and had
some “knobs” done with red paint and a very fine brush. The life raft was
painted yellow and had some “tie wraps” done with khaki shade and a very
fine brush. I used the nice decal seat belts for the front seat (I think
decal seat belts look generally good in 1/72, the 2D effect being not that
apparent), whereas I fabricated seat belts from masking tape for the radar
operator’s seat. I did not attach the small oval rear fuselage windows,
planning to replicate them at later stages with Clearfix.
The wings were next assembled, where, you have to choose between two styles
of carburettor air inlet rear ducts: a slimmer that blends into the wing and
a fatter that extends well to the rear (and, seemingly, doubles as cooling
air duct). Though not depicted in the only pic available, I went for the
latter one, since it has the most chances of being correct for the “specific
bird at the specific time”.
 The
5-piece main bays were assembled and attached to the wings, with the wings
then attached to the fuselage. The horizontal stabilizers were next
assembled and attached at a distinctive upward angle, for which you are
strongly advised to use a 3-d view for reference and a means of support/jig
to hold them in position till glue cures.
The
5-piece main bays were assembled and attached to the wings, with the wings
then attached to the fuselage. The horizontal stabilizers were next
assembled and attached at a distinctive upward angle, for which you are
strongly advised to use a 3-d view for reference and a means of support/jig
to hold them in position till glue cures.
The correct nose for my version was assembled and had its forward gun
opening holes filled with styrene rod and sanded smooth. Whereas Revell
recommends 20g of weight secured aft of the cockpit prior to closing the
fuselage halves, I went “safe” and stuffed a somewhat higher amount of
fishing weight in the nose (since it is not glazed), securing it with
styrene bits, which proved to be not only a safer but an easier task than
securing the weight in the open area aft of the cockpit.
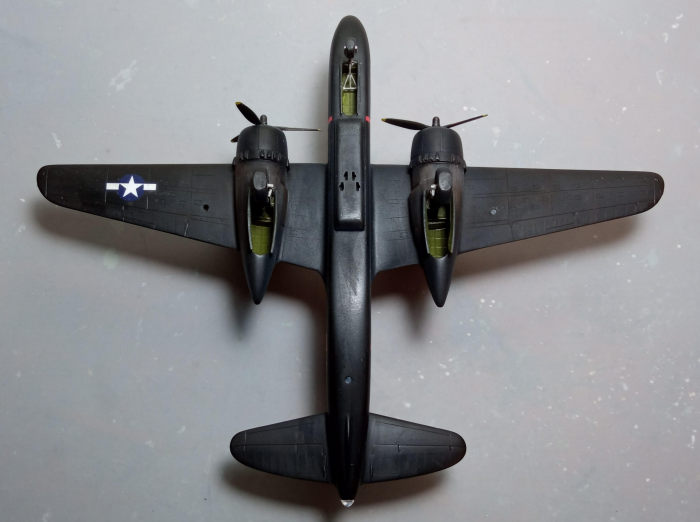
After attaching the engine firewall/exhausts part at each wing, I assembled
the nice looking engines and glued them onto the firewalls, followed by the
cowlings and the carburettor inlet extensions on top. I had to trim down the
rear engine base by roughly 1mm, since otherwise the crankcase would
protrude unnaturally out of the cowling front. The engines were painted
black with gray crankcase, then heavily dry brushed with silver. Cowling
innards and firewall were painted Hu226 Interior Green. The distinctive
exhaust fairings adjacent to the cowlings were drilled out for extra
realism. I was too lazy to add cylinder pushrods from stretched sprue, but,
should you do so, it will definitely be beneficial for the prominent engine
looks.
The lower gun tray had its gun openings and ejector chutes drilled out for
extra realism and attached in position, concluding the basic model assembly.
The wheels were assembled and then filed to look weighted. Finally, the tiny
exhausts found circumferentially of the cowlings were drilled out for better
looks.
Overall fit of main parts, though certainly not “Tamiya”, was in general
manageable, becoming more challenging at some areas (like the cowlings) and
easing-off at others (nose fit), nothing an average modeler cannot tackle
with patience. After a dual filling and sanding session, I took the
night-fighting trainer to the paint shop!
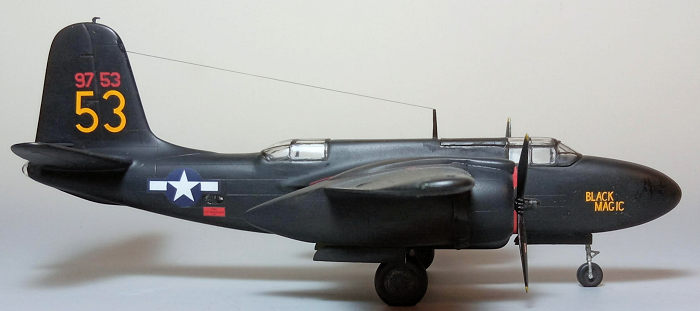
 I gave
the whole model a coat of Hu33 Black, including the gear doors, wheels and
props, the latter receiving yellow tips afterwards. I did not bother
spraying uniformly, since, the more nonuniform the painting, the better for
adding some interest to the monotonous all-black scheme. Painting could not
be easier, with a coat of Future preparing the bird for decaling.
I gave
the whole model a coat of Hu33 Black, including the gear doors, wheels and
props, the latter receiving yellow tips afterwards. I did not bother
spraying uniformly, since, the more nonuniform the painting, the better for
adding some interest to the monotonous all-black scheme. Painting could not
be easier, with a coat of Future preparing the bird for decaling.
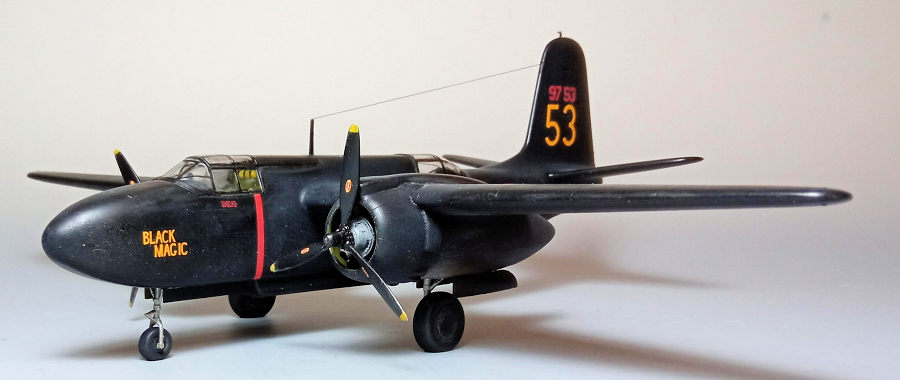
I used the kit decals, in order to represent “Black Magic”, a bird belonging
to 481st Night Fighter Operational Training Group (481 NFOTG), as it stood
in California in early 1944. The nicely printed decals detached effortlessly
from their backing paper and behaved well. Some silvering became apparent at
their transparent portions, placing a safe bet that it it Yours Truly fault,
which was effectively tackled by following Tom Cleaver’s tip to slice the
discrepant area with my hobby knife and flood it with some sort of decal
setting solution, which, in my case, was Future, with another coat of it
finally sealing everything.
 The
A-20 family main landing gear is a quite complex construction, featuring an
inner framing, onto which the main leg is attached. Being realistically
replicated by MPM, means the seven scale-thick parts that comprise each leg
are nice looking but also fragile and their construction proved complex,
taking some effort to align.
The
A-20 family main landing gear is a quite complex construction, featuring an
inner framing, onto which the main leg is attached. Being realistically
replicated by MPM, means the seven scale-thick parts that comprise each leg
are nice looking but also fragile and their construction proved complex,
taking some effort to align.
Upon inserting the assembled legs into the main bays (with some tweaking
around), I noticed that the final leg part rested a couple of millimeters
aft of the front door border, when, to my understanding, it is supposed to
practically be adjacent to it (as it is also clearly depicted at the
instruction drawings): might be my fault during construction, but,
nevertheless, a heads-up here. In order to obtain a correct placement, I had
to trim the framings’ front ends a couple of millimeters (they are
practically invisible as they are anyway hidden in the bay front) and
attached the main legs at the correct position. Due to repositioning, the
retraction cylinders came too short, so I used leftover ones of suitable
size.
The nose gear was next attached, secured at a slight positive rake angle, as
it is observed in reality (the instructions’ side views depict the angle
clearly). All wheels and doors were then attached. The wheels were filed to
look weighted and brake lines were added to the main legs from stretched
sprue, accordingly routed.
Bays, door innards and main legs inner framing were painted interior green,
the legs themselves were painted “steel”, whereas tires, rims and brake
lines were painted black and the oleos were highlighted with a fine tip
silver pen. No accuracy is claimed regarding the above colors, as the main
legs’ inner framing might have been steel or gray and the rims themselves
might have been silver (whereas at the painted and assembled model depicted
at the Revell instructions, the main rims are interestingly painted interior
green!).
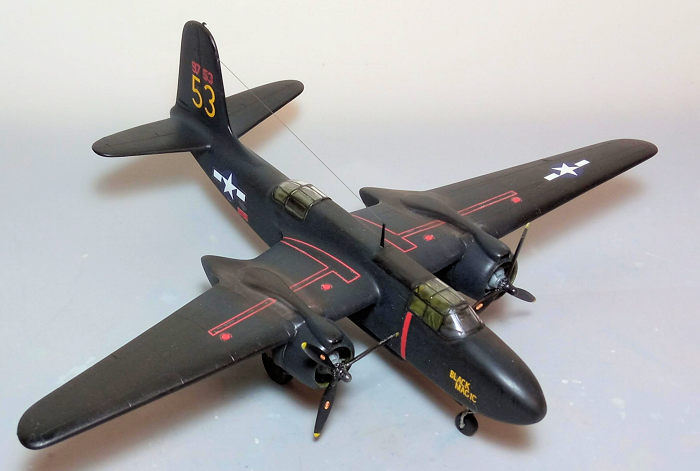
It was then time for some weathering: I first applied dark brown dry pastels
to simulate dirt, grime and even engine staining, followed by white dry
pastels judiciously applied to simulate the white streaks found aft of the
exhausts. Landing gear and bays received a quite heavy black wash, whereas
the prop tips and cow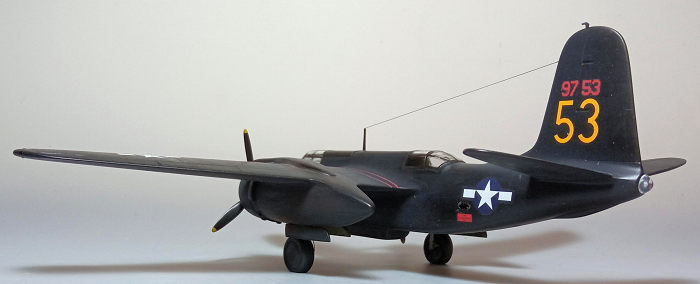 ling
lips received some light silver dry brushing, to simulate paint peel-off.
Since this was a “school” plane, I was not too heavy on weathering. A matt
coat sealed everything and gave the bird its final hue.
ling
lips received some light silver dry brushing, to simulate paint peel-off.
Since this was a “school” plane, I was not too heavy on weathering. A matt
coat sealed everything and gave the bird its final hue.
The transparencies had their well defined frames hand painted and attached,
together with the distinctive tail one. Fit was more or less good after some
judicious trimming, with the gaps taken care of white glue. The underwing
landing lights, the rear under-fuselage one and the small side oval windows
were replicated with Clearfix, which dried crystal clear. The props were
merely affixed into place, since they fitted quite tightly so there was no
need for gluing.
The nose mounted radar array antennas, typically found at war weary P-70s
were not mounted on the specific bird (at least for a certain period of
time), so they were not attached. For the same reason, though with less
certainty, the port wing inclined quadruple mini rod antennas were also not
attached.
Approaching the finish line, I attached the tiny but quite exclusive
fin-mounted pitot, and the top antenna mast itself, with thin stretched
sprue run from its top to the fin front, in order to simulate the antenna
wire, before calling the Nighthawk done!
This is a very nice kit of the less sung but nevertheless very
important night fighter variant of the A-20 family. Clearly, it is the most
modern, accurate and detailed P-70 kit of any scale as of the time of this
writing (2023), the same being true for every other MPM A-20/Boston family
member. General shape is spot on, details are lavishly provided, molding is
good, clear parts are quite well done, instructions are superb and the same
can be said for the decals.
Whereas the kit’s limited run nature cannot be hidden, requiring some extra
effort and patience during construction (mainly test fitting and trimming
before gluing) and becoming more demanding at areas featuring teeny-tiny
bits (such as the main landing gear), it fits within the average modeler’s
skills, who will come with a very detailed and accurate model.
The kit is not that difficult to find nowadays, if not in the Revell night
fighter version, certainly in some other variant form, as it is regularly
reboxed by Special Hobby, featuring equally excellent instructions and
decals and priced very sensibly. The finished model is not that big,
requiring a modest space in your showcase.
If you are not a novice and fancy building the type, go on and give one of
these kits a try. Using your skills and patience, a gorgeous model will
emerge.
Conquering the Night - Army Air Forces Night Fighters at War by Stephen L.
McFarland
Happy Modeling!
Spiros Pendedekas
26 May 2023Copyright ModelingMadness.com. All rights reserved.
No reproduction in part or in whole without express permission.
If you would like your product reviewed fairly and fairly quickly, please
contact
the editor
or see other details in the
Note to
Contributors.
Back to the Main Page
Back to the Review
Index Page
Back to the Previews Index Page