AMT 1/48 P-70
| KIT #: | 8646 |
| PRICE: | €25 |
| DECALS: | Two options |
| REVIEWER: | Spiros Pendedekas |
| NOTES: |
| HISTORY |
In October 1940, the USAAC felt a need for long-range
fighters more than attack bombers. As a result, sixty of the production run of
A-20s were converted to P-70 night fighters, all delivered by September 1942.
They were equipped with SCR-540 radar (a copy of the British AI Mk IV), the
glazed nose often being painted black to reduce glare and hide the details of
the radar set, and had four 20 mm (.79 in) forward-firing cannon, each provided
with 120 rounds, in a tray in the lower part of the bomb bay, while the upper
part held an additional fuel tank with a capacity of 250 US gallons.
 In 1943,
between June and October, 13 A-20Cs and 51 A-20Gs were converted to P-70A.
Differences were to be found in the armament, with the 20mm cannon package
replaced by an A-20G gun nose with six .50 caliber guns installed, the SCR-540
radar installation being carried in the bomb bay with the vertical-plane,
twin-dipole "arrowhead" transceiver antenna protruding between the nose guns.
In 1943,
between June and October, 13 A-20Cs and 51 A-20Gs were converted to P-70A.
Differences were to be found in the armament, with the 20mm cannon package
replaced by an A-20G gun nose with six .50 caliber guns installed, the SCR-540
radar installation being carried in the bomb bay with the vertical-plane,
twin-dipole "arrowhead" transceiver antenna protruding between the nose guns.
Further P-70 variants were produced from A-20G and J variants. The singular
airframe P-70B-1 (converted from an A-20G) and subsequent P-70B-2s (converted
from A-20Gs and Js) had American centimetric radar (SCR-720 or SCR-729) fitted.
The P-70s and P-70As saw combat only in the Pacific during World War II and only
with the USAAF. The P-70B-1 and P-70B-2 aircraft never saw combat but served as
night fighter aircrew trainers in the US in Florida and later in California. All
P-70s were retired from service by 1945.
Though a stop-gap measure having its possible shortfalls and rushed into service
till more dedicated types would emerge, the P-70 was nevertheless a tough,
dependable aircraft which not only provided valuable training to the “soon to
become'' night fighter crews, but was present when little else was available.
| THE KIT |
Introduced in 1994, this was the night fighter
version of the AMT quarter scale “A20” family, which, apart from the P-70,
included the A-20B/C introduced at the same time, the A-20G in 1996 and finally
the A-20J in 1998, then reboxed by Italeri (with a one-off G/J rebox by Revell
too). Together with their 1/48 Tigercats and Warhawks, those kits were somehow
representatives of what looked like AMT’s ‘golden age”, making quite an impact
on the modeling world.
 The kit
comes in a not that strong top-opening box, with a very attractive box art,
portraying the famous P-70 “Dusty” getting away from an Aichi Jake in flames,
the latter presumably having been hit by "Dusty" . The portrayed engine cowlings
and solid nose, as nice as they look, are wrongly depicted for “Dusty”, at least
regarding the pictorial evidence available: cowlings should feature the
individual mini exhausts, whereas the nose should exhibit the “painted framing”
looks. Interestingly, the correct cowlings and nose are provided in the kit! The
2013 Italeri P-70 reissue features a box art that is accurate regarding the
above aspects.
The kit
comes in a not that strong top-opening box, with a very attractive box art,
portraying the famous P-70 “Dusty” getting away from an Aichi Jake in flames,
the latter presumably having been hit by "Dusty" . The portrayed engine cowlings
and solid nose, as nice as they look, are wrongly depicted for “Dusty”, at least
regarding the pictorial evidence available: cowlings should feature the
individual mini exhausts, whereas the nose should exhibit the “painted framing”
looks. Interestingly, the correct cowlings and nose are provided in the kit! The
2013 Italeri P-70 reissue features a box art that is accurate regarding the
above aspects.
This kit is essentially the same as the AMT/Italeri A-20G, with some extra parts
to account for the night fighter version (ventral gondola, “solid” nose and
antennas). Upon opening the box, you are greeted with 8 light gray sprues,
containing all parts, with the two fuselage halves provided separately. There is
some flash here and there, easy to clean up. External details look sufficient
and panel lines are very nicely engraved. Whereas cockpit detail is good,
looking acceptable even out of the box, the same is not true for the radar
operator’s compartment, with instructions wanting you to assemble it per the gun
version by attaching the gunner’s seat and gun, which is wrong: at least a radar
console and a proper (lower) seat were expected there (the newer Italeri
instructions take a “sideway’ there by wanting you to partially modify the gun
base and delete the gun, but no “consoles” or a more proper seat are
provided whatsoever).
 Engines,
though very nicely molded, cry for a wiring harness, a prominent feature of the
R-2600 engine. The one piece props look nice too. Landing gear is very well
detailed, with brake lines molded at the MLG struts. The wheels have good
looking rims and are realistically “weighted”, but the main tires' diamond
pattern is overdone. Wheel well detail is good for the nose bay, but towards the
plain side for the “semi boxed” main ones. A specific for the night fighter
version suite of antennas is provided, though a few more seem to (at cases)
have been fitted in the real planes.
Engines,
though very nicely molded, cry for a wiring harness, a prominent feature of the
R-2600 engine. The one piece props look nice too. Landing gear is very well
detailed, with brake lines molded at the MLG struts. The wheels have good
looking rims and are realistically “weighted”, but the main tires' diamond
pattern is overdone. Wheel well detail is good for the nose bay, but towards the
plain side for the “semi boxed” main ones. A specific for the night fighter
version suite of antennas is provided, though a few more seem to (at cases)
have been fitted in the real planes.
Transparencies are clear, but on the thick side (which might not be too bad for
the radar operator’s compartment, as you will not have to do too much extra work
to busy it up!), with their framing well defined but tad broader than in
reality. Instructions come in a big, newspaper style double sided leaf. They are
mostly clearly written and followable, but a couple of “gray areas” were
spotted, mainly regarding the “wrong” single exhaust engine cowlings and the
antennas locations which are not the same at both versions. Two decal options
are provided, with one of them being the famous “Dusty” (and is the one most
will choose, in order to add some extra decoration to the otherwise all black
model), the other being a contemporary one. Decals seemed well printed and
looked usable after 25 years (more on that later). An omission seems to be the
absence of the red “WALK” lines on the top wing area, but it is not sure if all
P-70s carried them, especially when operating overseas.
| CONSTRUCTION |
I started by
attaching the nicely detailed instrument panel and sidewalls onto the cockpit
tub, then joined the two fuselage halves with the partially assembled cockpit,
the radar operator's tub, the nose wheel bay and the very effective spars that
support the wings, all trapped in between. Only then did I secure in position
the nose wheel bay, to ensure a gap free joint with the undersides, with the
front bulkhead following immediately afterwards. Fit of all the above was very
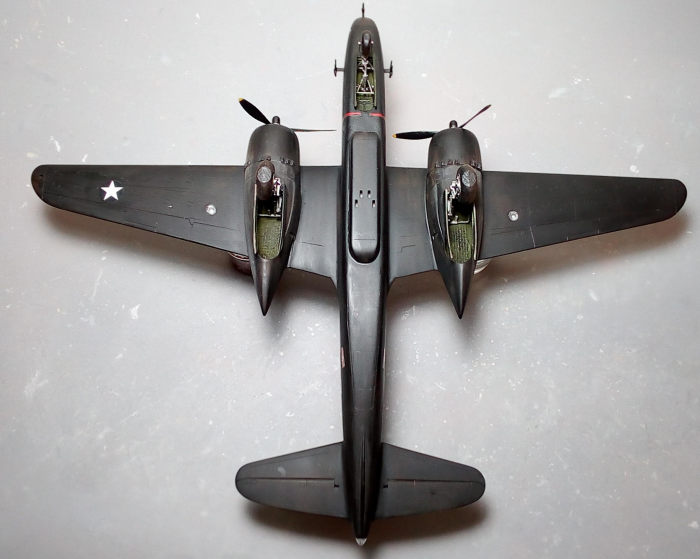
good. The bomb bay dors were glued shut, followed by the underbelly gondola that
had its four cannon holes drilled out and then attached under the bomb bay
doors.
As I love doing subassemblies, I assembled the pair of wings, the main wheel
bays, the horizontal stabilizers, the solid nose and finally the fin, then
attached all of them in position. Fit varied from good to challenging, the
latter especially at the main bays/wings joints. All gaps were initially taken
care of with liquefied styrene and then with normal putty. A good amount of lead
had already been secured inside the solid nose, in contrast to the only 1 gram
AMT suggestion. This was due to the fact that the main legs would be attached
forward (after a little surgery) of where the instructions suggest, as this is
how they look in reality.
As a side note, instructions want you to attach the two (port and starboard)
stabilizer lower halves onto the one piece upper half and attach the whole
subassembly onto the rear fuselage. I resisted the temptation in doing so, but
instead attached the top half onto the fuselage, followed by the bottom halves,
focusing my attention in obtaining gap free fuselage joints, then let those
bottom halves “rest” onto the upper half. I use this method whenever possible,
to minimize the risk of nasty root gaps emerging.
 Having
decided to go for closed canopies, I secured the opaque piece aft of the cockpit
(it opens together with the canopy). The two piece good looking engines were
next assembled, with the prop shafts trapped between the cylinder rows. After
receiving spark plug wires from stretched sprue, they were painted black and
heavily dry brushed with silver.
Having
decided to go for closed canopies, I secured the opaque piece aft of the cockpit
(it opens together with the canopy). The two piece good looking engines were
next assembled, with the prop shafts trapped between the cylinder rows. After
receiving spark plug wires from stretched sprue, they were painted black and
heavily dry brushed with silver.
It was then cowling time: the A-20 family wore two types of cowings, one with a
big single exhaust and another with multi mini exhaust openings, to account for
different engine configurations. Whereas the kit provided cowlings had separate
exhausts, clearly indicated at the instructions, on the other hand, not only the
attractive box art, but also the painted chart depicted both P-70 schemes
featuring the single-exhaust. Without giving it too much thought, I carelessly
went and shaved off the separate exhaust fairings from both cowlings. Typically,
it was only afterwards that not only I discovered net evidence, clearly
indicating that the multi-exhaust cowlings were correct for at least a good
number of P-70s (including, of course, the kit depicted ones!).
Additionally, the newer Italeri release had “correct” box art and instruction
profiles, meaning I had to re-attach pieces of styrene and file them to shape,
in order to come up with the initial configuration that I had compromised…
The kit provided cowlings also feature quite pronounced side bulges, which were
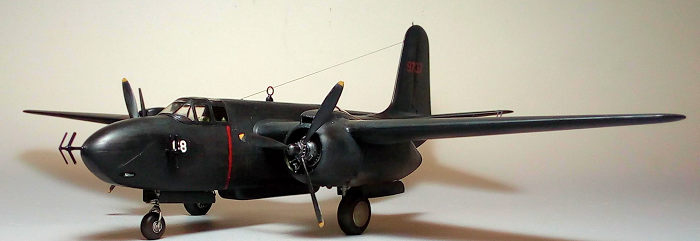
filed down to look more discrete, as in reality. The engines were then attached
to the cowlings and the complete subassemblies at each of the wings, followed by
the extended top air ducts (the extended ducts were typically attached to all
machines sent overseas). Cowling innards were painted green zinc. Finally, the
exit louvers on top of the wing, which were molded bland, were carefully drilled
out for more realistic looks.
A final filling and sanding session took place, followed by blanking the engines
with wet tissue and taking the model to the paint shop!
| COLORS & MARKINGS |
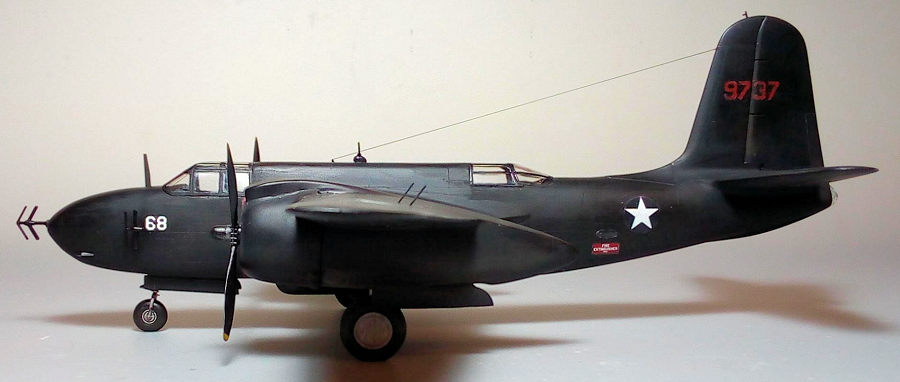
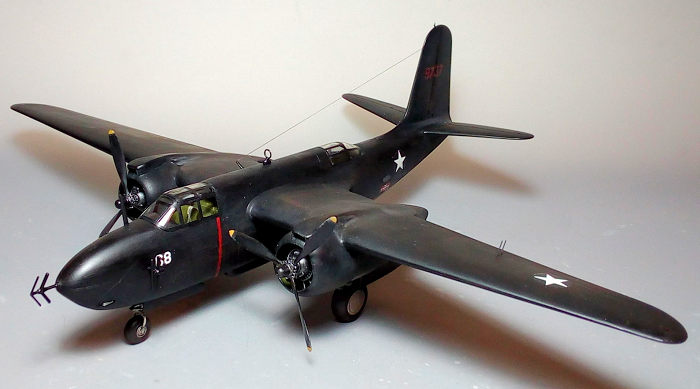
I gave the whole model, including landing gear doors,
a coat of Hu33 flat black, followed by a coat of Future, in order to prepare the
model for decaling. Of the two kit markings, the one depicting “Dusty” is the
most flamboyant and is the one most modelers would opt for, so I decided to go
for the other “simpler” version, s/n 9737/68, which is not often seen modeled.
The specific bird, from a point onwards, was assigned overseas and mostly used
for training crews, until more capable night fighters were available.
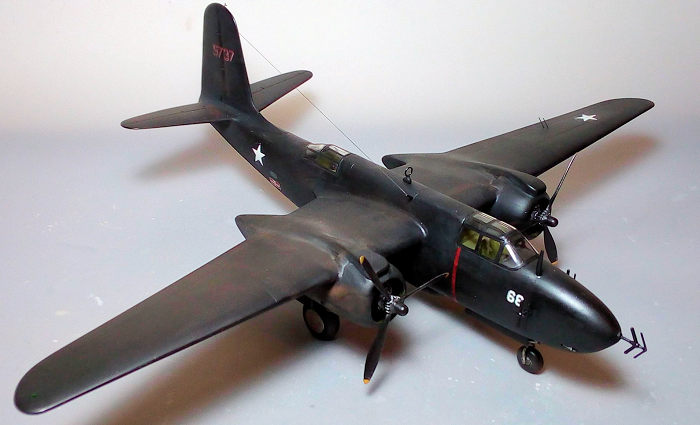 A net pic is
available, portraying “9737” at its seemingly earlier days back in the U.S.
carrying the shorter top cowling air intakes and wing walk lines. When sent
overseas, the longer tropicalized air intakes were typically retrofitted. Since
the kit does not provide wing walk lines, possibly assuming that those lines
were deleted when overseas, I also went for this “assumption”.
A net pic is
available, portraying “9737” at its seemingly earlier days back in the U.S.
carrying the shorter top cowling air intakes and wing walk lines. When sent
overseas, the longer tropicalized air intakes were typically retrofitted. Since
the kit does not provide wing walk lines, possibly assuming that those lines
were deleted when overseas, I also went for this “assumption”.
Decals, though old, detached easily and were applied nicely, however intensive
silvering occurred, which, apart from operator error, might have to do with
their age. To counteract it, I followed Tom Cleaver's advice of slicing the
already applied decals with my hobby knife and flooding them with decal setting
solution. Some silvering still persisted, which was touched up with black paint
and a very fine brush wherever possible. Finally, some white that bled from the
edges of red decal portions (like the red fin serials), which was touched up
with red paint and a very fine brush, the "touched-up" areas becoming noticeable
but, still, yielding a better result was better than before. A coat of Future
sealed the decals.
| FINAL CONSTRUCTION |
The seat and control column were attached in the
cockpit. Regarding the radar operator’s office, instructions wanted you to
attach the tall tripod-type seat and the gun, something totally wrong for the
P-70, which carried no rear gun, but a set of radar consoles, with the seat
itself being lower in height and featuring only one central leg. So, firstly the
kit provided seat had its side legs removed, keeping only the central one, which
was reduced in height. Secondly, two radar consoles made from leftover spares
were added onto each sidewall.
Cockpit and radar operator’s office basic color was Hu226 Interior Green, with
black instrument panel, yoke, consoles and various sidewall boxes. Throttle
knobs were white, whereas all raised instrument details were dry brushed with
silver and also had a few red “knobs” done with a very fine brush. Seat belts
from masking tape were added at both seats, with the radar operator seat having
a “leather” lower cushion.
Moving onto the landing gear, I assembled the nice looking main and nose legs.
The main legs, as provided by the kit, sit too far aft. By looking at net pics,
it was pretty obvious that the leg main body should be very close to the front
of the bay (something that makes sense, since the gear is retracted rearwards).
Attaching the assembled gear legs to the correct position took some tweaking,
together with some material removed, but it was feasible, resulting in a more
accurate look. Finally, by consulting net evidence, the nose leg was attached in
a slight positive caster angle (it was designed to be attached to a zero caster
by the kit). This was made possible by slightly repositioning its retraction
arm.
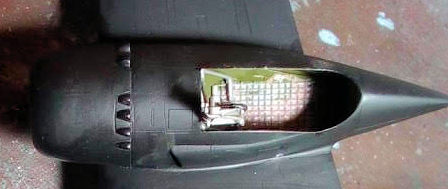 Since the
main bays' top walls were totally flat, I attached suitable pieces of mesh, to
obtain a “grid” look. Landing gear basic color was steel with silver oleos and
black brake lines, whereas bays and door innards were Hu226 interior green. The
wheels had black tires and steel rims and were attached as well. The main
wheels' overdone diamond pattern was toned down by some serious sanding with 220
grit paper. Of note is that instructions of various kits state in cases gray or
even interior green color for the upper part of the gear legs and also gray for
the wheel rims, but “aluminum” all over seemed a more “common sense” choice with
chances to be correct and that is why I went for it.
Since the
main bays' top walls were totally flat, I attached suitable pieces of mesh, to
obtain a “grid” look. Landing gear basic color was steel with silver oleos and
black brake lines, whereas bays and door innards were Hu226 interior green. The
wheels had black tires and steel rims and were attached as well. The main
wheels' overdone diamond pattern was toned down by some serious sanding with 220
grit paper. Of note is that instructions of various kits state in cases gray or
even interior green color for the upper part of the gear legs and also gray for
the wheel rims, but “aluminum” all over seemed a more “common sense” choice with
chances to be correct and that is why I went for it.
I decided to apply an amount of weathering, not only to depict the harsh
conditions that this bird was operating at, but also to break the monotony of
the all black scheme. I applied gray/white exhaust stains around the cowlings
and various shades of brown almost anywhere, in order to simulate dust, dirt and
grim, all done with dry pastels. Some heavy black wash was also applied at gear
components and into the bays. The already painted black with yellow tips props
received paint chipping where applicable with silver dry brushing. The model
then received its final almost matt coating.
The pilot’s and gunner’s transparencies had their well defined frames hand
painted and were attached in position. Fit was more or less good, with the
emerging gaps taken care of white glue. The tail transparency was also attached,
whereas the gunner’s oval side windows were replicated using Clearfix.
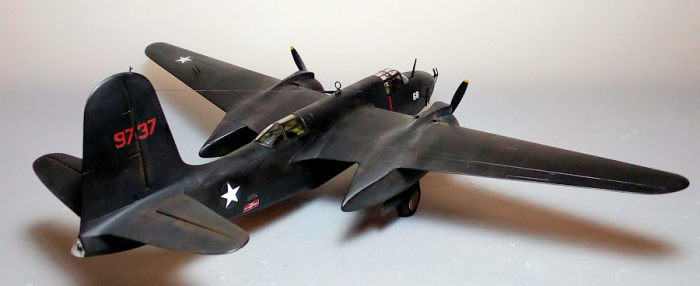
It was only then that I added the exclusive and prone to snapping-off antennas’
suite. The main antenna mast was affixed fore of the windscreen and tad to the
right, whereas a smaller mast was
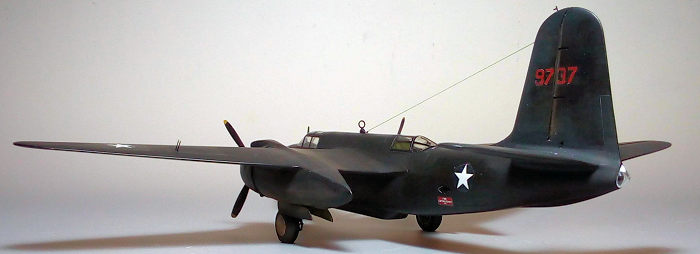 fabricated
from sheet styrene and attached at the topsides between the two cockpits,
inclined to the right, with an aerial wire made of stretched sprue run from it
to the fin front. I also decided to add the top mounted DF loop antenna.
fabricated
from sheet styrene and attached at the topsides between the two cockpits,
inclined to the right, with an aerial wire made of stretched sprue run from it
to the fin front. I also decided to add the top mounted DF loop antenna.
A number of P-70s carried distinctive mini paired antennas at the top and/or
bottom surfaces at one or both wings. Speculating, they were either factory
fitted or field retrofitted, so I went with one pair (made from stretched sprue)
on top of the port wing. The three typical nose mounted array antennas were
also attached. together with the peculiar fin-mounted pitot tube that had been
fabricated from two tiny pieces of stretched sprue. All above add-ons were
painted satin black, with the pitot tip gun metal.
A number of the A-20 family featured some kind of formation lights, mounted at
the rear part of the wing tips: assuming that the night fighter version did not
utilize them, I decided not to replicate them. Finally, the wing tip lights were
replicated by pins of my fine silver pen, onto which mini blobs of red or green
clear paint were affixed, before calling this interesting plane done!
| CONCLUSIONS |
This is still a good kit of an important A-20 family
variant. It has good general shape and features nice recessed panel lines,
detailed cockpit and busy looking landing gear. On the other hand, no radar
operator’s interior is provided, main wheel bays are too plain, the wheels’
diamond pattern is overdone and, most importantly, the main legs attachment
points are wrongly located aft. All of the above issues are not too difficult to
be resolved either by scratch building or by using aftermarket stuff.
Instructions are at places misleading or wrong (radar operator’s interior
assembly, scheme profiles) and also the box art, though artistically superb,
depicts some falsified details. (these issues have been fully resolved with the
2013 Italeri re-release). Decals were slightly off registered and silvered
badly, the latter possibly due to their age (apart from operator error).
Fit is at places good and at places challenging, but nothing an average modeler
cannot handle. Out of the box, a very imposing model can emerge, with a great
variety of aftermarket stuff providing you many correcting or improving
possibilities.
Whereas the newer Italeri reissue offers much better instructions (which are
downloadable), excellent decals, “correct” box art and is very reasonably
priced, the only area the AMT version practically falls short would be the decal
sheet, for which one can easily go aftermarket. This means that if you own an
AMT version , or come across “an offer you can’t refuse”, by all means grab it
and build it! An awe-inspiring model of this important plane will decorate your
showcase.
Happy modeling!
18 October 2022
Copyright ModelingMadness.com. All rights reserved. No reproduction in part or in whole without express permission.
If you would like your product reviewed fairly and fairly quickly, please contact the editor or see other details in the Note to Contributors.