
| KIT #: | 872092 |
| PRICE: | Around €20 |
| DECALS: | One option |
| REVIEWER: | Spiros Pendedekas |
| NOTES: | Kit includes paint, brushes, and glue. |
| HISTORY |
Whereas in 1928 the Polish Department of Aeronautics ordered aviation manufacturer Państwowe Zakłady Lotnicze (PZL) to make preparations towards the development of a multi-engine night bomber, it was finally decided to procure a number of Fokker F.VIIs to meet the bomber role. In the face of this, PZL decided to independently continue refining their design. Joylessly, all work on this concept, including the construction of a prototype, was abandoned towards the end of 1930 due to economic restraints, with the advanced technical data reportedly later received by French manufacturer Potez.
It was not until October 1934 that PZL at long last was granted a “GO” to proceed with its multi-engine bomber project. The design underwent various stages of modifications and refinements, with the prototype performing its maiden flight on 30 June. The airworthiness and service trials that followed, while addressing the (expected for every new type) plane's shortcomings, clearly demonstrated the potential of the design, with the test pilots being highly impressed!
In response to the feedback from flight testing, the second prototype, known as PZL.37/II, featured, among others, twin-vertical stabilizers, a reworked cockpit and an altered ventral gun position: it was this type that was accepted for production.
The first 10 serial aircraft, designated as the
PZL.37A, were furnished with the initial design's single vertical stabilizer,
with the next 19 interim aircraft, constructed to the PZL.37A "bis" standard,
outfitted with twin tail configuration. All of these "A" series aircraft were
powered by 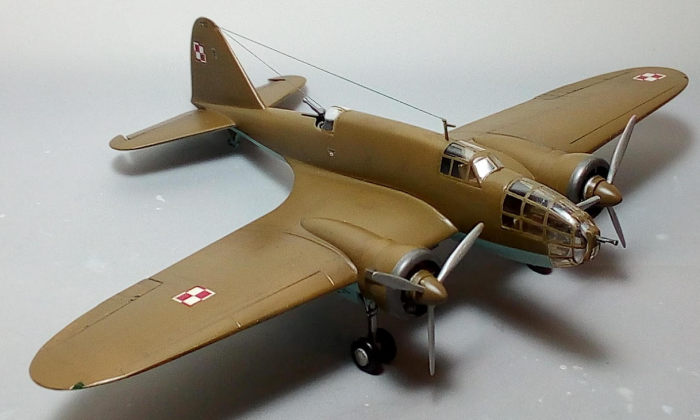 licensed
built Bristol Pegasus (PZL Pegaz) XII B radial engines. The PZL.37B (or: Łoś
II), the main production variant that followed, was furnished with the twin tail
arrangement along with newer Pegaz XX engines.
licensed
built Bristol Pegasus (PZL Pegaz) XII B radial engines. The PZL.37B (or: Łoś
II), the main production variant that followed, was furnished with the twin tail
arrangement along with newer Pegaz XX engines.
Prior to the war, the type was widely considered to be one of the most advanced bombers then operational in the world. The conventional in layout bomber was able to carry a heavier bomb load than considerably larger aircraft, though the dimensions of the individual bombs were limited. Being smaller than most contemporary medium bombers, it was relatively fast and easy to handle. As a consequence of a favorable landing gear arrangement, having been fitted with double wheels, it could operate from austere airstrips as well as rough fields or meadows. Typically amongst bombers of the late 1930s, its defensive armament consisted of only three machine guns, which subsequently proved too weak against enemy fighters in combat.
During early 1938, the Polish Air Force operational Units started to receive the Łos A variant, followed by deliveries of the improved Łos B, which had been slowed by delays in supply of the Pegaz XX engines and other equipment. With only a few months available to train the crews and complete the equipping of the bombers, the planes were not fully ready when the war broke out. For example, the extra internal fuel tanks for the type were not yet in service, thus the maximum range quoted in specifications was in practice not achievable.
By the outbreak of the war, an estimated 92 machines had been produced and delivered to the Polish Air Force, with a further 31 being in different phases of construction. Upon the invasion, a number of P.37s had been deployed to rural improvised airfields, so they were not destroyed on the ground by the Germans in their initial attack on the main Polish air bases. However, because of this move-away from developed airfields to short fields with poor surfaces, the planes could take off with only a fraction of their maximum bomb load which limited their effectiveness.
From 4 September onward the planes of the Bomber Brigade were attacking German armored columns in day attacks, forced by the desperate situation to perform missions for which they were not designed for. During these engagements, the type suffered heavy losses as a result of a lack of adequate fighter protection, further amplified by the operational tactics employed, usually flying missions in units of no more than three aircraft at a time.
There are no surviving PZL.37 aircraft, only an original Pegaz XX engine, exhibited at Muzeum Lotnictwa Polskiego w Krakowie. A full scale mock-up has been assembled by PZL Mielec and is currently exhibited outdoors on the grounds of the factory.
The P.37 is a sounding paradigm of Polish Aviation industrial capability to come up with formidable machines. Though having its vices (like unforgiving stall behavior, or reduced takeoff weight from rough airfields - but, frankly, which aircraft of the era did not have any?), the type was otherwise pleasant to fly, rugged and easy to maintain: a successful design that war conditions did not allow to show its full potential.
| THE KIT |
 The Mirage
kit is a 2016 rebox of the venerable ZTS Plastyk that was introduced in 1983 and
has been regularly reboxed ever since (also by Mastercraft / Mistercraft) 21
times so far, with the molds totally unchanged! The specific boxing is a “model
set”, containing, apart from the kit itself, four acrylic paints (Polish khaki,
light blue, silver and black), a two sided (broad/fine) paint brush and a tube
of glue. It is definitely an old school kit, looking tad unrefined for today’s
standards, however it is not totally deprived of details. A more extensive
preview of the kit can be found here.
The Mirage
kit is a 2016 rebox of the venerable ZTS Plastyk that was introduced in 1983 and
has been regularly reboxed ever since (also by Mastercraft / Mistercraft) 21
times so far, with the molds totally unchanged! The specific boxing is a “model
set”, containing, apart from the kit itself, four acrylic paints (Polish khaki,
light blue, silver and black), a two sided (broad/fine) paint brush and a tube
of glue. It is definitely an old school kit, looking tad unrefined for today’s
standards, however it is not totally deprived of details. A more extensive
preview of the kit can be found here.
The specific copy was sent to me by a Polish fellow modeler, after reading my build review of the 1/48 Mirage P.37B, asking me if I would be interested in building it. My answer was a sounding “YES”. What a great motivation!
| CONSTRUCTION |
I started by attaching the front and rear bulkheads
under the main floor, followed by the pilot’s deck on top. The assembly was
attached inside the port fuselage half, followed by the instrument panel, the
radio console and the gunner’s seat. The radio operator's seat was attached to
the starboard fuselage innards and the two fuselage halves were subsequently
joined.
Basic interior color was Testors Field Drab (for the Polish Khaki), with black
instrument panel, yoke, consoles, boxes, consoles and sidewall molded levers,
leather seat cushions, crew bags and gunner’s restraint belt and gunmetal guns
and magazines. All raised instrument details were dry brushed with silver and
some red “knobs” were added with a fine brush. The seats received seat belts
made from green doped masking tape. Some of the above parts (pilot and
bombardier seats, control column, bombardier floor and aft guns) were left out
for easiness of painting, to be attached at later phases.
 The wings
were assembled and attached, followed by the rear tail, which is a complete
upper and lower half 2-piece affair that contains the horizontal stabilizers.
The two small fins were then supposed to be attached at the stabilizer tips,
but, since the single fin was also provided at the sprues and having already
built the twin-fin 1/48 version, I thought it would be a good idea to go for the
single fin. This option, while not mentioned neither in the current, nor in the
recent reboxings’ instructions, is clearly mentioned at the old ZTS ones which
can be found at the Net! All insignia are the same and the extra codes provided
deem the kit decal sheet sufficient to represent a single fin machine (there
were some examples that carried extra decorations near the codes, possibly from
a point onwards, but, still, machines with “simple” camos without extra
decorations are documented). Off we go for a single fin version then!
The wings
were assembled and attached, followed by the rear tail, which is a complete
upper and lower half 2-piece affair that contains the horizontal stabilizers.
The two small fins were then supposed to be attached at the stabilizer tips,
but, since the single fin was also provided at the sprues and having already
built the twin-fin 1/48 version, I thought it would be a good idea to go for the
single fin. This option, while not mentioned neither in the current, nor in the
recent reboxings’ instructions, is clearly mentioned at the old ZTS ones which
can be found at the Net! All insignia are the same and the extra codes provided
deem the kit decal sheet sufficient to represent a single fin machine (there
were some examples that carried extra decorations near the codes, possibly from
a point onwards, but, still, machines with “simple” camos without extra
decorations are documented). Off we go for a single fin version then!
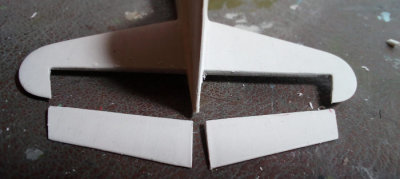
In order to attach the single fin, instructions wanted you to cut the top semi
conical part of the tail assembly and glue the fin (which contains the now
removed tail part). After giving it some thought, I decided not to remove the
tail part from the assembled stabilizers but, rather, remove the equivalent
section molded onto the fin: this way, the fin base attaching area became level
and was easily attached (butt-fitted), with not only the emerging seams being
simpler, but also the tail’s conical shape not being compromised.
It was then engine time: I attached the engine fronts to the rear cowlings, then
attached the distinctive exhausts and the lower air scoops (all of them had
their bland openings drilled out). The cylinders received valve rod actuators
made from stretched sprue. The engines, as well as the cowling innards, were
painted steel, the crankcases and cowling exteriors Polish Khaki, whereas the
cowling lips and exhausts were painted Testors Burned Metal.
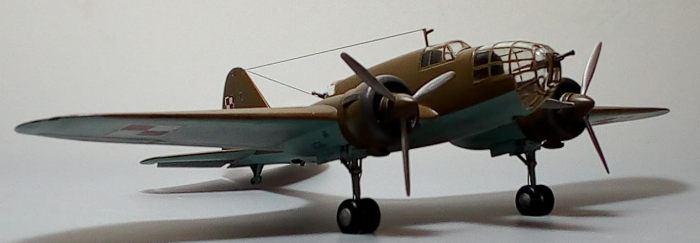
 After
coming across a seasonal pic which depicted a machine with drooped elevators, I
decided to separate mine, in order to “breathe some life”: for this, I carefully
ran the back side of my hobby knife along the hinge lines, then, upon
separation, all rough edges were sanded smooth. After the basic model received a
hefty filling and sanding session, I wasted no time and took the Łoś to the
paint shop!
After
coming across a seasonal pic which depicted a machine with drooped elevators, I
decided to separate mine, in order to “breathe some life”: for this, I carefully
ran the back side of my hobby knife along the hinge lines, then, upon
separation, all rough edges were sanded smooth. After the basic model received a
hefty filling and sanding session, I wasted no time and took the Łoś to the
paint shop!
| COLORS & MARKINGS |
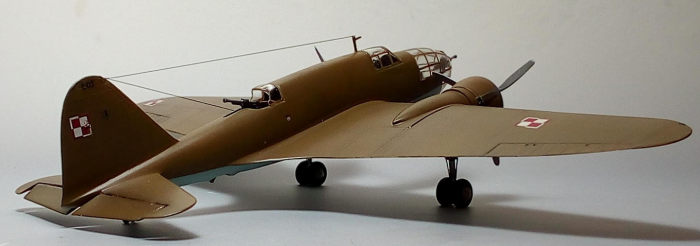
 I first gave
all undersides (including gear doors) a coat of Hu65 light Blue, then masked it
off. For the topside Polish Khaki, I chose Testors Field Drab, which dried to a
convincing green/brown/olive-ish shade, with the spinners receiving the same
color. A coat of Future prepared the bird for decaling.
I first gave
all undersides (including gear doors) a coat of Hu65 light Blue, then masked it
off. For the topside Polish Khaki, I chose Testors Field Drab, which dried to a
convincing green/brown/olive-ish shade, with the spinners receiving the same
color. A coat of Future prepared the bird for decaling.
I decided to depict #72.10 machine, which is documented carrying only the Polish
insignia and the code number (so the kit-supplied decals would be sufficient).
The Mirage decals behaved excellently: they detached easily from their backing
paper and adhered nicely with no silvering at all. A coat of Future sealed them.
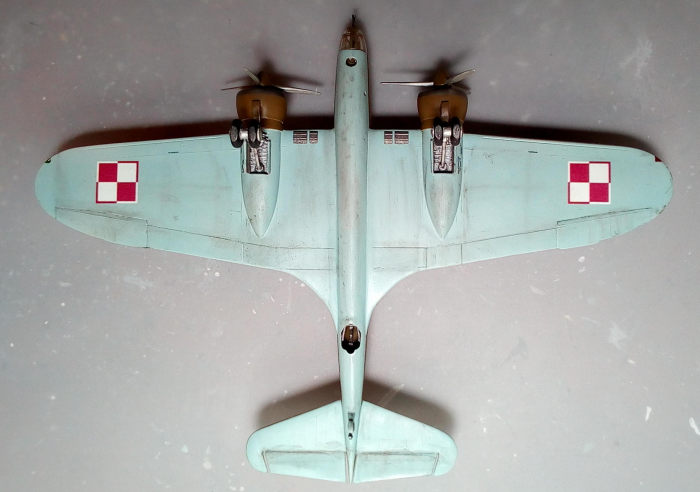
It should be pointed out that the top wing insignia were not placed
symmetrically, in order to distract (at least in theory) the enemy from aiming
accurately, so the asymmetrical placement is not an instruction’s bug (something
that I erroneously thought it was at my previous 1/48 P.37 build, where the top
insignia are wrongly applied symmetrically…)!
| FINAL CONSTRUCTION |
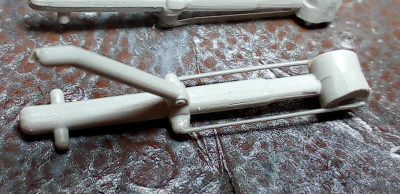 The main
wheel wells had their plain top walls busied-up with small pieces of fine mesh.
Then the landing gear was attached, followed by the wheels and doors. The main
legs received dual brake lines from stretched sprue, running bilaterally of the
oleos, as witnessed on reference pics. The oblique leg supporting rods were too
thick and were replaced with pieces of stretched sprue.
The main
wheel wells had their plain top walls busied-up with small pieces of fine mesh.
Then the landing gear was attached, followed by the wheels and doors. The main
legs received dual brake lines from stretched sprue, running bilaterally of the
oleos, as witnessed on reference pics. The oblique leg supporting rods were too
thick and were replaced with pieces of stretched sprue.
The main tires were tad filed to look weighted. The extra wheel covers provided
were attached (chances are that they were carried during early days but were
removed in the field, leaving the spoke-looking rim visible). Main landing gear
color (including door innards and wheel hubs) was steel, with black tires and
brake lines. Oleos were chrome (done with my fine tip silver pen). The rear
wheel had its mini tire painted black, while its gear was painted under-fuselage
color with khaki gaiter.
All three guns had their barrel fronts drilled for added realism, then painted
gunmetal. The top and bottom rear guns were affixed onto their mounts, while the
front was secured at the transparent nose. The four wing mounted radiators
were painted gunmetal and attached in position, as were all leftover interior
parts (seats, front floor and control column). Finally, the elevators were
attached “drooped” (with a corresponding front “push” at the control column).
The props were painted steel, had their khaki spinners attached and were secured
to the engines with small pieces of styrene at their axles’ ends, then the
complete engines were attached in position. Regarding the spinners, two types
were carried: a distinctive sharp looking (pointy) one which was more commonly
used and a less pointy, more classic looking, that seems to have been used in
earlier years and possibly in initial production machines. The kit only provides
only the latter “classic” looking spinners, so you might want to check your
references upon building your specific machine.
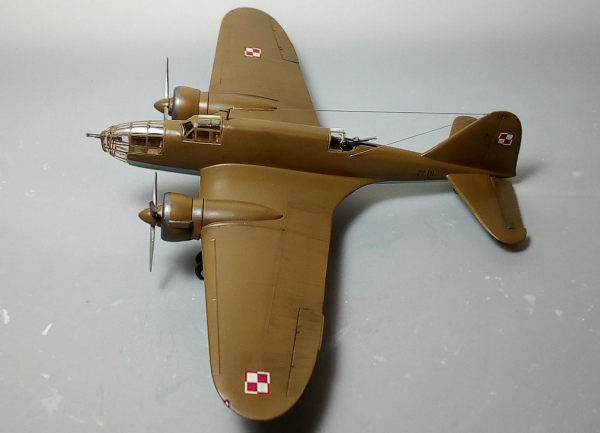
 Polish were
(and still are) well known for keeping their planes in near pristine condition,
so I did not apply too much weathering, other than some underside dirtying and
engine soot near the exhausts, with also minimal sun fading at topsides, all
performed by using dry pastels of suitable color. A satin coat sealed everything
and gave the bird its final finish.
Polish were
(and still are) well known for keeping their planes in near pristine condition,
so I did not apply too much weathering, other than some underside dirtying and
engine soot near the exhausts, with also minimal sun fading at topsides, all
performed by using dry pastels of suitable color. A satin coat sealed everything
and gave the bird its final finish.
The transparencies needed some trimming to fit, it being especially true for the
front bulbous one, where I unashamedly used my bastard file (carefully and with
fingers crossed, to be honest), in order to make it fit. After hand painting
their frames with a fine brush, all transparencies were attached in position and
the emerging gaps were treated with white glue.
The top antenna mast was finally attached and a wire made from stretched sprue
was run from the mast top to the fin. A second wire was run from the fin to a
hole drilled next to the gunner’s port area. The wing tip lights were
represented with blobs of red and green clear paints, before calling this
interesting medium bomber done!
| CONCLUSIONS |
This is definitely an old school kit, with raised
panel lines and parts somehow crudely molded. It requires quite a bit of extra
work in order to clean all parts and deal with the challenging fit (all the more
for the nose transparency), in order to come up with a homogeneous result. That
said, a certain level of detail is definitely provided, something that concerns
the interior, as well. Though not mentioned in the instructions, apart from the
double finned, the single fin version can (effortlessly) be built from the kit
contents. Instructions are for the rest adequate and decals superb.
 If you want
the best 1/72 P.37, by all means get the new IBG kit: it is modern, detailed and
with extra PE goodies. It looks to be of the “high end/limited run” nature,
meaning it will need its attention during building, with the end result
consequently being “high end”. It is very sensibly priced and its various
boxings cover every P.37 version and scheme. It is very clear which kit the
leading edge is.
If you want
the best 1/72 P.37, by all means get the new IBG kit: it is modern, detailed and
with extra PE goodies. It looks to be of the “high end/limited run” nature,
meaning it will need its attention during building, with the end result
consequently being “high end”. It is very sensibly priced and its various
boxings cover every P.37 version and scheme. It is very clear which kit the
leading edge is.
The Mirage kit, though definitely on the more simplistic side and with cruder
moldings, requiring extra filling and sanding work, is for the rest an
uncomplicated and relatively quick build that will provide a good looking 'Łoś'
even out of the box. The specific "model set" costs a bit less than the IBG, but
contains an additional four paint jars (the basic colors), a dual brush and a
tube of glue, which does not make it a bad deal. The basic kit can be found for
roughly a quarter of the superb IBG, giving the modeler a choice, with the low
price even be tempting for introducing the kit to a youngster, in order to put
it together “in one afternoon - like old times'', not caring too much about bad
fit and mismatches (will definitely fly sufficiently around the room!).
A fair amount of aftermarket for both interior and exterior seems to exist,
leaving the decision of buying the kit and adding aftermarket ,or going directly
for the already detailed IBG to the modeler.
I had a great time putting this kit together, not minding walking the extra mile
of additional filling, sanding and some scratch built detailing. If you have one
in your stash, or get one at a good price, or, even better, like yours truly,
happen to have a friend who wishes to offer it to you, go and build it: you will
definitely come up with an attractive and not often seen model of a significant
medium bomber that was not granted suficient chances to deploy its full
potential.
Thanks to my friend Bernard Sobczyk from Gdańsk, not only for sending me the
kit, but also for his generous support throughout the build.
23 August 2022
Copyright ModelingMadness.com. All rights reserved. No reproduction in part or in whole without express permission.
If you would like your product reviewed fairly and fairly quickly, please contact the editor or see other details in the Note to Contributors.