|
KIT: |
Classic Airframes 1/48 Fairey Battle I |
|
KIT # |
428 |
|
PRICE: |
$44.95 |
|
DECALS: |
Three different aircraft |
|
REVIEW & |
|
|
NOTES: |
Short Run Kit |
BUILDING THE CLASSIC AIRFRAMES 1/48 FAIREY BATTLE
|
HISTORY |
For the history of this aircraft, see the preview of this kit.
|
THE KIT |
Classic Airframes new 1/48 Fairey Battle looks far more complicated upon viewing it unbuilt in the box than it turns out to be when built. To my mind, this is one of the best Classic Airframes kits to date, and well worth the MSRP of $44.95. (Squadron has it for US$37.97, which is very reasonable for what
you get.)I highly recommend that you bookmark the Battle walkaround page at IPMS Sweden, which has a number of very useful color shots of the Fairey Battle that has been restored for the RAF Museum at Hendon. You will particularly want to look at the photos of the landing gear, as this is the only part of the construction where you need to see how things really looked in order to get the parts looking right and assembled correctly. The URL for this page at IPMS Sweden is:
<http://www.hotel.wineasy.se/ipms/stuff_eng_detail_battle.htm>
|
CONSTRUCTION |
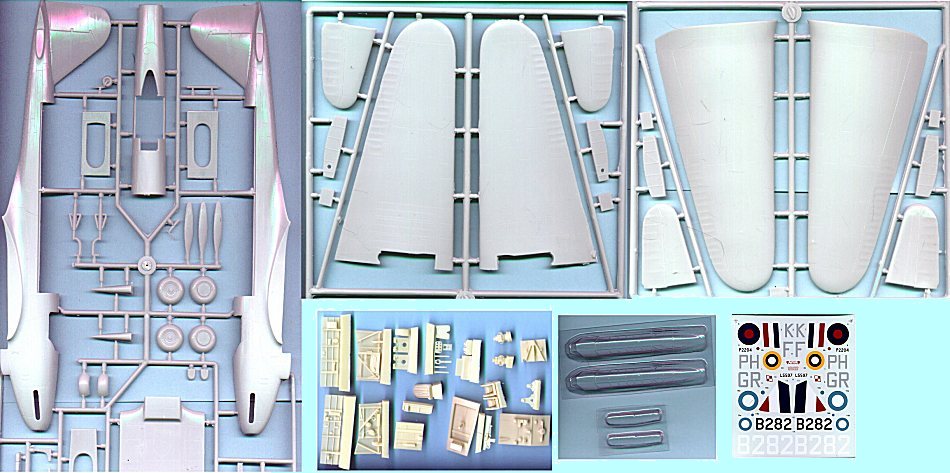
As with any limited-run injection-molded kit, the sprues are thick; it's best to cut away the parts from the sprue with a razor saw. Once this has been accomplished, the next step is to remove all the mold release pins on the interior surfaces of the major parts. My technique is to cut them away with a #11 X-Acto blade, sanding the interior surface smooth only for those areas where other parts will be inserted. I also took this opportunity to sand down the mating surfaces of the wings, horizontal stabilizers and rudder, to obtain thin trailing edges on all surfaces.
I next cut away all of the resin parts for the cockpit from their mold blocks and smoothed them up. I painted all the interior parts British Interior Green and set them aside to dry.
The first major sub-assembly to work on is the wing. This comes in five parts: left and right upper and lower, and center sections. I first cut out the correct areas for the landing lights, then assembled the wheel wells per the instructions. I glued the outer wing halves together, then glued in the resin landing lights, and glued the outer wings to the center section; I put the assembly aside to set up, after having first created a set of braces from sprue to get the proper dihedral.
 After painting
the details in the pilot's and gunner's cockpits, I assembled these. I found it
necessary to raise the pilot's seat considerably to get it right, and
accomplished this by using the resin mold blocks and cutting them to make a
"stand" for the underside of the seat that could not be seen once the
cockpit was assembled. I also used instrument decals from a Pro-Modeler generic
RAF instrument panel sheet, individually laying down the dials on the resin
panel. I left the gunner's seat uninstalled at this time.
After painting
the details in the pilot's and gunner's cockpits, I assembled these. I found it
necessary to raise the pilot's seat considerably to get it right, and
accomplished this by using the resin mold blocks and cutting them to make a
"stand" for the underside of the seat that could not be seen once the
cockpit was assembled. I also used instrument decals from a Pro-Modeler generic
RAF instrument panel sheet, individually laying down the dials on the resin
panel. I left the gunner's seat uninstalled at this time.
I also took this time to locate and cut out the two windows on the port side of the turtleback ahead of the gunner's cockpit, to make the windows for the third crewman - the navigator/bombardier - whose office was out of sight between the pilot and gunner.
Fixing the "Catch" to the Battle Kit:
Since Classic Airframes intends to release the Battle in two further versions, the two cockpit trainer and the target tug, the upper rear section of the fuselage is separate from the rest, as a "turtleback." The instructions call for installing the gunner's cockpit in the main fuselage, and then gluing the turtleback over it. However, because of the mounting ridge that runs around the lower fuselage here, doing this will result in the gunner's cockpit being set too low in the fuselage, and the resulting fit of the turtleback has already given some modelers fits with lots of putty being necessary to get a smooth final fit.
The easy thing to do here is to carve off the ridge from all around the opening on the lower fuselage. Then attach the gunner's cockpit into the turtleback, so that the upper deck of the cockpit is even with the lower line of the rear canopy windows, and glue into position with cyanoacrylate. Set this aside, and assemble and position the pilot's cockpit into the fuselage half, then glue the fuselage together. The pilot's cockpit fits easily, though as with all limited-run kits it should be test-fitted before final positioning. Once the fuselage is assembled, then attach the turtleback with the gunner's cockpit; the gunner's cockpit will force the fuselage out to the proper width, and the turtleback will fit easily. I only used a very little bit of putty to smooth the joint doing it this way.
Final Main Assembly and Finishing:
 Once the fuselage
was assembled, I attached the horizontal stabilizers, being careful to check for
alignment since there are no aligning tabs provided and the stabilizers
butt-join to the fuselage.
Once the fuselage
was assembled, I attached the horizontal stabilizers, being careful to check for
alignment since there are no aligning tabs provided and the stabilizers
butt-join to the fuselage.
Once all this had set up, I mated fuselage and wings. I then puttied all joints and put the model aside for everything to set up. When the putty was dry, I sanded everything smooth, then rescribed panel lines where necessary. I then airbrushed the whole airframe light grey to expose any seams that needed further filling. I covered these with Gunze "Mr. Surfacer" 500, and when it was dry lightly sanded the seams to get them smooth.
The Greenhouse Canopy:
Fortunately, Classic Airframes provides two vacuforms of the long greenhouse canopy. I was going to make my model with the canopies over the pilot's and gunner's cockpits open. Having two meant that I would use one as the main canopy, and cut out the separate canopies from the second one. I did this, cutting the canopies away with a brand-new sharp #11 blade (the only way to separate a vacuform canopy from its base), and then dipped both in Future.
While the canopy was drying, I painted the camouflage pattern over the upper fuselage, where it would be under the canopy. When this was dry, I attached the canopy bracing struts. I glued the main canopy in place, using cyanoacrylate to attach it to the fuselage (since Future protects vacuform canopies from fogging when you use C-A on them). I ran a line of putty around the join. When the putty was dry, I sanded it smooth with a rat-tail file, and the greenhouse was in position.
I then masked off the panes of the greenhouse; I use shiny Scotch tape for this, which doesn't leave a lot of residue when pulled up later.talled gunners seat and the Vickers "K" Gun in their deployed positions, and attached the open canopies. I used nylon thread for the antenna wire.
|
PAINT & DECALS |
Painting:
I "preshaded" the model with flat black along all the panel lines, and then painted the lower surfaces flat black overall. I dipped a little flat white into the paint when that was finished, to make a very dark grey, and "shaded" the panel lines on the lower surface. The result is a very subtle effect which breaks up the dead blankness of the lower surfaces.
I then painted Dark Earth over the upper surfaces. When that was dry I masked off the camouflage pattern, running thread 1/16" in from the edge of the drafting tape to raise it. I airbrushed RAF Dark Green, which had just a bit of "scale" overspray with the tape lifted. Lifting the tape this way also insures there will be no "ridges" which is a dead giveaway of having put the tape directly onto the surface.
When all this was dry, I used a little Tamiya "smoke" to add shading to certain areas and empahsize ever so slightly the effect of the pre-shading. Finished, I shot two coats of Future over the whole model and let it dry.
Decals:
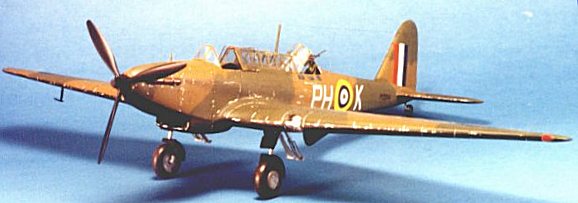
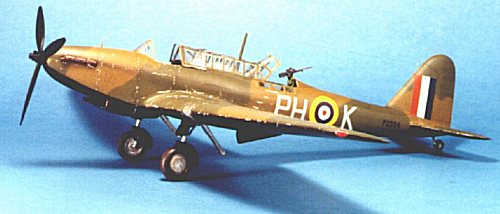
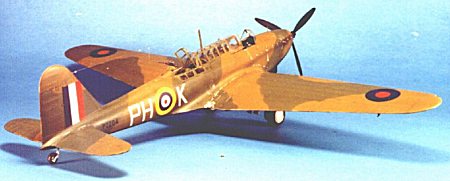
 I opted to make the airplane flown by Flying Officer Donald
Garland and gunner Sergeant Thomas Grey of 12 Squadron, AASF, during the May 12,
1940 attack on the Maastricht bridges, for which Garland received the first RAF
V.C. of the war.
I opted to make the airplane flown by Flying Officer Donald
Garland and gunner Sergeant Thomas Grey of 12 Squadron, AASF, during the May 12,
1940 attack on the Maastricht bridges, for which Garland received the first RAF
V.C. of the war.
Classic Airframes now uses Micro Scale decals, and these went on with no problems. I used a couple of radio stencils and "jack here" instructions from other sheets in the decal dungeon to finish things off. When these had set, I shot another coat of Future over the whole model.
Final Details.
While the model was drying, I went about assembling the landing gear. The parts for the pneumatic devices that stick down to the rear of the main gear - a part of the retracting mechanism I have never seen before on any other airplane - seemed too big when compared with the photos of the Hendon Battle, so I
replaced these with scratchbuilt ones made from evergreen rod and tube. I assembled the landing gear in the wheel wells with no problem, and finished by attaching the propeller and the exhausts.
When the model was dry, I "dinged" it with Model Master Aluminum non-buffing paint, and then shot the model with several coats of "Flat Future," my mix of Future and Tamiya Clear Base.
When the model was dry, I removed the scotch tape from the greenhouse canopy. I installed gunners seat and the Vickers "K" Gun in their deployed positions, and attached the open canopies. I used nylon thread for the antenna wire.
|
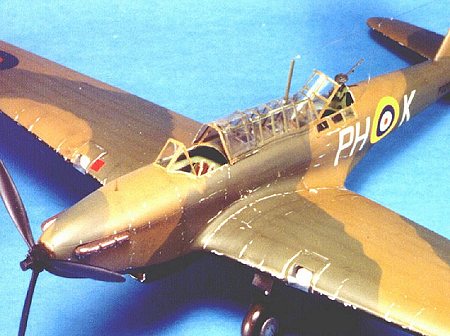
CONCLUSIONS |
I think the photos here of the completed model say everything that needs be said. The Battle is a big, good-looking airplane with a 1930s grace about it. Had Britain gone to war with Germany in 1938 over the Sudetenland, it is likely this airplane would have had a better combat record than it had two years later, given the pace of aeronautical development that left it technically and operationally obsolete by the time it was called on to serve. For those who like RAF airplanes, this kit is a must-have.