
| KIT #: | 02027 |
| PRICE: | $10.00 in 2005 |
| DECALS: | Two options |
| REVIEWER: | Spiros Pendedekas |
| NOTES: | Old tooling |
| HISTORY |
The development of the Blenheim began when the Bristol Type 142, a civil airliner that first flew in April 1935, impressed with its performance, with the Air Ministry ordering a modified design as the Type 142M for the RAF as a bomber. Deliveries of the newly named Blenheim Mk.I commenced on 10 March 1937.
It was one of the first British aircraft with an all-metal stressed-skin construction, retractable landing gear, flaps, a powered gun turret and variable-pitch propellers. In service the Mk.I would evolve into the longer Mk.IV. Though faster than most of the RAF's biplane fighters in the late 1930s and a nevertheless effective bomber, advances soon left it vulnerable if flown in daylight, with many shot down.
 In addition
to operating as medium bombers, both versions were converted into heavy fighters
by the addition of a gun pack with four Browning .303 in (7.7 mm) machine guns
mounted under the fuselage and proved effective in the night fighter role. The
Mk.IV was also used as a maritime patrol aircraft and both variants were also
used as bombing and gunnery trainers once they had become obsolete as combat
aircraft.
In addition
to operating as medium bombers, both versions were converted into heavy fighters
by the addition of a gun pack with four Browning .303 in (7.7 mm) machine guns
mounted under the fuselage and proved effective in the night fighter role. The
Mk.IV was also used as a maritime patrol aircraft and both variants were also
used as bombing and gunnery trainers once they had become obsolete as combat
aircraft.
Prior to the war, the successful implementation of a front bombardier / navigator position on the MkI, which resulted to the elongated MkIV, arose the interest of the Royal Hellenic Air Force (Ελληνική Βασιλική Αεροπορία - ΕΒΑ), which wanted the Blenheim to be its primary bomber. Cost negotiations delayed the order and when this was finally given for 24 units, time was running out and half were seized by the RAF.
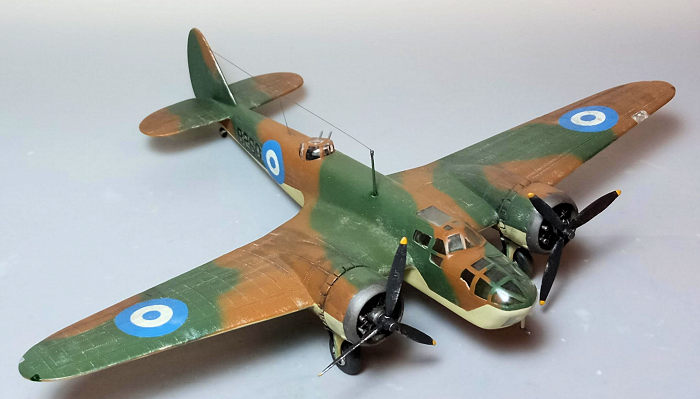
The twelve received were delivered, perhaps not surprisingly,without operational equipment (no bomb sight, non conforming bomb attachment points and so on) and only the ingenuity of the technicians managed to make them combat-worthy and put to intensive use upon the outbreak of the war. Those planes featured the standard Dark Earth/ Dark Green over Sky camo and were assigned B251 to B262 codes, carrying Hellenic roundels at the six usual positions and, at least in most cases, no fin flash. Considering the genuine yet primitive in nature transformation of those machines to being combat worthy, what they achieved upon the outbreak of the war was superlative.
Acknowledging the fact that rapid technical advances deemed the type obsolete as a front line machine quicker than anticipated, the Blenheim was nevertheless a sound and effective design, particularly taking into account that it had not been designed from scratch, but practically emerged from a passenger layout evolving to a fighter/bomber.
| THE KIT |
The Blenheim has been
well served in 1/72 from as early as 1939, with the FROG PENGUIN offering and
the Truscale, Comet/AMCO and Megow toolings following soon after. Airfix and
FROG came with newer tools in the late 60s frequently reboxed (the FROG mold by
numerous, mainly Eastern Block companies). Then MPM presented their detailed,
limited run, multimedia kit in 2000, which was reboxed till 2010 by Special
Hobby), with Airfix finally presenting their superb new tool Blenheims from 2014
onwards.
The specific kit is the 2004 edition of the old Airfix tooling, bought in 2005
from an Athens hobby shop at a good price. It came in the usual (back then)
small and relatively flimsy Airfix top opening box, featuring an attractive box
art of RAF 235 Sqn’s V5735/QY-D example in flying status.
 Upon
opening the box, I was greeted with 71 light gray soft styrene parts. The
fuselage and wing halves are separately provided, whereas all the rest are
arranged in four medium sized sprue trees. Molding is, of course, old school
with a lot of flash, indicating an intensive use of the 1968 molds. Panel lines,
apart from moving surfaces’ hinges and rear gunner’s steps, are raised all over
with a lot of riveting, which, though off-scale if left as is, will not look too
bad after a light sanding.
Upon
opening the box, I was greeted with 71 light gray soft styrene parts. The
fuselage and wing halves are separately provided, whereas all the rest are
arranged in four medium sized sprue trees. Molding is, of course, old school
with a lot of flash, indicating an intensive use of the 1968 molds. Panel lines,
apart from moving surfaces’ hinges and rear gunner’s steps, are raised all over
with a lot of riveting, which, though off-scale if left as is, will not look too
bad after a light sanding.
Cockpit is basic, featuring a rudimentary seat, yoke, instrument panel and rear
bulkhead. The navigator and rear gunner areas are totally void of any detail and
three average figures are provided, deeming not a bad idea to use them, in order
to busy up the above areas. Landing gear, engines, exhausts (two styles) and
props are also averagely represented, with, at least, the distinctive ram air
oil coolers well rendered.
Clear parts are quite thick but relatively clear. Instructions are the typical
old style Airfix, coming in the form of a folded b/w A3 size paper, featuring a
short history of the type, with the construction spread in 10 simple and
followable steps. Apart from “black” indicated for the engines, guns and tires,
no internal color callouts are supplied.
Two schemes are provided, for a RAF machine in typical Dark Green/dark Earth
over Sky, and for a Forces Aériennes Françaises Libres example carrying the
Desert camo of Dark Earth/ Middle Stone over Azure Blue. Colors are provided
only in Humbrol codes, with the proposals for the French machine being of
questionable validity, however you can easily download the superb instructions
of the equally superb new tool Airfix Blenheims to use as reference.
Instructions want you to first assemble the cockpit and rear gunner station,
then, together with the navigator himself, trap them between the fuselage
halves. The underbelly gun packs are then attached, followed by the front
glazing and the horizontal stabilizers. The wings are then assembled and
attached, followed by the landing gear, the engines, props, exhausts and rest
tiny bits, ending a seemingly straightforward, uncomplex build.
| CONSTRUCTION |
 I started
by attaching the instrument panel, seat and rear bulkhead onto the cockpit
floor, with the completed cockpit attached to the port fuselage half. The rear
turret base was then assembled, but without the gun and clear dome, planning to
attach them after painting, and equally attached, with the fuselage halves
joined afterwards. Basic interior color was Hu78 Interior green, whereas the
instrument panel and yoke were black. I did not bother to add any extra interior
detail, since little would nevertheless be visible through the thick, distorting
transparencies.
I started
by attaching the instrument panel, seat and rear bulkhead onto the cockpit
floor, with the completed cockpit attached to the port fuselage half. The rear
turret base was then assembled, but without the gun and clear dome, planning to
attach them after painting, and equally attached, with the fuselage halves
joined afterwards. Basic interior color was Hu78 Interior green, whereas the
instrument panel and yoke were black. I did not bother to add any extra interior
detail, since little would nevertheless be visible through the thick, distorting
transparencies.
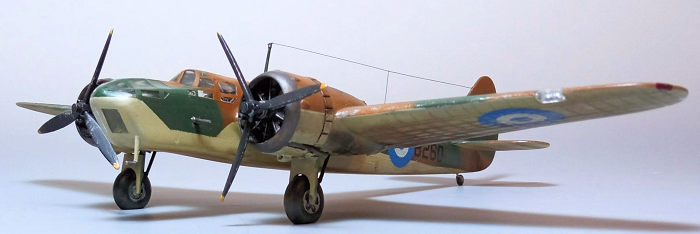
The wings were then assembled and attached, followed by the tail planes (2-piece
each). Fit was more or less manageable with no significant gaps. The engines had
the distinctive dual oil cooler ram air tubes attached and then glued onto the
rear firewall/cowling flaps part. The front cowling was next glued, followed by
the underside carburettor air inlet, with the completed engine/nacelle finally
attached to the wings. The engines were painted black, then heavily dry brushed
with silver, whereas the cowling innards were painted Hu78 Interior Green.
Overall fit of the basic model was, of course, not perfect, with the molds’ age
definitely contributing towards it, but manageable. In fact, fit was better than
expected for such an old mold. After a filling and sanding session, I blanked
all interior areas and engine openings with wet tissue and took the bird to the
paint shop!
| COLORS & MARKINGS |
 I
first gave all undersides, including gear doors, a coat of Hu23 Duck Egg
Blue (for the “sky”), then masked it off. The topside pattern of dark green
/ dark earth was next freehanded, using Hu30 and Hu29 respectively.
Demarcation lines were “tightened” by using “fine” settings to my airbrush,
including tad lower air pressure and thinner paint. A coat of Future
preparing the bird for decals.
I
first gave all undersides, including gear doors, a coat of Hu23 Duck Egg
Blue (for the “sky”), then masked it off. The topside pattern of dark green
/ dark earth was next freehanded, using Hu30 and Hu29 respectively.
Demarcation lines were “tightened” by using “fine” settings to my airbrush,
including tad lower air pressure and thinner paint. A coat of Future
preparing the bird for decals.
I used the excellent, but long OOP “Plastimodelismo” generic decal sheet for
the greek roundels and I used leftover black codes of suitable sizes to
depict #260 bird. A coat of Future sealed the decals.
| FINAL CONSTRUCTION |
The landing gear
was assembled and attached. Door innards and wheel wells (if we attribute
“wells” to the inner totally void of any detail area) were painted Hu78
Interior Green (aluminum would also be probable), landing gear struts and
tires were painted black, rims were painted “steel” (the new tool
instructions state black for the rims, as well, but photo evidence of
Hellenic birds indicate an aluminum shade - in fact, some pics depict gear
legs in steel), whereas oleos were highlighted with a fine tip silver pen.
Main tires were filed to look weighted. Typically, I managed to break the
tail wheel strut, and I replaced it with a pin piece.
The props were painted black with yellow tips and attached, followed by the
exhausts, which were painted Testors Burned metal and attached at this time,
as well.
 Since
Hellenic Blenheims were hastily prepared/modified to being combat ready and
put to extreme use, mostly operating from primitive airfields, I decided not
to restrain too much myself in weathering: I first gave a black wash to
bring out whatever recessed detail was there (like moving surfaces hinges or
cowling flaps/louvers), then applied dark brown and black dry pastels to
simulate dirt, grime and engine soot. Some silver dry brushing at the top
wing roots and prop blades’ leading edges concluded weathering, with a final
matt coat sealing it ang giving the bird its final hue.
Since
Hellenic Blenheims were hastily prepared/modified to being combat ready and
put to extreme use, mostly operating from primitive airfields, I decided not
to restrain too much myself in weathering: I first gave a black wash to
bring out whatever recessed detail was there (like moving surfaces hinges or
cowling flaps/louvers), then applied dark brown and black dry pastels to
simulate dirt, grime and engine soot. Some silver dry brushing at the top
wing roots and prop blades’ leading edges concluded weathering, with a final
matt coat sealing it ang giving the bird its final hue.
The transparencies had their framing hand painted and attached. Fit of the
pilot’s glazing was challenging and needed some judicious trimming, in order
to fit and present a somehow passable look. The top machine gun was painted
burned metal and attached , followed by the turret transparency (the latter
being thick and looking toy-ish).
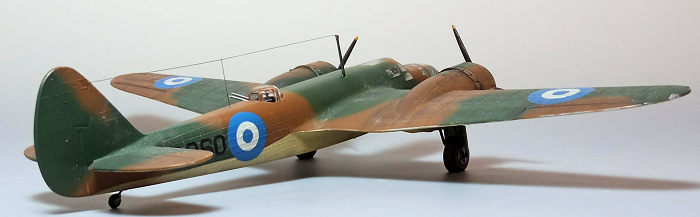
The top antenna mast was attached, with thin stretched sprue run from it
towards the fin, with a secondary section run from its middle towards a
drilled hole at the fuselage, to simulate the aerial wire. Since this was
the bomber version, neither the underbelly gun tray nor the wing mounted
guns and corresponding ejector chutes were used.
Blobs of red and green clear paint were applied, to simulate the wingtip
lights, whereas the formation lights located at the wigtips’ aft areas were
merely replicated by my fine silver pen, before calling the Hellenic bomber
that exceeded its expectations done!
| CONCLUSIONS |
The fact that Airfix itself presented a superlative new tool 1/72 Blenheim from 2014 onwards makes it pretty clear which way to go if you want the best mainstream 1/72 Blenheim (you may check our Editor’s thorough previews of the Mk.I and the Mk.IV and Tom Cleaver’s and Scott Lyle’s excellent builds and reviews, all found at the MM archives). This leaves this 1/72 ancestor, the subject of this review, far behind in every respect (details, the "de rigueur" recessed panel lines, transparencies, decals, instructions and fit - though the newer tooling also needs some attention during building - and so on).
Still, this elderly
fellow can be quite effortlessly put together and, possibly with some extra
detailing, present a nice result. If you have one or find one, resist the
temptation to keep it as a collector’s item and give it a go: for sure, a nice
representation of this important fighter/bomber will emerge!
Happy Modeling!
Spiros Pendedekas
| REFERENCES |
6 June 2023
Copyright ModelingMadness.com. All rights reserved. No reproduction in part or in whole without express permission.
Thanks to me for picking this one up when it was on sale.
If you would like your product reviewed fairly and quickly, please contact the editor or see other details in the Note to Contributors.