Airfix 1/48 Bristol Blenheim IF
| KIT #: | A09186 |
| PRICE: | $50.00 or so |
| DECALS: | Two options |
| REVIEWER: | Scott Lyle |
| NOTES: | I |
| HISTORY |
The Bristol Blenheim was a British light bomber that was a leading edge design in the mid-1930s. By the start of WW2 it was nearly obsolete however; too slow and too lightly armed to survive in the skies above Europe. Making matters worse were poor RAF tactics early in the war, dooming the bomber and its crews to sustain brutally high casualty rates.
Even if some of the bomber’s deficiencies are forgiven due to its relative age at the start of the war, the Blenheim had severe shortcomings to be sure. It should have had better defensive armament. There was virtually no armor for the engines or crew. The cabin heating and the crew’s oxygen system were poor, meaning crews were lost to a whole host of environmental issues. Early versions did not have self-sealing fuel tanks.
Other issues plaguing the aircraft’s performance were unrelated to the aircraft itself. British bombs early in the war were notoriously unreliable – oftentimes they simply failed to explode. And RAF tactics at the time were lacking. During the battles of Norway and France wave after wave of Blenheims were sent on daylight raids to bomb targets heavily defended by AAA, Bf 109s and Bf 110s. Without fighter escort they stood little chance, a lesson relearned by the Luftwaffe during the Battle of Britain, and again later by the Americans during their own daylight bombing campaign.
It is an oversimplification to dismiss the aircraft as a failure however. It was the only competent bomber available to the RAF in anything near suitable numbers, and faced with the German onslaught throughout the early stage of the war, it wasn’t as though the RAF could sit on its hands and do nothing. It had to fight with what it had. The Blenheim was the aircraft with which the RAF tackled the learning curve, a process that probably would have been painful no matter what aircraft was being used.
 The
Blenheim began life as a civilian project. In 1933 Bristol began work on a
twin engine aircraft that could carry 8 passengers. A mockup of the design
was unveiled at a French show in 1935 and attracted the attention of Lord
Rothermere, the owner of the Daily Mail newspaper. He became interested in
the design as a way to transport businessmen between European cities. Funded
by Rothermere, work soon began on the prototype, now called the Type 142.
With sabers starting to rattle on the continent and the RAF looking to
expand, Bristol shrewdly created a sister prototype as a light bomber.
The
Blenheim began life as a civilian project. In 1933 Bristol began work on a
twin engine aircraft that could carry 8 passengers. A mockup of the design
was unveiled at a French show in 1935 and attracted the attention of Lord
Rothermere, the owner of the Daily Mail newspaper. He became interested in
the design as a way to transport businessmen between European cities. Funded
by Rothermere, work soon began on the prototype, now called the Type 142.
With sabers starting to rattle on the continent and the RAF looking to
expand, Bristol shrewdly created a sister prototype as a light bomber.
First flying in April 1935, the prototype attained a top speed of 307 mph during testing. In September the RAF ordered 150 aircraft under the name of Blenheim Mk. I. The Mk.IV, the most numerous variant, began replacing the Mk. I in service during the summer of 1939. When the war began the Blenheim was the first RAF aircraft to attack the enemy, executing a strike against German ships at Wilhelmshaven. Anti-shipping strikes continued into 1940, and the Battle of Norway offered a painful glimpse into the future as the Blenheim suffered high losses. High casualty rates continued during the German invasion of France in May 1940. Flying in broad daylight at medium altitude, the slow-moving Blenheims were easy meat for the marauding German fighters and flak.
In January 1941 the RAF began “Circus” operations, basically sending Blenheims escorted by fighters over France to lure German fighters up for the RAF fighters to attack. The Germans figured out what was up however and only attacked when they had the initiative, resulting in even more Blenheim losses.
Blenheims saw action throughout the Mediterranean theaters, fighting in North Africa as well as Greece, Iraq and Malta. Flying from Malta they exacted a heavy toll on Axis shipping, but also suffered enormous losses in the process. By February 1942 most surviving Blenheims had been transferred to the Far East where they fought on for a little longer before being replaced by new bombers like the Douglas Boston.
During the early part of the war Blenheims and their valiant crews did their best to stem the Axis flood, but unfortunately sacrificed a great deal in the process.
| THE KIT |
Opening up the box, Airfix has absolutely packed the kit with detail and options. A fully detailed cockpit, bomb bay, and gunner’s station start things off. The highly detailed landing gear can be assembled in the raised or lowered positions. The ailerons are separate parts, as are the elevator flaps and rudder. The fully detailed landing flaps can be posed in the lowered position. Two nicely detailed engines are included, complete with the option of having the small cowling flaps opened or closed. Airfix provides a jig to ease construction of the dorsal turret, and also gives you the option of displaying both entry hatches opened or closed! There are also many unused parts on the sprues that will no doubt be used on future releases – more on that below.
 The
Blenheim was not a large bomber, but the kit consists of seven sprues of light
gray plastic and one of transparent parts. Recessed panel lines cover both the
wings and fuselage, while both raised and recessed rivets line the wings. Two
different sizes of bombs and even a pilot figure for the cockpit round out the
plastic. Decals are provided for two Blenheims, a heavy fighter from No. 23
Squadron in February 1940, and a night fighter from No. 54 OTU in December 1940.
The
Blenheim was not a large bomber, but the kit consists of seven sprues of light
gray plastic and one of transparent parts. Recessed panel lines cover both the
wings and fuselage, while both raised and recessed rivets line the wings. Two
different sizes of bombs and even a pilot figure for the cockpit round out the
plastic. Decals are provided for two Blenheims, a heavy fighter from No. 23
Squadron in February 1940, and a night fighter from No. 54 OTU in December 1940.
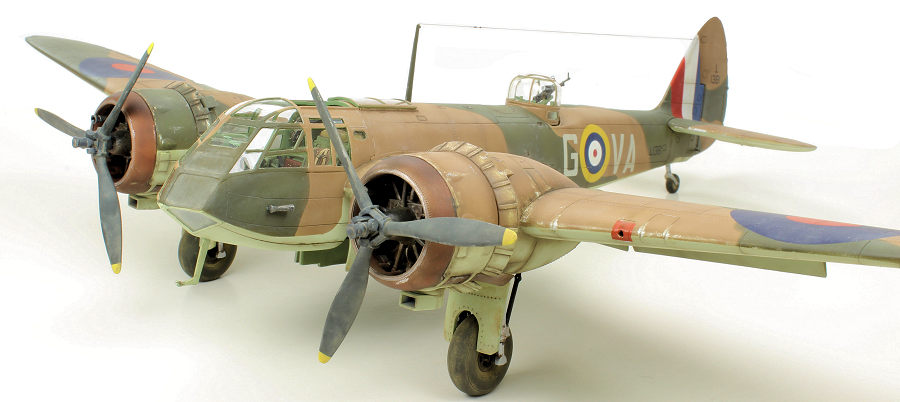
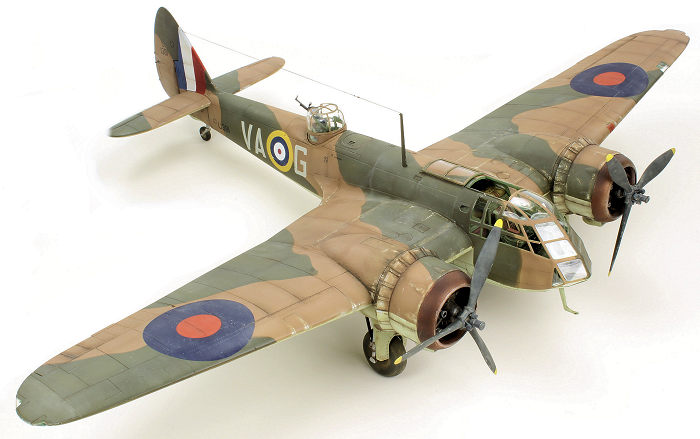
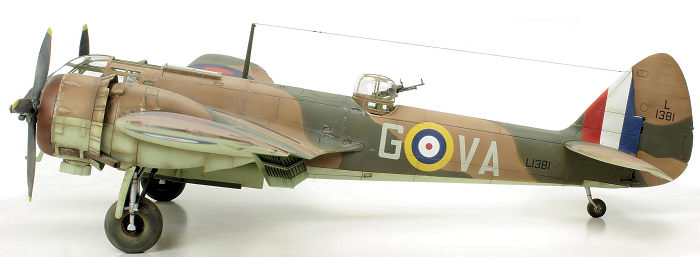
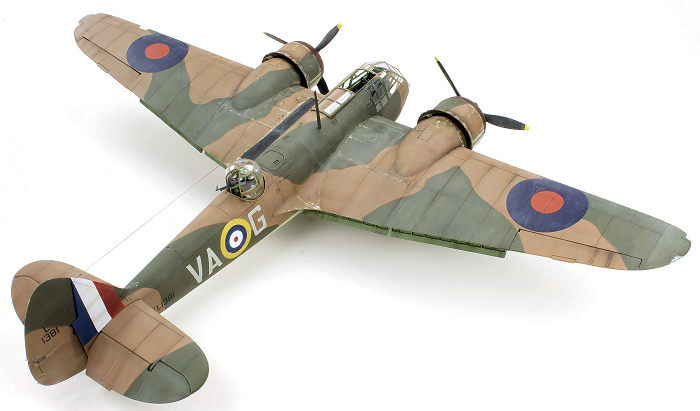
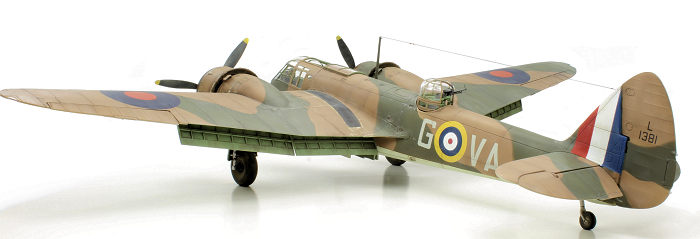
I struggled to find aftermarket decals for a Mk. I that was used in combat. It seems they saw little use in Europe, having quickly been replaced by the Mk. IV. They did however see plenty of use in the Mediterranean, North Africa, and the Far East. I ended up going with a No.211 Squadron bomber, L1381, that I found pictures of online. It saw action in Greece in November/December 1940 during the ill-fated Italian invasion of that country.
I have to give Mr. Eduard some money with every aircraft I build these days, and in this case I bought the color photo etch set and also their newer “T-Face” masking set, which provides masks for not only the outside but also the inside of the canopy. Because if masking just one side is fun, masking both sides must be twice as fun, right?
| CONSTRUCTION |
The build begins by assembling….not the cockpit, but a big open tub right behind the cockpit. I honestly have no idea what that thing is (someone please enlighten me), but it consumes more than half of the bomb bay so it must do something. At any rate it joins with the bomb bay and wing spars to form a sturdy module. I airbrushed it Tamiya XF-71 Cockpit Green that was lightened with a few drops of XF-2 Flat White, and then gave it a thin wash of Mig Productions Dark Brown to bring out the shadows.
Something to point out here if you’re building the kit as a bomber and not a fighter – step 3a & 3b in the instructions have you snip away what are actually the inner bomb bay doors. You might not want to do that. Since the fighter version bolted the bomb bay doors shut and mounted a gun pack over them, it makes sense to snip those away for the fighter version. For the bomber version however, you might want to leave them as is so they will be posed open. That’s the road I chose. And my road is nice smooth, unlike the potholed disasters we call roads here in Massachusetts.
 Up next
is the pilot’s seat, nicely rendered on its tubular framework. A large pack
mounts behind the seat, which in turn is mounted to the mysterious tub thing.
The various controls/panels are added next. The fit of the parts is tight and
precise, giving the cockpit a realistic, busy look.
Up next
is the pilot’s seat, nicely rendered on its tubular framework. A large pack
mounts behind the seat, which in turn is mounted to the mysterious tub thing.
The various controls/panels are added next. The fit of the parts is tight and
precise, giving the cockpit a realistic, busy look.
I gave the assembled cockpit and the insides of both fuselage halves the same paint treatment as the tub module above. Small details were then picked out by hand before I began adding the various pieces from the Eduard color set. The Eduard set does not contain seatbelts, but I was able to source some from my spares box. It does give you a very nice printed photo etch instrument panel. I added some small wires to the back of the instrument panel to add some further detail.
Next the two fuselage halves were closed up, the fit of which required a little sanding and putty but nothing out of the ordinary. A single part covers the mystery tub – I glued one side first and let it dry before gluing the other side. By applying a little pressure to the fuselage while the glue dried I was able to keep everything lined up and negate the need for putty.
The wings and landing gear are next, and the landing gear are small kits in and of themselves. Several struts and bulkheads are involved but it all went together fine. I followed the paint choices called out in the instructions for the different struts, though looking at pictures of the real thing reveals room for interpretation. Attaching each landing gear assembly to each lower wing (steps 49 & 51) required a slight modification – I snipped off the small tabs of the aft ends of the side walls in steps 48 & 50, and then everything clicked into place.
The upper and lower wings were next joined together, with a small amount of sanding and putty applied to the seams. Next the wings are attached to the fuselage, which brings us to the first trouble spot – large gaps between the wings, fuselage, and fillet pieces at the aft edges of the wing roots.
Other reviews I read found the same issue, and it took some putty, sanding and rescribing to fill in the gaps. Some more of the same treatment was needed with the rear fairing aft of the dorsal turret, but the rear stabilizers, having deep pockets to sit in, attached nicely to the fuselage.
The engines are next, and they consist of six piece assemblies. I painted the radial cylinders Vallejo Black Gray and then dry-brushed them Testors Steel and Aluminum to bring out the details. The crank case was also painted Black Gray and then dry-brushed Vallejo Neutral Gray. Dark Brown washes were added to dirty things up. The front cowling rings and exhausts were sprayed Testors Copper and then over sprayed with a thinned mix of Tamiya XF-10 Flat Brown to replicate their burnt metal-copper color.
As I moved onto the small air filter under each cowling, I suddenly realized something – for my Greece-based bomber, those filters are supposed to be the larger, Vokes air filters typically used in dry, dusty locales. While I was pondering this dilemma I perused the sprues and voila – Airfix provides the very parts needed to build those up in the box! Clearly more versions are on the way…
 The
engine cowling panels build up nicely, and then the engines are glued to the
wings. I next added the flaps, followed by the ailerons. I then tackled masking
the canopy pieces, for which I highly (and I
mean
highly) recommend the
Eduard T-Face set. There are many small windows in those parts, and I would not
want to mask them by hand. Another thing to note for those building this as a
bomber – Airfix “frosted” the lower left pane of glass on part G4 because on the
fighter variant those panes were painted over. On the bomber variant however
that pane was transparent. A little sanding with the polishing stick brightened
it up, and then I masked it by hand. All of the transparent parts were then
airbrushed on both sides Tamiya XF-71 Cockpit Green. Remember to move the inner
masks before attaching the canopies to the fuselage!
The
engine cowling panels build up nicely, and then the engines are glued to the
wings. I next added the flaps, followed by the ailerons. I then tackled masking
the canopy pieces, for which I highly (and I
mean
highly) recommend the
Eduard T-Face set. There are many small windows in those parts, and I would not
want to mask them by hand. Another thing to note for those building this as a
bomber – Airfix “frosted” the lower left pane of glass on part G4 because on the
fighter variant those panes were painted over. On the bomber variant however
that pane was transparent. A little sanding with the polishing stick brightened
it up, and then I masked it by hand. All of the transparent parts were then
airbrushed on both sides Tamiya XF-71 Cockpit Green. Remember to move the inner
masks before attaching the canopies to the fuselage!
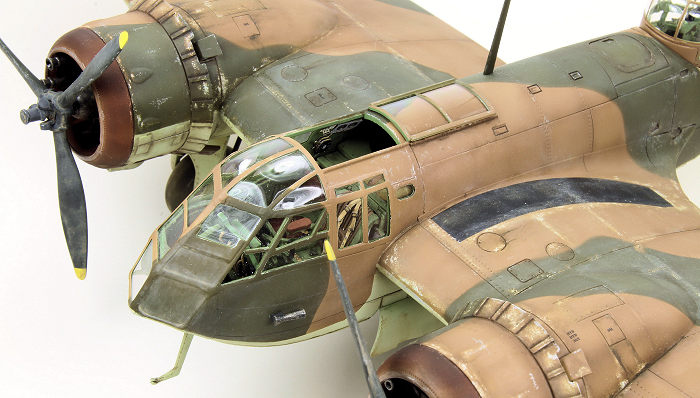
The fit of said canopies was not great. A lot of test fitting is in order here. They have to be finessed into position and then held in place with CA glue. There are gaps here and there, and in some places they sit proud of the fuselage. A fair amount of putty was used to build up the fuselage sides to make them flush with the canopy, followed by some panel line rescribing. The good news is that the centerline seam between the two pieces wasn’t terrible. If you pose the top sliding hatch in its open position, a lot of that nice cockpit detail will be visible.
The last assembly step was adding the wingtip lights. In an attempt to depict just the light bulb, I drilled a tiny hole in each transparent piece and then filled the hole with either red or green paint. Once glued in place they received masks from the Eduard set.
At last it was time to start painting. I stuffed tissue paper into the cockpit, dorsal turret opening, landing gear bays, and engine faces, and it was off to the airbrush booth.
| COLORS & MARKINGS |
Tamiya’s Surface Primer was sprayed on for the first step, followed by a 50/50 mix of Tamiya XF-2 Flat White and XF-21 Sky on the lower surfaces. Wanting to depict a well-worn aircraft, my intention was to use the hairspray technique to show paint chipping around the engines and wing roots. I sprayed some Tamiya TS-17 Aluminum in those areas, followed by a couple of layers of hairspray.
For the upper surfaces I decided to try a new painting strategy. Like many of us, I’ve always resorted to spraying Future all over the model to create the smooth surfaces that work best for decals. I began thinking, what if the base coat paint I use was already semi-gloss? Then I could (hopefully) do away with the time consuming Future step.
I decided to try Gunze’s Aqueous line of paint. This line features most of the prominent aircraft colors in a semi-gloss finish. Using their own Leveling Thinner, I applied a basecoat of H72 Dark Earth. The finish was indeed smooth, with a slight sheen to it. I then darkened the mix with some Gloss Black and went over the panel lines to create some contrast. Next I masked that off with Silly Putty and then sprayed H73 Dark Green that was also darkened a bit with Gloss Black. The paint sprays beautifully, and the sheen is slightly glossy. So far I am a fan.
 At this
point I wanted to do some of the hairspray chipping. With a stiff brush I wet
some of the areas with water and began chipping. Only problem was that none of
the Gunze paint was coming off. Only after a long time and by really applying
some elbow grease did some tiny chips appear. This was not going to work. I
decided to move on.
At this
point I wanted to do some of the hairspray chipping. With a stiff brush I wet
some of the areas with water and began chipping. Only problem was that none of
the Gunze paint was coming off. Only after a long time and by really applying
some elbow grease did some tiny chips appear. This was not going to work. I
decided to move on.
To darken the panel lines I applied a thin wash of Tamiya XF-1 Flat Black and water. I then applied the decals, using some of the kit’s decals and some from my stash. The fuselage codes were from Carpena’s RAF Grey Fighter Codes #48.77. As I was struggling with one small decal, I had to add a lot of Solvaset to straighten it out. Using a pair of tweezers to move it around, I noticed the Gunze paint underneath it starting to chip. A lightbulb went off – use Solvaset as a chipping fluid? Sure enough it works. You have to let it soak into the paint a bit, but it does work, actually producing nice looking paint chips.
After removing some paint around the wings roots and engine areas, I next sealed the decals with a couple of coats of Vallejo Polyurethane Matt Varnish. I then airbrushed a very thin mix of 50/50 Tamiya XF-69 NATO Black/Tamiya XF-64 Red Brown onto the panel lines and around the engine. To further muck up the engine areas I applied some washes using Tamiya’s Dark Brown Panel Line wash. Some more chipping with a Silver pencil was applied, and the painting phase was done.
| FINAL CONSTRUCTION |
 Now
to assemble the parts that are easily broken off. The tire halves were glued
together and painted Tamiya XF-69 NATO Black, weathered with pigments, and
glued to the model. Then the wheel well doors and bomb bay doors (stealthily
included as separate parts) were painted with my Tamiya Sky mix, weathered,
and attached as well.
Now
to assemble the parts that are easily broken off. The tire halves were glued
together and painted Tamiya XF-69 NATO Black, weathered with pigments, and
glued to the model. Then the wheel well doors and bomb bay doors (stealthily
included as separate parts) were painted with my Tamiya Sky mix, weathered,
and attached as well.
Next up was the dorsal turret, which is a very detailed multi part assembly in and of itself. Airfix provides a separate plastic jig to keep the delicate framework parts in alignment as they’re assembled. I painted the parts Tamiya XF-71 Cockpit Green and weathered them with dark washes. The Lewis gun has been criticized by other reviewers and rightfully so, it’s not very detailed. Fortunately I found a better version in my spares box and used that. Once assembled the turret was inserted into the model by lining up a tab on the turret with a notch in the turret “socket”. It’s a tight fit but it goes. The final steps involved removing the window masks, adding the mast and EZ Line aerial, and lastly attaching the props.
| CONCLUSIONS |
| REFERENCES |
- Osprey Publications, Combat Aircraft #5, “Blenheim Squadrons of World War 2”
- Squadron/Signal Publications, Aircraft in Action #88, “Bristol Blenheim in Action”
- Wikipedia, the Online Encyclopedia
Back to the Previews Index Page
Back to the Previews Index Page