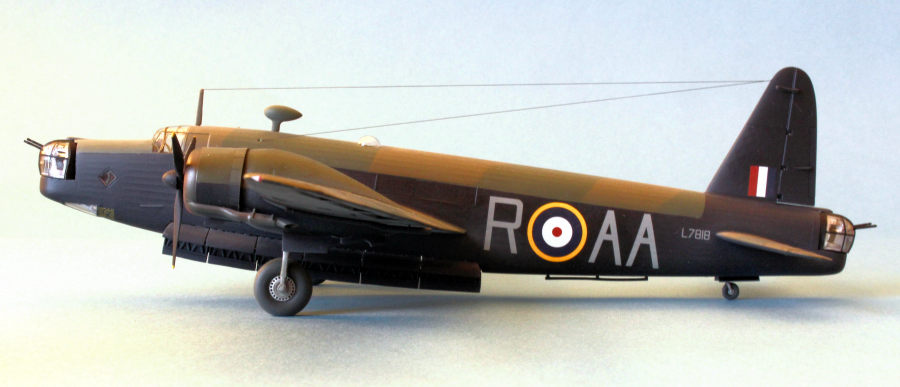
Airfix 1/72 Wellington IC
| KIT #: | A08019 |
| PRICE: | $34.00 |
| DECALS: | Two options |
| REVIEWER: | Lee Kolosna |
| NOTES: | Basic kit build |
| HISTORY |
 Great
Britain went to war in September, 1939 with five different bomber
aircraft: Fairey Battle, Handley Page Hampden, Armstrong Whitworth Whitley,
Bristol Blenheim, and Vickers Wellington. Of those, the first was obsolete, the
Hampden and Whitley barely acceptable, the Blenheim was upgraded in performance,
and only the Wellington was robust enough to serve for the entire war.
Great
Britain went to war in September, 1939 with five different bomber
aircraft: Fairey Battle, Handley Page Hampden, Armstrong Whitworth Whitley,
Bristol Blenheim, and Vickers Wellington. Of those, the first was obsolete, the
Hampden and Whitley barely acceptable, the Blenheim was upgraded in performance,
and only the Wellington was robust enough to serve for the entire war.
Wellingtons served with Bomber Command up until 1943 before they were replaced by the “Heavies”, the Lancaster and Halifax. With Coastal Command, they performed anti-submarine duties up until the very end of hostilities in 1945. Over 11,000 Wellingtons were built, more than any other British bomber. Wellingtons comprised over half the attacking force during the first 1000 bomber raid against Cologne in May 1942. They also served in the Mediterranean, India, and in Africa.
The unique geodetic structure of the airframe contributed to great overall strength, allowing the aircraft to take significant battle damage and still return home. It had generally docile handling characteristics and was well-liked by its crews. In its later years, Wellingtons were used to train bomber crews before they made the transition to operational units.
| THE KIT |
This is a modern Airfix kit with all the delightful characteristics of their resurgence as a model manufacturer: decent but not excessive detail for this scale, modeler-preferred engraved panel lines, generally good fit, accuracy of dimensions, high-quality decals printed by Cartograf, and excellent instructions. This model has been issued in numerous variants (Mk. IA/C, Mk II, GR Mk. VIII) since its debut in 2018. 140 parts in Airfix’s now standard light bluish-gray styrene with a few clear pieces make up the kit, with reasonable internal detail. Airfix very graciously admits that some of this detail inside the fuselage will be impossible to see once the model is assembled, so they helpfully list the parts that can be left out for efficiency’s sake.
Decals are provided for two aircraft, one from No. 75
Squadron, serial number L7818, which was involved in the awarding of a Victoria
Cross to a crewmember who attempted to put out an engine fire in July 1941 by
crawling outside the aircraft onto the wing, and one from No. 20 Squadron,
N2980, which ditched in Loch Ness in 1940 and was recovered from the lake in
1985 and is now on display at the Brooklands Museum of Auto Racing and
Aviation. Six 250 lb. bombs are included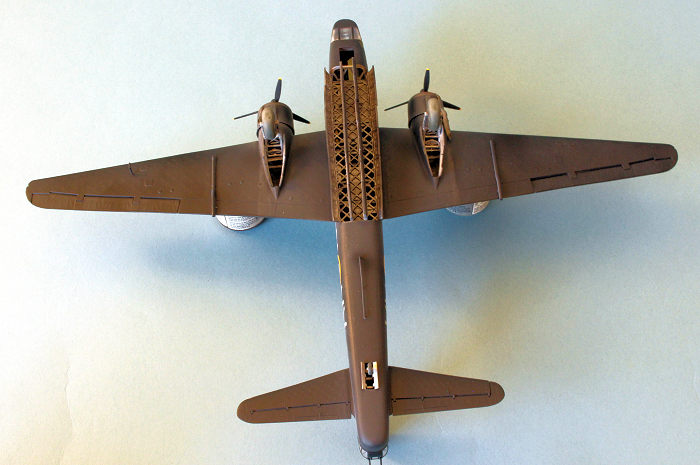 ,
the tires have flattened bottoms, the bomb bay doors can be positioned as open
or closed, the landing gear retracted or extended, and clear panels for the
extensive side windows that can be painted over for the IC variant.
,
the tires have flattened bottoms, the bomb bay doors can be positioned as open
or closed, the landing gear retracted or extended, and clear panels for the
extensive side windows that can be painted over for the IC variant.
The kit has virtually no issues that I addressed while building my model. I did note a few minor ones:
· The inserts to fill the waist gun positions (which were found to be ineffective in combat) don’t fit all that well and the surrounding gaps need to be carefully filled.
· The ceiling of the bomb bay is uncovered with just the geodetic frame structure of the aircraft evident. On the actual aircraft, this structure typically had either a canvas or plywood floor installed above it.
· My model’s clear side window pieces were short-shot, meaning they were incompletely formed. I had to cut out the ill-formed panels and replace them with thin sheet styrene as the IC model I built had these windows overpainted.
· Something went wrong with my assembly of the port wing nacelle, resulting in large gaps that had to be filled. This could just be of some kind of misalignment that I didn’t notice while assembling the parts, but it did require some careful filling and sanding to avoid ruining the surrounding lattice and fabric wing surfaces.
The great Frank Spahr used this same kit to convert into a Coastal Command GR Mk. VIII and I encourage everyone considering building this kit to read his excellent review here.
In my quest to build a collection of World War II bombers in 1/72 scale, the Wellington is a must-have. I was very pleased to have a new-tool kit available and other than a small hiccup with the fit of the port nacelle, the model was a delight to build.
| CONSTRUCTION |
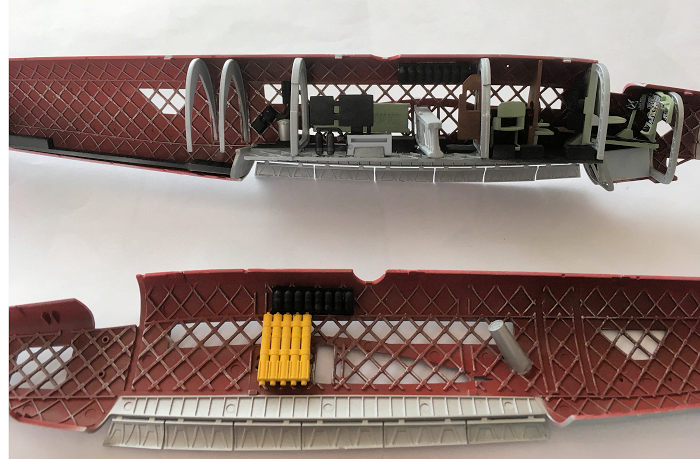 The
interior of a Wellington is unique due to it geodetic frame structure, covered
with doped linen. This means rather than the standard British Interior
Grey-Green, the inside walls were a dark red with the unpainted aluminum of the
framing evident. For this I added a few drops of black to Polly Scale Signal
Red and sprayed the inside of the fuselage halves. I then dry-brushed the
lattice structure with silver, building it up until it was fairly uniform in
appearance. The rest of the interior components were painted with Vallejo Model
Air Interior Grey Green. Even though Airfix gives the builder the opportunity
to leave off interior details that can’t be seen, I went ahead and installed
them anyway, including the very important chemical toilet.
The
interior of a Wellington is unique due to it geodetic frame structure, covered
with doped linen. This means rather than the standard British Interior
Grey-Green, the inside walls were a dark red with the unpainted aluminum of the
framing evident. For this I added a few drops of black to Polly Scale Signal
Red and sprayed the inside of the fuselage halves. I then dry-brushed the
lattice structure with silver, building it up until it was fairly uniform in
appearance. The rest of the interior components were painted with Vallejo Model
Air Interior Grey Green. Even though Airfix gives the builder the opportunity
to leave off interior details that can’t be seen, I went ahead and installed
them anyway, including the very important chemical toilet.
There is a set of decals provided for the instrument panel. The builder is instructed to shave off a piece of the fuselage fairing around the nose gun turret. I glued the two fuselage halves together using CA glue in order to prevent ghost seams from appearing months later and sanded the joint smooth.
The two waist gun windows weren’t present on the IA and IC, so a triangular-shaped insert is provided to fill the space. Unfortunately, these didn’t fill the gap completely and required filling of the seam, which is a bit tricky due to the surrounding fabric contours.
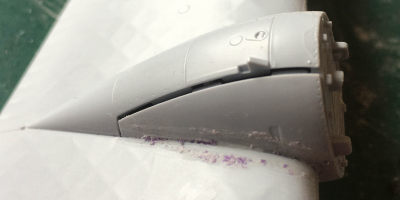 I
had problems with the nacelles and the non-standard engineering that requires
the modeler to insert them up through the top wing half from below. It fit just
fine for the starboard wing, but the port nacelle had a large gap between the
two nacelle pieces that required me to fill the gap first with scrap plastic and
then fill with CA glue. It could be something I messed up, but it did present a
challenge in getting the seam sanded without messing up the surrounding wing
surface detail.
I
had problems with the nacelles and the non-standard engineering that requires
the modeler to insert them up through the top wing half from below. It fit just
fine for the starboard wing, but the port nacelle had a large gap between the
two nacelle pieces that required me to fill the gap first with scrap plastic and
then fill with CA glue. It could be something I messed up, but it did present a
challenge in getting the seam sanded without messing up the surrounding wing
surface detail.
I cut out the solid wingtip position light locations and fashioned clear replacements from a piece of clear sprue, drilling a hole in each and dropping a tiny drop of red (port) or green (starboard) paint inside to represent the colored light bulb housing. The sprue pieces were sanded down to the proper contour of the wingtip and polished back to clarity with a nail buffer stick.
The engines were painted Testor Metalizer Exhaust color and glued onto the nacelles, followed by the cowlings. The wings were then glued onto the spar pieces extending from the fuselage and those seams filled with CA glue and Mr. Surfacer 500. The same for the horizontal and vertical stabilizers.
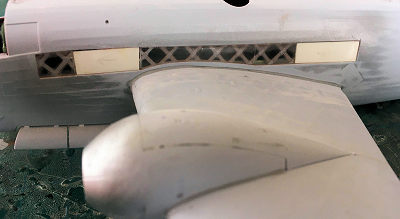 I
attached the cockpit canopy and the bomb aimer’s canopy and filled the seams
around those pieces to give a smooth transition to the surrounding fuselage. As
written above, the clear fuselage window pieces were not completely molded,
which required me to build the IC variant with painted-over windows. I cut off
the short-shot sections of the clear pieces and made replacements from thin
sheet styrene.
I
attached the cockpit canopy and the bomb aimer’s canopy and filled the seams
around those pieces to give a smooth transition to the surrounding fuselage. As
written above, the clear fuselage window pieces were not completely molded,
which required me to build the IC variant with painted-over windows. I cut off
the short-shot sections of the clear pieces and made replacements from thin
sheet styrene.
The turrets were painted with flat black interiors and assembled. I went ahead and masked the frames and painted them black on the outside.
The model was prepared for paint by washing all the sanding dust and finger prints off with a solution of dishwashing liquid and warm water, I rinsed this off, and left the model to air dry.
| COLORS & MARKINGS |
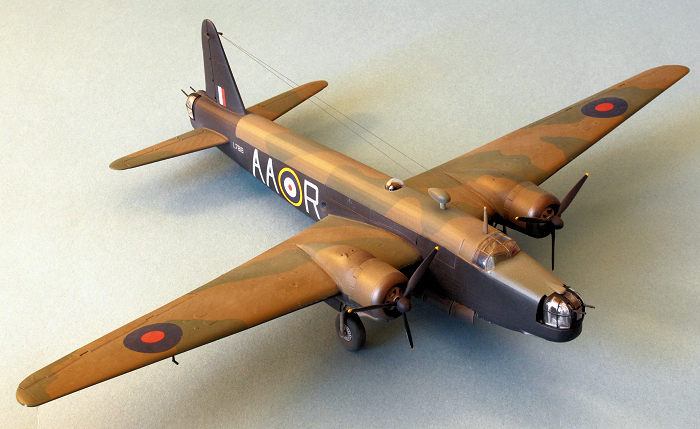
I masked off the clear canopies and primed the entire model with Vallejo Black Surface Primer. This paint is slightly lighter in tone than pure black and is a pretty good match for Night. I masked the underside demarcation line with Tamiya tape and sprayed the topsides with Vallejo Model Air BS Dark Earth. After drying for a day, I masked the disruptive camouflage pattern with drafting tape and sprayed Vallejo US Forest Green, which I think is a better match for RAF Dark Green than the paint that Vallejo sells as that latter color.
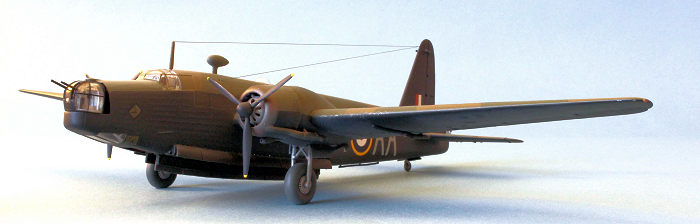 The
bomb bay and wheel wells were painted with Alclad II Lacquer Aluminum and then
dirtied up with a dark wash. The landing gear and wheels were also painted
Aluminum.
The
bomb bay and wheel wells were painted with Alclad II Lacquer Aluminum and then
dirtied up with a dark wash. The landing gear and wheels were also painted
Aluminum.
I masked off the canopy frames and painted them with my north-south/east-west method over a couple of days. I find that this gives a crisper definition in this scale than trying to mask each individual tiny pane.
The exhaust collectors at the front of the cowls were painted with Tamiya Bronze. This was the first model of a British bomber I had built with radial engines, and I followed the kit directions for painting these metallic pieces. Later research has led me to believe that I should have painted the collectors with aluminum paint in a bright ring at the front, followed by a patchy red-brown color aft of that.
A coat for Future Floor Polish prepared the model for decals. The kit decals for Wellington IC, Air Ministry serial L7818, were used and behaved beautifully. I placed a small drop Future on the surface of the model in the location of the marking and then laid the decal down on top. This helps prevent silvering and increases adhesion. After the decals were dry, another coat of Future was sprayed over the decals to blend them with the rest of the model.
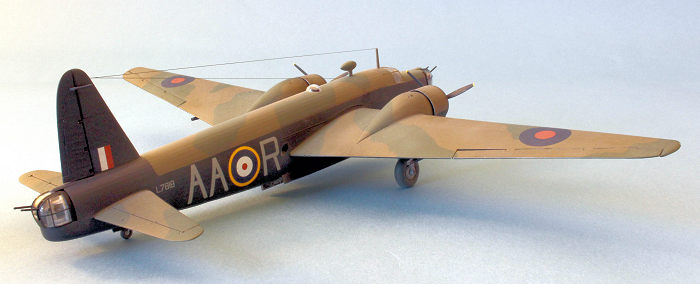 A
pre-made dark enamel wash from MIG Productions was applied to all the panel
lines. I did some minor paint chipping on the leading edge of the propeller
blades using a silver color pencil. A coat of Testor Acryl Clear Flat sealed
the weathering.
A
pre-made dark enamel wash from MIG Productions was applied to all the panel
lines. I did some minor paint chipping on the leading edge of the propeller
blades using a silver color pencil. A coat of Testor Acryl Clear Flat sealed
the weathering.
The landing gear were glued into the wheel wells. I had problems again with the port nacelle and had to cut the frame in half to get it to fit proper in the opening. I can only conclude that I messed something up during construction of that nacelle.
The tires were painted with Vallejo Tire Black and a thin coat of Polly Scale Mud was sprayed around the circumference. The propellers were black with yellow tips (4 scale inches!) were glued onto their shafts, and the ADF football and main antenna mast were attached. What I think are fuel dump tubes were glued under the wings and the turrets were installed in their respective locations in the nose and tail.
The final step was to fashion aerial wires using nylon “invisible” thread, which I painted a dark gray.
| CONCLUSIONS |
Despite my problems with the port nacelle I still really enjoyed building this model kit. I think the revival of Airfix and their systematic upgrade of important British subjects with modern tooling has resulted in the creation of model kits that have just the right blend of accuracy, detail, reasonable price, and ease of assembly. I really appreciate the experience of building them and this Wellington exemplifies their philosophy of providing a quality kit that isn’t overly fussy to build. I’m a little disappointed that Airfix’s quality control system didn’t catch the improperly molded clear fuselage parts, but no other Airfix kit that I have built since then has exhibited any issues whatsoever. I hope that my example was just an unlucky random occurrence.
The Wellington is an important aircraft and this Airfix kit is an excellent representation that befits this subject.
14 August 2026
Copyright ModelingMadness.com. All rights reserved. No reproduction in part or in whole without express permission.
If you would like your product reviewed fairly and fairly quickly, please contact the editor or see other details in the Note to Contributors.