| KIT #: | A08019A |
| PRICE: | 43 Euros |
| DECALS: | Two options |
| REVIEWER: | Frank Spahr |
| NOTES: |
|
| HISTORY |
The Vickers Wellington is a British twin-engined, long-range medium bomber. It was designed during the mid-1930s at Brooklands in Weybridge, Surrey, led by Vickers-Armstrongs' chief designer Rex Pierson; a key feature of the aircraft is its geodetic airframe fuselage structure, which was principally designed by Barnes Wallis. Development had been started in response to Air Ministry Specification B.9/32, which was issued in the middle of 1932. This specification called for a twin-engined day bomber capable of delivering higher performance than any previous design. Other aircraft developed to the same specification include the Armstrong Whitworth Whitley and the Handley Page Hampden. During the development process, performance requirements such as for the tare weight changed substantially, and the engine used was not the one originally intended.
 The
Wellington was used as a night bomber in the early years of the Second World
War, performing as one of the principal bombers used by Bomber Command. During
1943, it started to be superseded as a bomber by the larger four-engined
"heavies" such as the Avro Lancaster. The Wellington continued to serve
throughout the war in other duties, particularly as an anti-submarine aircraft.
It holds the distinction of having been the only British bomber that was
produced for the duration of the war, and of having been produced in a greater
quantity than any other British-built bomber. The Wellington remained as
first-line equipment when the war ended, although it had been increasingly
relegated to secondary roles. The Wellington was one of two bombers named
after Arthur Wellesley, 1st Duke of Wellington, the other being the Vickers
Wellesley.
The
Wellington was used as a night bomber in the early years of the Second World
War, performing as one of the principal bombers used by Bomber Command. During
1943, it started to be superseded as a bomber by the larger four-engined
"heavies" such as the Avro Lancaster. The Wellington continued to serve
throughout the war in other duties, particularly as an anti-submarine aircraft.
It holds the distinction of having been the only British bomber that was
produced for the duration of the war, and of having been produced in a greater
quantity than any other British-built bomber. The Wellington remained as
first-line equipment when the war ended, although it had been increasingly
relegated to secondary roles. The Wellington was one of two bombers named
after Arthur Wellesley, 1st Duke of Wellington, the other being the Vickers
Wellesley.
(Shamelessly cribbed from Scott´s preview)
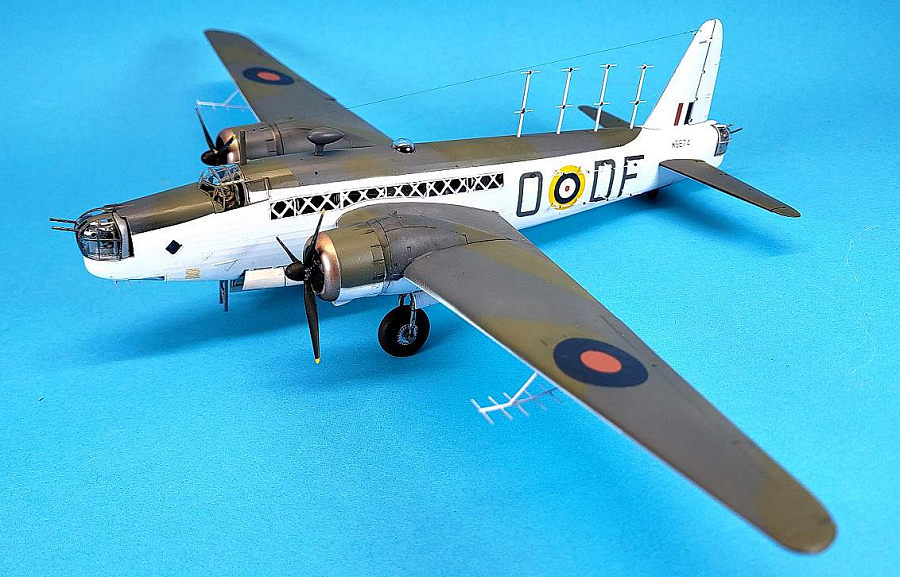
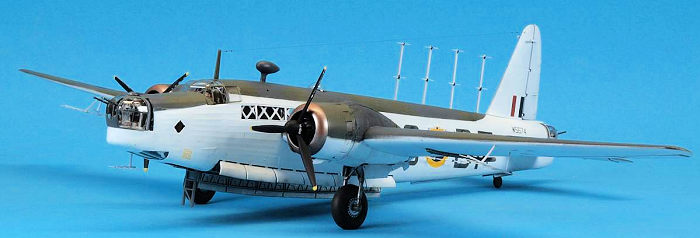
I may add that the GR Mk. VIII version was a conversion of the Ic bomber version for maritime service. It looks to me as if new-built Mk. VIII may have not had front and / or rear turrets fitted, but there were converted aircraft like the one I have modeled that retained them. Aircraft to Surface Vessel (ASV) radar was installed successively, same as the Leigh light that improved target acquisition at close range where radar did not work. The Mk. II ASV radar also came in different configurations: A chin-mounted transmitter antenna was paired with wing-mounted receivers, but a complex array of dorsal transmitter and waist receiver dipoles could complement them. The latter broadside array enhanced the detection area vastly to the sides of the aircraft.
| THE KIT |
This kit has been previewed here: https://modelingmadness.com/scott/allies/previews/airfix/72/a08019.htm
| CONSTRUCTION |
 I was
asked to build a Coastal Command Wellington by a friend, for a future communal
display. So I first tried to get the Airfix kit of the GR Mk. VIII, but it was
unavailable. So I looked through aftermarket decal sheets for planes that I
would be able to convert from a Mk. Ic into an ASW plane without too much ado. I
found an Xtradecals sheet with a plane converted from a Ic, retaining the nose
turret, thus eliminating the need for converting the plane´s nose.
I was
asked to build a Coastal Command Wellington by a friend, for a future communal
display. So I first tried to get the Airfix kit of the GR Mk. VIII, but it was
unavailable. So I looked through aftermarket decal sheets for planes that I
would be able to convert from a Mk. Ic into an ASW plane without too much ado. I
found an Xtradecals sheet with a plane converted from a Ic, retaining the nose
turret, thus eliminating the need for converting the plane´s nose.
So I ordered a Mk Ic bomber kit, and looked into my options.
To that purpose, I downloaded the Airfix instructions for the GR Mk. VIII and looked into what I could use for my version. Here I found the useful parts for blanking the fuselage gunners´ positions, and where to drill for the mountings of the radar arrays. The mounting holes in the wing also gave me a definite measurement for the receiver aerials.
Moreover I looked into kit previews of the GR Mk. VIII and found one on Britmodeller with useful images of those sprues I did not have. By scaling the images to the correct size I was able to get approximate measurements for the various radar arrays and the depth charges.
To ease construction, I ordered Eduard paint masks, very helpful for any greenhousy canopy stuff. More as an afterthought, I invested in an Eduard Zoom PE sheet for the instrument panels, being well aware that nothing of it would be visible later on. That is a basic issue with this kit, and admitted by Airfix themselves – there is a lovely interior, but you´ll see next to nothing of it once completed. Better take some pictures while you can ...
Lastly I splurged on a nice CMK figure set of a Wellington crew. The idea was that this model would be very fragile and difficult to handle with all those external radar aerials. So I really wanted to mount it on a base and inside a display case. Having a few people next to the plane would liven that display up a notch or so.
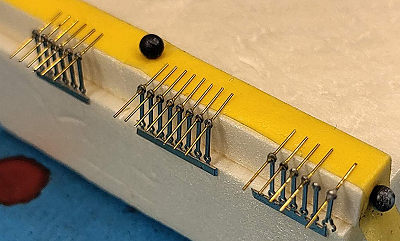 So,
after doing all this thinking and preparing, I started on the radar arrays one
Wednesday morning. Using Evergreen profiles and brass wire, plus generic Saemann
PE, I built the chin-mounted transmitter, the two wing-mounted receivers, plus
the four dorsal and sixteen waist arrays. Using 4 mm styrene tubing, I cut six
pieces of 20 mm length for the depth charges and drilled mounting holes into
them. I added lengths of .75 mm styrene rod to the bomb bay mounts onto which
the depth charges should fit later. Moreover, I added the blanking parts for t
So,
after doing all this thinking and preparing, I started on the radar arrays one
Wednesday morning. Using Evergreen profiles and brass wire, plus generic Saemann
PE, I built the chin-mounted transmitter, the two wing-mounted receivers, plus
the four dorsal and sixteen waist arrays. Using 4 mm styrene tubing, I cut six
pieces of 20 mm length for the depth charges and drilled mounting holes into
them. I added lengths of .75 mm styrene rod to the bomb bay mounts onto which
the depth charges should fit later. Moreover, I added the blanking parts for t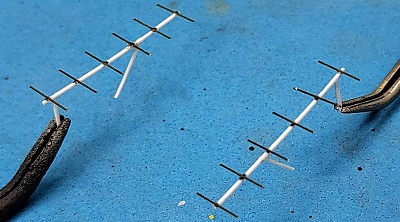 he
gun mounts, not without some sanding to make them as flush with the fuselage as
I could. Several light applications of Vallejo plastic filler addressed the
remaining gaps, always trying to retain the nicely done surface structure of the
kit.
he
gun mounts, not without some sanding to make them as flush with the fuselage as
I could. Several light applications of Vallejo plastic filler addressed the
remaining gaps, always trying to retain the nicely done surface structure of the
kit.
Next I started on the kit proper, and on its rather complex interior. Pretty soon I needed to use the paint masks on one part, and brought them out. For the first time ever, Eduard had packed the wrong instructions with these, but I soon printed out the correct ones from the Scalemates website.
So I started on removing all the interior parts from their sprues, cleaning them up and mounting them on pins prior to priming and painting. It made up quite a collection.
Having dealt with the interior, I tackled the wings, and was amazed at how well the rather demanding and intricate upper and lower halves fit around the engine nacelle. I only needed a very little amount of filler, but am convinced that a lot of you out there will do without. I then prepared the engines and cowlings, using my trusty razor saw to separate the cooling „gills“.
After priming all the parts I had prepared so far, I sprayed and then brush painted, washed and drybrushed them as per instructions and where appropriate. In retrospect, that speeded up the building process quite a bit. I then started the assembly process as per instructions.
I made two minor mistakes there. Firstly, I painted the big set of instruments and assorted boxes in the radio room before ever looking into the instructions of the Eduard Zoom set I had bought. And yes, all of those instrument faces and box fronts were to be replaced by PE. Well, off the part came from the floor, and off the rather nice detail came with a carbide burr, and on came some black paint and atop of that the very nicely printed PE. Some detail also had to go from the pilot´s instrument panel prior to installing the PE there. The second mistake was not to look into the set of resin figures by CMK a bit earlier. I only then realized that the pilot figure came molded together with the pilot´s seat, so all my effort at adding PE seatbelts to said seat were surplus to requirements. Call it training.
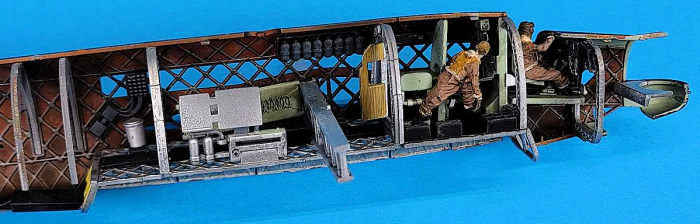 I
cleaned up the figures, assembled them and mounted them on pins prior to
priming. I also added interior detail, partly from the kit, partly from the nice
PE set, to the fuselage halves. Moreover, I added the ailerons to the wings and
assembled the engine faces and assorted pieces. I had previously sprayed the
fore parts of the engine nacelles and the exhausts a dark copper using Vallejo
paints.
I
cleaned up the figures, assembled them and mounted them on pins prior to
priming. I also added interior detail, partly from the kit, partly from the nice
PE set, to the fuselage halves. Moreover, I added the ailerons to the wings and
assembled the engine faces and assorted pieces. I had previously sprayed the
fore parts of the engine nacelles and the exhausts a dark copper using Vallejo
paints.
Now came painting the figures, aided by some internet resource. Having checked their fit, I added two figures to the interior, and glued it to the left fuselage half. When everything was cured and looked correctly assembled, I gave the interior a flat coat to hide any glue stains. Now I was able to check the fuselage halves fit, and was delighted it was quite all right, despite the exent of the interior present in this kit. I then sequentially glued the halves together, using my Berna clamps and a lot of rubber bands. Cleaning up the seams and doing some very limited filling followed. I also now checked the fit of the wings, which were held positively by the wing spar, and only needed a little bit of work to end up with a decent fit. Whilst I had nothing else to do, I masked the two gun turrets and the canopy. As I wanted to use the canopy with open side windows, I masked an extra canopy for use during the build process. At the time, I also removed the final few parts from the sprues, mounted and primed them.
| COLORS & MARKINGS |
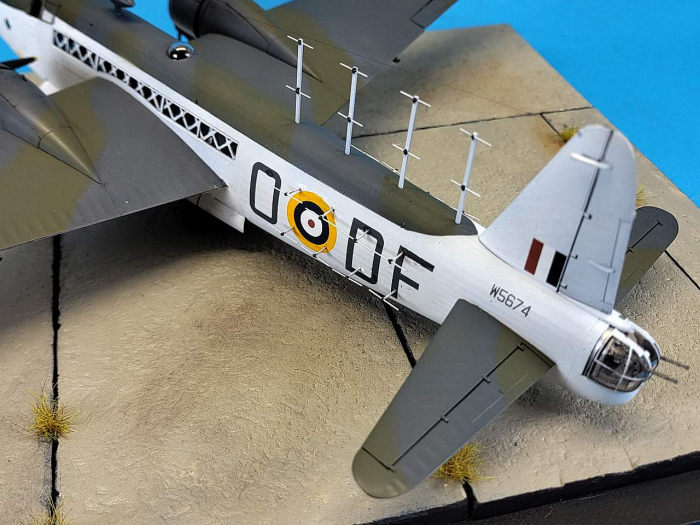 The
still unattached wings were sprayed Vallejo Premium white, and then were masked
using tape and Patafix (Silly Putty) Rolls of the latter were also used for the
demarcations of the camo scheme (Vallejo Extra Dark Sea Grey and Dark Slate
Grey). In the fuselage, I attached most of the transparencies and protected them
with the Eduard masks. The remaining openings were either masked or covered with
foam pieces cut to size. Here, I started with the small camouflaged area on top,
as it was easier to mask, and only then sprayed white. I ran into some
difficultites and had to remove the large window on the underside of the nose,
and reattach it. Plus the paint didn´t cure well, stayed gooey for longer than
Stynylrez primer would do. Last but not least, at some point I heard a nasty
rattling sound – some inside piece must have come loose despite all my efforts.
Arrgghh.
The
still unattached wings were sprayed Vallejo Premium white, and then were masked
using tape and Patafix (Silly Putty) Rolls of the latter were also used for the
demarcations of the camo scheme (Vallejo Extra Dark Sea Grey and Dark Slate
Grey). In the fuselage, I attached most of the transparencies and protected them
with the Eduard masks. The remaining openings were either masked or covered with
foam pieces cut to size. Here, I started with the small camouflaged area on top,
as it was easier to mask, and only then sprayed white. I ran into some
difficultites and had to remove the large window on the underside of the nose,
and reattach it. Plus the paint didn´t cure well, stayed gooey for longer than
Stynylrez primer would do. Last but not least, at some point I heard a nasty
rattling sound – some inside piece must have come loose despite all my efforts.
Arrgghh.
Upon curing, I found the new paint had cracked. More arrgghh. There must have been some kind of contamination, but I had no idea what. So again off I stripped the paint and sanded the underlying plastic, and reapplied white primer and later on white paint. I was not overly happy.
At least I located and removed the loose part, it was the stretcher-like item glued to the port inside. As I had no means of reliably reattaching it, I left it off.
| FINAL CONSTRUCTION |
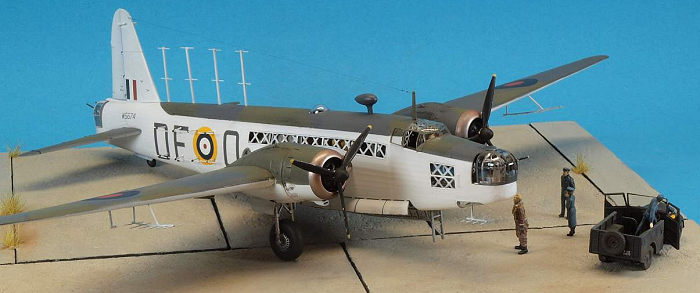
 I did not
want to have to handle the model after completion. Those numerous iffy antennae
were an open invitation to disaster. So I needed a base to permanently attach
the model to. Luckily the largest square Trumpeter display box I had would just
about hold the model if it was placed diagonally on it. So even if I didn´t like
this geometry, this was what I had to do. I tried a different approach to a
„concrete“ base this time. As my foam cutter would not allow cutting a 5 mm
strong piece wider than 20 cm, I opted to make several individual „concrete“
slabs. These were easily cut, and somewhat structured using a crimpled up ball
of aluminum foil. I then painted the surfaces a boring muddy grey, and the sides
black. Upon gluing them to the base, I would get instant „bituminous“ seams.
I did not
want to have to handle the model after completion. Those numerous iffy antennae
were an open invitation to disaster. So I needed a base to permanently attach
the model to. Luckily the largest square Trumpeter display box I had would just
about hold the model if it was placed diagonally on it. So even if I didn´t like
this geometry, this was what I had to do. I tried a different approach to a
„concrete“ base this time. As my foam cutter would not allow cutting a 5 mm
strong piece wider than 20 cm, I opted to make several individual „concrete“
slabs. These were easily cut, and somewhat structured using a crimpled up ball
of aluminum foil. I then painted the surfaces a boring muddy grey, and the sides
black. Upon gluing them to the base, I would get instant „bituminous“ seams.
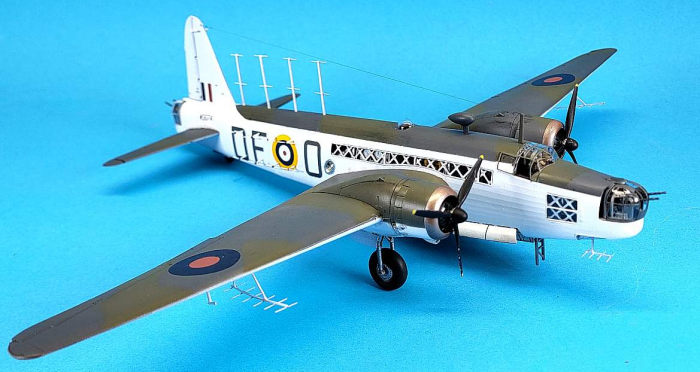
That worked out quite neatly in the end, and with adding some „weeds“ in a sickly hue I called it quits. The aircraft would just about fit into the display box, and I vowed not to remove the cover on model shows.
I then added the decals, which went reasonably well, yet the decals showed a disturbing tendency to crack in some areas, namely the callsigns. Luckily I had an AK marker in just the right shade, but disturbing it was nonetheless. After having applied all the decals and letting it all cure a while, I added another gloss coat and - a while later – a flat coat.
That cured, I added external items such as landing gear, exhausts, the bottom antenna and the like. The landing gear needed some fiddling, but it worked out. All that cured, I weathered the aircraft gently, starting with a dark wash in recesses and areas subject to wear and tear. In between, I assembled the gun turrets and started on the locations for the external antennae. I had marked the spots for the dorsal antennae in the fuselage halves, and now drilled them to the actual size needed. Cracking the dorsal fuselage seam in the process. (//&$$%%§) That reglued and lightly sanded, I resprayed the area. Thereby ripping away parts of the portside roundel with the wide yellow surround and some of the code letters. Despite there being two layers of clearcoat over the decals.
Arrgghhh.
 I then
repaired the area by brushpainting the yellow in various layers, and the code
letters with the abovementioned AK pen thingy. But my friendly feelings towards
the model had chilled a bit now.
I then
repaired the area by brushpainting the yellow in various layers, and the code
letters with the abovementioned AK pen thingy. But my friendly feelings towards
the model had chilled a bit now.
Following the repair, I removed the masks and added the final (and some of them really iffy) bits and pieces. The dorsal mast and antenna were left to cure, and then the sixteen lateral and four dorsal dipoles were glued. The former needed some coaxing and adjusting, and some repainting, until they all looked acceptable.
Having added an aerial made from Caenis monofilament, done some corrections and some re-masking, I added the final flat coat of forgiveness and obfuscation and called it quits.
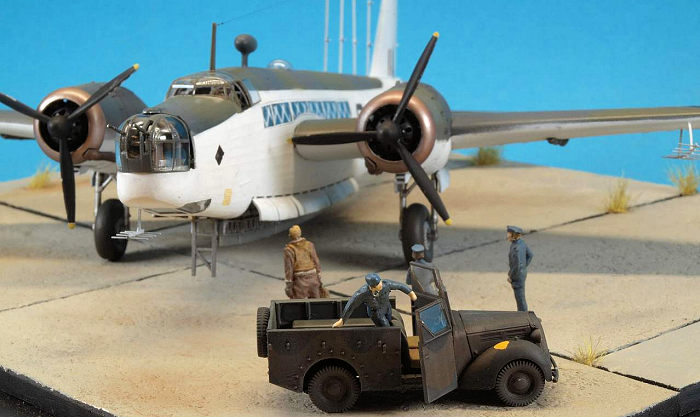
Not quite. I am now actively trying to reduce my stash, so I happened upon the very nice Airfix Bomber Re-Supply set, and a set of ye aulde Airfixe soft plastic RAF ground personnel. I decided to use three of the figures and one vehicle from the former, the Standard Light Utility Vehicle („Tilly“). Building the vehicle was a breeze and soon done. I only substituted the steering wheel, as the kit part had gone AWOL. I painted the vehicle per instructions, and did some accentuating and weathering. I left off the cover for the time being, though. The figures were cleaned up as good as I could, and primed with Stynylrez. Painting and accentuating went easily and fast. Once the vehicle was decaled and everything flatcoated, I was able to place all the items on the base. It´s a very tight fit with the wingtips, but just about works. As I said previously, I will surely not remove the cover of the display box unless vitally important.
| CONCLUSIONS |
You know what? I´m quite happy after all. I like the aircraft, I like this special version festooned with weird-looking dipoles galore, I like the elegant Coastal Command paint scheme, and I enjoyed the very nice Airfix kit. Even though I did not get the proper kit, my alternative decals and homemade radars should not look worse than what the manufacturer provided. The Eduard masks were in this case truly indispensable, as I can but stress. I like the CMK figures with their credible poses, and the vehicle and assorted figures lend some more interest to the setup. And the abovementioned trials and tribulations have already paled somewhat. There are already two more Airfix four-engined bombers on my to-do pile.
| REFERENCES |
7 October 2025
Copyright ModelingMadness.com. All rights reserved. No
reproduction in part or in whole without express permission.
If you would like your product reviewed fairly and
fairly quickly, please
contact
the editor
or see other details in the
Note to
Contributors.