Revell 1/48 F-22A Raptor
| KIT #: | 04559 |
| PRICE: | 30.00 Euros |
| DECALS: | Two options |
| REVIEWER: | Spiros Pendedekas |
| NOTES: | Reboxed Italeri kit |
| HISTORY |
The F-22 Raptor is a fifth-generation air superiority fighter developed in the United States during the late Cold War, primarily to counter advanced Soviet aircraft. Its origins trace back to the Advanced Tactical Fighter (ATF) program launched by the United States Air Force in the 1980s, seeking a successor to the F-15 Eagle. After a competitive fly-off between prototypes from Lockheed Corporation (teamed with Boeing) and Northrop (with McDonnell Douglas), the YF-22 design was selected in 1991, leading to the production F-22.
Development proved lengthy and costly, reflecting the complexity of integrating stealth, supercruise, advanced avionics, and extreme maneuverability into one platform. The aircraft officially entered service in 2005, but procurement numbers were drastically reduced from an initial plan of over 700 aircraft to just 187 operational units due to high costs and shifting post-Cold War priorities. Production was shared mainly between Lockheed Martin (which absorbed Lockheed) and Boeing. A key political decision was the strict ban on exports mandated by the U.S. Congress, largely to protect its sensitive stealth and avionics technologies and maintain a decisive technological edge.
 This export
ban meant that even close allies could not acquire the F-22, unlike later
aircraft such as the F-35 Lightning II. Meanwhile, production was terminated in
2011, primarily due to cost concerns, changing defense strategies, and the
absence of a near-peer adversary at the time. The line closure has since been
debated, especially as global competition intensified again. Despite its
relatively small fleet size, the F-22 remains a cornerstone of U.S. air
dominance, though sustaining it has required careful maintenance planning due to
the limited number of airframes.
This export
ban meant that even close allies could not acquire the F-22, unlike later
aircraft such as the F-35 Lightning II. Meanwhile, production was terminated in
2011, primarily due to cost concerns, changing defense strategies, and the
absence of a near-peer adversary at the time. The line closure has since been
debated, especially as global competition intensified again. Despite its
relatively small fleet size, the F-22 remains a cornerstone of U.S. air
dominance, though sustaining it has required careful maintenance planning due to
the limited number of airframes.
In terms of capabilities, the F-22 is renowned for its stealth design, which minimizes radar cross-section through shaping, materials, and internal weapon carriage. It combines this with supercruise (the ability to fly at supersonic speeds without afterburners) and thrust-vectoring nozzles for exceptional agility. Its avionics suite is highly advanced, featuring sensor fusion, powerful radar and electronic warfare systems that give pilots unmatched situational awareness. The aircraft was among the first to fully integrate these features into a single operational platform, setting the standard for fifth-generation fighters.
Operationally, the F-22 has been used more sparingly than earlier fighters, reflecting both its specialized air superiority role and its limited numbers. It saw combat use in the Middle East, including strikes against extremist targets in Syria, and has been deployed frequently for deterrence missions in Europe and the Pacific. Over time, the fleet has undergone continuous modernization, including software upgrades, improved weapons integration, and enhanced communications to better operate alongside other assets like the F-35.
The Raptor remains, even as the years pass, a quietly dominant force in the skies - a machine that doesn’t need to shout to prove its superiority. Yes, it is no longer the newest blade in the arsenal, and time inevitably presses on its design, but its fusion of stealth, supercruise, agility, and unmatched situational awareness still makes it a predator few can challenge. In an era of rapidly advancing threats, it may no longer stand alone at the absolute peak, yet it endures as a deeply viable and formidable weapon, kind of a veteran warrior whose presence alone reshapes the battlefield. There is something almost poetic about it: a fighter built for a future that arrived, mastered it, and still refuses to fade quietly into the past.
| THE KIT |
 Italeri came
in 1999 with their F-22 mold, the first Raptor in 1/48, which was reboxed in
2006 and 2022 (also by Revell in 2001 and Testors in 2009), with all reboxings
differing only in the decal sheet. With little doubt, Italeri took all
measurements from the prototype, which presented a number of differences from
the operational machines that were introduced late in 2005. Since Yours Truly is
by no means an F-22 adept, I will only say that overall shapes of parts resemble
those of the F-22 and I will leave the rest to the F-22 Experten.
Italeri came
in 1999 with their F-22 mold, the first Raptor in 1/48, which was reboxed in
2006 and 2022 (also by Revell in 2001 and Testors in 2009), with all reboxings
differing only in the decal sheet. With little doubt, Italeri took all
measurements from the prototype, which presented a number of differences from
the operational machines that were introduced late in 2005. Since Yours Truly is
by no means an F-22 adept, I will only say that overall shapes of parts resemble
those of the F-22 and I will leave the rest to the F-22 Experten.
The specific kit is the Revell 2001 reboxing, bought in 2005 from one of my
beloved, now sadly closed toy/hobby shops in my equally beloved hometown (Chalkis,
Greece) at what then seemed a fair price. Should you wish a more in-depth look
at the kit’s contents, you may read its preview,
found in the ever growing MM archives.
The kit was practically thrown by my younger 9yo son (who has become an F-22
addict) on my Ever-overloaded / Multi-project / Sorry Saga bench to build it
with a pilot in and weapon bays “closed”. And so the story goes…
| CONSTRUCTION |
I started by assembling
the cockpit and trapping it between the front fuselage halves, letting the
subassembly aside to cure (in retrospect, I should have followed Tom’s advice in
similar cases - to attach the front top half to the rear top half and do the
same with the lower halves, then join them to avoid the dreaded mid fuselage
seam…oh well, next time…). No nose weight was added and, I believe, no F-22
model needs any. Cockpit, including the seat, was painted black, while the
various raised details were dry brushed with silver and a few “switches” were
created here and there by “pinning” red and yellow paint. I used the provided
decal for the instrument panel, where I added tiny blobs of green clear paint to
the uninspiring b/w printed glass displays. While the cockpit lacks the detail
expected for modern 1/48 jet kits, its overall black color, the decision to put
a pilot in and the closed canopy mask almost everything.
 I continued
by attaching the gear bays and the various weapon and equipment bays, the intake
ducts and the exhaust bits on the insides of the upper and lower rear
fuselage/wing parts. Intakes were painted white, while the exhausts were painted
Testors Burned Metal. Be careful here, in order to glue everything firmly - I
didn’t and ended up trying to reglue the starboard main gear bay with the model
assembled and painted, a tedious process. Please note that, despite going for
“closed” weapons and equipment bay doors, I attached all bays underneath, to
give the doors a better chance of proper attachment.
I continued
by attaching the gear bays and the various weapon and equipment bays, the intake
ducts and the exhaust bits on the insides of the upper and lower rear
fuselage/wing parts. Intakes were painted white, while the exhausts were painted
Testors Burned Metal. Be careful here, in order to glue everything firmly - I
didn’t and ended up trying to reglue the starboard main gear bay with the model
assembled and painted, a tedious process. Please note that, despite going for
“closed” weapons and equipment bay doors, I attached all bays underneath, to
give the doors a better chance of proper attachment.
Next step was to join the rear fuselage halves and attach the subassembly to the
completed front fuselage, where my initial fears for a nasty seam were
justified. The two triangular intake fillets were then attached, after spending
a good amount of time studying net pics on their exact positioning, as they
neither have a positive location aid, nor the instructions show clearly where
they go. The intake lips were finally attached , followed by the flaps, for
which I decided to omit their moveability feature and glued them “neutral”,
which is the normal stance with a pilot in and engines operating (I have seen
them automatically lowering in take-off and, of course, deploying during various
flight maneuvers).
The weapons and equipment doors were attached in “closed” position. Fit was
average there, as was the case with the arresting hook, housing, which was also
attached “retracted”. Next the single piece external flaperons were attached,
followed by the rudders and elevators, all two-piece affairs. The canopy frame,
being a separate piece from the canopy glass (not sure how many of us like this
feature, as it gives zero margin for error upon installation of the glass), was
also attached at this time as well.
This concluded basic assembly, which, despite looking straightforward and
uncomplicated, presented a number of fit challenges, namely the front/rear
fuselage joint and the fit of the various doors in closed position. All seams
were first treated with liquified styrene, which was very helpful in areas like
the long thin closed weapon doors (which desperately needed some means of
bonding together, followed by “normal’ filler. After a couple filling and
sanding rounds, the Raptor was ready for the paint shop!
| COLORS & MARKINGS |
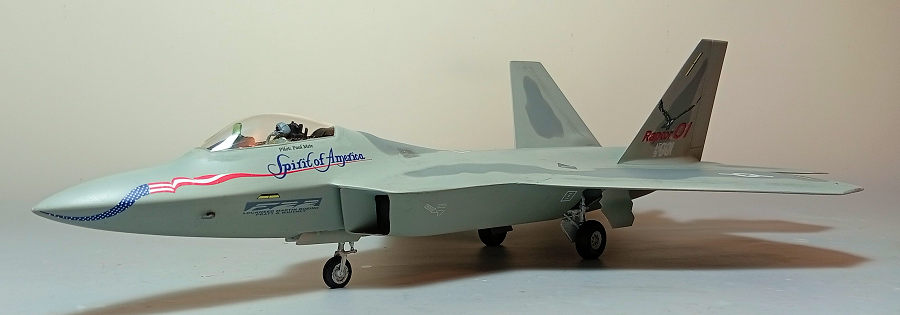
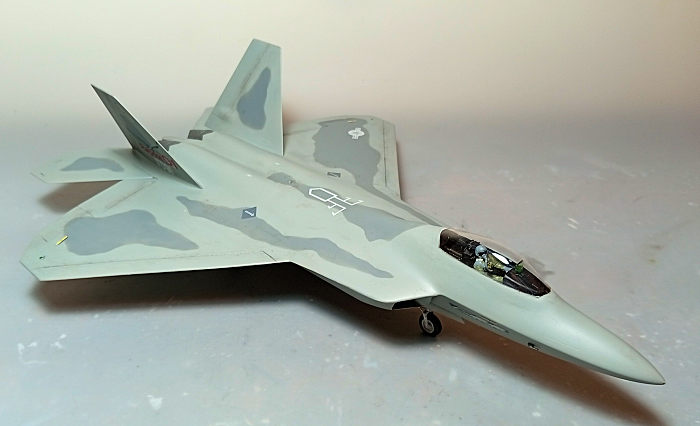
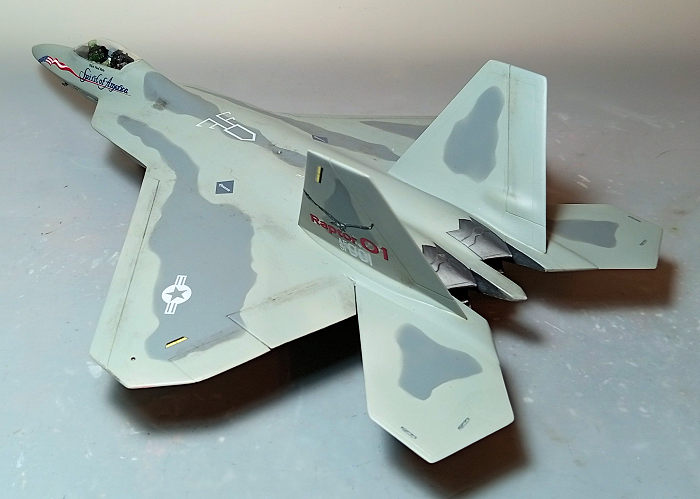
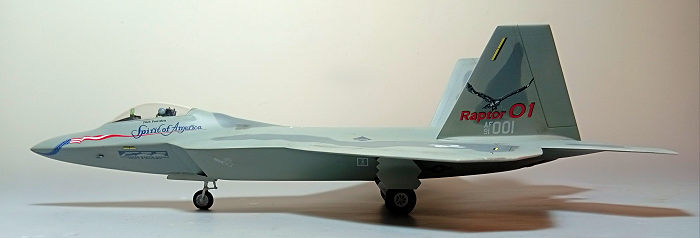 I decided to
go for the relatively colorful Raptor #001 prototype during one of its first
flights. Seasonal pics display the bird freshly painted, carrying a nice two
tone gray camo and some attractive celebration markings. So, I first applied to
the complete airframe a coat of Hu165 US Satin Medium Sea Gray, which dried to a
nice light gray shade. The topside pattern was done with Hu140 Gull Gray, using
strings of Tak and spraying perpendicularly near them, in order to achieve a
tight, yet not dead hard demarcation line. The engine exhausts outer faces were
painted and buffed with Testors Burned Metal, with a coat of Future preparing
the bird for decaling.
I decided to
go for the relatively colorful Raptor #001 prototype during one of its first
flights. Seasonal pics display the bird freshly painted, carrying a nice two
tone gray camo and some attractive celebration markings. So, I first applied to
the complete airframe a coat of Hu165 US Satin Medium Sea Gray, which dried to a
nice light gray shade. The topside pattern was done with Hu140 Gull Gray, using
strings of Tak and spraying perpendicularly near them, in order to achieve a
tight, yet not dead hard demarcation line. The engine exhausts outer faces were
painted and buffed with Testors Burned Metal, with a coat of Future preparing
the bird for decaling.
I used the kit’s 25yo decals, which, to Revell’s (Cartograph’s?) credit, behaved
beautifully, easily detaching from their backing sheet and nicely adhering to
the model surface. A coat of Future sealed them.
| FINAL CONSTRUCTION |
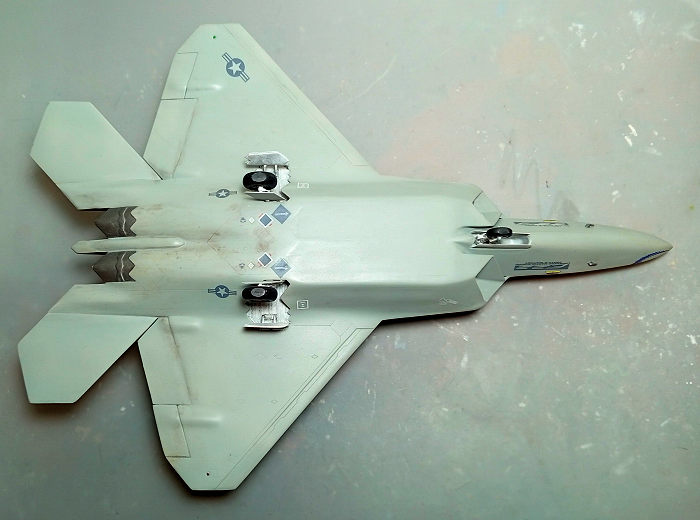
 The landing
gear parts were assembled and attached in position. Basic color, including wheel
rims, bays and door innards was white, while oleos and landing lights lenses
were highlighted with a fine tip silver pen and tires were painted black The
wheels were filed to look weighted. Since the bird was in pristine condition
during its initial flights, weathering was minimal, consisting in a light black
wash to all landing gear parts (mainly to make them look less toy-like) and some
brown/black dry pastels along panel lines, to add a more realistic, lightly
“shading” look to the otherwise monotonous gray camo. A flat coat gave the bird
its final hue.
The landing
gear parts were assembled and attached in position. Basic color, including wheel
rims, bays and door innards was white, while oleos and landing lights lenses
were highlighted with a fine tip silver pen and tires were painted black The
wheels were filed to look weighted. Since the bird was in pristine condition
during its initial flights, weathering was minimal, consisting in a light black
wash to all landing gear parts (mainly to make them look less toy-like) and some
brown/black dry pastels along panel lines, to add a more realistic, lightly
“shading” look to the otherwise monotonous gray camo. A flat coat gave the bird
its final hue.
The pitot tubes were sized down and, after being painted gunmetal, were glued
on. I modified a pilot from a Hasegawa A-7 (basically repositioned with some
surgery his right hand to look like he is holding the Raptor’s side stick) and
slipped him in the cockpit. He had an olive drab suit, gray helmet, oxygen mask,
gloves and seat belts, yellow secondary seat belts and black visor and boots.
The HUD was painted clear green and attached in position, while the canopy
received a very light coat of yellow clear paint from the insides and carefully
attached with white glue. Blobs of red and green clear paint represented the
wingtip lights, before calling the Raptor done!
| CONCLUSIONS |
As of 2026, it is
important to remember that this nearly 30-year-old mold resembles the prototypes
more than the production machines. Nevertheless, this is a respectable early
Raptor kit: panel lines are well engraved, cockpit detail is reasonable, the
canopy is well-molded and transparent and the instructions, apart from the
intake fillets positioning, were sufficient. The 25yo decals were a pleasant
surprise, as they behaved beautifully. A good early Raptor can be produced right
out of the box, and a production Raptor appears to be doable.
While construction was, for the most part, quite uncomplex and uneventful, I
encountered fit issues at the front/rear fuselage joint (possibly solved if
first assembling the complete top and bottom halves and then joining them), the
intake lips and the weapons and equipment bay doors, which I attached "closed"
(there will be no issue if you go for "open" doors , a posture which I believe
most will prefer). So, this kit is within the average modeler's capabilities.
Of course, if you want a modern, detailed and accurate Raptor, you may look no
further than the Hasegawa offering, for which you have to pay roughly double the
price compared to this one. So, in a way, the Revell/italeri kit comes as a
cheaper, simpler, but still decent alternative and as such it is a kit worth
tackling.
Happy Modeling!
9 April 2026
Copyright ModelingMadness.com. All rights reserved. No reproduction in part or in whole without express permission
If you would like your product reviewed fairly and fairly quickly, please contact the editor or see other details in the Note to Contributors.