Hasegawa 1/72 F-4J Phantom II
|
KIT # |
Ka 1 |
|
PRICE: |
$25.95 in 1990 |
|
DECALS: |
See review |
|
REVIEW : |
|
|
NOTES: |
|
HISTORY |
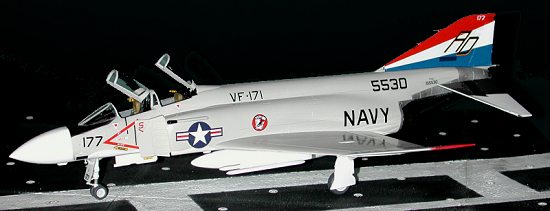
VF-171 was initially formed by splitting of the Phantom FRS (Fleet Replacement Sqadron) in August 1977. This was due to the need for an east coast F-14 FRS and the need to keep training going for the Phantom, which was still in fleet use at the time. VF-171 became a most unusual squadron; one with two missions. First of all, it was the RAG (Replacement Air Group) for the F-4, it was also an east coast adversary unit with A-4 and TA-4 aircraft, the Skyhawks mostly being based at NAF Key West.
 VF-171 was the only training unit for the Phantom as VF-121
disestablished in 1980/81. Known as the 'Aces', the F-4s of 171 kept the fleet
supplied until there was no longer a need. The training for additional F-4 crew
was transferred to VMFAT-101 when VF-171 disestablished in mid-1984. VMFAT-101
continued in that role until late 1987 when it became an F-18 training squadron.
(For you non-naval types, disestablished is the same as standing down or
deactivating. The Navy uses the other terms to refer to vessels and not units.)
VF-171 was the only training unit for the Phantom as VF-121
disestablished in 1980/81. Known as the 'Aces', the F-4s of 171 kept the fleet
supplied until there was no longer a need. The training for additional F-4 crew
was transferred to VMFAT-101 when VF-171 disestablished in mid-1984. VMFAT-101
continued in that role until late 1987 when it became an F-18 training squadron.
(For you non-naval types, disestablished is the same as standing down or
deactivating. The Navy uses the other terms to refer to vessels and not units.)
For a history and description of this kit, go to this page.
|
CONSTRUCTION |
First step with this kit was to do some painting. With the large number of semi-hidden areas that need pre-painted, it seemed like the best way to start. This was confined to white for the intakes, wheel wells, gear doors, struts and wheels. Interior bits were painted a nice dark grey. When dry, real gluing commenced. The first parts to be glued together were the drop tanks. Then decals were placed into the interior consoles and on the instrument panels. These are convincing, though not as nice as the Monogram kit. However, the Monogram 1/72 kit is basically an Air Force version, so that is the downside. While both have side walls for the right side of the back seat, they leave the console on the left. It is an easy way to get around remolding a new interior.
This is probably one of the most modular kits ever built. Both the Fujimi and Hasegawa 1/72 F-4s are modular to the max with the Hasegawa kit having a lot more bits and pieces. For instance, there are four different tail tips depending on which version you are doing and Hasegawa does not offer a G model in this scale!
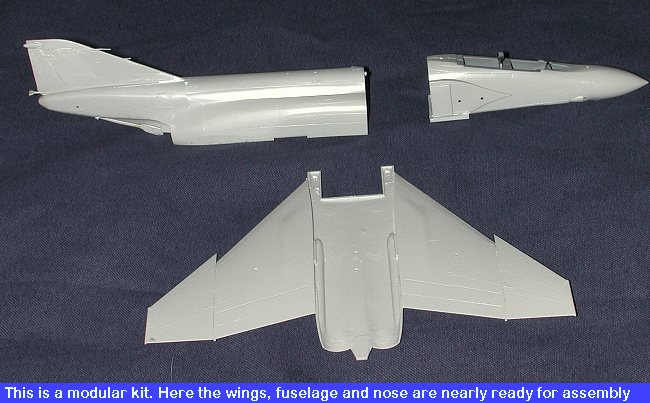
This means that building several sections of the model at the same time are quite possible and do speed up construction a bit. Starting with the main fuselage, the proper spine antenna holes are opened and then the fuselage halves cemented together. Many of the common sprues have been pressed tens if not hundreds of thousands of times and are beginning to show that. I had sink marks on the upper spine where alignment pins were located. There was also a bit of flash on the rudder. Once the halves were glued together, the proper tail tip for an F-4J was cemented on as was the proper drag chute door on the rear (there are three options for this one). The photo flash flare doors were also cemented in place. These are for the RF-4 versions and are not found on regular F-4s. The doors are a bit small for the holes. Don't forget to fill in or sand off the refueling probe from the spine and USN Phantoms don't have one.
 The wings were next. After drilling out the holes for
the underwing pylons and the over wing gear attachment housing, the wings were
cemented together. No real trauma here. On the underside front, there are two
spaces for the bridle attachment to go on the Navy version. These inserts were
glued in and fit well. Finally, the wing ends were glued in place. These would
be folded up on the carrier deck, but you need to do the mechanism yourself as a
folded wing option is not offered. Fit of these was fair.
The wings were next. After drilling out the holes for
the underwing pylons and the over wing gear attachment housing, the wings were
cemented together. No real trauma here. On the underside front, there are two
spaces for the bridle attachment to go on the Navy version. These inserts were
glued in and fit well. Finally, the wing ends were glued in place. These would
be folded up on the carrier deck, but you need to do the mechanism yourself as a
folded wing option is not offered. Fit of these was fair.
The third major section is the nose. This requires the cockpit to be pretty well complete and so mine was, sans seats, which will be installed near the end of the build. The interior gets glued to the roof of the nose gear bay and the roof is then glued to the lower section of the nose section. Once this is done, glue in the instrument panels and the back seater's right side panel. Then test fit it in one of the fuselage halves. This ensures that all the interior bits will fit properly. Once that is dry, then glue one side of the nose to the lower section with the fuselage. Make sure the lower nose is flush with the upper nose and let it dry. If this is hurriedly done, it can cause major misalignments and will require filler, destroying all the detail. I know as I have done this a bunch of times on other kits! Once that assembly is dry, then glue on the other side and all should match up pretty well. You will still have a bit of a gap at the forward section of the gear well, but it will be easy to fill with Mr. Surfacer or something equally as fluid.
 When these components are
dry, then you can work on any sanding and filling that may be needed prior to
attaching the parts together. I have tried waiting until all is together to work
on this aspect of the kit, but to me, it is easier to work on the bits
separately and when done, put them together.
When these components are
dry, then you can work on any sanding and filling that may be needed prior to
attaching the parts together. I have tried waiting until all is together to work
on this aspect of the kit, but to me, it is easier to work on the bits
separately and when done, put them together.
Before gluing the sections together, a bit more work was needed on the nose section. This consists of adding the front anti-glare shield and the two cooling scoops for the lower nose. These small scoops are something that is rarely done well in 1/72. It seems all of the major kit makers do the same thing in this area. A nice aftermarket resin replacement would be most welcome, but since the F-4 is not well treated by resin bits in this scale, it won't happen soon. Once the scoops were glued in and dry, they were smoothed out with a sanding stick and Mr. Surfacer was used to fill in the small seams.
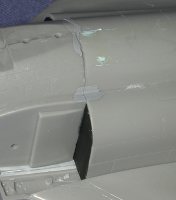
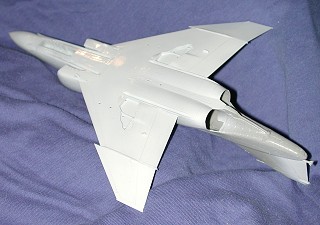
Then it was time to assemble the sections. While the kit suggests doing the nose to fuselage first before the wings, I have found that in order to get it all to line up well, they should be glued at about the same time. There are three major areas to watch for in regards to fit. First, is the underside where the nose section slots into the wings. This needs to be completely flat. Then there is the rear section where the wings mate with the fuselage near the exhaust. Invariably there will be a step in this area and any attempt you can do to eliminate that is all for the better. Finally, the nose to fuselage join. This will be most difficult to properly line up if the others are aligned. It seems that you either get the intakes to line up, or the upper fuselage but not both. I generally go for something in between that will be easy to fill and sand. Hairline gaps can be filled with Mr. Surfacer.
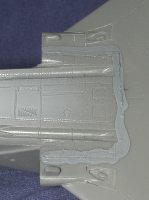 Nose to wing |
 Fuselage to wing (rear) |
|
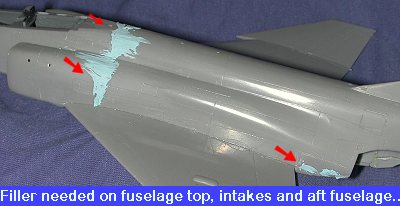 I did what I could
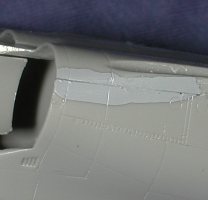
with the Mr. Surfacer and then it was time to install the intakes. This is where
every F-4 kit I have ever built eventually needs filler. I have yet to meet
someone who can show me how to get this part done without it. I also discovered
that I forgot to paint a section of the intake white. It is the piece shown in
the far right image above, right next to the part painted flat black. Figured
that no one would notice it so blew it off. Glued the interior of the intake in
place, then the small inlet temperature probes were glued to the inside of the
intakes. The intake outer section was then glued in place as best as could
be done, matching it up as good as possible. When it was dry, the kit was
examined and those areas that needed filler were so treated. As usual, the
intakes needed it as well as the upper fuselage and back near the exhaust. Oh
well.
I did what I could
with the Mr. Surfacer and then it was time to install the intakes. This is where
every F-4 kit I have ever built eventually needs filler. I have yet to meet
someone who can show me how to get this part done without it. I also discovered
that I forgot to paint a section of the intake white. It is the piece shown in
the far right image above, right next to the part painted flat black. Figured
that no one would notice it so blew it off. Glued the interior of the intake in
place, then the small inlet temperature probes were glued to the inside of the
intakes. The intake outer section was then glued in place as best as could
be done, matching it up as good as possible. When it was dry, the kit was
examined and those areas that needed filler were so treated. As usual, the
intakes needed it as well as the upper fuselage and back near the exhaust. Oh
well.
 |
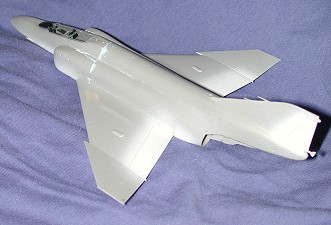 |
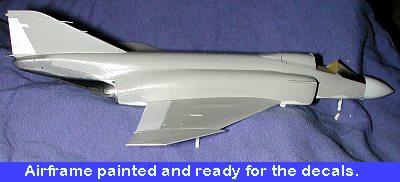
Once all the sanding and rescribing were done, I felt that it was time to do a bit of painting. While not really the final coat by any stretch of the imagination, it will help to spot any glitches and to fill some of the really thin gaps. For this I used Testors Model Master gloss white. The entire underside was painted as were the rudder and upper wing control surfaces. These showed that all was doing well so it was back to doing a bit of construction, most of which is intakes and cockpit at this point in time. BTW, in case you hadn't noticed, white is a real pain to photograph with a built in flash.
After the white was painted, the canopies were installed. Fit was pretty good, though there was some flash along the edges that needs to be removed. In spite of careful gluing, when it came time to put the canopy sections in, I found that the front one wouldn't fit. Not a real problem as I plan on posing them open, but it made masking a bit more of an effort than I would have liked. I also glued in the landing gear and associated struts so I wouldn't have to set the plane on its clean, white belly during painting or decaling. Once the canopies were masked, it was time to do some serious painting.
|
PAINT & DECALS |
I had already painted the white, but knew that I'd have to retouch a number of spots as is usual with my painting. The first thing I did was to mask off all the white areas that would be a pain to touch up. That was mainly the upper surface control surfaces like the rudder, ailerons, and flaps. Then the lower surface dividing point was masked. This was normally a wavy line and could be either hard masked or freehanded. I hard masked it. At this time, I discovered that the nose cone was supposed to be white so this was painted and when dry, masked off.
 The next color was the gloss gull grey. I used Testors Modelmaster
for this job. It covers very well, so much in fact, that I generally don't prime
under it. In fact, I rarely prime my kits anyway. By the time I get done sanding
all the mistakes I have made, it doesn't need it!!
The next color was the gloss gull grey. I used Testors Modelmaster
for this job. It covers very well, so much in fact, that I generally don't prime
under it. In fact, I rarely prime my kits anyway. By the time I get done sanding
all the mistakes I have made, it doesn't need it!!
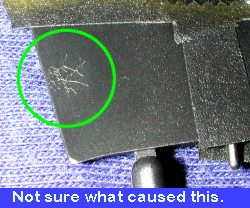
The gloss paint was let dry several days and then it was time for the metallic colors. For this particular kit, several were used, all from the Testors Metallizer range. I used steel, magnesium, titanium, burnt iron and exhaust. No Aluminum was used as this is generally too light a color. These colors were all confined to the aft section where it gets very hot and stains the kit. Having undercoated all these sections with gloss enamel, the Metallizer stuck very well and I was able to mask over it. Only on one spot did I have any problems and that was on one of the stabilizers. For some reason, I got a nasty blotch. Sanding it off and repainting the area took care of it, but how it got there is a mystery.
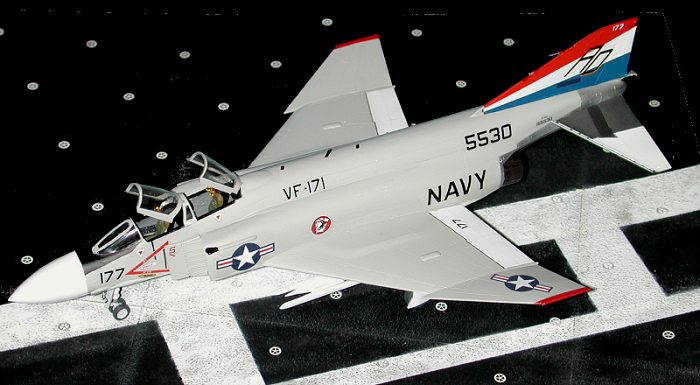
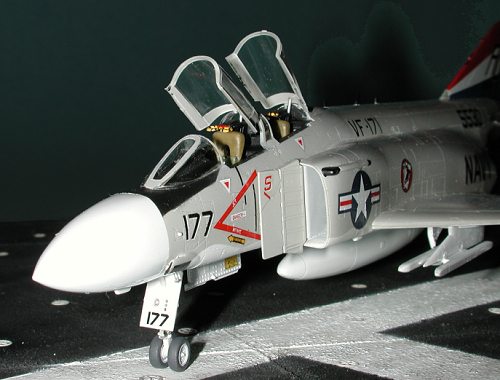
 Finally, all the painting was done on the
basic airframe and I could start putting on the decals. As you can guess, I'm
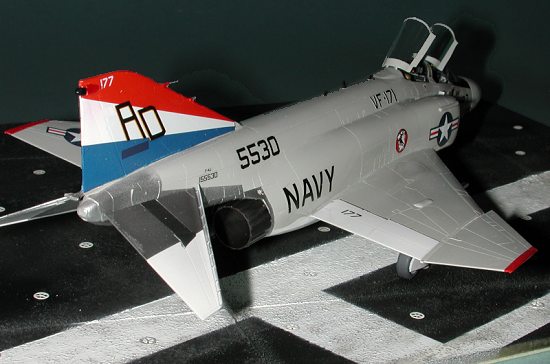
doing a VF-171 scheme from the 1970s after the unit had split from VF-101.
Basically, what the unit did was to paint out the '0' in 101 and replace it with
a '7'. All other markings are as they were when the aircraft was with VF-101.
These interim markings are part of a recent Eagle
Strike sheet that was reviewed here a while back.
Finally, all the painting was done on the
basic airframe and I could start putting on the decals. As you can guess, I'm
doing a VF-171 scheme from the 1970s after the unit had split from VF-101.
Basically, what the unit did was to paint out the '0' in 101 and replace it with
a '7'. All other markings are as they were when the aircraft was with VF-101.
These interim markings are part of a recent Eagle
Strike sheet that was reviewed here a while back.
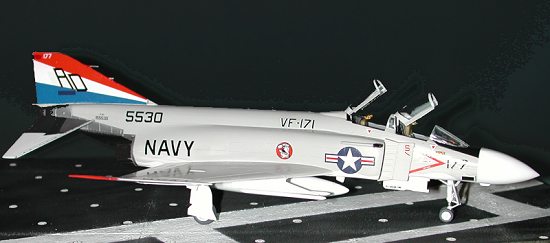
I started by applying one of the large tail decals. It was then that I noticed that the decals are a bit transparent, allowing the white rudder to show up as a lighter area than the rest of the gull grey fin. The key, I guess, is to paint the entire fin white. While not something I can do with this model, it is something I will have to remember about Eagle Strike decals for the next one. Some decals, such as the nose numbers and unit number are shadowed in white, and the white part is offered separately. So are the bars on the national insignia. In fact, the placement for the red bars is shown on the base decal as a grey stripe, the first I have seen of this.
 It was during the placement of
the wing flap numbers that I noticed that the wing tips were supposed to be
painted red. Fortunately, the wing insignia had not been placed yet so the wings
were masked off and the tips painted red using Gunze acrylics. The small RHAWS
antenna on the fin tip also needs to be painted red as the decal doesn't cover
it. Unfortunately, the red I used is just a touch darker than what is provided
on the decal. I think this is due to the grey that is under the red. Another
reason that I should have painted the fin white!
It was during the placement of
the wing flap numbers that I noticed that the wing tips were supposed to be
painted red. Fortunately, the wing insignia had not been placed yet so the wings
were masked off and the tips painted red using Gunze acrylics. The small RHAWS
antenna on the fin tip also needs to be painted red as the decal doesn't cover
it. Unfortunately, the red I used is just a touch darker than what is provided
on the decal. I think this is due to the grey that is under the red. Another
reason that I should have painted the fin white!
Applying the
rest of the decals went on without a hitch. Before applying the intake warning
decals, glue in the splitter plates. Decaling often takes me several days
as I generally only do a few at a time and give them plenty of time to dry
before moving on. Then it was time to continue with construction as there were a
lot of small parts still to put on.
|
CONSTRUCTION CONTINUES |
Next parts to put on were the wheels and gear doors. When doing the main gear doors, put on the largest one first. This gives you a good idea how the small outer doors will hang. The inner doors have a retractor and a hole in the well to place them. They won't fit into the hole so don't even bother trying. Putting them there has the door attachment point at the wrong angle. Glue them in where the inner door attachment is sticking straight down and even with the inner edge of the door. Then glue the inner door to the retractor. This will then allow easy alignment on that knife edge attachment point for the inner door. Nose gear doors are no problem at all. If you haven't already, glue the inserts into the main wheels. There are two different types. Make sure you use the ones for USN Phantoms as directed in the instructions.
Next for me were the burner cans. An easy fit. I used regular liquid cement for these. Make sure the cement does not touch the Metallizer on the outside of the nozzles or it will remove the paint! I next removed the horizontal stabs from the sprues and cleaned off the pips. I also accidentally cleaned off the attachment tab on one of them so had to resort to my usual paper clip repair. (To find out how to do this, go here). I then attached all the small antennas and the wing pylons.
 At this
stage, I had a pretty complete model. Looking it over, I noticed a number of
places that needed some touchup painting. Having recently purchased an Iwata
Eclipse, I was able to do these touch ups without worrying about overspray
getting on the decals. A quality airbrush is so handy at times!
At this
stage, I had a pretty complete model. Looking it over, I noticed a number of
places that needed some touchup painting. Having recently purchased an Iwata
Eclipse, I was able to do these touch ups without worrying about overspray
getting on the decals. A quality airbrush is so handy at times!
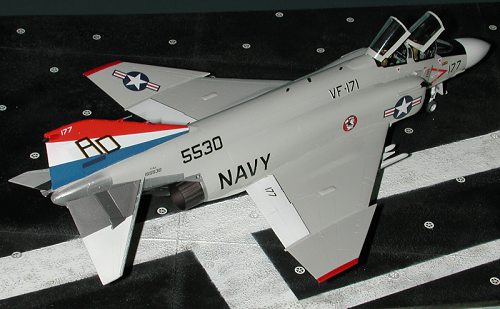
It was then time to install the canopy actuators. Be careful gluing these in as the hole they fit into is larger than the actuator! Then it was time to install the seats that had been built and painted earlier. These seats are quite nicely done, but are totally devoid of any harnesses. You may wish to add the harness or replace the seats with resin or metal ones, but for this review, I kept things stock. The tailplanes were glue in, the seats were installed, the masking taken off the clear bits and the two canopies glued in place.
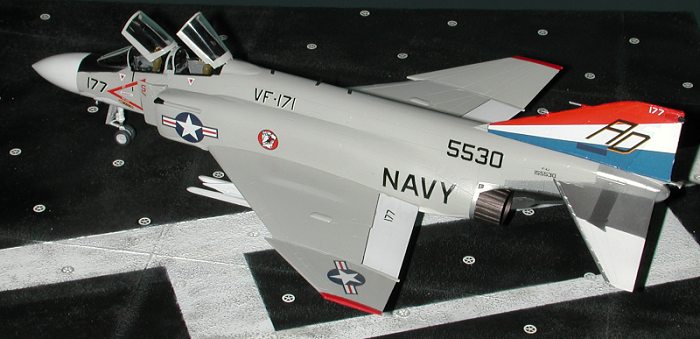
The Phantom was now complete. You may wish to put a clear coat over it, but I did not. I also did no panel accentuation, though I did pencil the flaps and ailerons.
|
CONCLUSIONS |
This is still the best 1/72 Phantom. If I had any quibble about it, it would be that there are too many small parts. However, I have found that generally, the more parts, the more accurate. This one certainly builds into a very nice model. Doing a bit of work on it every day, I completed it in less than a month, which is really pretty fast for me. Highly recommended if you can handle all the small parts.
|
REFERENCES |
McDonnell Douglas Aircraft since 1920: Volume 2, by Rene
J Francillon, 1990, Naval Institute Press
Hook Code: USN and USMC Aviation Tail Code Markings, by Pat Martin, 1994,
Third Edition, self published
Review kit courtesy of me and my wallet!
If you would like your product reviewed fairly and fairly quickly, please contact the editor or see other details in the Note to Contributors.