Trumpeter 1/32 F4U-4 Corsair
Page 3
Back to Page 2
December 15
 Today, I spent most of my time working with the various control surfaces and applying filler to the landing gear. The landing gear have at least 3 sink areas on each side of the main struts and I just couldn't leave them as they were since they would be so visible. No choice but to slather on the filler. I'll sand it off tomorrow after the filler has fully dried.
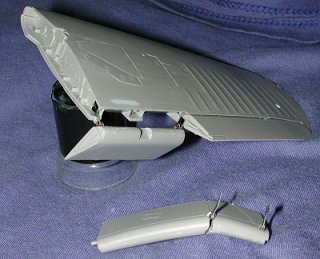
Getting back to the control surfaces, I assembled those that were left so that I could later sand them smooth on the joins after they have dried. Those that I had already done (which was about half of them) were then assembled into groups. One grouping gets trapped into the wing halves. I had the aileron and outboard flap for the right wing done. First the aileron is glued in place and this is not a problem. In fact, the fit is actually quite good. The outboard flap section was a real problem as the little hinges that are made from brass and the etched bits kept falling apart. I must have made new hinges for the one side three or four times before I got one that stayed together. I would highly recommend making the actual hinge from stretched sprue or plastic rod instead of brass wire. That way, you can gently heat the end of the plastic hinge to make a seal. It may not be as strong as brass, but it should be a lot easier to work with.
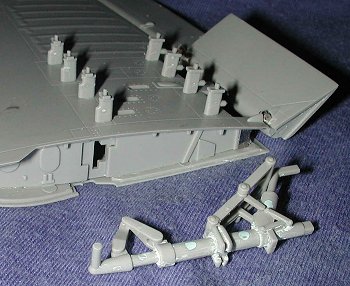
The outboard flap section also gets glued to the outside of a wing rib section. Be careful when gluing this to make sure the rib section is fully solid and dry before doing this or you'll have alignment problems. Also make sure the aileron is in the neutral position when installing this flap section or you'll have trouble later. The metal hinge acts to keep the aileron travel down to what would be normal for the aircraft. However, there is no limit to the lower travel of this outer flap section, as you can see. The inner flap sections (shown in the foreground of the image above) were not a big problem, but I did have to redo several of the hinges and all of that took quite a bit of time.
December 16-21
Back into business after spending a lot of time getting the Shrike done, I returned to the job of getting all the ailerons and flap sections installed. As I mentioned, it is rather tedious work and it is often that I wished I'd just superglued them in place, but I feel it is a duty to report things as they are. I'd highly  recommend shaving the small inner flap tab to where it is curved on the bottom rather than flat or it will not smoothly slide in and out of the slot in the neighboring flap segment. I should also take this time to mention that some of the part # callouts are not correct and I found that one needs to test fit all parts prior to applying glue to be sure that you've got the right ones for the proper side. I found an error in one of the flap pieces and later for the oil cooler intakes where the instructions showed the wrong part numbers.
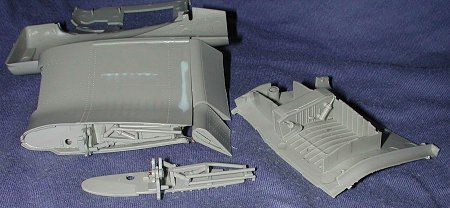
With all the control surfaces finished, it was time to work on the inner wing section. The wheel wells were built up with what I assume to be gear door actuators. This part seems a bit tall once installed in the well. I can't see how there would be room for the gear strut to fit over that. Fortunately, the model does not have retracting gear so I won't have to worry about that. Just something that struck me. As usual, I did nothing with the myriad of ejector pin marks in the wheel well parts. One thing I did notice was that on two sprues (C&D) there was quite a big difference in part quality. Sprue C had a ejector pin marks on everything and also had overly thick sprue attachment points. Sprue D, which has basically all the 'other side' parts as on C, had a great deal fewer ejector pin marks. If one sprue can be pretty good, and a very similar one horrible, then there is a definite quality control problem where the sprues are made.
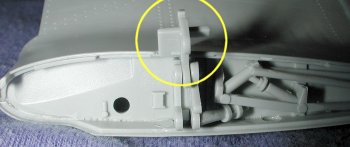 Anyway, I started building up the inner wing hinge area. These are designed to work so a small metal hinge is provided. The central piece is shown in reverse of how it should be in the assembly diagram, but in proper alignment in the 'already built' drawing. Make sure that your part is aligned as shown in the image. These parts are from the D sprue as you can see by no ejector pin marks on the wing rib. I also found that I was missing one of the two tiny metal hinges, so had to use a piece of the copper wire provided to complete that assembly.
When both assemblies had dried, I glued them onto the bottom of the wing and let that dry. Then the inner flap assemblies were glued in place. Fitting these is not super easy, as the attachments are a bit tricky and will require some superglue accelerator to help get parts solidly affixed. Then the upper wing section had the wheel well walls installed and were then glued in place. I found that I had to clamp them to get them to fit snugly.
 After the upper wings had dried, I installed the radiator inlets. The parts of the C sprue needed a lot of cleanup inside the grille part thanks to overly large ejector pin towers in between the grills. These were then glued in place in the wing leading edge. As I mentioned earlier, the instructions show them going in the wrong sides, but since they are keyed, it will be difficult to install them wrong. They also did not fit very well and so I had to clamp them in place while drying and will have to use filler on them once they are dry.
I then continued on to do a few more subassemblies. This aircraft will have one drop tank, one bomb and the under wing rockets installed. I have to confess that I really don't like doing ordnance that much (which is why I do so few modern jets), but this plane has to have them. The rockets take quite a bit of cleanup, especially the fins (a separate part) which have large and thick seams. I only managed to do four rockets and it took nearly 30 minutes to clean them up before gluing. I've applied some filler to the inner wing seams so that they can be smoothed out tomorrow. Overall, not bad for a weekend's work.
December 22
 Today's work consisted of assembling the wing center section to the fuselage. Fit here is fairly good, but I found that there were gaps between the wing and the fuselage that I couldn't get out. I filled them using the good old standby; white glue. For the other joins I could reach, normal filler was used. I also noticed that the forward fuselage is a rather odd shape. It isn't circular. The lower section and initial side sections are quite a bit flattened when compared to the upper section. I don't think this is right, but I'm not a Corsair expert so it may be the norm. I should also mention that I needed more than one application of filler for the oil cooler intakes on the leading edge of the wing.
Other work was the installation of the rocket rails on the wings and the completion of the main landing gear legs. These last items will take quite a bit of work in a small area to clean up prior to painting. I also cleaned up the other four rockets and fins and got them assembled. The instructions would have you attach the rails to the rockets prior to gluing them to the wing, but then it would be a real hassle to paint the rails as they will not be the same color as the rockets. Then I took a few of the parts (such as the wheels, landing gear and doors) to the paint shop and had the first shot of sea blue paint applied to them. All in all a busy day. Doesn't sound like 3 hours worth of work, but it was!
December 23
I sanded on the various bits that needed them on the fuselage, which was the additional bits put on the cooler intakes and those areas in the back of the wing/fuselage join and those up in the front near the engine. Then I started adding on more bits to the fuselage in preparation for painting. That included gluing in the gun sight and attaching the windscreen. I'm not really sure if the gun sight is the right type for the -4 or not. It is the small circular one used on earlier variants and I think it should be a larger and more boxy one. Both the canopy and windscreen are rather thin as clear parts go. I was able to remove them from the sprues with no problem, though I think I put in a gouge or two in the process. I really like that the non-clear parts of these are in a roughened texture. Makes it easier when it comes to masking. Masking was a breeze thanks to the clear delineations of the framework. 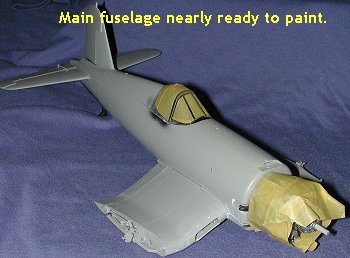
The windscreen fit quite well. The canopy is supposed to be able to be opened and closed, but it is a touch wider than the opening and there is no rail on the canopy to match the one on the fuselage. In the open position it will just sorta sit atop the fuselage! It was attached with white glue until after painting. Since it overlaps a part of the fuselage when closed, it will have to be taken off to paint that area. I masked off the engine as the cowling on this plane will not be the same color as the rest of the airframe and is being painted separately.
Other things that were attached were the catapult hooks on the underside. I also glued on one of the bomb racks as my Corsair will carry a drop tank on one side and a bomb on the other. I also assembled the appropriate drop tank rack. Moving a bit back, I glued on the lower antenna and also did the upper antenna just prior to going for a bit of painting.
In other areas, I assembled the other four rockets and sanded down the step that will be there when you attach the tails on the four previously glued and dry. The bomb was fully assembled at this time as well.
Now it is time for some paint. I used White Ensign's Colorcoat sea blue enamel for this one. It goes on very well and dries relatively quickly. I did the entire upper surface of the fuselage and wing stubs. Then on the other wing bits, I painted the upper halves as well as all the wing fold areas. I also painted the upper portion of the drop tank. This took a LOT of paint and I don't think I'll have enough to finish so will have to hunt up some more Sea Blue! The engine cowling was painted white on the outside and yellow zinc chromate on the inside. Then it was all set aside for a good 12 hours of drying before getting back into it tomorrow.
December 24/25
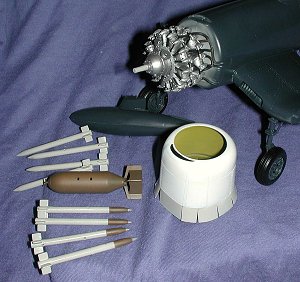 Having scrounged another bottle of Sea Blue, I finished painting the airframe. While that was drying, I also painted the rest of the drop tank and the pylon for it. The rocket bodies were painted FS 16440 Light Gull Grey. I also painted the cowl flaps this color as the photos I saw of a similar aircraft had them looking brighter than the FS 36231 Dark Gull Grey the instructions said they should be. The bomb was painted Olive Drab and when the rocket bodies had dried, they were masked and the tips also painted this color. When they were all dry, I carefully brushed some aluminum on the very tip of each one.
When the airframe was dry, I inserted the tail wheel and glued the strut halves together. I also glued in the main landing gear after wrapping the oleos with Chrome Bare Metal Foil. The left side fit perfectly, but the right side didn't seem to want to go in. I carefully applied a bit of grunt and was rewarded with the rear support strut breaking! I then sighed and glued the gear in as snugly as I could. When it had dried, I then installed the landing gear. The axles seemed a bit too long so I nipped a small bit from each end. I then glued the wheels to the axle stubs. No rolling wheels for this kid. 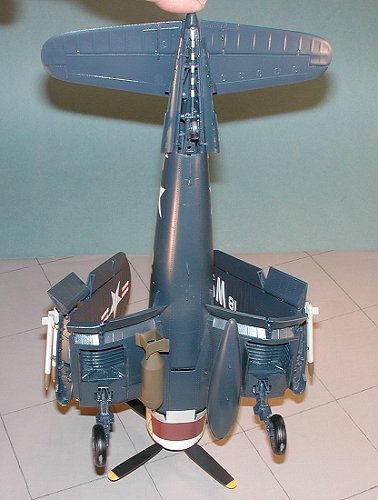 I should back up a bit and tell you that the tires are just like what is on a bicycle. One holds the three parts of each wheel together and then installs the tire over it just like you do for your bicycle. It takes a touch of work and a little bit of help (I used a flat ended paint stirrer) to get the tire fully on. While all that was drying, I painted the various light lenses as shown in the instructions.
Next step was decals. I was seriously hoping these would turn out OK as replacements at this time are non-existent for the -4 Corsair in this scale. The decals are printed by Cartograf and much to my delight, worked just perfectly. I did have to do some cutting on them to get them to fit around the rocket stubs on the wing with 'MARINES' on it, and I also had to trim the 'S' on the left rudder where it interfered with the rudder trim actuator rod, so you may want to install that after decaling. Other than that, they worked quite well and succumbed to Solvaset with no problems. The big decal on the cowling didn't fit perfectly and you'll need to do a touch of trimming and slicing to prevent wrinkles. However, it will snuggle down and looks great.
Then it came to the data and stencil decals. There aren't that many, but I didn't put on any other than the one for fuel. I looked at a LOT of Korean War era Corsair photos and didn't see any on these planes. The instructions said that when a plane was repainted (as these would have been), the stencils were often not replaced I did put them on the prop. Probably the most difficult one is the tail hook stripes. I think the hook shank is supposed to be painted black for this, but I put it over the sea blue and it looks just fine to me. I did paint the hook itself a steel color.
With the decals on, the kit was then given an overcoating of clear semi-matte acrylic to seal in the decals and give an overall consistent sheen. Once that was dry, it was on to a few more build things.
Gear doors were the next items. The main wheel doors fit very well. The forward part of the hinge has a groove in it for the door actuating cylinders to fit. None of them fit where they should and the rods all had to be bent to get the doors installed properly. The fit of the small forward doors wasn't bad, but both took two applications of cement as there is not any really firm contact or alignment point. Eventually, they were on to stay with little fuss.
 The tail wheel doors were another story. Mine had the hinges rather badly damaged from other sprues banging against them. One had been completely torn off the door and repairing the ragged tear was not fun. The fit, once repairs had been made, wasn't bad. There is no positive locator for them, but getting them in position isn't any real problem. Once those were on and dry, I touched up any paint glitches and got ready to glue on the small clear lenses. The ones on the top of the wing were painted with clear blue, the tip position lights had red and green painted on the edges and the lower ID lights were painted with clear yellow, green and red. These lower ID lights were a very tight fit. The upper wing ones were held in with clear paint while the wing tip lights were glued in using regular glue. I then started installing the rockets. Fit here was good as well, though my screw-up on one of the fin assemblies (it is not on-center) caused a bit of a problem as the clearance is quite tight.
While that was drying, I glued the bomb and drop tank onto the fuselage. There is a breather tube that goes on the upper forward section of the tank and a brace that goes on the rear that will need to be attached. There will be a hole for the brace on the bomb side that won't, naturally, be used. I'm not sure if it is supposed to be there on the real plane, but my gut feeling is that it isn't and so you may want to consider filling it. I also glued in the clear lens on the upper fuselage and the tail. Then I added all the pastels for the exhaust stain. I put it on rather heavy as I knew that most of it would disappear once I sprayed on the clear to hold it in place, and I was right!
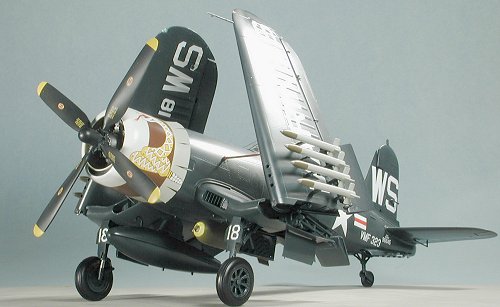
 The tape was removed from the canopy and windscreen at this time. Then it was time to deal with the wings. They were slid onto the alleged 'one-way' clips that look as if they'll stay fastened onto the wing once they are mated. That is a bit of a misnomer. At least for the left wing. As you can see from the photo, you'll have to remove all sorts of bits and prepare the kit way in advance if you want to build this with the wings spread. The fold mechanism and other bits will prevent the outer wings from mating up and there is a huge gap because of this. The left wing's clip didn't want to stay seated and the wing kept falling out. I ended up gluing it in place. Then when it came time to fold it, I had a terrible time getting the thing to line up properly. I eventually superglued the strut to the fuselage and wing, holding it there until the glue set. It popped off several times despite that and I only hope it stays on long enough to photograph the model! No problem with the right wing at all, though I will say that having that one hinge, large as it is, still makes for a rather wobbly affair. Since the canopy has no positive contact with the proper guide rails, it was just set atop the fuselage so it 'looked' normal. Final touch was to nip about an eighth of an inch from the prop shaft and push on the prop. The kit was now finished.
It almost seems as if Trumpeter can't make up its mind as to whether it is building kits for the serious modeler, or just doing toys. There were times during the build that I thought that this was engineered by 6 different people working well apart and not talking to each other. They all came together for the finished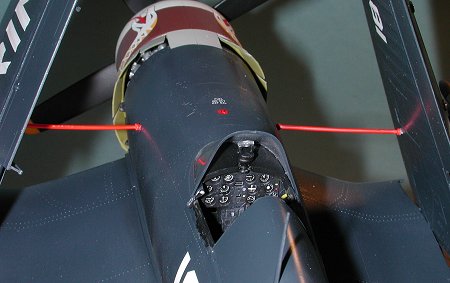 product. I mean, why have a retracting tail wheel when the rest of the gear are fixed? Why have movable elevators when the actuating rods will prevent them from being moved? Why have no fixed wing option built into the instructions? Why have no guide on the canopy to allow it to be moved? And finally, why all the darn ejector pin marks on one sprue and not as many on what is basically the same sprue.
As you can all see from this review, this wasn't an easy build. Some of it could well have been me, but I think it was a case of some rather poor engineering on the part of Trumpeter. Does it build into an impressive kit? Yes in does, and once you are done with it, you'll look back and feel mighty good about overcoming a lot of problems. This is a kit that the average modeler can build if he takes his time and thinks through every step. You won't find this one built in a weekend!
December 2003
#1297 in a series
Copyright ModelingMadness.com. All rights reserved. No reproduction in
part or in whole without express permission.
If you would like your product reviewed fairly and fairly quickly, please contact the editor or see other details in the Note to Contributors.
Back to the Main Page
Back to the Reviews Index Page
2022