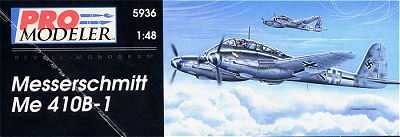
ProModeler 1/48 Me-410B-1
Kit # 5936
Decals: Three versions all in RLM 74/75/76.
II./ZG 76; II./ZG 26 and 8./ZG 26
Price: $23.50 retail
Date of Review: 8 November 1998
Review and Photos By: Scott Van Aken
The Me-410 is what the unsuccessful Me-210 should have been at the start. A fast, heavily armed destroyer aircraft. Unfortunately by the time it entered widespread use in 1944, it was a bit late for this type of aircraft. It was used in a variety of roles from ground attack, to night intruder, fast bomber, night fighter, reconnaissance aircraft, day fighter, and maritime attack.
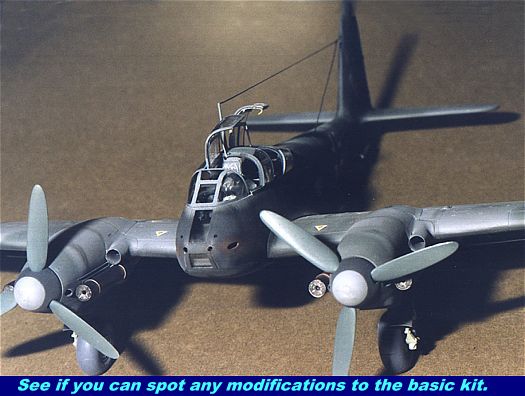
ProModeler's kit depicts the Me-410B-2 zerstorer or destroyer version and comes with a variety of underside ordnance including 21 CM rockets and a 4 gun belly pack to augment the 20 or 30 mm nose cannon. Also on the sprues are other weapons indicative of upcoming versions. The kit is in R-Ms typical medium grey plastic and has the sprues in individual bags to prevent scratching. Also included are weighted wheels and the typically out of register Scalemaster decal sheet. The canopy can be built in the open or closed position and the kit is detailed to the high standard we have come to expect from R-M. There are even two crew members, a seated pilot and a rear gunner posed to climb aboard.
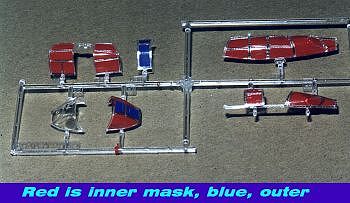 Once one has finished
ogling the parts, it is time for construction. With this kit, I used a product
called E-ZMasks. you may have read about them in a past review;
suffice it to say, they are pre-cut masks for canopies. In the case
of the 410, both inside and out. In the photo to the left, the inner
masks are red and the outer masks are blue. A great boon to those who are
clumsy like me and tend to really screw up multiple pane canopies. They
are really easy to use and can be peeled off and repositioned if you don't
get it on just so. However, they are a bit time consuming to use. It
took me the better part of an hour and a half to get mine on all the way.
Note that there are not as many braces inside the canopy as there are
outside so there isn't a mirror image mask for each one. Another nice thing
about EZ Masks is that there is a lot of extra stuff so you can use them
for other projects. Anyway, once the canopy is masked n both sides it is
set aside awaiting the interior to be complete for painting.
Once one has finished
ogling the parts, it is time for construction. With this kit, I used a product
called E-ZMasks. you may have read about them in a past review;
suffice it to say, they are pre-cut masks for canopies. In the case
of the 410, both inside and out. In the photo to the left, the inner
masks are red and the outer masks are blue. A great boon to those who are
clumsy like me and tend to really screw up multiple pane canopies. They
are really easy to use and can be peeled off and repositioned if you don't
get it on just so. However, they are a bit time consuming to use. It
took me the better part of an hour and a half to get mine on all the way.
Note that there are not as many braces inside the canopy as there are
outside so there isn't a mirror image mask for each one. Another nice thing
about EZ Masks is that there is a lot of extra stuff so you can use them
for other projects. Anyway, once the canopy is masked n both sides it is
set aside awaiting the interior to be complete for painting.
The interior is typical PM: it is beautiful. While I'm sure there will be a number of aftermarket parts to replace the PM one, it really is not necessary. On this kit, I decided to add harnesses for the pilot and gunner. For this, I bought Waldron buckles. This is the first time I have used these and was rather intimidated by their small size. For the belts themselves, lead foil was used. Lead foil was chosen not for ease of assembly, but because it tends to stay in position better than any other material. The downside is that it cannot take a huge amount of handling and will break if flexed too much.
Assembling the belts was not a simple matter for me. First, the foil had to be cut to the proper width. Then, because it was too thick, it was rolled under a piece of brass tubing to thin it out enough to fit through the buckles. Once that was done, it was re-trimmed. The foil was then threaded through the buckle prior to snipping the buckle from the fret. This prevented the buckle from flying off into space. This procedure worked great, although I did lose a piece anyway. For the front seat a full harness was needed. However the gunner had only a lap belt to hold him in. For the front, the pilot's seat needed holes cut for the belt to pass through in the back and on the side. This was done with a heated jeweler's screwdriver tip. Make sure that you do not install the belt attachment pieces until AFTER the belts are threaded through the seats. Of course, you could leave them off completely as they are not visible once the interior is installed. To simulate woven fabric, the belts were pressed between the jaws of pliers that have serrated teeth.
Let me back up a bit.
 Before
the belts were actually installed, the interior subassemblies were built
and painted using Xtracolor RLM 66 dark grey. Then they were given
a black wash and then drybrushed with Testors primer grey. The results
are quite good. Don't sweat the mold marks as they are invisible
once the interior is installed. After that had dried, items were then
detailed with various paints and colors. The throttles were gently
cut using a jewelers saw to heighten the separation. Seat cushions were then painted
very light grey, given a dark grey wash and dry brushed with white. Seat
belts were then installed and painted white. Then the belts were given a
wash with dark grey. I left the buckles in metal. Finally, the whole interior
was installed in the fuselage halves and joined. As you can see from the
below image the effect is quite good. A note of warning. Do NOT glue the
forward section of the interior to the side walls of the fuselage. If you
do you will find the forward cockpit horribly misaligned when comes to adding
the lower fuselage section and the lower nose window.
Before
the belts were actually installed, the interior subassemblies were built
and painted using Xtracolor RLM 66 dark grey. Then they were given
a black wash and then drybrushed with Testors primer grey. The results
are quite good. Don't sweat the mold marks as they are invisible
once the interior is installed. After that had dried, items were then
detailed with various paints and colors. The throttles were gently
cut using a jewelers saw to heighten the separation. Seat cushions were then painted
very light grey, given a dark grey wash and dry brushed with white. Seat
belts were then installed and painted white. Then the belts were given a
wash with dark grey. I left the buckles in metal. Finally, the whole interior
was installed in the fuselage halves and joined. As you can see from the
below image the effect is quite good. A note of warning. Do NOT glue the
forward section of the interior to the side walls of the fuselage. If you
do you will find the forward cockpit horribly misaligned when comes to adding
the lower fuselage section and the lower nose window.

The fuselage was then fully assembled and left to dry. While that was
going on, the wings were assembled. Fit is very good, though some filler
was needed around the supercharger intakes. More on these intakes a bit later.
Once the wings were assembled, it was time to install the radiators. PM
provides not only nice radiators, but also positions them in the full open
mode. Once the radiator bay is painted RLM 02 grey
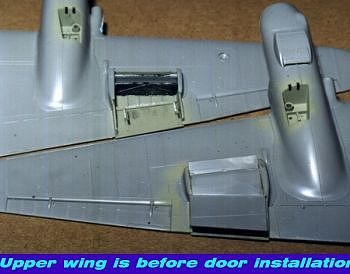 (and for this
I used Aeromaster Enamel), the radiator itself is installed. These
were painted flat black and drybrushed with steel. Next the radiator actuating
flaps were installed. Finally the lower door assembly was installed. These
did not fit as well as I would have liked and I ended up dragging out the
filler. As you can see from the photo on the right, there is quite a gap
between the door and the sides. You can also see the filler used on
the supercharger intake near the top of the image as well as the rear door
hinges. The engine radiators were also installed at this time. No problems
at all, but they are nearly invisible one installed.
(and for this
I used Aeromaster Enamel), the radiator itself is installed. These
were painted flat black and drybrushed with steel. Next the radiator actuating
flaps were installed. Finally the lower door assembly was installed. These
did not fit as well as I would have liked and I ended up dragging out the
filler. As you can see from the photo on the right, there is quite a gap
between the door and the sides. You can also see the filler used on
the supercharger intake near the top of the image as well as the rear door
hinges. The engine radiators were also installed at this time. No problems
at all, but they are nearly invisible one installed.
The next major task was the fuselage. I found that parts were not a perfect
join so had to use some filler to even things out. This is probably just
me as I have to use filler for everything. However, when it came to installing
the lower forward section, things did not line up at all well for me in the
back. I 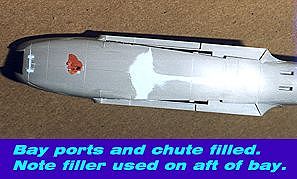 ended
up with a large step that required mucho filler to smooth out. One thing
that did work out well was gluing one side first and then the other.
Since I was building a B-1 bomber version, all the gun ports
and shell ejector chute in the lower nose had to be filled in and that area
rescribed. While fussing with the forward section, the tailplanes were glued
together, cleaned up, and installed. If you don't like the large rivet heads
on the tailplanes, then sand them down. I left well enough alone.
ended
up with a large step that required mucho filler to smooth out. One thing
that did work out well was gluing one side first and then the other.
Since I was building a B-1 bomber version, all the gun ports
and shell ejector chute in the lower nose had to be filled in and that area
rescribed. While fussing with the forward section, the tailplanes were glued
together, cleaned up, and installed. If you don't like the large rivet heads
on the tailplanes, then sand them down. I left well enough alone.
Next to be attacked was the engine exhaust and the upper cowling. Since I was building a night intruder that used flame dampeners, the exhaust shields were not used and the exhaust was installed without them. Next the upper cowlings were glued together and installed. As I had feared during dry fitting, the lower rear corners did not fit well. Next time, I'll use a spreader bar to widen them. Wish I had thought of that before the glue dried!! Some heavy sanding was required on my part to get the back section of the cowling to smooth out with the rest of the wing.
Next was the flame dampeners. These little items put the kit on hold
for several weeks
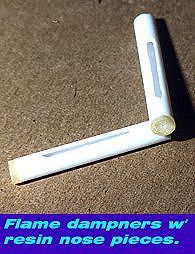 awaiting some
home-spun resin casting from my friend Brian in Canada. Poor Brian
was having a terrible time trying to get some that came out well. In the
end, he sent me enough forward and rear parts so that I could use them to
make my own. The forward sections of German flame dampeners are a
concentric circle screen that is nearly impossible to scratch-build.
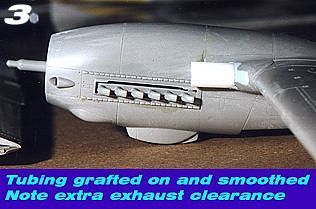
Initially, these resin forward sections were to be grafted onto brass
tubing, however a visit to my local hobby shop turned up plastic tubing by
Evergreen in proper diameter. The resin forward screen was cut off
and superglued to the plastic tubing. A slice was made with a cutting
disc on a Dremel to incorporate the kit exhaust and they were then
cut to length. Some filler was used at the resin/plastic interface
and smoothed out.
awaiting some
home-spun resin casting from my friend Brian in Canada. Poor Brian
was having a terrible time trying to get some that came out well. In the
end, he sent me enough forward and rear parts so that I could use them to
make my own. The forward sections of German flame dampeners are a
concentric circle screen that is nearly impossible to scratch-build.
Initially, these resin forward sections were to be grafted onto brass
tubing, however a visit to my local hobby shop turned up plastic tubing by
Evergreen in proper diameter. The resin forward screen was cut off
and superglued to the plastic tubing. A slice was made with a cutting
disc on a Dremel to incorporate the kit exhaust and they were then
cut to length. Some filler was used at the resin/plastic interface
and smoothed out.
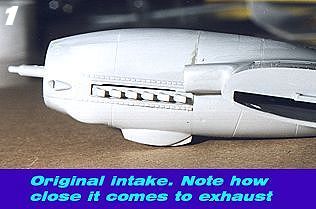
It was then that the most obvious error on PM's kit; the oval vice circular supercharger intake came into play. No way were these dampeners going to fit on the supercharger
 |
 |
 |
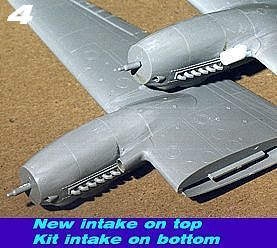 |
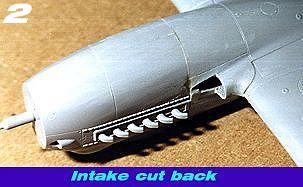
side of the engine. It was then that the decision was make to remove the oval intakes and replace them with circular ones. The offending bit was hacked off and replaced with Evergreen tubing. A bit of filler, a bit of smoothing out and 'voila', the dampeners fit and the kit is that bit more accurate. In reality, those last two sentences took about 4 days!! I just wanted to sound like those home improvement shows where an entire wall can be knocked out, reconstructed and finished in 30 minutes.
Once the engine problems were taken care
of,.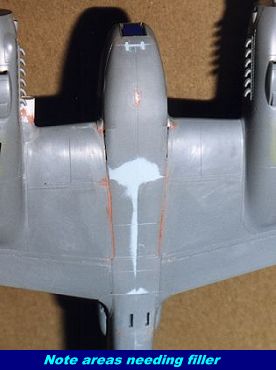 the interior
was finished off with headrests, braces and gunsights. Then the wings
were attached. The fit of the wings is really very good indeed, though
there is a small step. It won't be fixed as to do so will trash the
upper wing detail. Underside isn't bad and got a touch of putty to
take care of my goofs.
the interior
was finished off with headrests, braces and gunsights. Then the wings
were attached. The fit of the wings is really very good indeed, though
there is a small step. It won't be fixed as to do so will trash the
upper wing detail. Underside isn't bad and got a touch of putty to
take care of my goofs.
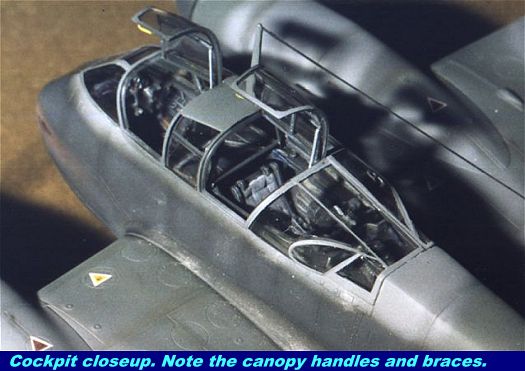
Then it was on to attaching the canopy and other clear bits. The 410 has
a canopy that is impossible to mold in one piece due to the severe undercut
around the aft portion. ProModeler decided to do this in two parts.
A left section that covered 2/3 of the canopy that includes the open
hatch areas and a right section for the fixed portion. There is also
a separate
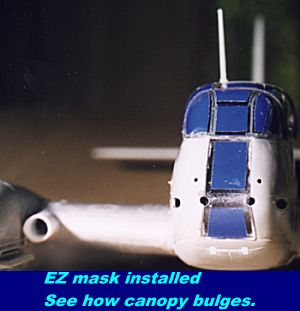 windscreen and
lower nose transparency. It is important to get the lower nose transparency
properly situated as it includes half of the nose gun openings (or they could
just be fresh air vents as there are no guns in this section included with
the kit). As you can see from the image to the left, the canopy is bulged.
You can also see how nice the EZMasks are when installed.
windscreen and
lower nose transparency. It is important to get the lower nose transparency
properly situated as it includes half of the nose gun openings (or they could
just be fresh air vents as there are no guns in this section included with
the kit). As you can see from the image to the left, the canopy is bulged.
You can also see how nice the EZMasks are when installed.
The rest of the canopy gave me fits. It looks like a simple installation,
but I had a terrible time with it. In the end, I had to use standard
glue to attach it as all attempts at using epoxy (my standard canopy adhesive)
failed miserably. As you can see from the image below, a
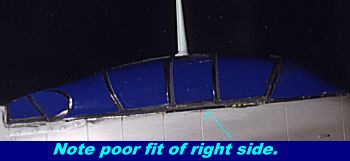 rather large
and unsightly gap was left on the right side. This was eventually smoothed
out using white glue, but detracts from the overall pleasure of the build.
It is quite possible that poor construction on my part caused the gap.
Also during this time, the antenna needs to be attached as it is trapped
between the canopy halves. It is here that EZMasks made a small error.
They provide a mask for the top portion of the canopy where the antenna
goes. All photos I have seen of this aircraft show that part to be
metal, or at least painted over. There are marks on the canopy to show you
where to cut the EZMask.
rather large
and unsightly gap was left on the right side. This was eventually smoothed
out using white glue, but detracts from the overall pleasure of the build.
It is quite possible that poor construction on my part caused the gap.
Also during this time, the antenna needs to be attached as it is trapped
between the canopy halves. It is here that EZMasks made a small error.
They provide a mask for the top portion of the canopy where the antenna
goes. All photos I have seen of this aircraft show that part to be
metal, or at least painted over. There are marks on the canopy to show you
where to cut the EZMask.
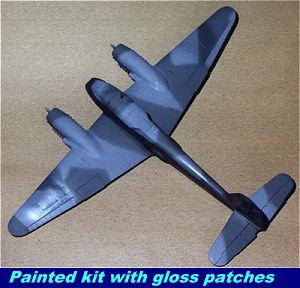
With all the airframe basically complete, it was time to add the first coats of paint. Since this is a night intruder, the first part was the underside, and it is supposed to be black. However, if painted that color, the black codes will not show, so Aeromaster suggested using RLM 66 and I did so using their enamel paint. The RLM 74/75 upper colors were also applied using Aeromaster paints, which dry very matte. After the usual back and forth with paints, the airframe was ready for the Future. Since this particular aircraft had the RLM 76 areas overpainted with RLM 66, there would not be any stencils on the side or underside.
 |
 |
Those few areas that got decals were sprayed with Future in preparation for the decals. But before that, there were other items that needed taken care of. For instance, the undercarriage had to be assembled and installed. These items were painted RLM 02. The rubber boots over the oleos were painted tire black and the entire assembly dirtied up a bit. They were then glued in place. When dry, the gear doors put on and finally the wheels. Make sure they are not perpendicular with the ground as the 210/410 wheels were slightly offset inward at the bottom. Once all that was dry, it was time to apply the decals.
Aeromaster's sheet for the 410 supplied markings for the KG 2 plane and were really superb. Common marking on the upperside were from the kit and both worked well with Champ setting solution. I did have some minor silvering on a couple of smaller decals, but nothing that detracts from the kit. While the decals were drying, the prop spinners got a coat of light grey. When dry, the tips were masked with Parafilm M and the rest sprayed with RLM 66. The entire airframe was then sprayed with a matte clear and the EZ Masks taken off. This proved a bit of a trial as they had stiffened up quite a bit under all the paint as during the month they were on the canopy. Typically for me, I managed to pull off the front canopy while trying to remove the EZMasks. Not a major catastrophe and much easier than Scotch tape. The underside plastic was nice a clean with no residue.
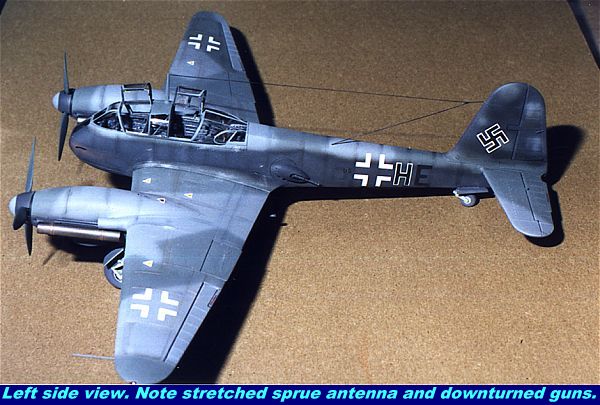
Next, holes were drilled for the long wire antenna and the antenna made from stretched sprue. When installed, it was painted black. Next canopy handles were made and once the canopy parts installed in the open position, hinges added to the back to keep them open. Final assembly included the landing light which had the receptacle painted aluminum, the pitot tube replaced with brass tubing, and the tip lights painted red and green. Now the aircraft was complete. Well, not quite.
Remember the exhaust dampeners? They still had to be painted and finished.
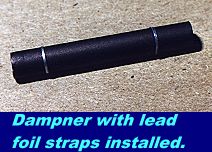 First
they were given a brushed on coat of flat black. Then they were sprayed
with Burnt Iron Metallizer. Finally, straps were cut from lead foil
and glued onto the dampeners using white glue. Once that was done,
the dampeners were given a light mist of Burnt Metal Metallizer and attached,
again using white glue.
First
they were given a brushed on coat of flat black. Then they were sprayed
with Burnt Iron Metallizer. Finally, straps were cut from lead foil
and glued onto the dampeners using white glue. Once that was done,
the dampeners were given a light mist of Burnt Metal Metallizer and attached,
again using white glue.
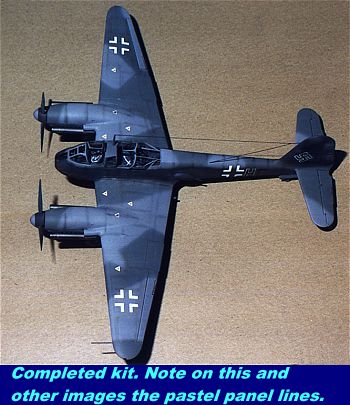
The final step was to brush on pastels to accentuate the panel lines. While not strictly the way the aircraft looked, it does add a certain artistic enhancement that many find pleasing. It also helps to break up a normally dull paint scheme. At the same time a few areas were scuffed up (not many as this was a recently painted aircraft) and the forward guns and exhaust areas were stained up a bit. I did nothing to the rear guns as they were rarely used. Note that they are pointed downward. This was pretty standard on the ground to keep moisture from condensing in the barrels.
Overall a really nice kit that turned out a lot better than I had first thought. Highly recommended

References:
Me-410 in Action (Squadron/Signal)
German Aircraft of WWII (Putnam's)