Hasegawa 1/32 Bf-109G-6
|
KIT # |
Bt 17 |
|
PRICE: |
$39.95 MSRP |
|
DECALS: |
Two Aircraft |
|
REVIEWER: |
|
|
NOTES: |
Finally, an accurate, injected, large scale 109. |
|
HISTORY |

 The most produced version of the Bf-109 was the G-6. It is
estimated that nearly 10,000 aircraft of this variant were produced in
1942/42/44. It served on every front and with most Axis powers. Many of
Germany's top aces flew the G-6 and scored a lot of their kills with it.
The most produced version of the Bf-109 was the G-6. It is
estimated that nearly 10,000 aircraft of this variant were produced in
1942/42/44. It served on every front and with most Axis powers. Many of
Germany's top aces flew the G-6 and scored a lot of their kills with it.
Since it was based on a sports plane (the Bf-108), the 109 was quite small and fast. By the time the G models had come around, the power had increased, but so had the amount of stuff built onto the plane. It is a story that is told over and over again. As aircraft evolve, so they are required to do more. As a result, they get heavier and need greater power.
Though the design was basically obsolescent by 1943, the need for aircraft was so great that it was kept in production. It didn't help that the replacement Me-309 was proving itself to be a dismal failure and was no better than what was already in production. It wasn't until the revolutionary Me-262 entered service that a Messerschmitt replacement was available. By then, of course, it was too late and the 109 soldiered on until the end of the war.
|
THE KIT |
If you have read Tom Cleaver's review of this kit, then you know how superb it is. I can tell you that this is the first time I have built a Hasegawa kit that goes together as well as a Tamiya kit. The engineering is top notch and bodes well for other variants of the 109. I could hope for an F, but it seems as if we'll just be getting G models on this one. To do an F would require some modification of the forward fuselage by filling in the engine scoops and by having a different tail section with a retractable tail gear at a minimum. Then there is the need for a shallower under-nose radiator, different wheels, a smaller supercharger scoop and thinner prop blades.
|
CONSTRUCTION |
 As with all kits, the first thing to do is to determine which
version you are going to build. While there are few options (belly tank and
under wing cannon), you do need to determine if the plane you are modeling has
these features. Then open up the holes for them. This kit also needs the upper
wing bulge holes opened. Doing so leaves holes in the upper wheel well that will
need to be filled as they are easily seen. Fortunately, it is not that difficult
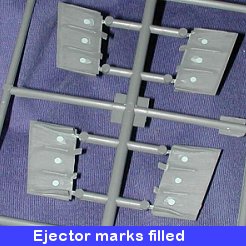
a job. While on the subject of filling things, you'll also need to fill the
ejector pin holes in the radiator flaps. These were normally open when on the
ground and they'll stick out big time if not filled.
As with all kits, the first thing to do is to determine which
version you are going to build. While there are few options (belly tank and
under wing cannon), you do need to determine if the plane you are modeling has
these features. Then open up the holes for them. This kit also needs the upper
wing bulge holes opened. Doing so leaves holes in the upper wheel well that will
need to be filled as they are easily seen. Fortunately, it is not that difficult
a job. While on the subject of filling things, you'll also need to fill the
ejector pin holes in the radiator flaps. These were normally open when on the
ground and they'll stick out big time if not filled.
Once the options were determined, I started on subassemblies. This is done so that those items that are the same color get painted at the same time. Works well for cockpit bits, for instance. The subassemblies other than the cockpit are the drop tank, tail section, wheels, flaps, and the supercharger intake. The cockpit is very well designed and practically fool-proof. All the parts fit very well. Those items that fit on the side walls fit snugly into recesses. Interior parts were painted RLM 66 and when dry, some were also painted flat black as required. They were then dry brushed with aluminum to bring out detail.
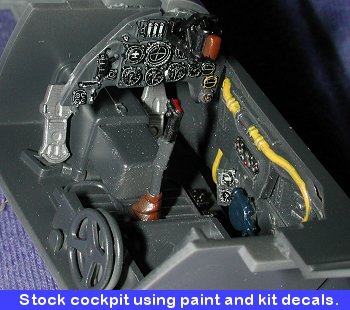 The instrument panels (there is also a small one), were painted
RLM 66 and the decals were placed over them. Then Champ setting solution was
added and they snuggled down into the proper recesses. The kit instructions
would have you sand off all the detail and then apply the decal on a flat
surface, but it is not required and placing the decal over the raised detail
looks most effective when done. The fuel line was painted yellow and the O2
regulator blue. I was going to remove a section of fuel line and replace it with
a clear piece but wanted to build this kit straight from the box (other than
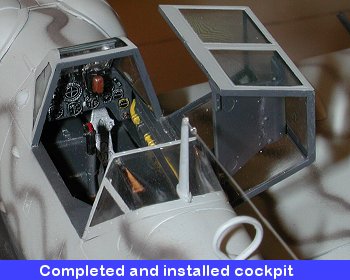
decals), so left it alone. The finished cockpit is a beauty and though there are
aftermarket cockpits available, I don't think it is necessary. The only bits I'd
like to add are pedal straps and a seat harness. Even having these as decals
wouldn't be so bad.
The instrument panels (there is also a small one), were painted
RLM 66 and the decals were placed over them. Then Champ setting solution was
added and they snuggled down into the proper recesses. The kit instructions
would have you sand off all the detail and then apply the decal on a flat
surface, but it is not required and placing the decal over the raised detail
looks most effective when done. The fuel line was painted yellow and the O2
regulator blue. I was going to remove a section of fuel line and replace it with
a clear piece but wanted to build this kit straight from the box (other than
decals), so left it alone. The finished cockpit is a beauty and though there are
aftermarket cockpits available, I don't think it is necessary. The only bits I'd
like to add are pedal straps and a seat harness. Even having these as decals
wouldn't be so bad.
Once the cockpit was done, it was installed in the fuselage halves and they were glued together. A front insert with the prop shaft was glued in at this time. While that was drying, the radiators for the nose and wings were painted flat black and drybrushed aluminum. They were then glued in place. After the surrounding area and the wheel wells were painted RLM 02, the wings were glued together. As Tom mentioned, there is a gap between the lower and upper wing you can see in the wheel wells. It is up to you as to how to deal with it or not. I chose to leave it as it was, for the time being.
 With the forward fuselage glued, I then glued on the tail section. Fortunately,
the attachment is large and fit is very good. I personally don't like this
method of doing tails and would MUCH rather have a full fuselage half. However,
I also understand the need to make things as interchangeable as possible on
modern kits. The lower center section of the fuselage is a separate piece. This
has the wing spar piece attached to it, and when the glue had dried, it was
cemented to the underside of the fuselage. Fit here is also very good. No filler
was used on the back section, though I did use a touch on the very front. The
landing gear attach to this piece, and the wings will then slide onto the spars.
This is very prototypical.
With the forward fuselage glued, I then glued on the tail section. Fortunately,
the attachment is large and fit is very good. I personally don't like this
method of doing tails and would MUCH rather have a full fuselage half. However,
I also understand the need to make things as interchangeable as possible on
modern kits. The lower center section of the fuselage is a separate piece. This
has the wing spar piece attached to it, and when the glue had dried, it was
cemented to the underside of the fuselage. Fit here is also very good. No filler
was used on the back section, though I did use a touch on the very front. The
landing gear attach to this piece, and the wings will then slide onto the spars.
This is very prototypical.
With that properly glued on, a touch of filler was used at the very front and sanded smooth. Then the wings were glued on. The fit here was really super. Yes, I needed a touch of filler on the lower forward section, but that was really it. With the wings on, could the tail planes be far behind? These fit quite well, though were a bit looser than I would have liked. Some constant fiddling got these to dry properly. Then it was time for some aerodynamic testing.
 Several test flights later it
was back to the hangar for some more work. This time, the upper engine cowling
was attached as well as the gun cowl bulges. I chose the non-G-5 ones as more
typical of the plane I was modeling. Next the supercharger intake was cemented
together and then onto the cowling. This part fit the cowling OK, but they
didn't exactly mate to each other well. Some work with a hobby knife was needed
to have the opening not look too off. I see a resin replacement in the works
from someone as it would be a big help. Turning to the underside of the plane,
the drop tank rack was glued on as were the gondolas for the underwing 20mm
cannon.
Several test flights later it
was back to the hangar for some more work. This time, the upper engine cowling
was attached as well as the gun cowl bulges. I chose the non-G-5 ones as more
typical of the plane I was modeling. Next the supercharger intake was cemented
together and then onto the cowling. This part fit the cowling OK, but they
didn't exactly mate to each other well. Some work with a hobby knife was needed
to have the opening not look too off. I see a resin replacement in the works
from someone as it would be a big help. Turning to the underside of the plane,
the drop tank rack was glued on as were the gondolas for the underwing 20mm
cannon.
Flipping it back over, the windscreen was then glued in place and masked. The main canopy was also masked as was the aft section. The inside brace of the aft piece was painted and then the bit glued in. These were then masked off as was the interior to prevent any overspray. Since the canopy was to be displayed open, it had to be left off during painting.
On the trailing edge of the wings, there are several bits that need glued on, but those waited until I was finished with the first stage of painting.
|
CAMOUFLAGE |
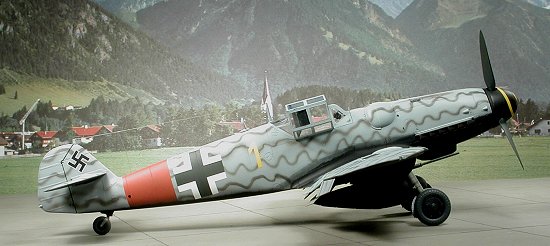
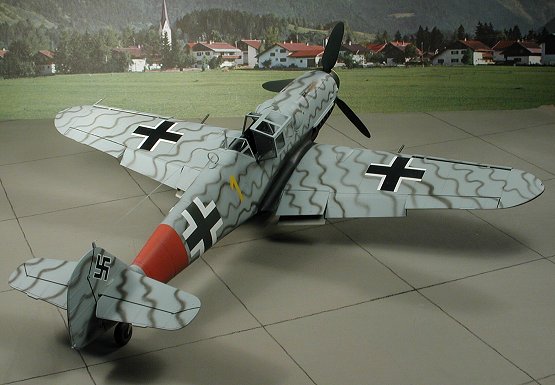
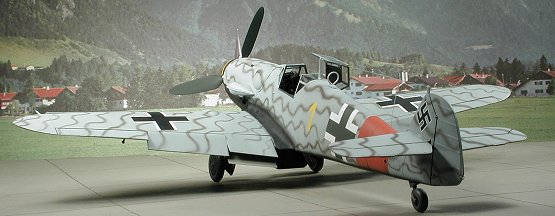
Ever since I saw this particular scheme, I knew that I'd be building a model of it. When I found that Eagle Editions had added it to one of their new 1/32 Bf-109G sheets, I turned a blind eye to the price tag, and grabbed it in anticipation of getting the Hasegawa kit.
 The RLM 76 upper with RLM 75 squiggles and lower black surface really look cool
to me. I knew that I wouldn't be able to duplicate the whistle on the left
exhaust shield, but figured that only the 'experts' would notice it missing and
most would not really care. Hey, I'm modeling the plane before it was
attached! The really nice thing about this scheme is that it was painted on over
all the data markings and from what I see of the photos included with the sheet,
there was quite a bit of overspray.
The RLM 76 upper with RLM 75 squiggles and lower black surface really look cool
to me. I knew that I wouldn't be able to duplicate the whistle on the left
exhaust shield, but figured that only the 'experts' would notice it missing and
most would not really care. Hey, I'm modeling the plane before it was
attached! The really nice thing about this scheme is that it was painted on over
all the data markings and from what I see of the photos included with the sheet,
there was quite a bit of overspray.
Anyway, as usual I started on the bottom by spraying it all flat black. The canopy bits were sprayed RLM 66 as that color would show through. The tail planes and some of the nose area was masked and then the upper surface was painted RLM 76. I also painted the upper and lower radiator doors, the flaps, leading edge slats and the gear doors at this time. The inside of the gear doors was painted RLM 76 as several folks have pointed out the often the gear doors and even the wells were in the underside color. With that in mind, the gear wells were painted RLM 02 as were the inside of the slats and the landing gear. The wing roots were resprayed in flat black. I also painted the rear fuselage band RLM 23 red, which thanks to the RLM 76 already on the plane, dried to a darker than normal color that is quite similar to the maroonish color that the decal sheet shows.
|
MORE GLUING |
 With the base airframe colors done the kit was taken to the
workbench where the fuselage band was masked off. Then the DF loop antenna was
attached and the black on the wing roots was masked to prevent RLM 76 overspray
from getting on it. At this time, the radiator coolant doors were glued on.
These are not the easiest things to glue so I hope you have a good pair of
tweezers to hold them in place. Next the flaps were glued. There are no options
as to which position you can glue these items unless you remove the mounting
tabs. It seems that all of this stuff bled to a lowered position after a while
when the plane was on the ground. Then the slats were glued in.
With the base airframe colors done the kit was taken to the
workbench where the fuselage band was masked off. Then the DF loop antenna was
attached and the black on the wing roots was masked to prevent RLM 76 overspray
from getting on it. At this time, the radiator coolant doors were glued on.
These are not the easiest things to glue so I hope you have a good pair of
tweezers to hold them in place. Next the flaps were glued. There are no options
as to which position you can glue these items unless you remove the mounting
tabs. It seems that all of this stuff bled to a lowered position after a while
when the plane was on the ground. Then the slats were glued in.
While all this was drying, the landing gear had the oleos wrapped with bare metal foil. Then the scissors were attached and any touch-up painting done. The wheels were then glued onto the gear. Normally, I'd have the gear glued onto the fuselage as the next step, but there was more painting to be done and I didn't want paint on the gear.
|
MORE PAINTING |
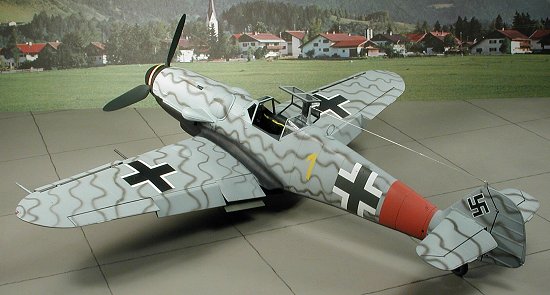
This scheme has RLM 75 squiggles all over it. This meant that I had to thin my
paint a bit more than usual and turn down the air pressure. I then started to do
the squiggles. As you may suspect, I botched several of them and so had to
respray the area with RLM 76 and redo them. This took quite a while to get them
all done to my satisfaction. With that complete, the masking was taken off the
tail band and the black undersides was touched up and properly done on the
bottom. I also went over the wing root area again. This plane had its old scheme
completely recovered and it was done in the field. That means no nice, neat
edges to most of the plane and overspray was pretty common. It also means that
all the old stenciling was painted over and it seems that nearly none of it was
reapplied. At least I couldn't see any other than the wing walk areas from the
photos supplied in the decal sheet..
|
DECALS |
 For this plane, I used Eagle Editions decals. It is the first
time I have used them. They are printed by Microscale and very crisp. They are
also pretty thick. It is quite possible that Microscale double printed the white
to keep it opaque. For this scheme, there are only wing and fuselage crosses,
the swastika on the tail, the spinner spiral, and the aircraft number. The only
data decals used were the wing walks.
For this plane, I used Eagle Editions decals. It is the first
time I have used them. They are printed by Microscale and very crisp. They are
also pretty thick. It is quite possible that Microscale double printed the white
to keep it opaque. For this scheme, there are only wing and fuselage crosses,
the swastika on the tail, the spinner spiral, and the aircraft number. The only
data decals used were the wing walks.
To be honest, I was less than happy with the decals. First of all, though they are basically brand new, I had two of the cross decals start to crack and splinter when I took them off the backing sheet. Secondly, they seemed to be impervious to Solvaset. Despite several applications, the cross insignia did not want to snuggle down into the panel lines. I blame this second deal on the thickness of the decals. I don't know what to tell you about the cracking as they shouldn't have done that. Finally, a third application of solution, this time using Champ seemed to help. However, as often happens with multiple applications of a strong solution, I got bubbles in the decals.
|
MORE GLUING & STUFF |
With the decals on, I decided to glue a few more parts. First was the prop. I had already painted the blades RLM 70 and the spinner in black. The individual blades were glued onto the backing plate and then the spinner glued over them. I then test fit it on the prop shaft. Hmmm. It seemed a bit wobbly. Reading the instructions I noticed that there was a plastic insert and cover plate that needed attached. This was done and the fit was excellent. While it was drying, the landing gear had the brake lines picked out in steel and this color was used to drybrush the black wheels. The tail wheel assembly was also painted at this time and left to dry. Moving to the exhaust, those had already been painted Burnt Iron. The openings were filed flat and painted flat black. Do not remove the mold line from the rest of the exhaust. These items were welded so the seam is perfectly normal. The heat/glare shields were then pressed in place. Then the gun barrels, which had been drilled out and painted gunmetal, were glued into their respective holes.
 At this time, the kit was
taken back to the paint shop and the clear matte overcoat was applied. Upon
return to the bench, the masking was removed from the clear parts. Then the hole
was drilled in the aft canopy section for the short antenna mast. I also drilled
out the pitot tube at this stage, having forgotten to do it earlier. The canopy
was glued into the open position. To glue it shut you'd have to remove a small
lip from the right side. The wing tip position lights and tail light were
painted and when dry, the clear tip light covers glued in place. Finally an
antenna long wire and lead were made from clear stretched sprue and some
exhaust/gun stains were added with pastels. Weathering was kept to a minimum as
this would have been a rather freshly repainted aircraft and not subject to the
usual scrapes and dings of relatively long term service.
At this time, the kit was
taken back to the paint shop and the clear matte overcoat was applied. Upon
return to the bench, the masking was removed from the clear parts. Then the hole
was drilled in the aft canopy section for the short antenna mast. I also drilled
out the pitot tube at this stage, having forgotten to do it earlier. The canopy
was glued into the open position. To glue it shut you'd have to remove a small
lip from the right side. The wing tip position lights and tail light were
painted and when dry, the clear tip light covers glued in place. Finally an
antenna long wire and lead were made from clear stretched sprue and some
exhaust/gun stains were added with pastels. Weathering was kept to a minimum as
this would have been a rather freshly repainted aircraft and not subject to the
usual scrapes and dings of relatively long term service.
|
CONCLUSIONS |
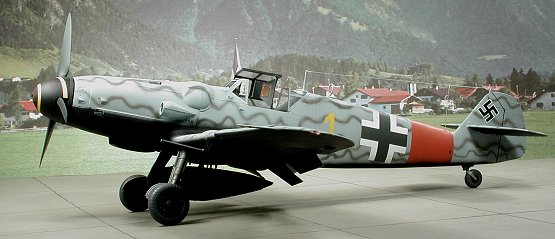
Though this wasn't a weekend wonder for me, taking the better part of a month to build, it is by far the best Hasegawa kit I can remember building for a long, long time. Engineering is excellent and those areas I thought would give me concern gave no problems at all. It isn't in the least bit fiddly (perhaps because the parts are relatively large) and was a true joy to build. I can see where Hasegawa has a winner here. If you have held off building large scale kits, this would be an excellent one to start with.
April 2002
Review kit courtesy of Marco Polo Importers. Thanks for your support.
If you would like your product reviewed fairly and fairly quickly, please contact the editor or see other details in the Note to Contributors.