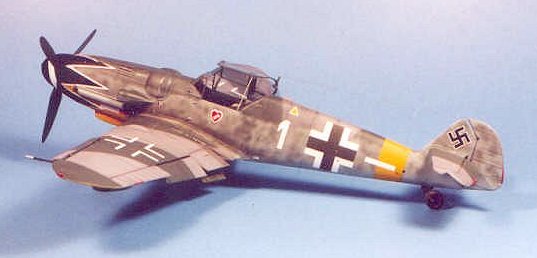
Hasegawa 1/32 Bf-109G-6
|
KIT # |
8067 |
|
PRICE: |
$39.95 |
|
DECALS: |
Two aircraft |
|
REVIEW & |
|
|
NOTES: |
AFTERMARKET SETS USED: |
|
HISTORY |
What can be said about the Messerschmitt Bf-109 that hasn't been said a thousand times before? Outside of the Yak series of fighters, no other fighter was ever produced in such numbers 33,000 between first prototype in 1935 and final production ten years later. Of these, the single most-produced sub-type was the Bf-109G-6, known to its pilots as the "Beule," or "bump," for the excrescences that blossomed from the airframe to fair over the breeches of the two 13mm machine guns in the fuselage, and the fairings for the enlarged tires necessary to take the increased weight of the airplane. The G-6 sub-type was the first attempt to create a new "production standard" airplane to replace the numerous varying sub-types that were in production, and first appeared in the summer of 1943; it would still be in combat at the end of the war.
From the G series onward,
the design was really played out. Major increases in power were almost
cancelled out by major increases in weight for increased armament, and the
G-series 109 had to be flown at full throttle in the landing circuit. Of the
major fighters of the war - the Bf-109, the Spitfire, the Fw-190, the P-47 and
the P-51, the Messerschmitt product was the most backward aerodynamically from
the outset, as revealed by its use of external mass balances on the ailerons.
As Edgar Schmued, designer of the P-51 and a product of the Messerschmitt
company once told me, "After the 109E was put into
 production, it was clear to
me that if one wished to participate in the development of a truly world-class aeroplane, one would have to do it elsewhere than at Messerschmitt." (We should
all be thankful that Schmued was so dismissive of the airplane, since he came to
the United States and designed the Messerschmitt-killer, the P-51 Mustang.)
production, it was clear to
me that if one wished to participate in the development of a truly world-class aeroplane, one would have to do it elsewhere than at Messerschmitt." (We should
all be thankful that Schmued was so dismissive of the airplane, since he came to
the United States and designed the Messerschmitt-killer, the P-51 Mustang.)
In truth, the Bf-109 owes its reputation more to force majeure and the ability of some outstanding pilots than to any intrinsic quality of the airplane itself. The Fw-190 was an airplane that was better than the Messerschmitt on all qualities other than altitude performance; for combat above 24,000 feet - which is where the Battle of Germany took place between 1943-45 - the Luftwaffe didn't have anything else it could use. In fact, more pilots were killed in the 109 from landing and takeoff accidents than were lost in combat, and nearly as many 109s were lost due to its vicious takeoff characteristics and difficult landing technique as were shot down in combat. Gunter Rall, the number-three ranking Luftwaffe experte once told me that there were only two kinds of Messerschmitt 109 pilots: those who had survived a ground loop and those who hadn't. The landing gear was weak, the wing had an unfortunate tendency to come off in high-g combat maneuvering, and the design of the cockpit forced the pilot to close the canopy on startup, which severely restricted his view during the two most dangerous parts of a flight in the fighter - takeoff and landing. The Bf-109 became famous in spite of itself.
You might gather from the above that I don't like the 109. Not true! Admittedly, the airplane doesn't interest me one whit from a design or technical standpoint, but the history its pilots wrote from its cockpit interests me very much.
 There is none of them
more famous than Erich Hartmann, the all-time ace of aces of all air forces in
all wars in history, with 352 kills. This score is even more amazing when one
considers that he did not arrive at the front until the summer of 1942 - well
past the "glory days" of the Luftwaffe. Once he got over his "buck fever" - he
turned tail and ran when he entered his first combat - Hartmann was a gifted
pilot in a target-rich environment. He was always outnumbered by his Soviet
foes. Flying three and four missions a day every day, he had over 100 victories
by the conclusion of the Battle of Kursk in July 1943 - a year after he entered
combat - and another 100 by the end of 1943. Hartmann was also fortunate to be
flying against an enemy whose political system did not encourage the
individualism that is crucial for a successful fighter pilot; additionally, he
became an expert at getting around the armor and knocking down the Il-2
Shturmovik, an airplane so unmaneuverable it couldn't get out of its own way.
However, when he flew against the Western allies in July 1944 over Romania, he
demonstrated he could take on the best the USAAF had to offer when he shot down
six P-51s of the 4th Fighter Group - one of the elite units of the Eighth Air
Force - when they were involved in the first "shuttle missions" from England to
Russia. One of those victims was Ralph "Kid" Hofer, one of the leading aces of
the 4th.
There is none of them
more famous than Erich Hartmann, the all-time ace of aces of all air forces in
all wars in history, with 352 kills. This score is even more amazing when one
considers that he did not arrive at the front until the summer of 1942 - well
past the "glory days" of the Luftwaffe. Once he got over his "buck fever" - he
turned tail and ran when he entered his first combat - Hartmann was a gifted
pilot in a target-rich environment. He was always outnumbered by his Soviet
foes. Flying three and four missions a day every day, he had over 100 victories
by the conclusion of the Battle of Kursk in July 1943 - a year after he entered
combat - and another 100 by the end of 1943. Hartmann was also fortunate to be
flying against an enemy whose political system did not encourage the
individualism that is crucial for a successful fighter pilot; additionally, he
became an expert at getting around the armor and knocking down the Il-2
Shturmovik, an airplane so unmaneuverable it couldn't get out of its own way.
However, when he flew against the Western allies in July 1944 over Romania, he
demonstrated he could take on the best the USAAF had to offer when he shot down
six P-51s of the 4th Fighter Group - one of the elite units of the Eighth Air
Force - when they were involved in the first "shuttle missions" from England to
Russia. One of those victims was Ralph "Kid" Hofer, one of the leading aces of
the 4th.
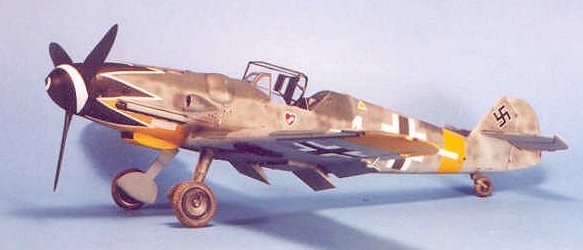
It was no choice at all when it came to build this model that I would choose to do the most famous 109 ace's most famous 109.
|
THE KIT |
1/32 scale has been largely neglected by the mainstream kit manufacturers over the years. One of the few to have paid any attention to creating models in this scale was Hasegawa, which created several 30 years ago that were at the cutting edge of the state of the art, and still make up into impressive models with a modicum of effort on the modeler's part. Still, the last new kit by Hasegawa in this scale before the release of this new Bf-109G-6 was well over 20 years ago.
It is interesting that the two leading kit manufacturers in the world have chosen to release a major new-mold, new-technology kit in this scale within a matter of months of each other. Tamiya's 1/32 A6M5b Zero-sen comes with all the bells and whistles there in the box: a super-detailed cockpit and engine, landing gear in which the oleos actually operate, etc. The price of nearly $75 reflects this. Hasegawa has taken the opposite tack with their Bf-109: at $39 it is only marginally more expensive than the company's 1/48 single-engine aircraft kits, and while it makes up into a beautiful model straight out of the box, has no claim to the level of detail that is offered by the Tamiya Zero.
 Both companies know their
market. Most modelers will not be likely to have more than one 1/32 A6M Zero in
their collection - let's face it, the color choices are green and grey, or one
can turn it upside down and do grey and green, and colorful unit markings are
non-existent - so it behooves Tamiya to give the modeler the opportunity to
construct a "definitive" model from the outset. To the contrary, the Bf-109
offers a plethora of possible camouflage schemes and markings, and it is likely
that many who build this kit will build more than one; thus a kit that looks
basically good at a price that encourages repeat business is going to meet the
demand for achieving these possibilities.
Both companies know their
market. Most modelers will not be likely to have more than one 1/32 A6M Zero in
their collection - let's face it, the color choices are green and grey, or one
can turn it upside down and do grey and green, and colorful unit markings are
non-existent - so it behooves Tamiya to give the modeler the opportunity to
construct a "definitive" model from the outset. To the contrary, the Bf-109
offers a plethora of possible camouflage schemes and markings, and it is likely
that many who build this kit will build more than one; thus a kit that looks
basically good at a price that encourages repeat business is going to meet the
demand for achieving these possibilities.
For about the same ultimate price as the Tamiya Zero, the modeler who wants to make a "definitive" Bf-109G-6 from this kit can do so, by purchasing the many, many aftermarket sets that are now and will become available for use with the basic kit. Not only are the resin manufacturers operating at maximum capacity, but decal manufacturers are too; no two units of the Luftwaffe had similar markings on their airplanes.
As regards what exactly is in the box, modelers have had access to first-look reviews at many sites and many magazines already. The experten of the 109 modeling community have already declared the basic kit to be the most accurate model of this airplane ever released. Opening the box, I was struck by the fact it looked like a box for a 1/48 Hasegawa kit, only bigger.
Having been provided with the Cutting Edge aftermarket sets for the cockpit of the 109, and the exterior set, along with a selection of decals for the model from Eagle Cals, I decided to build a 109 "with all the bells and whistles," and compare the result with what can be obtained out of the box. Let's proceed.
|
CONSTRUCTION |
While it is obvious that the 109 cockpit "out of the box" is acceptable for those who do not need total detail, the Cutting Edge cockpit does provide that "extra edge" of detail that convincingly adds to the realism of the model. As is usual with Cutting Edge products, the resin is crisply molded, and not so brittle one is going to ruin it holding it a bit tight while cutting off the resin blocks, which was where I first began.
I then painted the cockpit overall RLM66, then painted the details according to the instructions that come with the Cutting Edge set. In this scale, even with there being more detail than you get with a 1/48 kit, all the work was mostly taking the time to do the painting, and most of it can be done with a 000 brush, though I did use my 00000 brush for some of the smaller items.
 I used the Cutting Edge
3-part instrument panel. However, were I doing this again, I would use the kit
panel with the instrument decals individually separated, since in the end it is
very hard to see the instrument faces in the Cutting Edge set; it is likely more
accurate, but the overall look would be better going with the kit panel.
I used the Cutting Edge
3-part instrument panel. However, were I doing this again, I would use the kit
panel with the instrument decals individually separated, since in the end it is
very hard to see the instrument faces in the Cutting Edge set; it is likely more
accurate, but the overall look would be better going with the kit panel.
While the cockpit was being painted in stages and while the paint was drying, I proceeded with sub-assemblies for the airframe.
All the kit parts fit beautifully, and I only used a very little bit of Mr. Surfacer for the centerline seam of the fuselage, and the leading edges of the wings. Following the instructions is easy and there are no "glitches."
I cut off the kit rudder and elevators, since I was going to use the positionable parts from the Cutting Edge exterior set. These are very nice bits of resin. I will say that any modeler with experience in cutting off control surfaces and posing them on a 1/48 model could achieve a look very close to what I had with the use of these aftermarket parts, but particularly for the guy who has recently returned to the hobby and isn't that much of a "craftsman" with a razor saw, the aftermarket parts guarantee a good look without glitches.
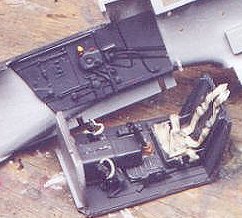 Returning to the cockpit,
I used the new Cutting Edge positionable resin seatbelts. These are very
different from photo-etch belts, and require a lot of "fiddling." Additionally,
one set of belts for one cockpit are as expensive as an Eduard fret that has
enough belts for 8 models. As you can see from the photo of the unassembled
cockpit here, though, the end result is highly realistic. If you're only going
to do one of these kits as a detailed model, these belts add greatly to the
overall look of the final result.
Returning to the cockpit,
I used the new Cutting Edge positionable resin seatbelts. These are very
different from photo-etch belts, and require a lot of "fiddling." Additionally,
one set of belts for one cockpit are as expensive as an Eduard fret that has
enough belts for 8 models. As you can see from the photo of the unassembled
cockpit here, though, the end result is highly realistic. If you're only going
to do one of these kits as a detailed model, these belts add greatly to the
overall look of the final result.
With kit cockpit wall detail sanded off, the resin cockpit walls were glued in position before the fuselage was glued together. I had previously glued each half of the tail to its respective fuselage part and allowed that to set up. The fuselage went together easily, and I popped in the cockpit floor and rear bulkhead. I glued the battery box from the Cutting Edge set in place since the 109 I was creating a model of had been equipped with that.
 After the fuselage had
set up for about an hour, I attached the wings and tail and oil cooler. I glued
the flaps and the upper part of the moveable rear portion of the wing radiators
in position and allowed the model to set up overnight. Construction was
complete.
After the fuselage had
set up for about an hour, I attached the wings and tail and oil cooler. I glued
the flaps and the upper part of the moveable rear portion of the wing radiators
in position and allowed the model to set up overnight. Construction was
complete.
Overall, this entire effort described above took about 6 hours of actual work over about 10 hours while paint dried and parts set up. Admittedly, I have 30 years experience putting these things together and much of that effort is now second nature to me - your mileage and performance may vary. But even if you are someone who needs to read the instructions twice and test fit the parts three times before gluing once, this is an easy model to build.
|
PAINT & DECALS |
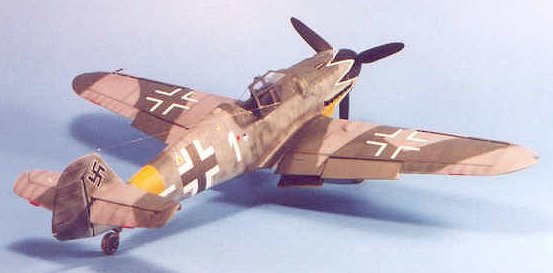
Overall, painting the
model was easier than would be the case for a 1/48 Bf-109, just because of its
size. After I pre-shaded the model in the standard way, I started with the
yellow theater recognition markings. When they were dry I masked them off and
then freehanded the camouflage, starting with RLM76. I then applied the RLM
02 blotches to the fuselage camouflage, then painted the RLM75 areas (for which
I used Gunze-Sanyo H-75 Dark Sea Grey, which I think is more accurate than the
Gunze "RLM75" color) and applied blotches to the fuselage. I used the
Gunze-Sanyo H-68 "RLM74" with a
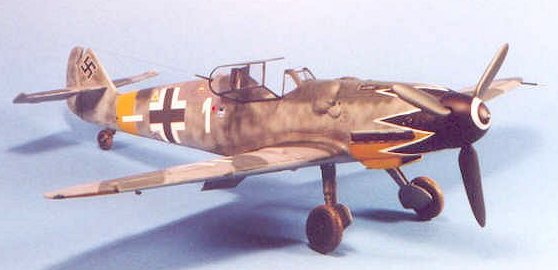 bit of H-59 "IJN Green" added to get the proper
tone. In each case, once the basic color was laid down, I lightened the paint
with some Gunze-Sanyo "Light Gull Grey" and faded the scheme down. This was
particularly the case with this airplane, since the painting notes in the Eagle
Cals said the camouflage scheme appeared considerably lightened. The Eagle Cals
instructions call for a different camouflage scheme than I used (which is the
"standard" 109G scheme), but from the photos supplied I didn't see that that was
right (sorry, Jerry, I know you're the markings experte, but I went with what it
looked like to me - photo interpretation is an art).
bit of H-59 "IJN Green" added to get the proper
tone. In each case, once the basic color was laid down, I lightened the paint
with some Gunze-Sanyo "Light Gull Grey" and faded the scheme down. This was
particularly the case with this airplane, since the painting notes in the Eagle
Cals said the camouflage scheme appeared considerably lightened. The Eagle Cals
instructions call for a different camouflage scheme than I used (which is the
"standard" 109G scheme), but from the photos supplied I didn't see that that was
right (sorry, Jerry, I know you're the markings experte, but I went with what it
looked like to me - photo interpretation is an art).
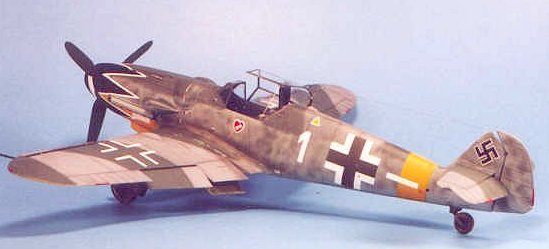
Cutting Edge had provided several sets of their "Black Magic" masks for the camouflage, and these allow you to do the five different camouflage patterns identified with the 109. Like I said above, I have been doing this awhile, and didn't feel the need. That said, the less-experienced modeler will find these very helpful and worth the money when they help you create a really accurate camouflage scheme. Were I doing a 109 with the famous "zig-zag edge" camouflage, I think I would have used that mask myself.
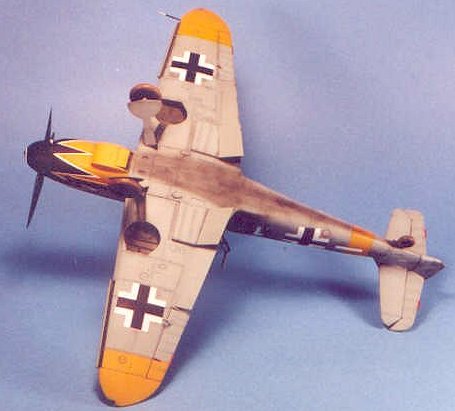
I painted the spinner black and the blades RLM70, then finished the wheel wells in RLM02, with the wheel well walls in Tamiya XF-68 "NATO brown" to simulate the leather inner covers used. By the way - the wheel wells, which are part of the lower half of the wing, do not meet the upper part of the wing. I found that the slight gap was easily filled in with Elmer's white glue prior to painting.
 I am personally of the
opinion that Eagle Cals are the best decals you can get. The research Jerry
Crandall puts into each is impeccable, and it's my experience they are as
accurate as one can hope for, sixty-odd years after the fact with mostly fuzzy
black and white photos to use for a guide. I consider them far superior to
Eagle-Strike and Aeromaster as regards accuracy. Additionally, they are printed
by MicroScale, while Eagle Strike and many others are now printed by Cartograph
and are much thicker than MicroScale decals are.
I am personally of the
opinion that Eagle Cals are the best decals you can get. The research Jerry
Crandall puts into each is impeccable, and it's my experience they are as
accurate as one can hope for, sixty-odd years after the fact with mostly fuzzy
black and white photos to use for a guide. I consider them far superior to
Eagle-Strike and Aeromaster as regards accuracy. Additionally, they are printed
by MicroScale, while Eagle Strike and many others are now printed by Cartograph
and are much thicker than MicroScale decals are.
The markings information in the Eagle Cals sheet is very helpful, and I had no trouble putting things where they belonged. One thing: even if they are printed by MicroScale, they are thicker than 1/48 scale decals, and I found at the end of the application process that I needed to run my X-acto through the decals along panel lines and then hit them with a "heavy artillery barrage" of a coat of Solvaset, after which they melted into the surface perfectly.
Please note: with quality decals like these, do not lay down the "final barrage" if you have used the lighter solvents to get them as "down" as possible, or you are very likely to end up in "wrinkle city" and the air over the workbench will turn a deeper shade of purple than you have seen before as you use words to describe the situation that you didn't know you knew.
After the decals set up overnight, I washed off the solvent residue and gave the model another coat of Future.
Final Assembly:
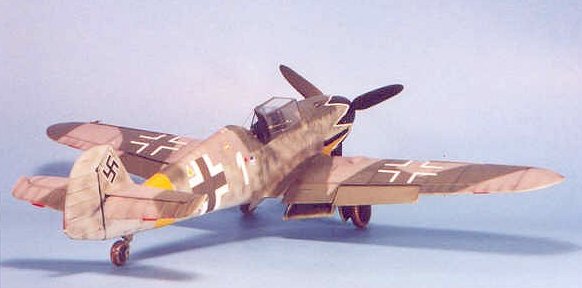
I painted the exhaust areas with Tamiya "Smoke" and applied some "dings" in various of the usual locations. Since the airplane was flown by a top ace and given the best treatment possible, I went over other areas that might have been "dinged" with daubs of RLM02, which the ground crew would have done to fight corrosion. Thus, the model looks quite "clean" overall. I shot several coats of thinned Testors Dullcote to get a flat finish with a slight sheen to it, which is the way German paints were at this period of the war.
I used the Cutting Edge tail wheel, but I have to say that in the end it does not look that different from what I could have gotten with the kit tail wheel, which would also be stronger than this is. I then attached the landing gear and propeller.
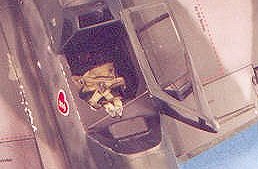
 The Erla-Haube:
The one problem this particular model had presented at the outset is the real airplane was equipped with the Erla-Haube clear-vision canopy, aka the "Galland Hood," and the kit only comes with the heavy-framed standard canopy. The upcoming Bf-109G-14 release will have the Erla-Haube, but in either case the kit canopies are really too thick for the proper look. Fortunately, Tore Martin at Falcon made a 1/32 Erla-Haube canopy several years ago, and has re-cast more now that the Hasegawa kit is out. This canopy is a bit long to fit the Hasegawa kit if you want it closed (but then, why would you?), but if it is posed open and trimmed slightly, no one will notice the "fit problem." I glued the short antenna mast to the canopy, and glued the canopy in position. The final bit was to make the antenna using nylon "repair thread." I created the insulators with a drop of white glue.
|
CONCLUSIONS |
This entire model was done as a "weekend project." I started it on a Friday evening and had the decals on and the model finished late Sunday evening. Admittedly, I am single and do not have the distraction of soccer games and "honey-do's," but even if your modeling is limited to a couple of hours on weekends, this is a model you can have completed in well under two months.
The kit is beautifully engineered, and goes together so well that even the "average modeler," if they take advantage of such things as the Black Magic masks, can have a museum-quality model sitting on their shelf.
I haven't been converted to the "darker dark side" of 1/32 modeling, but I suspect I may do more than one of the big Hasegawa 109s as they come out over the next few years. The engineering of the kit makes it clear that there will ultimately be a 1/32 kit for every version of the later 109 from the Bf-109F-2 through the Bf-109K-4. At the relatively modest price this kit is being sold at, it is one of the real bargains available in modeling today.
Copyright ModelingMadness.com
Thanks to HobbyLinkJapan for the review kit, and to Meteor Productions and Eagle Cals for the aftermarket items.
If you would like your product reviewed fairly and fairly quickly, please contact the editor or see other details in the Note to Contributors.