Hasegawa 1/72 Fw-190F-9 'Panzerblitz 1'
|
KIT # |
51632 |
|
PRICE: |
$23.98 |
|
DECALS: |
Several options |
|
REVIEWER: |
Scott Van Aken |
|
NOTES: |
Includes metal prop, fan, rockets, and rack. |
|
BACKGROUND ON THE PANZERBLITZ 1 |
 If you can say one thing about the scientists of the Third Reich
it is that they
had very fertile imaginations and came up with a huge number of advances
is weaponry. In fact, it was thanks to these research of these German
scientists that the then-Allies were able to make such large and
relatively swift advances in many area of weapons development, and that
included aeronautics and the newly emerging area of rocket and spacecraft
design. It is quite fortunate for all of us that many of the more potent
weapons fell into the 'too little; too late' category!
If you can say one thing about the scientists of the Third Reich
it is that they
had very fertile imaginations and came up with a huge number of advances
is weaponry. In fact, it was thanks to these research of these German
scientists that the then-Allies were able to make such large and
relatively swift advances in many area of weapons development, and that
included aeronautics and the newly emerging area of rocket and spacecraft
design. It is quite fortunate for all of us that many of the more potent
weapons fell into the 'too little; too late' category!
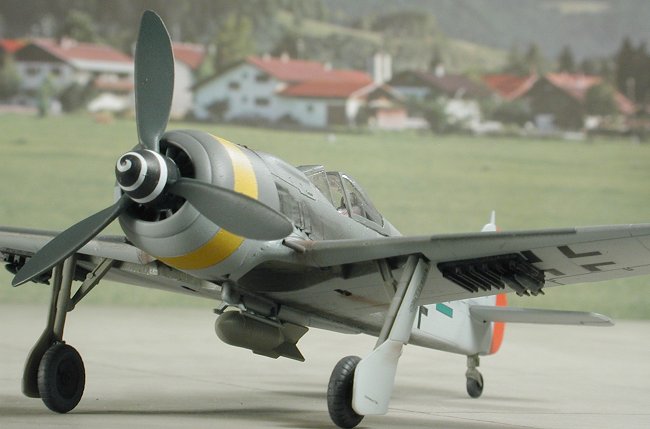
One of those was the Panzerblitz 1 rocket. Developed by Deutsche Waffen und Munitionsfabrik, the Panzerblitz (Pb1) was a more successful missile than the Panzerschreck 1 that preceded it. The rocket consisted of an 80mm mortar grenade (Gerat M8 -Device M8) mated with the R4M air-to-air missile. In 1 Sept 1944, four Pb1 launch rails were installed under the wing of Fw-190F-8 Werke Number 733705 for trails. Tests showed the rockets could be launched from about twice the distance from the target (about 200 yards) as the Panzerschreck but with a maximum target approach speed of 305 mph, the aircraft was vulnerable to ground fire.
 The number of rockets fitted beneath each wing rose to six and finally
standardized on eight very late in the war. Not surprisingly, the smaller warhead
penetrated only 90mm of steel. At first, the rockets were fired in two
salvos, but later launched in pairs. On 1 January, 1945, the pilot of an
Fw-190F-8, equipped with the Pb 1, crash landed near Asche, Holland,
giving the Allies their first glimpse of the new weapon system.
The number of rockets fitted beneath each wing rose to six and finally
standardized on eight very late in the war. Not surprisingly, the smaller warhead
penetrated only 90mm of steel. At first, the rockets were fired in two
salvos, but later launched in pairs. On 1 January, 1945, the pilot of an
Fw-190F-8, equipped with the Pb 1, crash landed near Asche, Holland,
giving the Allies their first glimpse of the new weapon system.
Production of the Fw-190F-8/Pb 1 received high priority and, by February 1945, 115 aircraft were so equipped. Meanwhile, the infamous SS-controlled factory near Brno, Czechoslovakia, were producing missiles at the rate of 16,000 a month. By February, 1945, some 43,850 missiles had been manufactured.
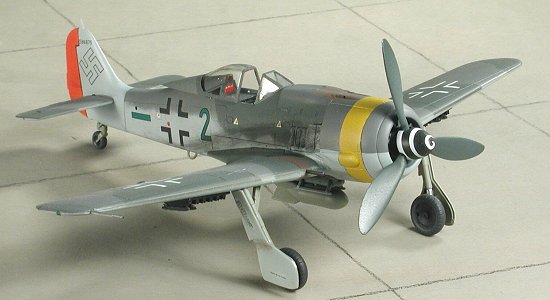
The type was replaced by Panzerblitz 2, a modified R4M with a Panzerschreck warhead, capable of penetrating 180mm of armor, but that is another story. The Panzerblitz 1 system also equipped a small number of BMW 801 TS powered Fw-190F-9 aircraft that started leaving the Arado and NDW production lines in October of 1944. In January 1945, all new build Fw-190s started receiving the taller 'blown' canopy. One of those aircraft is the subject of this review.
|
THE KIT |
For a look at what comes in the box and a brief history, please visit the preview.
|
CONSTRUCTION |
Anyone who wants a really nice 1/72 Hasegawa Fw-190 needs to spend the few extra dollars and get the True Details interior set (#72454). The Hasegawa interior is rather basic and cries for a replacement. No need to spend more than the $4-5 that this set costs. I should also mention that this kit is one of those 'special boxings' of which Hasegawa is so fond. Though dated 1994, the local hobby shop still has at least one of them on the shelves.
First thing to do is to make the few modifications needed
to the wings. That means removing the shell ejector chutes from the
bottom of the wing and sanding off the little shield for the outer wing
guns. These will be filled once the wing halves are glued together.
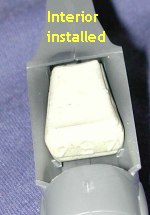
Inside the fuselage, no adjustments will have to be made for the resin
interior. In fact, other than rounding off its
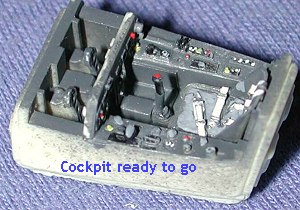 bottom, you need make no
adjustments to the resin plug. No need to cut it off as it won't
interfere with installation at all.
bottom, you need make no
adjustments to the resin plug. No need to cut it off as it won't
interfere with installation at all.
You will have to remove the plug from the bottom of the
seat, but the instrument panel bits can be carefully removed with a sharp
scalpel blade. The lower instrument panel is reversible depending on if
you are doing an A/F or a D version. Actually, in this scale it makes
little difference as the variations can barely be seen! The kit control
stick is 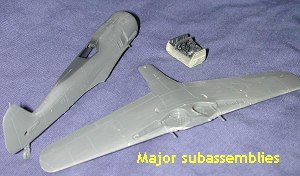 needed so one must cut that off. The instructions for the
interior set show just how to do all this. The interior is basically RLM
66 with black instruments. Seat belts are off white with the control
stick boot being a leather color. I painted the seat cushion a lighter
grey just to give some contrast. If you wish, you can glue the fuselage
halves together first then insert the upper instrument panel and then the
tub from the underside. That is what I did.
needed so one must cut that off. The instructions for the
interior set show just how to do all this. The interior is basically RLM
66 with black instruments. Seat belts are off white with the control
stick boot being a leather color. I painted the seat cushion a lighter
grey just to give some contrast. If you wish, you can glue the fuselage
halves together first then insert the upper instrument panel and then the
tub from the underside. That is what I did.
 When I glued the fuselage halves together, I added the
upper instrument panel and then glued on the upper cowling. Then I used a
bit of Mr. Surfacer 500 to take care of the inevitable seams that always
seem to show up. The interior was then sprayed RLM 66 to match the
cockpit tub. No sidewall detail is provided in the kit nor in the resin
set. I now had the three major subassemblies ready to go. The resin
cockpit fit perfectly into the fuselage as I slid it in from the bottom.
When I glued the fuselage halves together, I added the
upper instrument panel and then glued on the upper cowling. Then I used a
bit of Mr. Surfacer 500 to take care of the inevitable seams that always
seem to show up. The interior was then sprayed RLM 66 to match the
cockpit tub. No sidewall detail is provided in the kit nor in the resin
set. I now had the three major subassemblies ready to go. The resin
cockpit fit perfectly into the fuselage as I slid it in from the bottom.
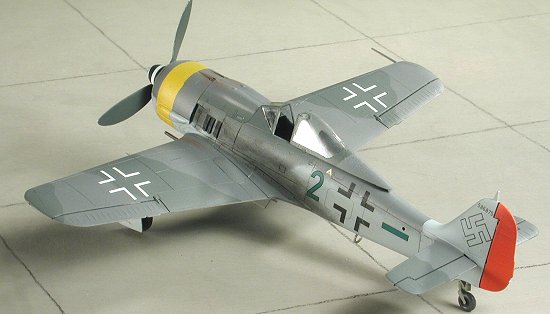
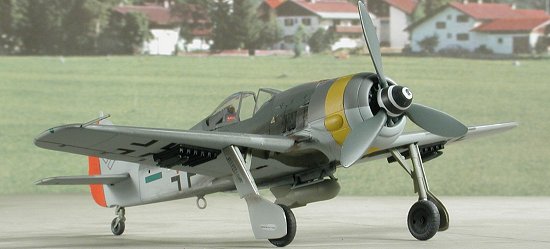
I next glued on the wings and the tailplanes. I had to do some slight trimming to the forward section of the cockpit tub. Not enough to get to where you need to remove the resin pouring stub, but enough to clear the aft portion of the wheel wells. The fit is very tight and pretty close to filler free. I did use a touch on the very back and the very front. The tailplanes were a perfect fit. Then it was on to the canopy. In my mind, this is the biggest are of concern. The windscreen is a touch too narrow to fit and so when one glues it in, one has to push it down over the anti-glare shield. Not enough to cause any problems with cracking, but one where gluing it is troublesome. It is also difficult to remove the clear bits from the sprue as they are so finely done that it is easy to gouge the plastic. I also found that the frame lines are very faint, making it difficult to mask. I tacked on the canopy portion in preparation for painting. The head rest will be added in a final step. I should also mention that the kit only provides the 'blown' hood so doing an earlier F-8 is not possible. Besides, why pay the extra bucks if you aren't going to do what is kitted?
|
COLORS AND MARKINGS |
With basically a full airframe, it was time to start
painting. Finding aftermarket sheets for the F-9 variant is quite
difficult in this scale. The only sheet I found was
Aeromaster 72-053,
which has markings for two F-9s from unknown units. They are about the
same as what comes with the kit, though will probably work better than
the kit decals. 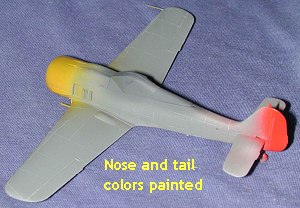
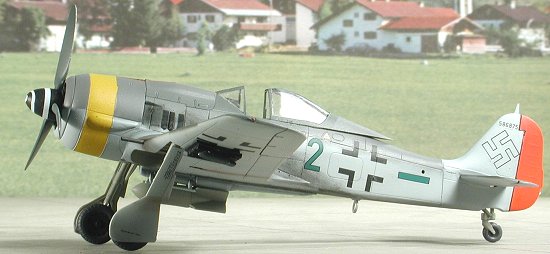
First thing I did was to spray the canopy area with RLM 66 and then the nose and rudder with white as a basis for the colors that will later be applied. I chose the version with the red rudder just to add to the color of the model. The nose was, of course, painted yellow. I used Xtracolor for the yellow and Humbrol for the red and purely because I had them already mixed up and ready to go.
Those were then masked off and I got down to applying the rest of the camouflage. That meant RLM 76 on the underside using Testors Model Master enamels for the first round. I then masked off the underside of the tailplanes and sprayed RLM 75 to the entire upper surface. When dry, that was masked off and the RLM 74 was added. You may wonder why the masking instead of free-handing the camo scheme. The truth is that, to me, masking makes for a better looking model. Yeah, I could have freehanded the scheme, but it wouldn't have looked as good and the overspray would have been a bit more than I was willing to accept. I did do some freehand spraying on the sides, but it was minor compared to the rest of the kit. This aircraft has no mottling on the sides so those of you who have a problem with mottling in this scale have a scheme you can easily do.
 With all the painting done, I removed the masking and was
pleased by not having any glitches. Then the kit was returned to the work
bench where the main landing gear was glued in place. This is a bit loose
so one has to be careful to get the gear just where one wants it. I
usually mess this part up, but I think this one looks the part. The kit
was then sprayed with several light coats of Future to provide a gloss
for the decals.
With all the painting done, I removed the masking and was
pleased by not having any glitches. Then the kit was returned to the work
bench where the main landing gear was glued in place. This is a bit loose
so one has to be careful to get the gear just where one wants it. I
usually mess this part up, but I think this one looks the part. The kit
was then sprayed with several light coats of Future to provide a gloss
for the decals.
The Aeromaster decals went on without a hitch and I used the Microsol/set system to apply them. They stuck well; even the little ones (which may well have not been applied to a late war aircraft) and the spinner spiral, which usually gives me some trouble.
|
FINAL ASSEMBLY |
 Before applying the last flat coat a lot of bits have to
be glued in place. I should mention that I painted the wheel wells RLM 02
and the gun barrels with Testors Gunmetal Metalizer. The wheels were
Black with Weathered Black for the tires, both colors being from the
Floquil line. The spinner was also painted black prior to adding the
decal. Mounts for the Panzerblitz rockets were painted Black and then
superglued to the lower wing. You'll note that they partially cover the
lower insignia so it is important to wait until near the end to glue this
in place. This particular mount is for the twelve rocket deal and not the
very late sixteen rocket set-up.
Before applying the last flat coat a lot of bits have to
be glued in place. I should mention that I painted the wheel wells RLM 02
and the gun barrels with Testors Gunmetal Metalizer. The wheels were
Black with Weathered Black for the tires, both colors being from the
Floquil line. The spinner was also painted black prior to adding the
decal. Mounts for the Panzerblitz rockets were painted Black and then
superglued to the lower wing. You'll note that they partially cover the
lower insignia so it is important to wait until near the end to glue this
in place. This particular mount is for the twelve rocket deal and not the
very late sixteen rocket set-up.
Gear doors have to be trimmed (there is a mark in there
showing where to cut) if used in the down position. That always takes a
bit of fussing to get them just right. I also glued the DF loop antenna
and the bomb to the underside of the fuselage. Then I did whatever
touch-up was needed and 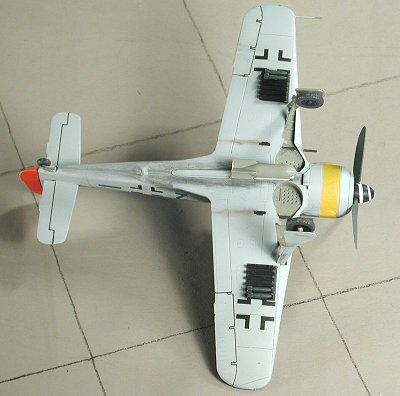 gave it a coat of clear flat acrylic. Following
that, I glued on the Panzerblitz rockets. Well, I tried to glue on the Panzerblitz rockets. You see, they are not very good castings. In fact,
they are pretty poor. They have small tabs that are supposed to fit into
the slots of the rocket rails. Most of the tabs are way too wide. I
eventually got two on each side after trying them all and that is where I
stopped. These are supposed to be fired in pairs and I figured that with
the 250 kg bomb, four (vice twelve) was the max load. I removed the
masking from the clear bits, glued the armor in the canopy and glued the
canopy open. Just a note that for you who want to add the long wire
antenna, be sure to have it drape over the rear fuselage with the canopy
open. The 'blown' hood had no tensioner in it like the older one had. I
added the exhaust stain (rather heavy on late war planes) and the
formation lights. Final bit was to paint the rockets RLM 70 and I was
done.
gave it a coat of clear flat acrylic. Following
that, I glued on the Panzerblitz rockets. Well, I tried to glue on the Panzerblitz rockets. You see, they are not very good castings. In fact,
they are pretty poor. They have small tabs that are supposed to fit into
the slots of the rocket rails. Most of the tabs are way too wide. I
eventually got two on each side after trying them all and that is where I
stopped. These are supposed to be fired in pairs and I figured that with
the 250 kg bomb, four (vice twelve) was the max load. I removed the
masking from the clear bits, glued the armor in the canopy and glued the
canopy open. Just a note that for you who want to add the long wire
antenna, be sure to have it drape over the rear fuselage with the canopy
open. The 'blown' hood had no tensioner in it like the older one had. I
added the exhaust stain (rather heavy on late war planes) and the
formation lights. Final bit was to paint the rockets RLM 70 and I was
done.
|
CONCLUSIONS |
A very nice model and I can see why many builders like it. Only real problem (other than the rockets) is the lack of really strong frame lines in the canopy. The kit builds very well and this one took about a week from start to finish.
December 2003
#1295 in a series
|
REFERENCES |
Monogram Close-up #8: Fw-190F, Monogram Publications, 1986
Copyright ModelingMadness.com. All rights reserved. No reproduction in part or in whole without express permission from the editor.
If you would like your product reviewed fairly and fairly quickly, please contact the editor or see other details in the Note to Contributors.