|
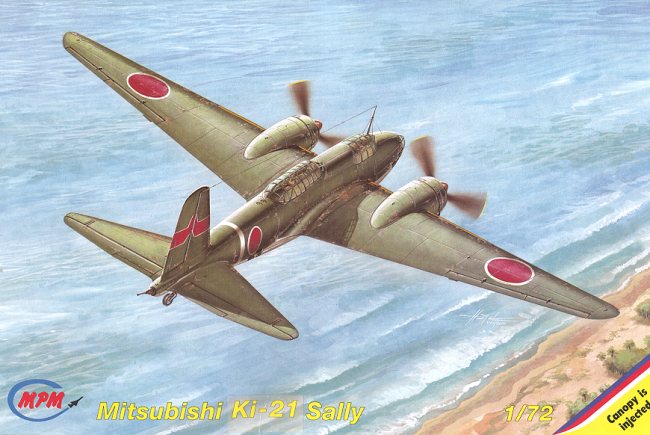
KIT # |
72092 |
|
PRICE: |
$46.98 |
|
DECALS: |
See Review |
|
REVIEW : |
|
|
NOTES: |
short run kit with resin parts |
|
HISTORY & THE KIT |
To take a look at what is in the box and to get a bit of background, please follow this link.

|
CONSTRUCTION |
Ever get one of those models where you immediately want to start building it? Well, for me, this is one of those kits. I just don't know why, but it is. If you read the preview, (see link above), then you know that this is a short run kit. That means that the first steps you'll take are to clean up the parts you will be initially putting together. For this kit, that meant removing the rather large ejector stubs from the fuselage, wings and tailplanes. If you have a set of flush-cutting sprue clippers, it will make pretty quick work of these stubs. Then there will just be a small bit that needs sanded smooth.
 Once those were removed, the sprue attachment points were sanded
smooth as many of these are on the edges and if not removed, won't allow the
pieces to be glued together. The rough edges were then sanded or scraped smooth
on the wings, tailplanes, fuselage halves and the engine nacelle halves. Once
done, the wings, tailplanes and engine nacelles were glued together and set
aside to dry.
Once those were removed, the sprue attachment points were sanded
smooth as many of these are on the edges and if not removed, won't allow the
pieces to be glued together. The rough edges were then sanded or scraped smooth
on the wings, tailplanes, fuselage halves and the engine nacelle halves. Once
done, the wings, tailplanes and engine nacelles were glued together and set
aside to dry.
During this time, I started to cut the resin parts off their blocks. Take care with the cockpit as it is easy to break off some of the more delicate parts on the floor. I know this from experience. The two seats, instrument panel, lower bombardiers panel and control columns were carefully cut away. Take particular care with the control columns so as not to break the control wheels. Careful sawing and sanding will get these pieces off the blocks. Once those bits were all removed and cleaned up, they were glued into the cockpit. At this same time, a couple of radio panels was glued to the left interior wall. It was all then taken to the paint shop in preparation for painting.
The next parts to get my attention were the wings, tailplanes
and engine nacelles. These had the edges sanded smooth and any seams filled with
 either Mr. Surfacer 500 or normal filler.
Starting with the nacelles, the inserts for the forward portion of the wheel wells were cut from the resin blocks and attempts were made to install them. They needed to have the upper portions trimmed a bit as the parts as designed do not have the same angle on the upper section as in the nacelle. These were glued in with superglue as are all the resin bits.
Once the inserts were dry, I tried to install the nacelles on the wings.
The upper section of the wing has a small nacelle part that is supposed to slot
into the nacelles. It doesn't fit. The problem is that the plastic is too thick
on the nacelles and the upper section of the nacelle is a bit too small in
radius compared to the same bit on the upper wing. The result is that the upper
glue join on the nacelle will undoubtedly split
 when you try to install it.
Thinning the inside of the nacelle is a big help, but I had to result in using
superglue to fill in the rather large gap that was there. No one ever said that
short run kits were slap-together models. The nacelles were clamped to the wings
to allow the glue to dry relatively gap free. After they had dried, a small
amount of filler was needed for a few gaps. That was then sanded smooth and the
small section of wing between the nacelle and fuselage was glued on. Why this
was not included as part of the wing half I do not know. Anyway, the fit isn't
the greatest, but it isn't anything beyond those who have reached this level of
skill.
when you try to install it.
Thinning the inside of the nacelle is a big help, but I had to result in using
superglue to fill in the rather large gap that was there. No one ever said that
short run kits were slap-together models. The nacelles were clamped to the wings
to allow the glue to dry relatively gap free. After they had dried, a small
amount of filler was needed for a few gaps. That was then sanded smooth and the
small section of wing between the nacelle and fuselage was glued on. Why this
was not included as part of the wing half I do not know. Anyway, the fit isn't
the greatest, but it isn't anything beyond those who have reached this level of
skill.
Turning back to the interior, all of the parts were painted with 'bamboo', a sort of yellowish green primer. There is no artifact of a Ki-21 around from which to get paint samples, so it could just as easily have been a dark green or even a grey green. Japanese interior colors is something that is a mystery to many of us! Anyway, once dry, the various parts had other bits picked out in various colors to add some interest.
While this was drying, I went to put the small square
transparency in the aft fuselage 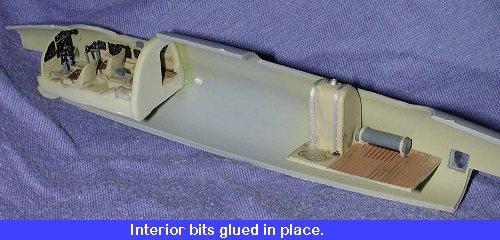 section.
The instructions show it fitting from the inside. Well, if that is done, then
there will be a very deep depressions from the outside until the clear bit is
reached. Not very aerodynamic. The opening was enlarged with a square file until
the transparency could be fit from the outside. It was then glued in place. The
interior bits were then glue in place on the right side using superglue. The fuselage
halves were held together during this operation to make sure everything was well
aligned.
section.
The instructions show it fitting from the inside. Well, if that is done, then
there will be a very deep depressions from the outside until the clear bit is
reached. Not very aerodynamic. The opening was enlarged with a square file until
the transparency could be fit from the outside. It was then glued in place. The
interior bits were then glue in place on the right side using superglue. The fuselage
halves were held together during this operation to make sure everything was well
aligned.
When that had dried, the other fuselage halves were glued together and clamped in place. The horizontal stabilizers were glued on to the back at this time as was the tail gun housing. The usual slathering of filler was added to the seams (it seems inevitable with these kits!).
Next is probably the biggest pain of the whole kit. The transparencies. One gets used to parts not quite fitting properly in these types of kit, but when it is the transparencies that are a bit off, fixing the problem is not as easy as just applying filler or sanding things down as often you'll destroy some of the clear parts doing this. Unfortunately, it is filler and a bit of sanding that are needed to correct the transparency problems with this kit. The biggest problem areas are the two underfuselage parts at the rear and the nose area. These each required some very careful filling and sanding to match up with the surrounding fuselage and even then some areas were not able to be properly treated. On the upper side, the main cockpit canopy is actually a bit narrower than the opening. This means that one side fits well while the other doesn't. Out comes the filler again for this and the front section. The center nose transparency looks like it will fit well enough after sanding, but it wasn't installed at this time.
 The reason for not completing all the transparencies is the
guns. You have to make up your mind if you want them and where you want them.
There are six places that can have guns. Two in the lower transparency area, two
in the aft section of the cockpit canopy, one in the nose and one in the aft
transparency. All but the last location will need to have holes drilled to
accept the guns. Needless to say, none will be installed in the lower
transparency section or the cockpit. However, I'm not sure about the nose as of
yet. There are no mounts or any other 'stuff' in any of these areas so it will
look a bit bare having the guns mounted there. The kit provides four resin guns
so you cannot put them in all available locales. Naturally, what I chose was to
use only the one for the upper aft section. This consisted of a resin gun and
flimsy resin mount that was painted black in preparation for gluing in place.
The reason for not completing all the transparencies is the
guns. You have to make up your mind if you want them and where you want them.
There are six places that can have guns. Two in the lower transparency area, two
in the aft section of the cockpit canopy, one in the nose and one in the aft
transparency. All but the last location will need to have holes drilled to
accept the guns. Needless to say, none will be installed in the lower
transparency section or the cockpit. However, I'm not sure about the nose as of
yet. There are no mounts or any other 'stuff' in any of these areas so it will
look a bit bare having the guns mounted there. The kit provides four resin guns
so you cannot put them in all available locales. Naturally, what I chose was to
use only the one for the upper aft section. This consisted of a resin gun and
flimsy resin mount that was painted black in preparation for gluing in place.
The nose transparency was glued on as best as possible and any
jutting edges cleaned up. My attention then turned to the aft upper
transparency. If doing the kitted version (as I did), you need to glue the
blanking plate with the gunners seat into the underside of the transparency
(which I did). Then you do a test fit to make sure it all fits (which it
didn't). Yup, I had mounted the rear floor with fuel tank too far forward so the
seat banged 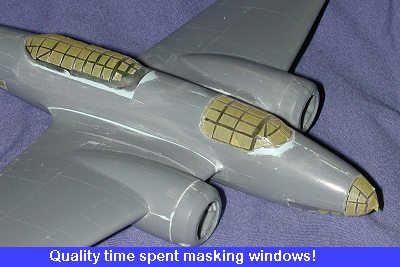 into it. The cure was to first try to cut the fuel tank off (you
won't see it anyway). It decided to have the whole resin floor break loose. Hey,
no problem, just lined things up and reglued the floor! In fact, I would
heartily recommend not installing the rear floor until this stage as it is a
MUCH easier time to do it and get it level!
into it. The cure was to first try to cut the fuel tank off (you
won't see it anyway). It decided to have the whole resin floor break loose. Hey,
no problem, just lined things up and reglued the floor! In fact, I would
heartily recommend not installing the rear floor until this stage as it is a
MUCH easier time to do it and get it level!
Once the floor was reinstalled, the aft transparency was test fit for the gun placement and then glued in. Then the transparency was test fit again. You will find as I did that the forward section of this canopy is not only too narrow, but too tall as well. (Sigh!). Well, you could clamp it in place and use pressure to spread things out, but you'd undoubtedly be rewarded with a loud CRACK as the canopy broke. I just glued mine in place and started sanding and filling! After that onerous job was done, the transparencies were properly masked off (a task that took several days and is not for the faint of heart) and the kit was ready for its first shot at painting.
|
PAINT & DECALS |
 First thing done
was a coat of gloss white. Since I was to be using Alclad II for the metal
finish, I chose Tamiya Gloss white acrylic to prevent a reaction. This was
sprayed on in a relatively thin coat. The idea is to cover not to get a solid
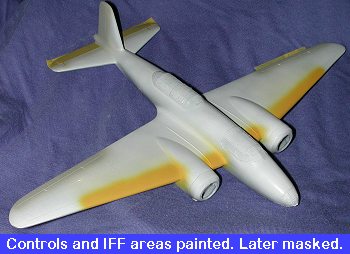
white plane. The next step was to paint on the leading edge yellow. I used
Testors Model Master Insignia Yellow enamel. This was carefully masked using
Tamiya Tape. The control surfaces were painted IJA Overall Grey from the Tamiya
Acrylic line. The color is quite typical for all IJA aircraft as the controls
surfaces were fabric and not metal. Then these were also masked and the
overspray covered with more gloss white.
First thing done
was a coat of gloss white. Since I was to be using Alclad II for the metal
finish, I chose Tamiya Gloss white acrylic to prevent a reaction. This was
sprayed on in a relatively thin coat. The idea is to cover not to get a solid
white plane. The next step was to paint on the leading edge yellow. I used
Testors Model Master Insignia Yellow enamel. This was carefully masked using
Tamiya Tape. The control surfaces were painted IJA Overall Grey from the Tamiya
Acrylic line. The color is quite typical for all IJA aircraft as the controls
surfaces were fabric and not metal. Then these were also masked and the
overspray covered with more gloss white.
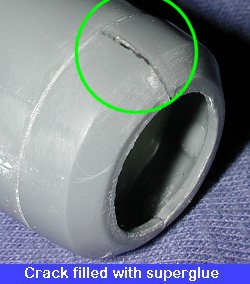
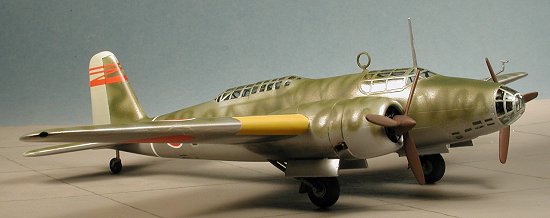
I then applied several coats of Alcad II aluminum over the entire plane when the white had dried. Much to my disgust, I had the same cracking problem with this plane as I did with the Me-262v1, though it only showed up on the underside. I had painted them both at the same time so it isn't a case of not heeding a problem shown on an earlier model. Due to this setback, I lost interest in the model and it sat for over a month while I worked on other kits.
After cleaning up my modeling desk (I know, it is sacrilege, but it is something I hadn't done since the last millennium and it was time to wade through the crud and see what was actually there. You'd be surprised at the things I found!), I had a rather large stack of 'models in waiting' that were in various stages of construction. I then decided to actually finish some of these kits (again, an act that some would never THINK of doing!).
 Smart
money would have said 'strip off the paint and do it again'. Well, not this kid.
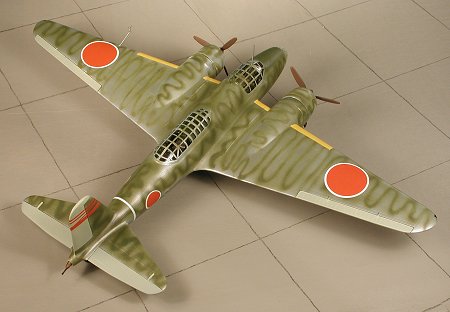
I broke out the JAAF upperside green (actually Aeromaster Nakajima Army Green)
and sprayed a very nice, wavy pattern on the plane. These field applications
were often very different from each other even amongst planes in the same unit.
They were also done with what paints were at hand. I chose not to overpaint the
control surfaces. My excuse is that these were taken off other planes or were
refurbished after the painting was done. Hey, it is like late war Luftwaffe.
Could happen. After the squiggles were painted on, the entire upper airframe was
misted with the same color to cut down on any shininess of the underlying
surface. A nose anti-glare panel was also painted on at this time. Then the
aircraft had the outer wing panels, rear fuselage and tail sprayed with a clear
acrylic gloss in preparation for the decals.
Smart
money would have said 'strip off the paint and do it again'. Well, not this kid.
I broke out the JAAF upperside green (actually Aeromaster Nakajima Army Green)
and sprayed a very nice, wavy pattern on the plane. These field applications
were often very different from each other even amongst planes in the same unit.
They were also done with what paints were at hand. I chose not to overpaint the
control surfaces. My excuse is that these were taken off other planes or were
refurbished after the painting was done. Hey, it is like late war Luftwaffe.
Could happen. After the squiggles were painted on, the entire upper airframe was
misted with the same color to cut down on any shininess of the underlying
surface. A nose anti-glare panel was also painted on at this time. Then the
aircraft had the outer wing panels, rear fuselage and tail sprayed with a clear
acrylic gloss in preparation for the decals.
The kit decals are really very nice and offer two different tail markings. However, like most of you, I didn't want to use the kit markings. Actually, I didn't want to use the kit tail markings. Scrounging through the decal sheets, I found what I wanted.
Tail markings come from an old Microscale sheet (72-070) that has nothing but tail markings on it. There were several options for the Ki-21. I chose the markings for the 7th Wing HQ flight. They didn't fit the tail perfectly, being a bit too small. However, I had a pretty close paint match and touched them up. The kit then had the decals and other shiny areas sprayed with a matte clear.|
CONSTRUCTION CONTINUES |
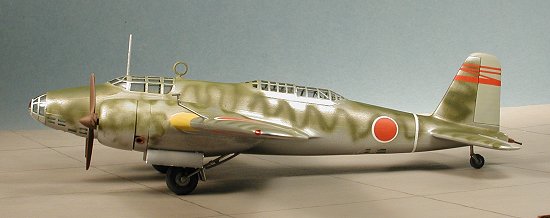 Now that the
tragedy of painting had played itself out, the final bits needed to be done.
This meant adding the gear doors, painting the wheels and exhaust and props. The
props were then drilled out in the back to allow them to fit the shafts on the
engine and pressed into place. The masking was taken off the myriad windows
(Three days to put them on and ten minutes to remove them). Having set for
months seemed to have no effect on the tape as it was easy to remove and left
little residue. The last steps were the pitot tube and the radio mast. Seeing as
I just wanted to finish this beast, I didn't rig the antenna.
Now that the
tragedy of painting had played itself out, the final bits needed to be done.
This meant adding the gear doors, painting the wheels and exhaust and props. The
props were then drilled out in the back to allow them to fit the shafts on the
engine and pressed into place. The masking was taken off the myriad windows
(Three days to put them on and ten minutes to remove them). Having set for
months seemed to have no effect on the tape as it was easy to remove and left
little residue. The last steps were the pitot tube and the radio mast. Seeing as
I just wanted to finish this beast, I didn't rig the antenna.
|
CONCLUSIONS |
 There are
kits that build well and then there are ones like this. Frankly, I know a number
of modelers who'd have tossed the whole thing in the trash weeks ago, but I feel
I need to finish everything I start. The construction hassles were nothing
compared to the problems with paint, but now I know what not to do so I leave
this build having learned and I guess that is what is important. I know it can
be made into a super model as there was one at the IPMS Nationals and it was
superbly done. Mine will be placed on the shelf of shame in the display case of
the dead in the basement!
There are
kits that build well and then there are ones like this. Frankly, I know a number
of modelers who'd have tossed the whole thing in the trash weeks ago, but I feel
I need to finish everything I start. The construction hassles were nothing
compared to the problems with paint, but now I know what not to do so I leave
this build having learned and I guess that is what is important. I know it can
be made into a super model as there was one at the IPMS Nationals and it was
superbly done. Mine will be placed on the shelf of shame in the display case of
the dead in the basement!
|
REFERENCES |
Model Art #533, Camouflage and Markings of IJA Bombers (only the title is in English. How I wish for an English translation of this and other Model Art camo books!)
Famous Bombers of WWII, Volume 2, by William Green, Doubleday, 1960
JAAF Camouflage and Markings of WWII, by Donald Thorpe, 1968
July 2001

Review kit courtesy of me and my wallet!
Copyright ModelingMadness.com. All rights reserved. No reproduction in part or in whole without express permission from the editor.
If you would like your product reviewed fairly and fairly quickly, please contact the editor or see other details in the Note to Contributors.