
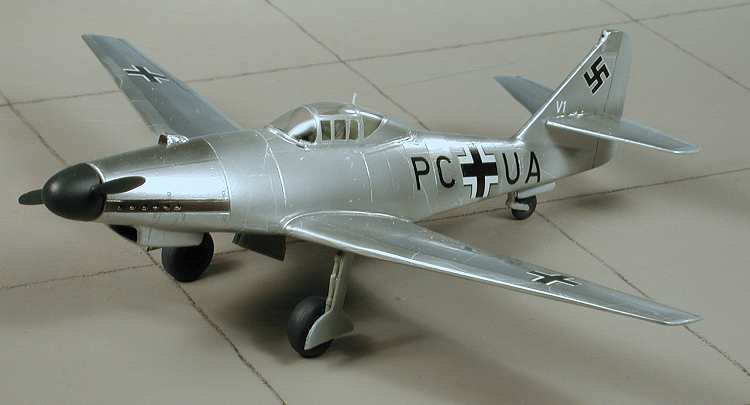
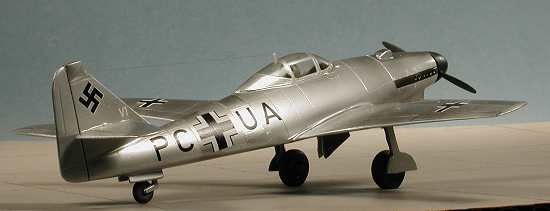
High Planes 1/72 Me-262v1
|
KIT # |
72038 |
|
PRICE: |
$17.95 |
|
DECALS: |
one aircraft |
|
REVIEW : |
|
|
NOTES: |
Short run kit with vac canopy & metal gear |
|
HISTORY & KIT |
Allow me to weasel out of doing an intro to this article by referring you to the preview done a while back.
|
CONSTRUCTION |
In addition to these things, there are large sprue gates that
need sanded off the wing inner sides as well as a lot of rough edges and general
flash that needs removed. Once you get the kit pretty well cleaned up, it is
time to start gluing some things together. I started with the wings. Removing
any lumps and bumps on the inside that may prevent a good join, the wings were
test fit to each other. Some sanding is required to get a flat join surface, but
thanks to the relatively soft plastic, this isn't much of a chore. With the wings glued, the fuselage is tackled. The kit is
designed to have the interior installed after the fuselage is glued together.
There is a small nose radiator that needs to be glued in. The fit on this piece
is pretty poor and much sanding/carving and test fitting was required before it
was permanently installed. Then on to gluing the fuselage. You'll find it easier
to do this in stages and to clamp each stage until dry. I found that there was
quite a gap just aft of the tail wheel doors. This was later filled with
superglue. As with the other parts much carving away of flash and
sanding/filling was needed. Now on to putting on some more bits. There are three additional
intakes that need glued in place. One on the top right and two on the
bottom right. The Adding the metal landing gear was next. The tail wheel fit into
a sort of slot in the tail wheel well without too much trouble. Superglue was
used on this after the minimal mold seam was cleaned off. The main gear were a
bit different. These needed to have holes drilled in the wheel well to accept
them. Despite all my efforts, I managed to drill through the top of the wing on
one side. Arrgh! With the holes drilled and enlarged it was time to fuss with the
main gear. These had the mold seams removed. There were very large lumps of
metal on the top of the axles that had to be removed. This was rather time
consuming and required the use of a file. Eventually the chunks were filed off.
Then the wheels (which look too wide to me, but what to I know) had the hubs
drilled out to accept the metal axles. Once that was done, the axles were
superglued into the holes. I don't know if the oleo links are supposed to face
forward or aft so I faced them aft.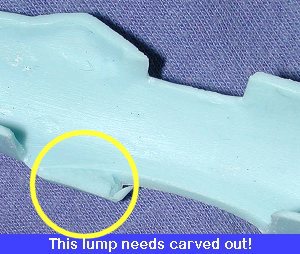 As with all short run kits of this
type, the first few hours are spent sanding, cutting, scraping and cursing. This
last one because if you are like me, you generally end up cutting yourself
during this process. It is hard not to as some times there are some rather large
lumps of plastic that need removed. This kit is no exception in that regard as
you can see by the image of the chunk left in the wing root. Upset by this? Not
really. It is all par for the course when doing these kits.
As with all short run kits of this
type, the first few hours are spent sanding, cutting, scraping and cursing. This
last one because if you are like me, you generally end up cutting yourself
during this process. It is hard not to as some times there are some rather large
lumps of plastic that need removed. This kit is no exception in that regard as
you can see by the image of the chunk left in the wing root. Upset by this? Not
really. It is all par for the course when doing these kits.
 Next on to the interior. This part is pretty crude and fit of
the cockpit tub with the end plates is particularly poor. The seat was cleaned
up and glued in place. It seems to stick up quite a bit and my guess is that
perhaps this is too large. Having no decent photos of the prototype's interior, I can't tell
for sure if this is normal or not. Anyway, the interior and surrounding area was
painted RLM 02. (I based this on some period color photos of the v3 which showed
this color in the cockpit.) The kit supplies no control stick and no rudder
pedals. It does have a control panel of sorts and this was glued into the
fuselage. Once that was in, the interior was glued in. Fit on this was very
poor. Rather than fuss with it too much. I just got in as straight as I could
and let it dry. Fortunately, you won't be able to see much of the interior and
there is NO WAY that this will be entered in a contest or anything.
Next on to the interior. This part is pretty crude and fit of
the cockpit tub with the end plates is particularly poor. The seat was cleaned
up and glued in place. It seems to stick up quite a bit and my guess is that
perhaps this is too large. Having no decent photos of the prototype's interior, I can't tell
for sure if this is normal or not. Anyway, the interior and surrounding area was
painted RLM 02. (I based this on some period color photos of the v3 which showed
this color in the cockpit.) The kit supplies no control stick and no rudder
pedals. It does have a control panel of sorts and this was glued into the
fuselage. Once that was in, the interior was glued in. Fit on this was very
poor. Rather than fuss with it too much. I just got in as straight as I could
and let it dry. Fortunately, you won't be able to see much of the interior and
there is NO WAY that this will be entered in a contest or anything.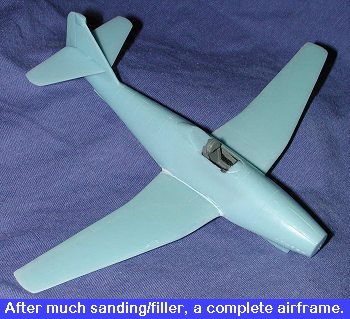 Probably the
worst fitting part to date are the wings. Here's the problem. The very deep and
scale-looking wheel wells are right where the fuselage sides should mate with
the upper wings. To get the wing to even get close to fitting, you have to carve
away the upper wing root on the fuselage as well as sand the heck out of the
wheel wells until they are nearly paper thin. After many test fittings to where
the forward wing/fuselage join is flush, the aft wing section is cut away (it's
too long) until it is also flush at the back. More carving is done on the
fuselage to allow much of this to happen. You are then basically gluing the wing
at the front and rear. Any gaps on the upper wing/fuselage join are filled with
superglue and then filler putty. Several applications are needed and then sanded
smooth. The tailplanes are cleaned up and butt glued to the fin. Now we have a
pretty much complete airframe. All of this took quite a bit of time, as you can
imagine. Frankly, it is this kind of work that many really enjoy as you get a
real feeling of accomplishment, unlike what you can get from a 'shake and bake'
Tamiya kit.
Probably the
worst fitting part to date are the wings. Here's the problem. The very deep and
scale-looking wheel wells are right where the fuselage sides should mate with
the upper wings. To get the wing to even get close to fitting, you have to carve
away the upper wing root on the fuselage as well as sand the heck out of the
wheel wells until they are nearly paper thin. After many test fittings to where
the forward wing/fuselage join is flush, the aft wing section is cut away (it's
too long) until it is also flush at the back. More carving is done on the
fuselage to allow much of this to happen. You are then basically gluing the wing
at the front and rear. Any gaps on the upper wing/fuselage join are filled with
superglue and then filler putty. Several applications are needed and then sanded
smooth. The tailplanes are cleaned up and butt glued to the fin. Now we have a
pretty much complete airframe. All of this took quite a bit of time, as you can
imagine. Frankly, it is this kind of work that many really enjoy as you get a
real feeling of accomplishment, unlike what you can get from a 'shake and bake'
Tamiya kit.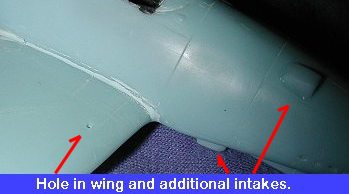 instructions
show where these go and there are hatched areas molded in the plastic to assist
in getting things on right. The two lower ones are sort of round and after all
the flash was cleaned off, these were drilled out.
instructions
show where these go and there are hatched areas molded in the plastic to assist
in getting things on right. The two lower ones are sort of round and after all
the flash was cleaned off, these were drilled out. 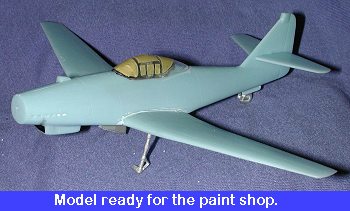 The inner gear
doors were cleaned up and glued on. The next item was the canopy. You only get
one, so don't mess it up. While I don't doubt that High Planes would send
another one, it will take a while. Once cut out the canopy was masked. The
frames are not very crisp so this wasn't an easy task. The masked canopy was
then glued onto the airframe with non-fogging superglue. Turning to the prop, I
noticed that there was a bit of a chunk taken out of one blade. An attempt to
sand it smooth resulted in the prop blade breaking off. Must have been a mold
fault as the rest of the kit wasn't that brittle. I then got a replacement prop
from the stash of metal Aeroclub props that I have. I found one the same length
and after cleaning up the spinner, glued the metal prop in place. The kit was
now ready for some paint. By the way, if you are wondering what the square lump
is at the tip of the tail, it is a housing for a movie camera so don't sand it
off!
The inner gear
doors were cleaned up and glued on. The next item was the canopy. You only get
one, so don't mess it up. While I don't doubt that High Planes would send
another one, it will take a while. Once cut out the canopy was masked. The
frames are not very crisp so this wasn't an easy task. The masked canopy was
then glued onto the airframe with non-fogging superglue. Turning to the prop, I
noticed that there was a bit of a chunk taken out of one blade. An attempt to
sand it smooth resulted in the prop blade breaking off. Must have been a mold
fault as the rest of the kit wasn't that brittle. I then got a replacement prop
from the stash of metal Aeroclub props that I have. I found one the same length
and after cleaning up the spinner, glued the metal prop in place. The kit was
now ready for some paint. By the way, if you are wondering what the square lump
is at the tip of the tail, it is a housing for a movie camera so don't sand it
off!
|
PAINT & DECALS |
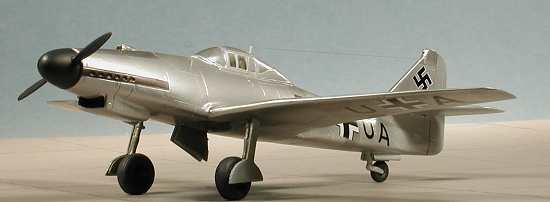
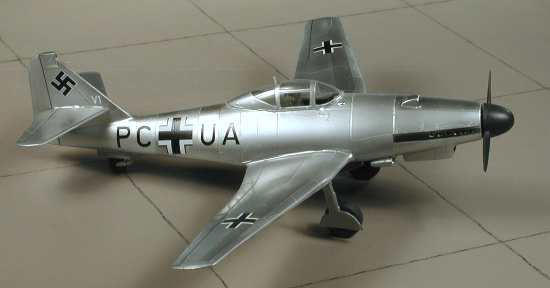 Since the aircraft was basically bare metal, this gave me an
opportunity to use more Alclad II. So to facilitate this, I sprayed the airframe
with Tamiya gloss white acrylic and let it sit for several days to allow
the paint to properly cure. At least I thought it was long enough. I was to find
out later that all was not well regarding my choice of undercoat. Acrylic was
chosen as it would not react with the Alclad lacquer and provide a smooth and
light surface as well.
Since the aircraft was basically bare metal, this gave me an
opportunity to use more Alclad II. So to facilitate this, I sprayed the airframe
with Tamiya gloss white acrylic and let it sit for several days to allow
the paint to properly cure. At least I thought it was long enough. I was to find
out later that all was not well regarding my choice of undercoat. Acrylic was
chosen as it would not react with the Alclad lacquer and provide a smooth and
light surface as well.
The next step was to paint over all this with aluminum. So far, no problems, though I did notice that in some spots it was difficult to cover over the white. Letting this dry for a day or two, certain areas were masked with Tamiya tape and polished aluminum was painted in those areas. The tape was then removed after a day and here is where I noticed my first problems. When one section of tape was removed, the area under the tape had taken on a wrinkled appearance. Not exactly sure why this happened. It almost looks as if the paint had softened and handling the model has shoved it around. Knowing that this wasn't going to be a contest model. I made no attempt to fix it. Besides it is on the bottom of the plane where it won't be seen anyway.
 I then did more masking and painted on dark
aluminum. Again, a spot or two showed this wrinkled appearance. Another round of
masking around the exhaust and the area was painted with Jet Exhaust, another
Alclad color. Then all the tape was removed. There are about 3-4 wrinkled areas
on the model. I can only assume that either the paint hadn't fully cured or it
reacted with something in the tape. Having used this tape with Alclad and other
types of acrylic paint on several other models with no problems, I can only
assume it is something to do with the Tamiya paint, as it is the only new part
of the equation.
I then did more masking and painted on dark
aluminum. Again, a spot or two showed this wrinkled appearance. Another round of
masking around the exhaust and the area was painted with Jet Exhaust, another
Alclad color. Then all the tape was removed. There are about 3-4 wrinkled areas
on the model. I can only assume that either the paint hadn't fully cured or it
reacted with something in the tape. Having used this tape with Alclad and other
types of acrylic paint on several other models with no problems, I can only
assume it is something to do with the Tamiya paint, as it is the only new part
of the equation.
With all the painting done, it was time to apply
the decals. These are quite nice. Properly thin and with good stick. They are
also a touch transparent, not a problem with black against a light background. A
bit of Solvaset to get them to crawl into the various recesses of the model and
it was set aside for a few days while I worked on other things.
|
CONSTRUCTION CONTINUES |
 Coming back to the kit to do final touches, I was less than
thrilled to see a series of cracks starting to form in the Alclad. I have seen
this phenomenon before when Future is sprayed over uncured paint and I fear that
this is what is happening to the Alclad. There is really no way to fix this
problem other than to strip off all the paint and repaint it. Not worth the time
and effort on this kit.
Coming back to the kit to do final touches, I was less than
thrilled to see a series of cracks starting to form in the Alclad. I have seen
this phenomenon before when Future is sprayed over uncured paint and I fear that
this is what is happening to the Alclad. There is really no way to fix this
problem other than to strip off all the paint and repaint it. Not worth the time
and effort on this kit. 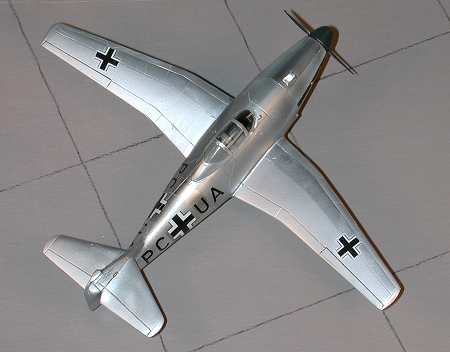
|
CONCLUSIONS |
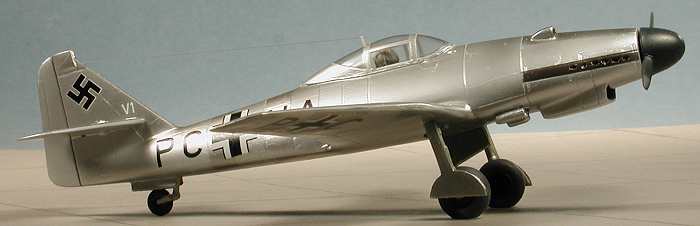
Easy to build this kit wasn't. It is relatively crude and requires you to use a number of modeling skills to complete. However, the end result is a prototype Me-262 that you won't find anywhere else that I know of. As with many of the models I have built, I learned a few things while building this model. Actually, while painting this model. I now know not to use gloss white acrylic underneath Alclad II or I'll be sorry that I did. You won't see this kit at a show and I seriously doubt if it will leave the display case, but it does look nice next to the 262v9 and 262A-1a on the shelf! Recommended only to experienced modelers.
|
REFERENCES |
Me-262: Volume I, by Smith and Creek, Classic Publications, 1997.
Copyright ModelingMadness.com. All rights reserved. No reproduction in part or in while without express permission from the editor.
Review kit courtesy of me and my wallet!
If you would like your product reviewed fairly and fairly quickly, please contact the editor or see other details in the Note to Contributors.
Back to Reviews Page 2016