Special Hobby 1/32 I-16 type 10/17
| KIT #: | 32001 |
| PRICE: | $45.00 ($36 at Roll Models) |
| DECALS: | Three options |
| REVIEWER: | Scott Van Aken |
| NOTES: | Multi-media kit with resin and etched brass parts |
| HISTORY |
The Polikarpov I-16 was a design that was basically obsolete at the start of the Great Patriotic War, but it was available in large numbers and so bore much of the brunt of the fighting and losses during the initial stages of the conflict.
The I-16 was also the first low wing monoplane fighter with retractable landing gear to enter service with the air force of any nation and provided the Soviet Union with a real edge in terms of aviation fighter capabilities. At least for a few years as the pace of improvement during these times was quick.
 Developed in the early 1930s, the
I-16 first flew in late 1933. So successful were the state acceptance
trials, that the aircraft was put into immediate production with deliveries
commencing barely 6 months after first flight. The type 4 with the M-25
engine (a Wright Cyclone 9 cylinder radial), was the first really combat
ready type and deliveries started in early 1934. This was followed in 1936
by the type 6 with an improved engine and the next year with the type 10,
which had even more improvements.
Developed in the early 1930s, the
I-16 first flew in late 1933. So successful were the state acceptance
trials, that the aircraft was put into immediate production with deliveries
commencing barely 6 months after first flight. The type 4 with the M-25
engine (a Wright Cyclone 9 cylinder radial), was the first really combat
ready type and deliveries started in early 1934. This was followed in 1936
by the type 6 with an improved engine and the next year with the type 10,
which had even more improvements.
The type 10 was the version sent to Spain in 1936 so that it could be evaluated against other aircraft. The Spanish Republicans liked the aircraft so much that a manufacturing license was obtained to build the aircraft locally and many were produced before the Nationalists under Franco and with help from Germany and Italy won the war in March of 1939. The type was also provided to the Chinese who used it against the Japanese.
Other versions followed including the type 17, an improved type 10 with 20mm cannon, type 18 and 24 which had an M-82 radial and carried improved armament, with the type 24 also carrying 20mm cannon. Total production of all types exceeded 7,000, a huge number for the time. 4,000 of these were used against the Germans during the early years of the war.
Today, several have been pulled out of bogs and swamps to be rebuilt and are flying in various places around the world.
| THE KIT |
 Special Hobby's kit is basically the
same kit as produced earlier this year by Azur. The only difference is that
it has parts for the type 17 and a full set of ski landing gear for the
boxing's type 10. Like the earlier kit, it has no engine with the engine
cowling shutters molded closed. While this would be appropriate for an
aircraft on skis, it wouldn't be for most other times it was used.
Special Hobby's kit is basically the
same kit as produced earlier this year by Azur. The only difference is that
it has parts for the type 17 and a full set of ski landing gear for the
boxing's type 10. Like the earlier kit, it has no engine with the engine
cowling shutters molded closed. While this would be appropriate for an
aircraft on skis, it wouldn't be for most other times it was used.
Fortunately, there are fixes for this. The one I chose was UMI Resins set #4 that included a new cowling front with open cooling holes and a resin engine to go behind it. This set also includes metal gun barrels as often the I-16s gun barrels jutted forward of the cowling.
The rest of the kit is up to the current standards of MPM/Special Hobby/Azur and includes a nicely done injected canopy. The resin bits are limited to exhaust pipes and a gun sight, while photo etch takes care of the instrument panel and seat belts. For more on what comes in the box, please visit the preview.
| CONSTRUCTION |
This is my second I-16 model. Previously I'd built the Hobbycraft 1/48 kit and while it was a pleasant experience, Hobbycraft had done a rather generic I-16, not taking into account all the differences between the types. The Special Hobby/Azur kit does, though doesn't always show it or properly inform the builder of these differences. A bit more on this later.
 I started construction by building
the cockpit. There really is little to this part of the aircraft. The plane
is about as basic as can be so it isn't festooned with radio boxes or
navigation equipment or map cases or the other detritus that you often find
in WWII aircraft. It was built to be flown and little else. Makes it easy
for us as there aren't a lot of bits.
I started construction by building
the cockpit. There really is little to this part of the aircraft. The plane
is about as basic as can be so it isn't festooned with radio boxes or
navigation equipment or map cases or the other detritus that you often find
in WWII aircraft. It was built to be flown and little else. Makes it easy
for us as there aren't a lot of bits.
I glued all the main plastic bits together (which was really just a seat, seat back, control stick, and rudder pedals) then gave them all a nice coat of military green paint . I then drybrushed the rudder pedals and other bits with aluminum. The seat belts and shoulder harness was then glued in place and painted ivory.
While all this was drying, I glued the fuselage halves together. I also glued the outer wing sections together and the rudder halves. The horizontal stabilizers are one piece so no worry. When the fuselage had dried, I glued in the aft bulkhead and after test fitting the interior, let that dry.
Next, I glued in the instrument panel. This is an etched metal bit with an acetate instrument backing that glues onto an injected backing piece. Finding a good fit was a real chore. There was no positive locator so I fudged around looking for the best spot (somewhere in front of the control stick would be best). With that found, I ground off some stringer detail that was keeping the piece from fitting well and with a good dose of super glue, glued it in place. I found it much easier to work with the the fuselage halves already cemented. I then glued in the rest of the interior.
 With that dry, I glued on the lower
wing section. This had to be clamped in place at the rear and at the
two small cement areas in the front as I didn't want things to wiggle out
of alignment. When all that dried, I then broke out the filler and took
care of the usual seam work.
With that dry, I glued on the lower
wing section. This had to be clamped in place at the rear and at the
two small cement areas in the front as I didn't want things to wiggle out
of alignment. When all that dried, I then broke out the filler and took
care of the usual seam work.
Next, I glued on the rudder and the horizontal stabilizers. I had to open up the mounting holes (these are the round ones were the pivot shaft fit and not the tabs themselves) and clean up the area around them. When you are done you will think that 'Oh drat, I'm going to have to do major filling to take care of the step between the stabs and the root'. Au contraire my good fellow. The I-16 was not an ultra-smooth aircraft and the fit of various pieces and panels was less than aerodynamically perfect. From what I've seen in photos, there is a bit of a step between these parts. Not as gross as the kit has it, but it is there. For sanity's sake, I made no effort to try to trim things down.
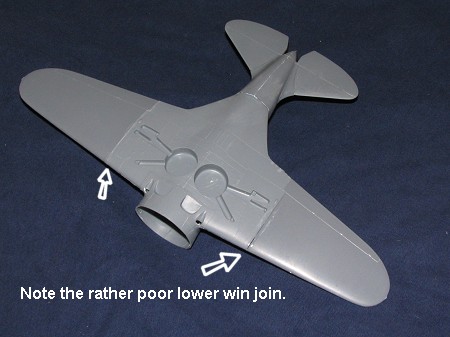 Now for what has to be the worst
fitting part of the kit, the outer wings. These jewels just didn't want to
cooperate fully, despite careful trimming and test fitting. As you can see
by the image. They were basically held in place with super glue while
accelerator was dribbled on the join. This was then sanded down several
times to get things at least somewhat smooth. The upper wing wasn't a real
problem, it was the lower part. But as I've always said, nothing that
filler and sandpaper won't fix!
Now for what has to be the worst
fitting part of the kit, the outer wings. These jewels just didn't want to
cooperate fully, despite careful trimming and test fitting. As you can see
by the image. They were basically held in place with super glue while
accelerator was dribbled on the join. This was then sanded down several
times to get things at least somewhat smooth. The upper wing wasn't a real
problem, it was the lower part. But as I've always said, nothing that
filler and sandpaper won't fix!
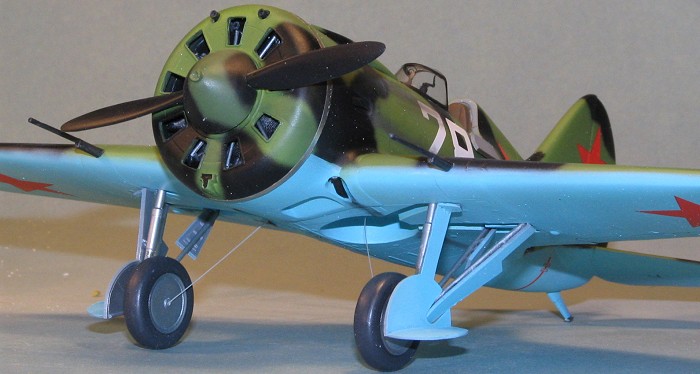
With that done, the next step was to
prep the UMI Resins cowl. I first sanded the forward part of the fuselage
and the back of the cowling part to get as good a mating surface as I
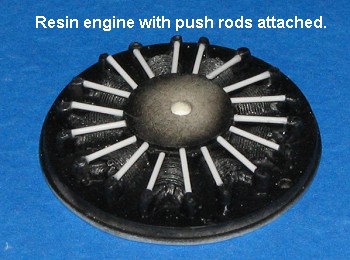
could. Next, I painted the engine insert matte black and then dry brushed
it with Metallizer's Steel to bring out detail. I should point out that the
engine casting wasn't perfect and there were a few of the rocker arm cover
pieces that had air bubbles in them or were short molded. However, I should
also point out that
 this
won't really make any difference as once the engine is in place, you'll see
darn little if any of that part of the engine.
this
won't really make any difference as once the engine is in place, you'll see
darn little if any of that part of the engine.
It also means that you'll see darn little of the push rods that you have to cut and install. UMI Resins offers two lengths of rod, but if you cut them properly, you'll only need one of these. What I did was to take one piece that fit well and then cut 17 more of them to the same length. I then glued them in place as best I could. Having a drawing of just where these things are to fit would be a real help as I really didn't know so put them where I thought best. Once glued in place (and you'll need super glue or epoxy), these were then painted with Metallizer's Steel. It was set aside until after painting.
Speaking of which, I glued on the tail strut, stuffed the cockpit with tissue and then tacked on the resin cowling. Were I to put the engine in place at this time, it would have been a real pain to mask. I then cut the main landing gear door as shown in the instructions and glued the bits in place. Then the kit and various bits were hauled off to the paint shop.
| COLORS & MARKINGS |
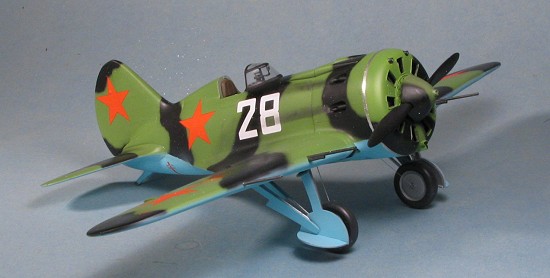
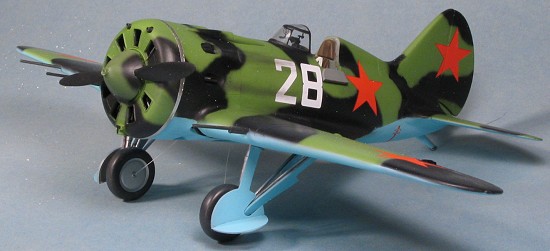
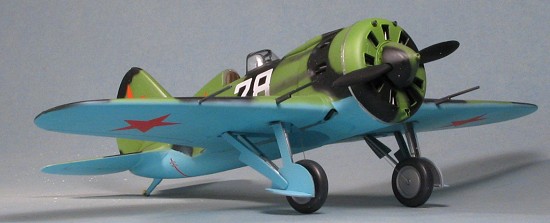
 Of the schemes provided on the decal
sheet, I liked the box art one the best. This one is in three AII shades
of: Blue for the undersides and Green & Black for the upper surface.
Since White Ensign had sent me a nice selection of Soviet colors in its
Colour Coats range, I decided to use them. First I painted the underside
with the rather brilliant blue shade. Colour Coats suggests 24 hours
between coats and I found that this is often a minimum time as the
underside blue took a full 72 hours to lose its 'tackiness'. It was
probably my imprecise mixing or something as the upper green only took
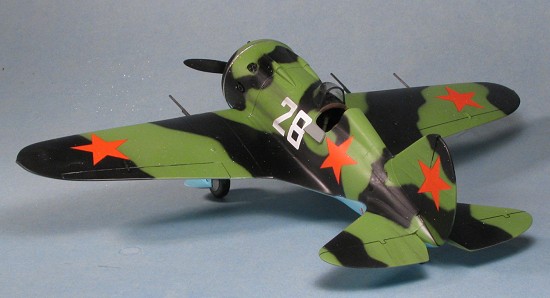
about a day and a half. Same with the black, which was sprayed on in a fun
pattern atop the green. I should point out that the upper surface colors
are carried around to the bottom of the cowling front and even the prop
spinner has two camo colors.
Of the schemes provided on the decal
sheet, I liked the box art one the best. This one is in three AII shades
of: Blue for the undersides and Green & Black for the upper surface.
Since White Ensign had sent me a nice selection of Soviet colors in its
Colour Coats range, I decided to use them. First I painted the underside
with the rather brilliant blue shade. Colour Coats suggests 24 hours
between coats and I found that this is often a minimum time as the
underside blue took a full 72 hours to lose its 'tackiness'. It was
probably my imprecise mixing or something as the upper green only took
about a day and a half. Same with the black, which was sprayed on in a fun
pattern atop the green. I should point out that the upper surface colors
are carried around to the bottom of the cowling front and even the prop
spinner has two camo colors.
Once all had dried sufficiently, I then returned to the work bench to add on some more bits and pieces prior to the decals. This meant attaching the resin forward cowl with the engine. The two machine guns supplied in the set help a lot in getting this properly aligned. Fit on the forward fuselage isn't perfect as it seemed to be a tad larger than the fuselage itself. However, this isn't a disaster as fit of components on the real plane often wasn't perfect. Once on, any additional painting was done and I used a strip of Bare Metal Foil to go around the cowling as I see all the time on Soviet planes from this period.
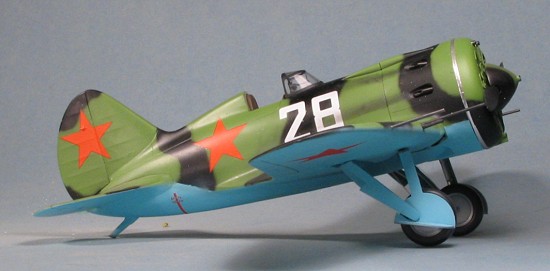
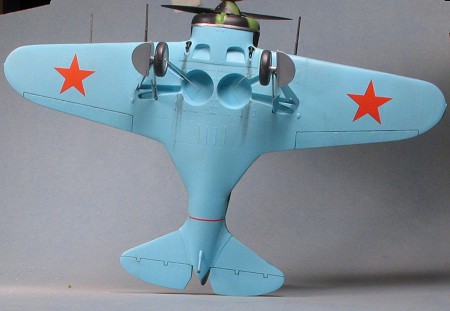 Then, I wanted to get the aircraft on its main
landing gear. Now the instructions say nothing about the color of the gear
legs, inside gear doors or the wheel wells. I went with aluminum for the
first two and underside color for the last. If it isn't correct, I'm sure
I'll get some feedback as to what to properly use.
Then, I wanted to get the aircraft on its main
landing gear. Now the instructions say nothing about the color of the gear
legs, inside gear doors or the wheel wells. I went with aluminum for the
first two and underside color for the last. If it isn't correct, I'm sure
I'll get some feedback as to what to properly use.
For the landing gear, I had to drill out the mounting holes with a #60 drill bit before the gear legs would fit. Once in place, I added the two additional gear retraction struts/braces. These are two sizes with one set a bit longer than the other. Ignore what the instructions tell you regarding which part number goes where as it is wrong. Test fit each one before gluing and you'll notice where the longer one and the shorter one goes.
Attaching the gear doors was not a fun exercise. Fit is difficult thanks to the extra struts so you'll have to do a bit of trimming to get them in the proper place. When done they look fine, but it is a bit of a struggle to get them attached.
At this time, I sprayed on some clear gloss in preparation for the decals.
Applying the decals was a real no-brainer. These are very well done, nice and thin, and with some care, went on without a fuss. I used Microset and it worked just fine. I did find it odd that there would be so many red stars as most Soviet aircraft did not carry them on the upper wing. I then matte coated it and had a disaster. Somehow, my clear matte became contaminated with something and there are little white 'freckles' all over the model. Easy to see on the black and impossible to get rid of without sanding and a repaint. So there it is.
| FINAL CONSTRUCTION |
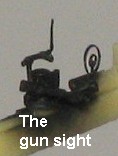 There were really quite a few
final bits. One was the gun sight, It is made up of three resin and two
photo etched pieces. You get a few extra resin bits in case you need them,
but I was quite fortunate. I kept the entire construct on the resin pour
stub to make it easier to handle. It was painted matte black and when ready
for installation, simply removed with a sharp blade and attached. I also
glued on the door in the open position, removed the tape from the canopy,
and glued it in place.
There were really quite a few
final bits. One was the gun sight, It is made up of three resin and two
photo etched pieces. You get a few extra resin bits in case you need them,
but I was quite fortunate. I kept the entire construct on the resin pour
stub to make it easier to handle. It was painted matte black and when ready
for installation, simply removed with a sharp blade and attached. I also
glued on the door in the open position, removed the tape from the canopy,
and glued it in place.
 Next went the pitot tube which
I'd drilled out, then the gear doors (which were a real pain to get into
place). The spinner was glued onto the prop and then that was attached to
the front. Fit is quite loose and the spinner does not completely cover the
prop. By this, I mean that it isn't as deep as I'd hoped. Gluing on the
resin exhaust stubs was also a chore as they just don't fit the openings. I
found it impossible to get the dual stubs on the lower side to fit at all
so inserted single stubs which are only a so-so fit. I then glued on
the cannon. The type 17 was, according to two very recent books on the
subject, the one with the cannon, so any commentary about it not having
them seems at odds with recent publications. The markings guide does not
show these guns used on any option, but the box art does and it is correct.
I drilled out the barrels, glued the guns in place, then stretched
some sprue for the gear retraction cables. These were attached using white
glue. The masking was removed from the canopy, a bit of touch-up painting
and it was done.
Next went the pitot tube which
I'd drilled out, then the gear doors (which were a real pain to get into
place). The spinner was glued onto the prop and then that was attached to
the front. Fit is quite loose and the spinner does not completely cover the
prop. By this, I mean that it isn't as deep as I'd hoped. Gluing on the
resin exhaust stubs was also a chore as they just don't fit the openings. I
found it impossible to get the dual stubs on the lower side to fit at all
so inserted single stubs which are only a so-so fit. I then glued on
the cannon. The type 17 was, according to two very recent books on the
subject, the one with the cannon, so any commentary about it not having
them seems at odds with recent publications. The markings guide does not
show these guns used on any option, but the box art does and it is correct.
I drilled out the barrels, glued the guns in place, then stretched
some sprue for the gear retraction cables. These were attached using white
glue. The masking was removed from the canopy, a bit of touch-up painting
and it was done.
| CONCLUSIONS |
Overall, a very nice model results. I would wish for better fitting exhaust and wing, but really, I had expected to run into some fit problems and so it wasn't as awful as it could have been. The UMI nose conversion really looks a ton better than the kit part and it is a very useful addition. As a note, UMI is no longer in business. Despite my screw-ups, the model looks very nice and is a fine addition to my small, but growing 1/32 collection.
November 2005
#1387 in a series
My thanks to
Roll Models
 for
providing the review kit.
for
providing the review kit.
If you would like your product reviewed fairly and fairly quickly , please contact the editor or see other details in the Note to Contributors.