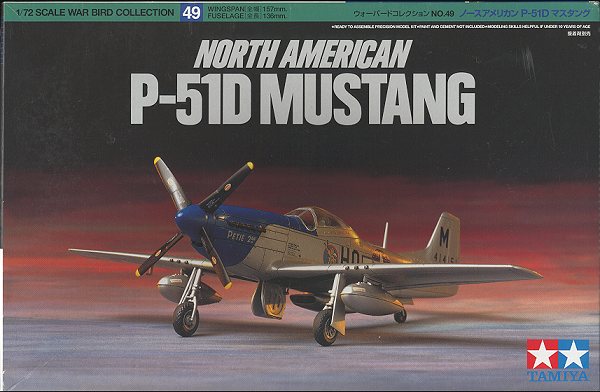
Tamiya 1/72 P-51D Mustang
|
KIT # |
60749 |
|
PRICE: |
$16.50 |
|
DECALS: |
See review |
|
REVIEW : |
|
|
NOTES: |
|
|
HISTORY |
 Going into the history of the P-51D is like doing the same for
the 109 and Spitfire. If you don't know anything about it, you just haven't been
paying attention. Needless to say, the Mustang is one of those aircraft that was
crucial to the ending of the war in that it was the first Allied fighter with
the range and the speed to be able to escort bombers to all their targets and
still be able to hold off attacking fighters.
Going into the history of the P-51D is like doing the same for
the 109 and Spitfire. If you don't know anything about it, you just haven't been
paying attention. Needless to say, the Mustang is one of those aircraft that was
crucial to the ending of the war in that it was the first Allied fighter with
the range and the speed to be able to escort bombers to all their targets and
still be able to hold off attacking fighters.
It is also one of the few WW II fighters whose military service lasted well into the 1970s. Not bad for a plane designed to last 400 flight hours. It is now a staple of the warbird show circuit, and I doubt if there is anyone who is even remotely interested in aircraft who has not had the opportunity to see one fly.
|
THE KIT |
 This particular
kit is a downsized version of its very nice 1/48 stablemate. It is one of series
of downsized kits that Tamiya will be releasing. It is a good plan on Tamiya's
part as it allows the 1/72 fan the ability to build some very nice kit. As to
whether it is worth the premium price is something that the buyer will have to
determine for himself. Already the Bf-109E and Spitfire I are scheduled for
release in 2000.
This particular
kit is a downsized version of its very nice 1/48 stablemate. It is one of series
of downsized kits that Tamiya will be releasing. It is a good plan on Tamiya's
part as it allows the 1/72 fan the ability to build some very nice kit. As to
whether it is worth the premium price is something that the buyer will have to
determine for himself. Already the Bf-109E and Spitfire I are scheduled for
release in 2000.
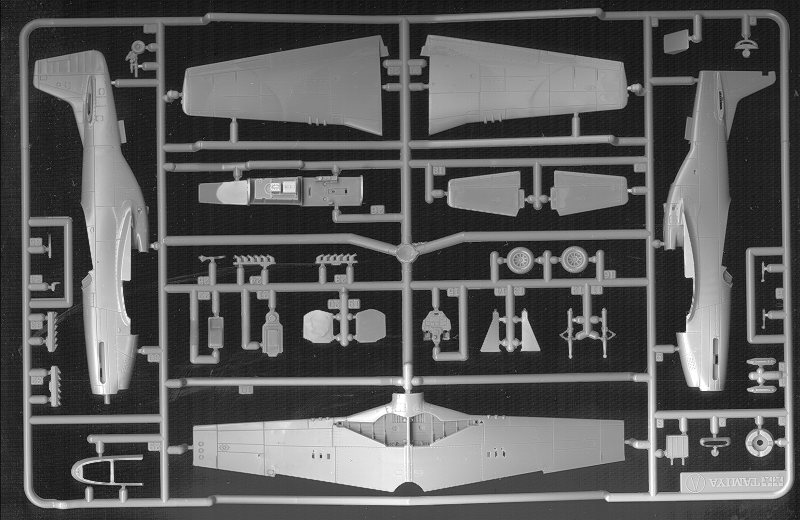
 Now, on to the kit itself. It is everything you would expect
from Tamiya. Superb detailing, a bunch of well engineered parts, and options to
do different variations on the theme. This is the WWII issue. Your options are
different exhaust stubs, different canopies, and the choice of whether or not to
install drop tanks and wing racks. It is obvious that a Korean War version is
coming as there are holes in the wing for the rocket stubs.
Now, on to the kit itself. It is everything you would expect
from Tamiya. Superb detailing, a bunch of well engineered parts, and options to
do different variations on the theme. This is the WWII issue. Your options are
different exhaust stubs, different canopies, and the choice of whether or not to
install drop tanks and wing racks. It is obvious that a Korean War version is
coming as there are holes in the wing for the rocket stubs.
There is some sidewall detail in the fuselage halves. There are no ejector pin marks in any visible locations, which is nice, as even Hasegawa hasn't been able to do that on all its 1/72 kits. The canopy can be positioned open if you desire. The frame and clear canopy are separate bits. Now I personally would prefer to have the frame as part of the clear canopy as I generally mess up installing the clear bit, but many like this arrangement.
 What is missing are the separate flaps. I don't know how Tamiya
could have possibly overlooked this as one rarely sees a Mustang sitting on the
ground with them up unless the engine is still hot! But, there it is!
What is missing are the separate flaps. I don't know how Tamiya
could have possibly overlooked this as one rarely sees a Mustang sitting on the
ground with them up unless the engine is still hot! But, there it is!
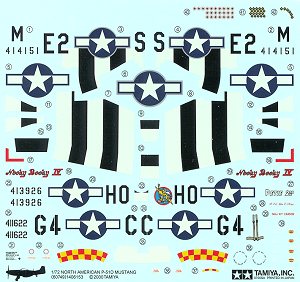
There are markings for three aircraft, all of them rather common markings that most P-51 builders have done before including Nooky Booky IV and Petie 2nd, which have been done to death! The decals look very nice, but one can see the blue backing through the white part of the insignia. The third aircraft E2*S, has a camo upper surface and invasion stripes. No way will the white be opaque enough to not allow the camo the show through. Most of us have oodles of aftermarket decals for Mustangs so will undoubtedly use one of those.
About now, I'd tell you about the instruction sheet, but I bought my kit at a swap meet and it is sans instructions! Well, not a problem as real modelers don't need no steenkin' instructions!I
|
CONSTRUCTION |
Construction begins with the cockpit. This is really a beauty. The radio racks are really very well done, and a good thing as they are very prominent. Well, I glued the armor plating and set into the interior and then painted it and all the wheel wells and gear insides with US Interior green. Yeah, I'm sure that someone will point out that I used the wrong colors in the wheel wells, but TOUGH!!
 While that was drying the wings had the pylon holes opened up
and were then glued together. I also glued together the two drop tank halves.
Back at the interior, the seat cushion was painted leather as was the boot on
the control column. Then the instrument panel was painted black as were a number
of boxes on the interior sidewalls and the radios behind the pilot. Once dry,
these items were lightly drybrushed with aluminum to bring out the detail.
Oddly, Tamiya does not offer a decal for the instruments, but there is one for
the seatbelts! I also painted and drybrushed the large radiator.
While that was drying the wings had the pylon holes opened up
and were then glued together. I also glued together the two drop tank halves.
Back at the interior, the seat cushion was painted leather as was the boot on
the control column. Then the instrument panel was painted black as were a number
of boxes on the interior sidewalls and the radios behind the pilot. Once dry,
these items were lightly drybrushed with aluminum to bring out the detail.
Oddly, Tamiya does not offer a decal for the instruments, but there is one for
the seatbelts! I also painted and drybrushed the large radiator.
Now that those things were painted and ready to go, I glued the interior and radiator into the fuselage. The fit is really very good and snug. Then the fuselage halves were glued together. When dry, I had to use filler all around it. Seems like I can never get away from the stuff. In the process, quite a bit of detail was removed. Then the belly and nose intakes were added. These fit very well and needed no filler, just some sanding around the edges. It was then that I noticed a 'see through' effect with the belly intake and the small exhaust door. You may want to put a piece of card in there to prevent that. Once the fuselage was smooth the lower radiator door was attached.
Next, the wings were glued in place. Fit here is also quite good. The tail planes were next and fit snugly. Now that I had a pretty complete airframe it was time to get ready for painting. The various wells were stuffed with tissue and I went to attach the clear bits. Tamiya has decided to design the kit so that we install only the clear bits and not any adjacent fuselage or framing. For me, this is not the optimal way to do things. I like having the frame included with the clear parts, especially in the front. Frankly, the fit of the windscreen does not match the fit of the rest of the kit. As to the canopy, it fits ok, but doesn't look at neat as on other Mustang kits. The clear bits were attached using non-fogging superglue.
Once masked the kit was then taken to the paint shop.
|
PAINT & DECALS |
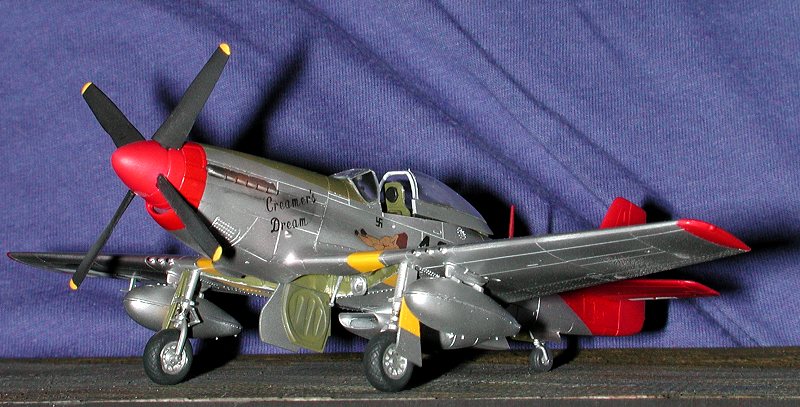
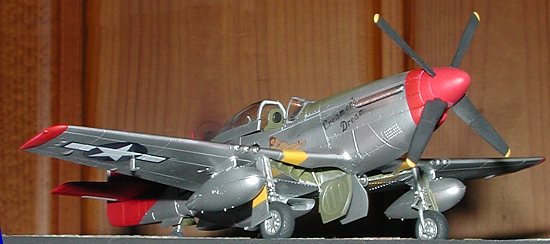
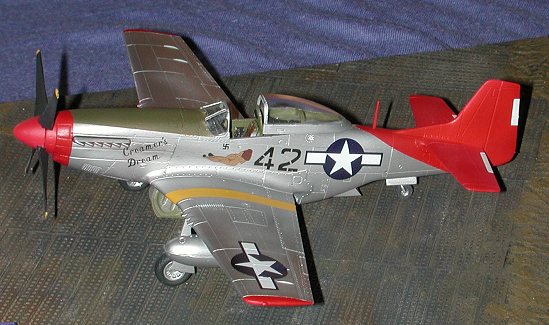
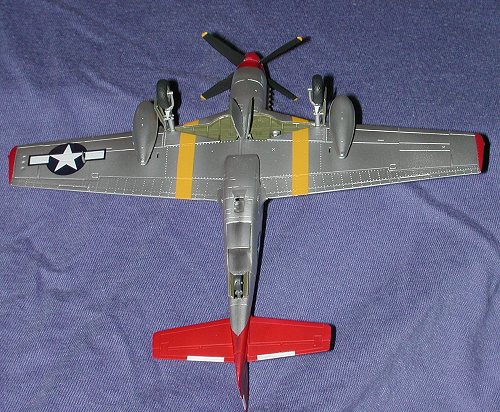
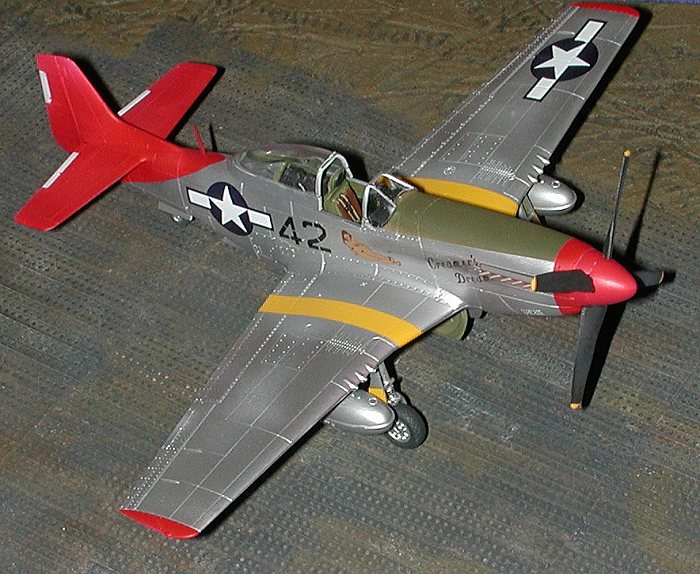
For this kit, I decided to use Three Guys Replicas sheet 72-011 for Tuskeegee Airmen in Italy. Mostly because the kit options have been done to death and I liked the red tails on these planes. I chose to do 'Creamer's Dream' from the 301st FG, not only because of the scheme but also the busty babe given in the fuselage art! This meant that I needed to paint the aircraft white so that the red would show up properly. It also gives a good surface for the Metallizer.
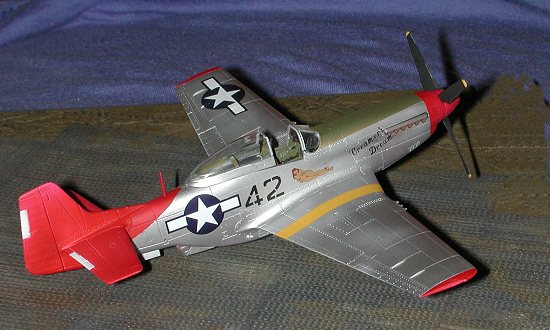 After
the white had dried, the red bits were painted. This included the nose, entire
tail section and the wing tips. I also took this opportunity to paint the
spinner parts white and red. It was at this time that I noticed that I should
have left the trim tabs in white. GRRRR! The red sections were masked off using
Tamiya tape and the trim tabs were then bared. The airframe was then painted
with Testors Aluminum Metallizer. Including the trim tabs. One needs something
light under white and that red would bleed through white paint like crazy!
After
the white had dried, the red bits were painted. This included the nose, entire
tail section and the wing tips. I also took this opportunity to paint the
spinner parts white and red. It was at this time that I noticed that I should
have left the trim tabs in white. GRRRR! The red sections were masked off using
Tamiya tape and the trim tabs were then bared. The airframe was then painted
with Testors Aluminum Metallizer. Including the trim tabs. One needs something
light under white and that red would bleed through white paint like crazy!
The usual day of drying was given to this coat, then the nose was again masked for the OD anti-glare panel. That was painted using Aeromaster Enamels and the trim tabs were then painted white. All of this went very smoothly. I bought an Iwata Eclipse airbrush and it is much more forgiving and easy to use compared to my old Badger 150. Maybe it is just the newness, but I liked it the moment I started using it.
Now that I had a painted aircraft, it was time
to apply the decals. The TGR decals supply all that is needed except for common
maintenance markings. Those will have to come from the Tamiya sheet. The decals
went down beautifully using the Microscale system. Some of the more reluctant
ones that covered large lumps and bumps needed some Solvaset to fully settle
down. Once all the decals were down, the residue of the setting solutions was
cleaned up and the kit then sprayed with a semi-matte clear to seal in the
decals and give the pastels something to 'bite' into.
|
CONSTRUCTION CONTINUES |
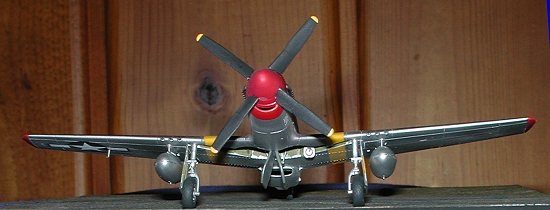
Final construction consisted of attaching those bits that would generally be knocked off during handling. This included the inner gear doors (which have the actuating arms; a first in 1/72), the pitot tube, drop tanks and clear bits. There was a bit of grunge added with pastels so it didn't look too clean and that was it.
|
CONCLUSIONS |
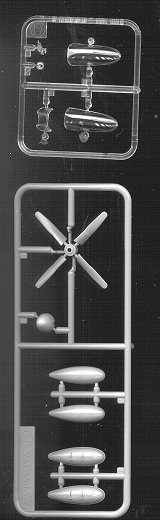
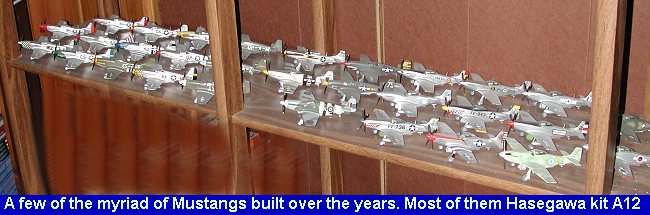
I must say that this really is a fine kit of this aircraft in 1/72. If you just want to build up a collection of Mustangs in various paint and camouflage schemes, I'd stick with the original Hasegawa kit (A12) that used to sell for under $5 (see the image below that shows a few of those kits). For those wanting to have the best, this Tamiya kit is it. However, it comes with a price and that is $16.50 as of this writing. BTW, I realize that I should not have painted the wells and gear doors in chromate green. I've gotten enough e-mails about it over the years!
Review copy courtesy of me and my wallet!
Copyright ModelingMadness.com. All rights reserved. No reproduction in part or in whole without express permission from the editor.
If you would like your product reviewed fairly and fairly quickly, please contact the editor or see other details in the Note to Contributors.
Back to Reviews Page 2024