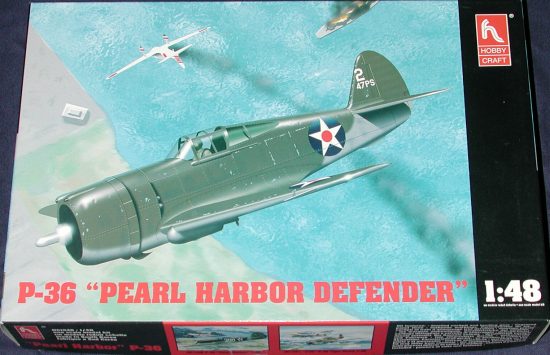
Hobbycraft 1/48 P-36 Hawk
|
KIT # |
1546 |
|
PRICE: |
$14.95 MSRP |
|
DECALS: |
At least three aircraft |
|
REVIEWER: |
|
|
NOTES: |
|
BACKGROUND |
Please visit the preview for more information on this aircraft and a peek in the box.
|
CONSTRUCTION |
 Frankly, the main
purpose of building this kit was to try out the
Legends Productions P-36 cockpit
set. I'd never used one before and wanted to see how well it worked. I know
the Legend box says Academy, but the Hobbycraft kit is the exact same kit. The
first thing I did was to remove all the big bits from their resin blocks. It
couldn't have been easier. You see, Legend doesn't use those massive chunks of
resin to attach its pieces. No, it has taken a different approach and the bits
are only held to the 'blocks' as it were, by on thin attachment point and some
thin rods of resin. Removal of the part took seconds instead of minutes and was
done with a sharp hobby knife. No need to spend all that time sanding and no
mass of resin dust to deal
Frankly, the main
purpose of building this kit was to try out the
Legends Productions P-36 cockpit
set. I'd never used one before and wanted to see how well it worked. I know
the Legend box says Academy, but the Hobbycraft kit is the exact same kit. The
first thing I did was to remove all the big bits from their resin blocks. It
couldn't have been easier. You see, Legend doesn't use those massive chunks of
resin to attach its pieces. No, it has taken a different approach and the bits
are only held to the 'blocks' as it were, by on thin attachment point and some
thin rods of resin. Removal of the part took seconds instead of minutes and was
done with a sharp hobby knife. No need to spend all that time sanding and no
mass of resin dust to deal 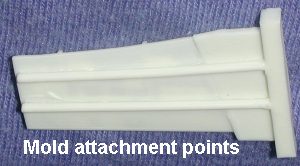 with.
The only part on a resin block was the seat and that block was easily removed
with a pair of cutters and a minute or two of scraping with a knife. I really
couldn't be more pleased with the ease with which these parts came free.
with.
The only part on a resin block was the seat and that block was easily removed
with a pair of cutters and a minute or two of scraping with a knife. I really
couldn't be more pleased with the ease with which these parts came free.
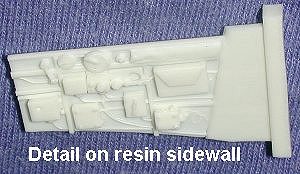
With the main parts ready to use, I first carefully scraped
(actually gouged and hacked) the detail off the sidewalls of the kit fuselage.
Then I test fit the side wall pieces. Before supergluing them in place, I glued
the back bulkhead to the cockpit floor piece and set them in the fuselage to get
things properly aligned. The resin parts use the same kit interior alignment
keys so don't cut those parts away. Then
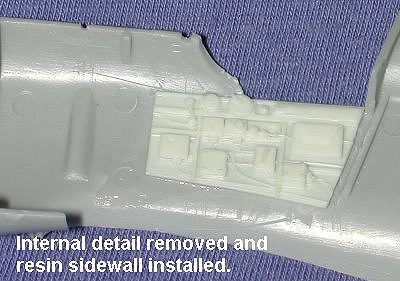 the resin sidewall was placed in
position and held with a small piece of tape. The rest of the interior was
removed, the resin part lifted up with its tape hinge to make sure it doesn't
shift, the area under the resin sidewall flooded with superglue, and the resin
sidewall pressed into place. I make sure that the glue oozes out a bit for a
good seal. The same process was repeated on the other fuselage half.
the resin sidewall was placed in
position and held with a small piece of tape. The rest of the interior was
removed, the resin part lifted up with its tape hinge to make sure it doesn't
shift, the area under the resin sidewall flooded with superglue, and the resin
sidewall pressed into place. I make sure that the glue oozes out a bit for a
good seal. The same process was repeated on the other fuselage half.
If you didn't test fit the sidewall and just glued it in place, you'd miss that there needs to be a gap between the rear bulkhead alignment section and the resin piece. Conversely, you could just as easily glue the sidewall to the interior parts first, but this way makes it much easier to paint and not have to worry about how one will get the sidewall pieces to fit flush once the interior is in place. I actually don't know how the instructions would have you do it as this is a test set without instructions!
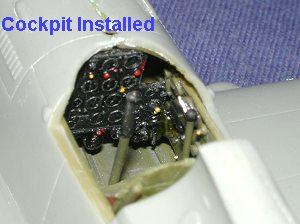 At this stage, it
seemed like a good time to go ahead and paint all this resin. I used Aeromaster
US Interior Green acrylic for the base and then detailed the various bits and
pieces in a manner similar to what was shown on the box for the detail set. Once
that was dry, I started gluing in all the rest of the bits like the seat frame,
seat, controls and the instrument panel. The seat frame is a bit too wide for
the mounting holes on the floor so I drilled the holes out a bit wide to
accommodate the frame. I then glued the seat in place, but messed up and used
fast setting superglue. The seat set out of alignment and removing it wasn't
fun. Once it was pried loose, it and the frame were sanded a bit, repainted and
then the seat glued with slower setting glue. With all those bits in place, I
then installed the instrument panel. Obviously, I missed something by not having
instructions and the panel wouldn't fit properly. It was trimmed and stuffed in
place. Superglue was used once it fit pretty close to properly to keep it from
moving about.
At this stage, it
seemed like a good time to go ahead and paint all this resin. I used Aeromaster
US Interior Green acrylic for the base and then detailed the various bits and
pieces in a manner similar to what was shown on the box for the detail set. Once
that was dry, I started gluing in all the rest of the bits like the seat frame,
seat, controls and the instrument panel. The seat frame is a bit too wide for
the mounting holes on the floor so I drilled the holes out a bit wide to
accommodate the frame. I then glued the seat in place, but messed up and used
fast setting superglue. The seat set out of alignment and removing it wasn't
fun. Once it was pried loose, it and the frame were sanded a bit, repainted and
then the seat glued with slower setting glue. With all those bits in place, I
then installed the instrument panel. Obviously, I missed something by not having
instructions and the panel wouldn't fit properly. It was trimmed and stuffed in
place. Superglue was used once it fit pretty close to properly to keep it from
moving about.
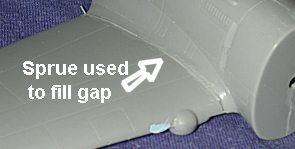 At this time the
fuselage halves were permanently joined. That was no real problem and though
there were some spots that needed filler, nothing really major compared to some
kits I've built. With all that done, I glued the wings in place. The fit of the
wings leaves a bit to be desired as I had gaps in the front and one one wing
root or the other, depending on how I positioned the wings. I decided to make
the left side the 'good' fit and glued that and those places where it touched on
the front and rear. Once all that had dried, I stretched some sprue and set it
in the gap on the right wing root. Using my Pro-Weld glue, it softened and
settled into the gap. It was then on to more filler and sanding to take care of
the other gaps. The tail planes were then attached at this time.
At this time the
fuselage halves were permanently joined. That was no real problem and though
there were some spots that needed filler, nothing really major compared to some
kits I've built. With all that done, I glued the wings in place. The fit of the
wings leaves a bit to be desired as I had gaps in the front and one one wing
root or the other, depending on how I positioned the wings. I decided to make
the left side the 'good' fit and glued that and those places where it touched on
the front and rear. Once all that had dried, I stretched some sprue and set it
in the gap on the right wing root. Using my Pro-Weld glue, it softened and
settled into the gap. It was then on to more filler and sanding to take care of
the other gaps. The tail planes were then attached at this time.
 For those of you wondering about all the filler
and less than perfect fit, it is normal for me and for many Hobbcraft/Academy
kits. One just comes to expect these things and for most of us, it is no big
deal. You know, not all kits are shake and bake Tamiya kits, and some of
them (like this one) require the use of some standard hobby skills to complete.
If you don't have those skills or need to hone them, then this kit is as good as
any to exercise them as the fixes needed are quite minor.
For those of you wondering about all the filler
and less than perfect fit, it is normal for me and for many Hobbcraft/Academy
kits. One just comes to expect these things and for most of us, it is no big
deal. You know, not all kits are shake and bake Tamiya kits, and some of
them (like this one) require the use of some standard hobby skills to complete.
If you don't have those skills or need to hone them, then this kit is as good as
any to exercise them as the fixes needed are quite minor.
Once
the fuselage was nice and tidy, the engine mount was glued in place and the
engine (which had already been glued together and painted) was attached to it.
While all that was still drying, the two cowling halves were glued around the
engine. This whole thing was adjusted quite a bit until I was happy with the
 way
that it was attached. There is lots of room for fudging and it was needed to get
a decent fit. During this time, the tail wheel insert was glued in place. This
fit OK, but needed filler all around it to get a smooth surface.
way
that it was attached. There is lots of room for fudging and it was needed to get
a decent fit. During this time, the tail wheel insert was glued in place. This
fit OK, but needed filler all around it to get a smooth surface.
Nearly ready for overall painting, but I needed to do a bit more work. That consisted of installing and masking the clear bits and gluing in some additional bits to the cockpit sills. These last items I totally screwed up. Once I had them installed flush with the outer fuselage; filled in and sanded smooth, no less, I realized that they should have been flush with the of the cockpit. In other words, recessed. Well S**T! Being too lazy to correct things, I left them as is and went on.
I cut off the appropriate clear bits and got ready to mask them. The aft portions were glued in with non-fogging super glue. The windscreen had to be trimmed to clear my mistake that I mentioned in the above paragraph. When it came to the canopy, I was in for a shock. Mine was so warped that no way would it be usable. I bit the bullet and purchased a set of Squadron vac canopies. These were well done and quite usable. I cut out the canopy part only as the windscreen was firmly attached. All of these clear bits were masked, the cockpit and engine likewise protected from overspray and it was off to add some color!
|
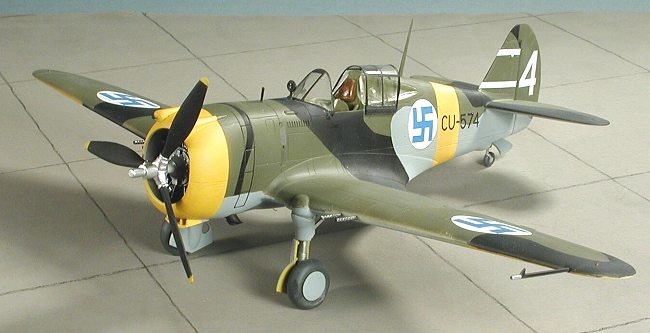
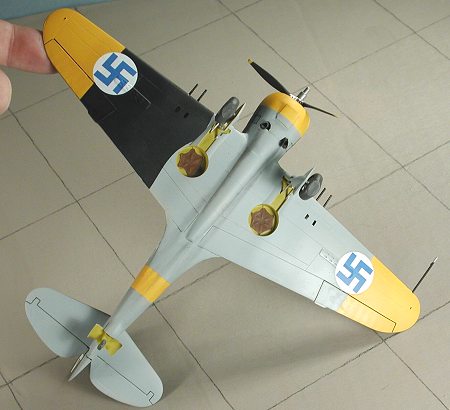
CAMOUFLAGE |
My initial plan was to do an OD over Neutral Grey USAAC version. I was going to
use an old Microscale P-36 sheet for this purpose. So I painted the model the
appropriate colors using Aeromaster and Tamiya Acrylics. Well, the best laid
plans......... When it came time to add decals, the ones I had decided to
 be
trouble and they split into a number of parts. I didn't want to do the kit plane
so was stuck. The model sat for a few days until I got another decal sheet. This
one was Aeromaster 48-060 for
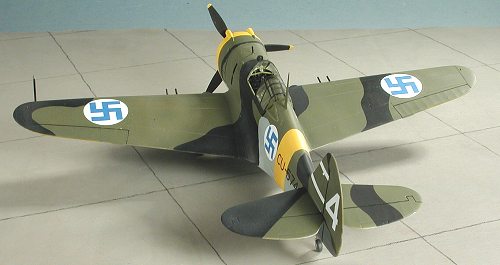
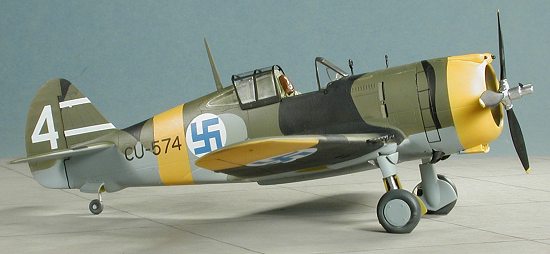
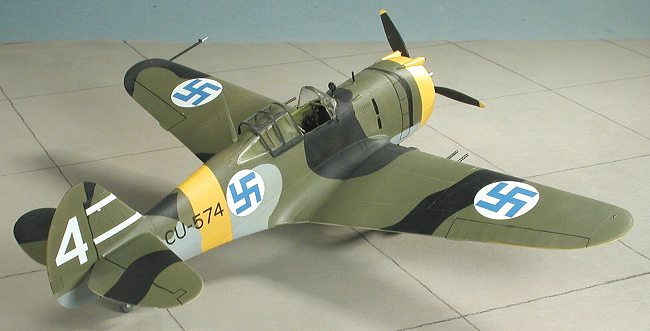
Foreign Hawk 75s. I decided to do one of the Finnish AF versions.
be
trouble and they split into a number of parts. I didn't want to do the kit plane
so was stuck. The model sat for a few days until I got another decal sheet. This
one was Aeromaster 48-060 for
Foreign Hawk 75s. I decided to do one of the Finnish AF versions.
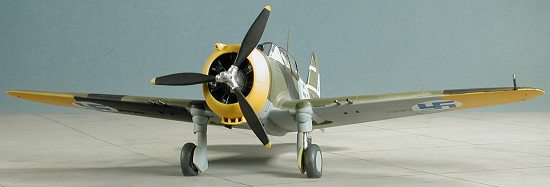
Fortunately, I had a full suite of Finnish AF colors in the Aeromaster Acrylic range that had barely been used. Step one was to paint the nose, lower wing tips and rear fuselage area with Floquil Reefer White. Then Finnish ID yellow as painted over these areas. When dry, it was masked according to the Aeromaster instructions. I then sprayed the Light Blue undersides. This was masked as needed and the upper surface painted in the Olive Green. The last color to be painted was flat black. Looking through the many pictures of the reference, all of the aircraft in these colors had very hard edges to their camouflage. With that in mind, I masked those areas I didn't want to be painted black and used Humbrol Flat Black for this section. I then went back and redid the Light Blue areas that had overspray on them, again using a lot of masking tape! Final painting was to do one section of the underside of one wing in black. Most unusual.
|
THE HOME STRETCH |
 Now I had a pretty well painted plane. During the paint session the inside of
the gear doors were sprayed yellow chromate and the outside of them as well as
the wheels were done in Light Blue. Back at the bench the wheel wells were brush
painted with yellow chromate and the insides of the main gear wells had the
covers painted with leather. It was probably a canvas but what the heck.
Now I had a pretty well painted plane. During the paint session the inside of
the gear doors were sprayed yellow chromate and the outside of them as well as
the wheels were done in Light Blue. Back at the bench the wheel wells were brush
painted with yellow chromate and the insides of the main gear wells had the
covers painted with leather. It was probably a canvas but what the heck.
Then the landing gear, which had been painted aluminum, was installed with superglue. I'd decided to use some True Details resin wheels that I had so the backs of them were drilled out to fit on the kit axles. Some trimming of the gear doors is needed to get the fit that is needed. Unlike the earlier boxings, this one provides some info on taking care of this. With the plane on its gear, it was time to apply the decals.
Fortunately, these decals were only 9 years old (1993) so I had no trouble with them at all. I used Microset for a solvent, though I did eventually have to resort to Solvaset to get the decals to properly snuggle down. I chose one of the two LeLv 42 planes; the one with the white tail stripes. These stripes are way too long so some trimming is needed. The white of the roundels is also a bit transparent, but nothing abnormal.
 With the decals on and dry, I started with some of the final bits. This meant
the exhaust first. The openings under the cowl are too small and the wrong
shape. I carved these out, but again, botched the job making them too large for
the exhaust. Well, I never claimed to be building a show model! The exhaust were
glued in as was the pitot tube, radio mast and the ring and bead sight. Then I
did all sorts of touch ups with a brush. Since I sprayed the Aeromaster right
from the bottle with no thinner, there was no problems with paint matches. Once
the flat coat was applied, you could not tell what was touched up.
With the decals on and dry, I started with some of the final bits. This meant
the exhaust first. The openings under the cowl are too small and the wrong
shape. I carved these out, but again, botched the job making them too large for
the exhaust. Well, I never claimed to be building a show model! The exhaust were
glued in as was the pitot tube, radio mast and the ring and bead sight. Then I
did all sorts of touch ups with a brush. Since I sprayed the Aeromaster right
from the bottle with no thinner, there was no problems with paint matches. Once
the flat coat was applied, you could not tell what was touched up.
After putting on the flat coat, I painted the exhaust with Burnt Iron and installed the guns. The masking was removed and the hood glued in the open position. Finally, the prop was glued on and the plane was complete. The prop just barely fits inside the housing. If you push it in as far as it seems it should go, the blades will rub against the cowling or hit the nose gun barrels. A bit of pastels were used for exhaust. Now I must say that I made a goof with this one, which isn't hard to believe. Most Finnish Hawk 75s were French planes captured and resold by the Germans and only had one wing gun. From what I gather, those sent from the US had two. Since I'd already opened up the shell ejector chutes in the wing, I went ahead and installed both wing guns. The Aeromaster instructions show two guns, but they may well be wrong as the Hawk 75 pictures in the reference show only one. I also later found out that the lower gear doors should have been removed. Thought you should know.
|
CONCLUSIONS |
This isn't the first time I've built this kit, but I seem to have made the same mistakes! Time will do that to you, you know. It is really a very nice kit on its own. It isn't perfect, but it provides a good basis for a model that you'll be pleased to have in your collection.
|
REFERENCES |
Finnish Fighter Aces. Suomen Ilmavoimien Historia #11, 1978
November 2002
# 1248 in a series
Copyright ModelingMadness.com. All rights reserved. No reproduction in part or in whole without express permission from the editor.
If you would like your product reviewed fairly and fairly quickly, please contact the editor or see other details in the Note to Contributors.
Back to the Reviews Index Page 2016