Hasegawa 1/48 P-40E Warhawk
| KIT #: | 09086 (JT 86) |
| PRICE: | $29.95 MSRP |
| DECALS: | Two options |
| REVIEWER: | Scott Van Aken |
| NOTES: |
| HISTORY |
The American military as well as the
military units from around the world spend a lot of time and effort in
keeping their heritage alive. For the US Navy, one of the most recognizable
units is the Jolly Rogers or the Red Rippers. Though the unit designation
changes, the nickname goes on with other squadrons. The US Air Force
basically keeps its heritage going with both Wings/Groups and with
individual squadrons. The famous 4th Fighter Wing of WWII continues today
with the 4th FW out 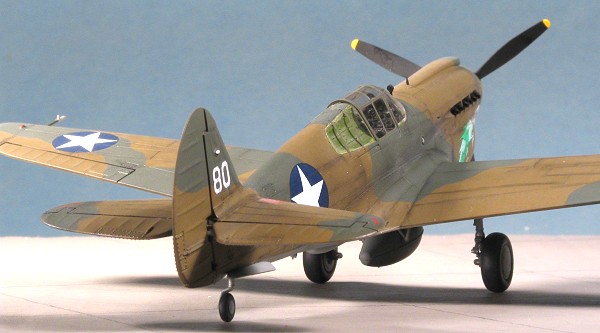 of
Seymour-Johnson AFB with their F-15Es. The squadrons are all there as well,
the 334th, 335th and 336th. From time to time others are added as is the
333rd which is used as an OCU. With the inevitable drawdown of units over
the decades since the hey-days of WWII, some have disappeared completely
and will probably never see the light of day again. The 380 BW is one of
those. The 'Best of the Southwest' will probably never be again.
of
Seymour-Johnson AFB with their F-15Es. The squadrons are all there as well,
the 334th, 335th and 336th. From time to time others are added as is the
333rd which is used as an OCU. With the inevitable drawdown of units over
the decades since the hey-days of WWII, some have disappeared completely
and will probably never see the light of day again. The 380 BW is one of
those. The 'Best of the Southwest' will probably never be again.
Despite this trend, there are units that are so indelible in Air Force history that they will probably never go away. One is the 23rd FG, the famous Flying Tigers. Though now a composite wing, many of their aircraft still carry the shark mouth made so famous with their P-40s. Another P-40 unit that should stay with the Air Force is the 49th FG, now flying F-117 Stealth fighters. The 7th 8th and 9th FS were the units that initially helped to defend Northern Australia from the Japanese and went on to Port Moresby, New Guinea, where it helped to stem the advance of Japanese forces. It eventually worked its way up the 'spine' of New Guinea and finally to the Philippines and beyond. They operated the P-40 long after their European counterparts were flying P-47s and P-51s. Most of their planes came from what was to be Lend Lease for the British so there was a mix of 'standard' USAAF birds with those painted and outfitted for the RAF. To me, the first year of combat for these men is the most interesting. When a country is not doing well in battle, it seems as if their aircraft are the most interesting in terms of the camouflage they use. When all is going well, they can take time to keep things standardized and as a result, for the modeler, things get a bit boring. That is why I like P-40s and tend to concentrate my P-40 building on the 23rd, 49th and 51st Fighter Groups.
| THE KIT |
Please visit the preview to see what comes in the box and to get a bit of background on the aircraft.
| CONSTRUCTION |
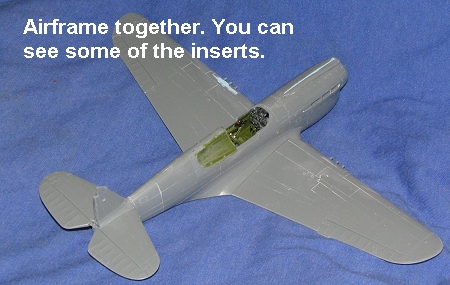
 As I'm often wont to do, I started
scanning the instructions for subassemblies. With all these inserts, I
decided to start with them. First ones were the wheel wells. These fit very
well and though do offer a bit of slop are nothing alarming. The shell
ejection chutes on the underside of the wing were next and these are a snug
fit. Once that had been done to both sides of the wing, I glued the upper
wings in place, followed by the gun inserts. These inserts are a bit looser
than the chutes. I also noticed that the guns are actually below the edge
of the wing. This is not what I'd expected as all the other P-40 kits I've
built had them right on the leading edge. My curiosity piqued, I went to my
Bowers book on Curtiss Aircraft 1907 to 1947 and from the photos, it sure
seems that they are as Hasegawa has molded them. Interestingly, the
drawings show them on the edge of the wing with one showing the center gun
mounted higher than the other two. This means don't trust drawings 100% as
they can lie. I also took the opportunity to glue the tail section to each
fuselage half before gluing the halves together. This will eliminate a lot
of possible fit problems later.
As I'm often wont to do, I started
scanning the instructions for subassemblies. With all these inserts, I
decided to start with them. First ones were the wheel wells. These fit very
well and though do offer a bit of slop are nothing alarming. The shell
ejection chutes on the underside of the wing were next and these are a snug
fit. Once that had been done to both sides of the wing, I glued the upper
wings in place, followed by the gun inserts. These inserts are a bit looser
than the chutes. I also noticed that the guns are actually below the edge
of the wing. This is not what I'd expected as all the other P-40 kits I've
built had them right on the leading edge. My curiosity piqued, I went to my
Bowers book on Curtiss Aircraft 1907 to 1947 and from the photos, it sure
seems that they are as Hasegawa has molded them. Interestingly, the
drawings show them on the edge of the wing with one showing the center gun
mounted higher than the other two. This means don't trust drawings 100% as
they can lie. I also took the opportunity to glue the tail section to each
fuselage half before gluing the halves together. This will eliminate a lot
of possible fit problems later.
 Back at the gluing, I glued the rear
bulkhead to the cockpit floor and then glued in the seat bracket (after
gluing the three parts together where they broke during shipment), control
stick and the flap handle to the floor. I also glued together the drop tank
halves. For some reason, I'd rather mount a drop tank than a bomb under my
Warhawks. I then attacked the photo etch fret which includes
basically stuff for the seat. There are two styles of belts and one
harness. There are also some teensy weensy bits for the seat adjustment
mechanism. One has to be a Munchkin to be able to handle those parts and I
ham-fisted my way through them as best I could. Once in place, the seat was
attached to the framework.
Back at the gluing, I glued the rear
bulkhead to the cockpit floor and then glued in the seat bracket (after
gluing the three parts together where they broke during shipment), control
stick and the flap handle to the floor. I also glued together the drop tank
halves. For some reason, I'd rather mount a drop tank than a bomb under my
Warhawks. I then attacked the photo etch fret which includes
basically stuff for the seat. There are two styles of belts and one
harness. There are also some teensy weensy bits for the seat adjustment
mechanism. One has to be a Munchkin to be able to handle those parts and I
ham-fisted my way through them as best I could. Once in place, the seat was
attached to the framework.
I then took all the interior bits, wheel wells, doors & such and had them sprayed with Testors US Interior Green that I'd darkened a bit. Then the interior parts were detail painted as shown in the kit instructions with black, aluminum and red. When dry, a wash of both acrylic black and dirty thinner was applied. I then dry-brushed it with aluminum. The cockpit parts were brought together and glued. You can insert the cockpit from the underside of the fuselage so I went to work on that.
First, the radiator assembly, which
had been painted previously, was trapped between the fuselage halves and
the halves glued. I also took this opportunity to install the carb intake
insert as well as the lower nose radiator insert. The insert for the back
transparencies wa s glued in at this time as well. Fit is good on them all,
though I did find that the cockpit insert was just a tad bit smaller than
the surrounding area. When dry, I used a sanding stick to even this area
out. You have to be very careful when sanding this part so as not to sand
away the rear window brace attachment bolts that are quite prominent. Once
all that was sanded and the lost detail rescribed, the interior was glued
in place from the underside. One thing that does seem to get in the way is
the little piece behind the main instrument panel that represents the back
of two instruments and provides a spot for you to attach the gun
sight. It seems to be a bit on the long side. I clamped the cockpit in
place to be sure of a good join while the glue dried.
s glued in at this time as well. Fit is good on them all,
though I did find that the cockpit insert was just a tad bit smaller than
the surrounding area. When dry, I used a sanding stick to even this area
out. You have to be very careful when sanding this part so as not to sand
away the rear window brace attachment bolts that are quite prominent. Once
all that was sanded and the lost detail rescribed, the interior was glued
in place from the underside. One thing that does seem to get in the way is
the little piece behind the main instrument panel that represents the back
of two instruments and provides a spot for you to attach the gun
sight. It seems to be a bit on the long side. I clamped the cockpit in
place to be sure of a good join while the glue dried.
 Back at the wing, I applied a couple
of coats of filler on the wing gun insert as it was just a teeny bit
shallower than the surrounding wing. Could have been a glitch on my part.
Once that was sanded down, the 'knees' on the front of the gear wells were
glued in place. Then I glued the tail planes and the wing in place. Fit on
the tail planes is excellent with the little connecting rod between the two
acting as a guide to ensure they were aligned. The wing also fit very well
with only a taste of filler being used. I also taped the wings while they
were drying to get the proper dihedral.
Back at the wing, I applied a couple
of coats of filler on the wing gun insert as it was just a teeny bit
shallower than the surrounding wing. Could have been a glitch on my part.
Once that was sanded down, the 'knees' on the front of the gear wells were
glued in place. Then I glued the tail planes and the wing in place. Fit on
the tail planes is excellent with the little connecting rod between the two
acting as a guide to ensure they were aligned. The wing also fit very well
with only a taste of filler being used. I also taped the wings while they
were drying to get the proper dihedral.
Next to be attached was the rudder
and its hinge. Returning to the cockpit, I glued in the gun sight and the
head rest. The clear bits were
 cut from the sprues and
prepped for installation. I glued the back pieces first and found that they
fit a bit proud of the edges on the back and lower part. I'm thinking that
perhaps the rivets under them are keeping them from fitting flush. I also
had a bit of trouble with the little 'pips' tearing the plastic when they
were cut off. I then masked all the clear parts. The windscreen was glued
in place with no trouble. The canopy seems a bit wide so I had to clamp it
while the glue was drying. It isn't thin enough to properly ride over the
back so it pretty much has to be cemented in the closed position.
cut from the sprues and
prepped for installation. I glued the back pieces first and found that they
fit a bit proud of the edges on the back and lower part. I'm thinking that
perhaps the rivets under them are keeping them from fitting flush. I also
had a bit of trouble with the little 'pips' tearing the plastic when they
were cut off. I then masked all the clear parts. The windscreen was glued
in place with no trouble. The canopy seems a bit wide so I had to clamp it
while the glue was drying. It isn't thin enough to properly ride over the
back so it pretty much has to be cemented in the closed position.
I then glued on several other small pieces such as the drop tank braces and the cowl flaps so that I could have it ready to paint. The instructions tell you to fill in the radio mast so I did. I'm sure that once I pick a scheme, I'll find out that I should have left this open! The wheel wells were stuffed with tissue and it was off to the paint shop.
| COLORS & MARKINGS |
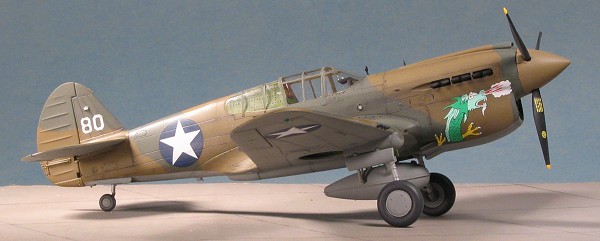
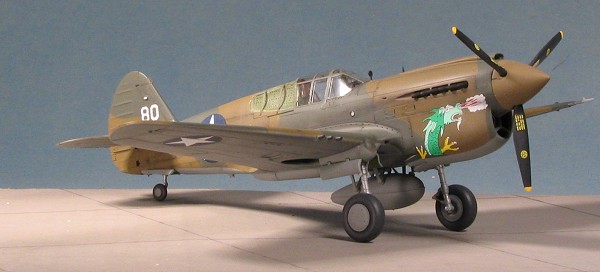
Unlike most of my models, I really
hadn't planned on any specific scheme for this one other than I knew I
didn't want to use the kit markings. So I started rifling through my
decals. I found a nice Superscale sheet (48-802
from 2002) with a couple of 49 FG aircraft on it (my
personal favorite unit for P-40s) and so sprayed the underside Neutral Grey
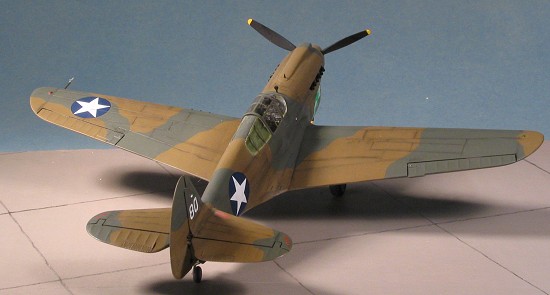
using ModelMaster enamels. With that dry, there was some masking of the
underside and the upper surface was painted in Dark Earth, again with
ModelMaster enamels. These aircraft were painted using masks so there will
not be a soft edge to the colors. With that
 in mind, even though I
freehanded the last one, I masked off the Dark Earth portions and gave the
rest of the airframe a good coat of ModelMaster enamel Dark Green. Now I
know that I could have used some other greens that were a bit 'off' as US
equivalent paint was not exactly the same as the RAF colors. I did that
with the AMtech P-40E and it looks good that way,
but really, this looks fine the way it is. Once it was dry, I did a bit of
pastel work on the panel lines just to add some interest. Then it was
time to add a few more bits and pieces.
in mind, even though I
freehanded the last one, I masked off the Dark Earth portions and gave the
rest of the airframe a good coat of ModelMaster enamel Dark Green. Now I
know that I could have used some other greens that were a bit 'off' as US
equivalent paint was not exactly the same as the RAF colors. I did that
with the AMtech P-40E and it looks good that way,
but really, this looks fine the way it is. Once it was dry, I did a bit of
pastel work on the panel lines just to add some interest. Then it was
time to add a few more bits and pieces.
Basically, I like to get the kit on its landing gear before applying the clear acrylic gloss (Future) in preparation for applying decals. I generally leave off doors and wheels and other little bitty parts until the final construction phase. This is as much to prevent them from being knocked off as anything else! I glued the landing gear and the two strut assemblies into their respective locators and left them to dry. You can basically insert the retraction struts before inserting the gear, a helpful ability as things are a touch tight in there. The tail strut took a teeny bit of bending to get into place.
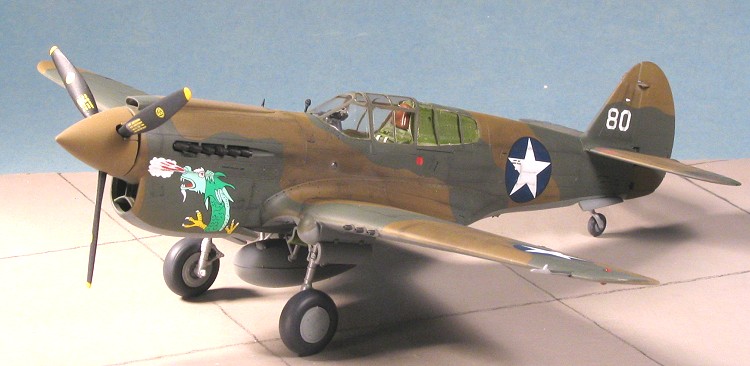
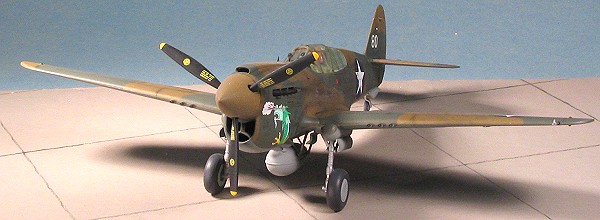
Once on its gear, I applied the 'green dragon' markings for one of the 9 FS/49 FG aircraft. It was a tough choice as the other set of markings was nice as well. I'm sure that there will be a flood of new sheets for this kit. I also applied the stencils. I'm not sure if they would have been there or not, but really, unless the aircraft is repainted, they would be there. I found a very few photographs that were detailed enough to show these stencils and it seems that even on rather well used planes, they were still visible. Your choice as it adds a bit of time to apply these markings.
| FINAL CONSTRUCTION |
Once the decals were on and had
dried, I started adding on the other pieces. In this case it meant gear
doors for a starter. The tail wheel doors have the actuating arm, the first
time I've ever seen this part included on a kit. I then drilled out the
holes in the upper fuselage (there are guides there) to install the ring
and bead sight. I would have thought that with a proper gun sight that this
would not have been installed, but again, photos show that almost every
P-40 still had the rin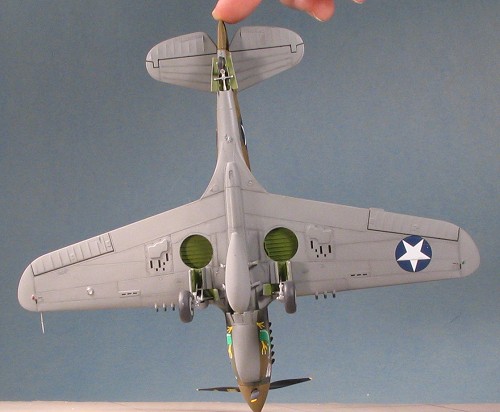 g
and bead installed. Probably to use when the normal gun sight failed. While
the 'bead' part of it looks fine, I'd suggest an aftermarket 'ring' as the
kit one is solid.
g
and bead installed. Probably to use when the normal gun sight failed. While
the 'bead' part of it looks fine, I'd suggest an aftermarket 'ring' as the
kit one is solid.
I also glued on the wheels. Hasegawa provides two sets of wheels; the covered ones and the spoked variety. The instructions indicate that you can use either, however this is not the case. It wasn't until the P-40N that the spoked variety became widely used. Photos of the aircraft provided in the kit markings indicate that the covered variety are used so you need to use those. Like the struts, the wheels are a touch loose so take care that they don't go out of whack when drying. Though two pitot assemblies are provided, the simpler one is used on these aircraft. I'm not sure why they have the older assembly as it looks more like it would be used on a P-36 or early P-40. Perhaps Hasegawa is considering doing those as well.
The prop bits were glued together and then pushed into the bearing in the nose. This is a bit of a loose fit so you may want to glue your prop to the nose. The drop tank was glued in place and I then painted the formation lights and the gun barrels prior to having an overall clear matte applied. Once that matte was done, I applied pastels over the decals where there were panel lines. I can't tell you how many times I've seen models where the panel lines are shaded in some form or another and the decals are pristine. Done it myself and it looks incongruous to say the least. You may not be able to tell from the photos, but the pastels are there! The masking was pulled from the canopy and I was delighted to be able to see all the detail in the cockpit through the crystal clear plastic. I then installed the exhaust stacks (which I'd drilled out since Hasegawa didn't feel like doing it for me) and put in the four little clear circles. One under the right wing, one under the rear of the wing, and one on each side of the cockpit (what those are for is totally beyond me as I've never seen those on a P-40 kit before). A bit of touch up paint, some clear gloss on the formation lights and that was it!
| CONCLUSIONS |
While this kit won't make all other
1/48 P-40s, obsolete, they will make them quite a bit less built. I have to
say that this is the best that has been done in 1/48 and it will take quite
some doing to produce one that is better. To my mind, some of the detail is
a bit overdone (such as the stuff with rivets), but Tamiya overdoes their
detailing and folks don't really find it too
 objectionable. It has
been a while since I've built a new mold Hasegawa kit and while I should be
amazed at it only taking five days from snipping bits to taking pictures, I
seem to recall the last one being a pretty fast build.
objectionable. It has
been a while since I've built a new mold Hasegawa kit and while I should be
amazed at it only taking five days from snipping bits to taking pictures, I
seem to recall the last one being a pretty fast build.
Hasegawa offers a ton of options for this kit and there are things I didn't do that I could have. For one, I didn't build the gun camera (because I think it looks ugly). I also didn't trim off the formation lights and use the clear ones supplied. To me that is just extra work as I'd paint over them anyway. I also chose not to run a radio long wire. I break these things off pretty quickly so better not to install them anyway. I'm sure that is what that 'thingie' on the leading edge of the upper fin is for.
They say that Tamiya and Hasegawa sell 90% of their stuff to the home market and the rest of the world is just 'gravy' for them. Well, I'd say that the P-40 chunk of that gravy has gotten bigger as this is one really fine kit.
| REFERENCES |
Arco-Aircam #7, Curtiss P-40D-N Warhawk, Chris Shores, 1969
February 2005
#1352 in a series
Copyright ModelingMadness.com. All rights reserved. No reproduction in part or in whole without express permission from the editor.
Kit courtesy of me and the fact that I just 'had to have' yet another P-40!
If you would like your product reviewed fairly and quickly, please contact the editor or see other details in the Note to Contributors.