AMtech 1/48 P-40E Warhawk
|
KIT # |
|
|
PRICE: |
$21.98 |
|
DECALS: |
Four aircraft |
|
REVIEWER: |
|
|
NOTES: |
Test shot |
|
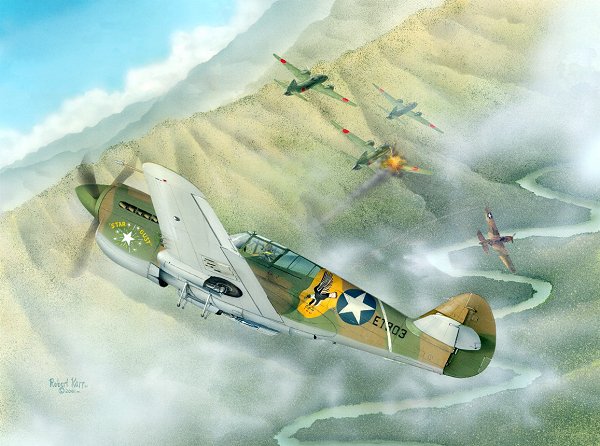
HISTORY |
 Numerically, the most important US Army Air Force plane of the
beginning of WWII was the P-40. The earlier versions had been in service for a
year or so and the later D and E model aircraft had been coming off the line.
These later versions had improved power, improved cooling and three .50 calibre
machine guns in each wing. These guns were to be the standard aircraft gun
of the war. As much as the US tried to get a decent operating small cannon such
as those used by all of the other major powers, it was not to be. In fact, the
machine gun was used well into the 1950s and it was only later that a workable
20mm was developed. Fortunately, the gun used was quite effective and able to
put a lot of lead into an area in a relatively short amount of time.
Numerically, the most important US Army Air Force plane of the
beginning of WWII was the P-40. The earlier versions had been in service for a
year or so and the later D and E model aircraft had been coming off the line.
These later versions had improved power, improved cooling and three .50 calibre
machine guns in each wing. These guns were to be the standard aircraft gun
of the war. As much as the US tried to get a decent operating small cannon such
as those used by all of the other major powers, it was not to be. In fact, the
machine gun was used well into the 1950s and it was only later that a workable
20mm was developed. Fortunately, the gun used was quite effective and able to
put a lot of lead into an area in a relatively short amount of time.
|
THE KIT |
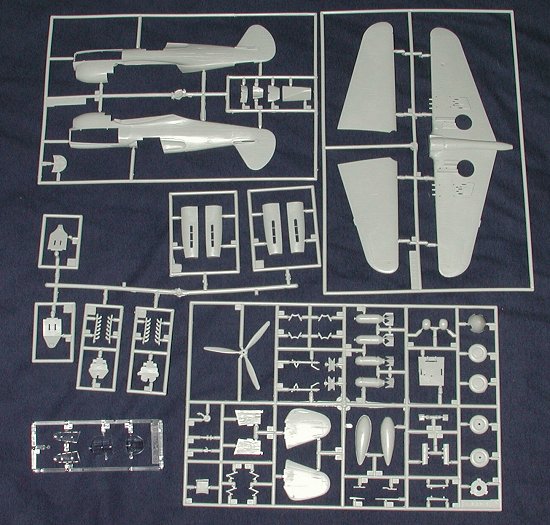
 As mentioned in the review of an earlier test shot
of this kit, AMtech has undertaken the lease and release of ERTL molds that were
never used when they decided to stop producing aircraft kits. As such, there is
much in common with the earlier ERTL models. Any shortcomings in these areas
will undoubtedly be filled by aftermarket people. Suffice it to say that having
an accurate 1/48 P-40E has been long in coming and I'm positive that the kit
will be well received. At least this time I remembered to take a photo of the
sprues! To be truly fair to the kit, it was built, as the other one, straight
from the box with no aftermarket parts. While those types of review are nice,
the vast majority of modelers will build their kit OOB and so that is how I
generally review them.
As mentioned in the review of an earlier test shot
of this kit, AMtech has undertaken the lease and release of ERTL molds that were
never used when they decided to stop producing aircraft kits. As such, there is
much in common with the earlier ERTL models. Any shortcomings in these areas
will undoubtedly be filled by aftermarket people. Suffice it to say that having
an accurate 1/48 P-40E has been long in coming and I'm positive that the kit
will be well received. At least this time I remembered to take a photo of the
sprues! To be truly fair to the kit, it was built, as the other one, straight
from the box with no aftermarket parts. While those types of review are nice,
the vast majority of modelers will build their kit OOB and so that is how I
generally review them.
Different from the other kit is that this one did come with decals and a set of preliminary instructions. As you can see, the decals are superbly printed and have markings for four aircraft. Two are Commonwealth birds in desert markings, and two are US, one from the 23rd FG in China and the other from the 49th FG in New Guinea. The US version were originally intended for the RAF so have US-equivalent colors (or close to it) to those used by the RAF.
 If you recall from the previous
review, there were some problem areas. Specifically those regarding the fit of
the horizontal tail planes, the engine covers and some areas that were short
shot. There was also some problem with matching of sections from the rear of the
upper carb scoop to the instrument anti-glare panel. The areas that were
short shot have basically been taken care of, though the one on the tailplane
still existed. The fit of the tail planes was also improved. Still there was a
gap problem on the left side. This seems to be endemic with the original mold
design and is not something that can be cured by AMtech. Secondly, this
particular kit must have had
If you recall from the previous
review, there were some problem areas. Specifically those regarding the fit of
the horizontal tail planes, the engine covers and some areas that were short
shot. There was also some problem with matching of sections from the rear of the
upper carb scoop to the instrument anti-glare panel. The areas that were
short shot have basically been taken care of, though the one on the tailplane
still existed. The fit of the tail planes was also improved. Still there was a
gap problem on the left side. This seems to be endemic with the original mold
design and is not something that can be cured by AMtech. Secondly, this
particular kit must have had  the
fuselage punched out of the mold while the plastic was still soft as there were
bumps on the fuselage halves that matched ejector pin marks on the inside. They
were not a problem to remove as a simple sanding took care of it. Still present
was the problem of matching of the upper forward fuselage, specifically the
instrument anti-glare panel. Frankly, this is also something that is endemic
with the original ERTL mold and is not something that AMtech can easily correct. Again,
it is relatively easy to cure with some filler.
the
fuselage punched out of the mold while the plastic was still soft as there were
bumps on the fuselage halves that matched ejector pin marks on the inside. They
were not a problem to remove as a simple sanding took care of it. Still present
was the problem of matching of the upper forward fuselage, specifically the
instrument anti-glare panel. Frankly, this is also something that is endemic
with the original ERTL mold and is not something that AMtech can easily correct. Again,
it is relatively easy to cure with some filler.
|
CONSTRUCTION |
 This was just as straight-forward on this kit as it was the
previous one. The gap situation on the engine cowling was fixed with thick
superglue. I poured it in from the rear and let it seep through the gap. Then it
was sanded flush with the rest of the fuselage. The benefit of using superglue
over putty is that it is easier to rescribe a panel line into without having
problems with it chunking. The cockpit was assembled and painted interior green
with some areas in black. Then it was given a wash and some dry brushing to
bring out detail. It and the intake assembly (which was also prepainted) were
then glued into the fuselage. When nearly dry, the prop shaft was trapped
between the fuselage and the halves glued together. After a bit of filler (which
is typical of every kit for me), the fuselage was sanded smooth and any detail
lost was rescribed. At this time, the exhaust were glued in place.
This was just as straight-forward on this kit as it was the
previous one. The gap situation on the engine cowling was fixed with thick
superglue. I poured it in from the rear and let it seep through the gap. Then it
was sanded flush with the rest of the fuselage. The benefit of using superglue
over putty is that it is easier to rescribe a panel line into without having
problems with it chunking. The cockpit was assembled and painted interior green
with some areas in black. Then it was given a wash and some dry brushing to
bring out detail. It and the intake assembly (which was also prepainted) were
then glued into the fuselage. When nearly dry, the prop shaft was trapped
between the fuselage and the halves glued together. After a bit of filler (which
is typical of every kit for me), the fuselage was sanded smooth and any detail
lost was rescribed. At this time, the exhaust were glued in place.
Next came the wing. The upper and lower sections were glued and what filler needed was used. Again, I filled in the holes for the wing bomb racks as I wasn't going to use them. The wing was mated to the fuselage and the upper wing fit was quite good. Once again, there was a small gap of about 1/16 - 1/32 inch at the rear of the wing. This was filled with strip styrene, filled and sanded smooth. This glitch is another that has been on every ERTL P-40 I have built and so is again, something that AMtech cannot cure. At this time, the machine gun barrels were drilled out. Then the tailplanes were installed. The fit here is much improved and so no filler or sanding was used.
The canopy parts were installed at this time using non-fogging superglue. They were then masked with Tamiya tape. This gave me a pretty well complete airframe and it was time to take it to the paint shop along with some of the other bits like the gear doors, landing gear and wheels.
|
CAMO & MARKINGS |
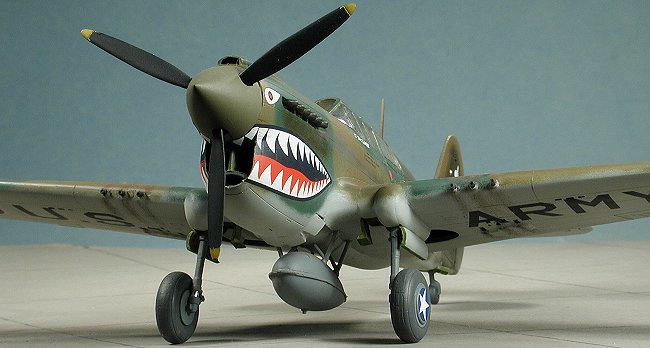
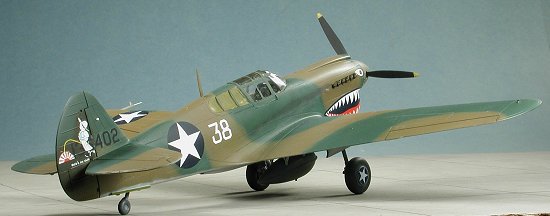
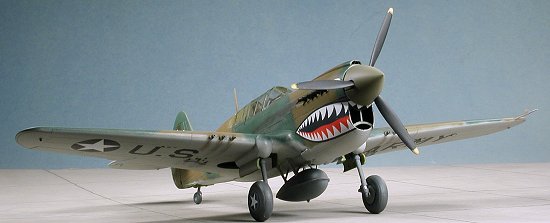
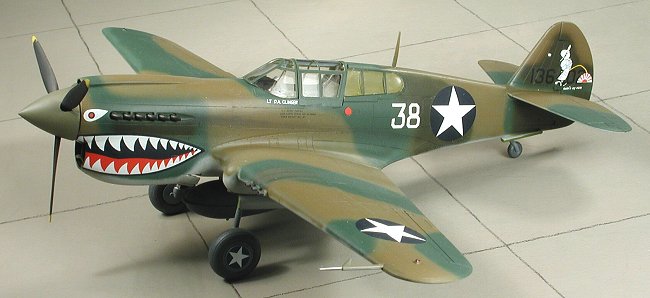
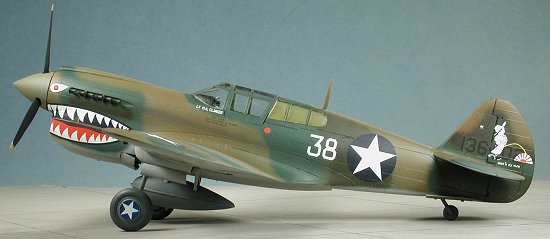 Having already done a P-40E in both Brit and 49th FG markings, I decided to do
this kit as the 23rd FG bird. Besides, I didn't have a single sharkmouthed P-40
in my collection! This particular plane was one that had been painted for the
RAF and then kept when the war broke out. The US did not use RAF standard
colors, but those that were close. In this case, the instructions called for FS
36118 Dark Earth, 34092 Dark Green and 36463 Sky Grey with 36087 OD for some
areas overpainted. Well, I had an ANA Dark Earth, the 34092 and the OD, but I
couldn't come up with any 36463 so used 16440, which is light gull grey,
instead. The Dark Earth was Aeromaster enamel, the Dark Green was Model Master
enamel, the OD was Tamiya acrylic and the 16440 was Model Master enamel. I also
used Aeromaster Neutral Grey and OD for some of the areas painted.
Having already done a P-40E in both Brit and 49th FG markings, I decided to do
this kit as the 23rd FG bird. Besides, I didn't have a single sharkmouthed P-40
in my collection! This particular plane was one that had been painted for the
RAF and then kept when the war broke out. The US did not use RAF standard
colors, but those that were close. In this case, the instructions called for FS
36118 Dark Earth, 34092 Dark Green and 36463 Sky Grey with 36087 OD for some
areas overpainted. Well, I had an ANA Dark Earth, the 34092 and the OD, but I
couldn't come up with any 36463 so used 16440, which is light gull grey,
instead. The Dark Earth was Aeromaster enamel, the Dark Green was Model Master
enamel, the OD was Tamiya acrylic and the 16440 was Model Master enamel. I also
used Aeromaster Neutral Grey and OD for some of the areas painted.
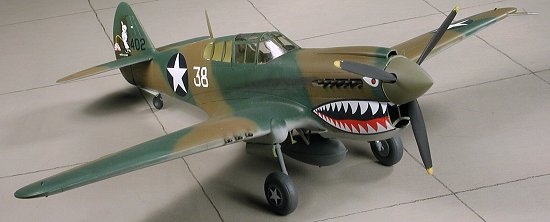
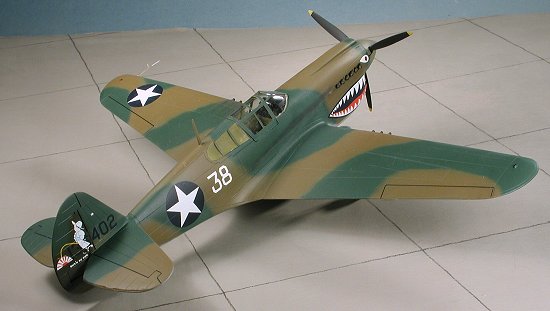
All of these colors were painted free-hand and the effect is really quite good. The drop tank, wheels and landing gear were painted Neutral Grey. I figured that since these were normally that color anyway, they wouldn't have been repainted just for the RAF. Or they could have been replacement parts. Same with the spinner, which I painted a faded OD. It really was just to add some interest to the aircraft. After all, scale modeling is more of an art form than a completely faithful representation of the real plane. Otherwise, we wouldn't do all this pre and post-shading or adding washes to panel lines or an number of other artistic tricks to our models. They'd also be made of the actual materials and weigh a heck of a lot more!!
With the colors on and in place, the kit returned to the workshop where the main gear had Bare Metal Foil added to the oleos. The gear were then glued into place as was the tail wheel. Then the main wheels were glued on. The fit here is pretty loose so I used super glue and accelerator to get them to quickly dry. Installation of the gear doors was next after painting the wheel wells and door interiors in chromate green (I'll probably get letters telling me they were actually chromate yellow!).
 Now that the beast was on its gear, it was returned to the paint shop to have a
few coats of Future clear acrylic misted on in preparation for the decals. Upon
return to the bench, the drop tank mounts were installed. To get these to fit
better, I highly recommend drilling out the mounting holes as they really are
too shallow. Once you clean up the mounts, then you need to test fit each one.
You should have the forward two a bit wider apart than the aft two so that they
will mate with the indentations on the drop tank. I tried putting them in as the
instructions suggested, but ended up having to move them all around several
times until I got the right combination. Unfortunately, I didn't write down
which part # fit into which hole. Perhaps I'll remember that on a subsequent
kit.
Now that the beast was on its gear, it was returned to the paint shop to have a
few coats of Future clear acrylic misted on in preparation for the decals. Upon
return to the bench, the drop tank mounts were installed. To get these to fit
better, I highly recommend drilling out the mounting holes as they really are
too shallow. Once you clean up the mounts, then you need to test fit each one.
You should have the forward two a bit wider apart than the aft two so that they
will mate with the indentations on the drop tank. I tried putting them in as the
instructions suggested, but ended up having to move them all around several
times until I got the right combination. Unfortunately, I didn't write down
which part # fit into which hole. Perhaps I'll remember that on a subsequent
kit.
It's decal time! With decal schemes like this, the first thing I do is to install one of the most difficult decals. That way, if I screw it up, I can always fall back on an alternative scheme. These decals are printed by Microscale so I knew that they would be well printed and would work well with all my decal solvents. The difficult decals on this scheme are the sharkmouth ones. This is because they have to conform to a variety of curves. There are some sections that you need to cut prior to getting the decal wet. I forgot and did it on the kit. Once the decal was pretty well in place, I took my super solvent, Champ, and gave it a bit of a dose to help on the forward curves. The rest of the decals went on beautifully. I chose to use the full markings on the tail as I though those were very nicely done. It requires some stacking of them, but the end result is superb. The Microscale white is completely opaque and no underside colors showed through.
|
CONSTRUCTION CONTINUES |
 Actually, very little else needed to be done once the decals were on. The kit
was wiped down with clear water to remove any decal glue and setting solution. A
coat of clear matte was applied and when dry, brought back to the modeling bench
for final bits. These included removing the masking from the canopy, a bit of
touch up painting that included the formation lights, and some pastels for the
exhaust. I didn't put on any antennas on this one as it won't be entered in any
shows, and those antennas usually only last a few weeks anyway!! The only
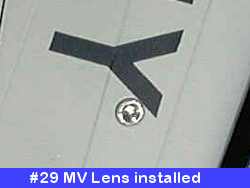
alteration from stock that was done was the installation of a #29 MV lens in
place of the kit supplied landing light. If you don't already have a stock of
these lights, I highly recommend them to replace kit lights. They can often be
found at model railroad shops if your local hobby shop doesn't carry them.
Actually, very little else needed to be done once the decals were on. The kit
was wiped down with clear water to remove any decal glue and setting solution. A
coat of clear matte was applied and when dry, brought back to the modeling bench
for final bits. These included removing the masking from the canopy, a bit of
touch up painting that included the formation lights, and some pastels for the
exhaust. I didn't put on any antennas on this one as it won't be entered in any
shows, and those antennas usually only last a few weeks anyway!! The only
alteration from stock that was done was the installation of a #29 MV lens in
place of the kit supplied landing light. If you don't already have a stock of
these lights, I highly recommend them to replace kit lights. They can often be
found at model railroad shops if your local hobby shop doesn't carry them.
|
CONCLUSIONS |
 What can I say that hasn't already been said. It is a ready to run P-40E. No kit
bashing required. The molds are old friends in many respects and are much better
aligned than those on the previous ERTL P-40 versions. It is not a Tamigawa kit.
However, it is one that nearly all modelers can build with no real problems.
You'll just have to exercise a few of those modeling skills; ones that I use
with every kit I have ever built. It is one that I recommend to all.
What can I say that hasn't already been said. It is a ready to run P-40E. No kit
bashing required. The molds are old friends in many respects and are much better
aligned than those on the previous ERTL P-40 versions. It is not a Tamigawa kit.
However, it is one that nearly all modelers can build with no real problems.
You'll just have to exercise a few of those modeling skills; ones that I use
with every kit I have ever built. It is one that I recommend to all.
Late note. Since this review was written, I have received a full production copy of this kit. A number of the problems mentioned in this review have been fixed or reduced. The left engine cover fits much better, the anti-glare panel and upper nose section have been much improved in terms of fit and matching. The one horizontal stabilizer is still a bit thick and the bumps are still there, but again, this is nothing difficult to fix. The folks at AMtech have done a lot of work to improve the kit and I think you'll be pleased with the results.
Late note: As many of you know AMtech is no longer a going concern following the near death of the owner. AMtech kits can still be found with a bit of looking. Also, before sending me e-mails, I know that the area behind the quarter windows should be the exterior color. This information was not widely known when the kit was built.
March 2002
Copyright ModelingMadness.com
If you would like your product reviewed fairly and fairly quickly, please contact the editor see other details in the Note to Contributors.
Back to Reviews Page 2016