| KIT #: | 014 |
| PRICE: | €10 (approx $18) |
| DECALS: | Two options |
| REVIEWER: | Gordon Zamit |
| NOTES: | Linden Hill Decals used. |
| HISTORY |
Same as my other Mi-24 review
| THE KIT |
The Italeri kit is an older one of this
 out
3mm, all discrepancies in 1/72nd scale. The tail boom is also short
in length by another 6mm, and more over the cross section of the tail fin is
wrong. It should have an aerofoil section like a conventional wing shape and not
a symmetrical cross section as in the Italeri kit. The sweep angle of the tail
is also not enough.
out
3mm, all discrepancies in 1/72nd scale. The tail boom is also short
in length by another 6mm, and more over the cross section of the tail fin is
wrong. It should have an aerofoil section like a conventional wing shape and not
a symmetrical cross section as in the Italeri kit. The sweep angle of the tail
is also not enough.
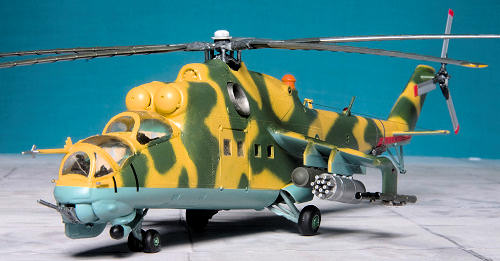
The cockpit, although not accurate is not bad, but the seats are! If they were the size as they are in the kit, the Hind would be a comfortable 4 seater! The undercarriage is also inaccurate, and the sit of the helo if built with the supplied undercarriage would be very parallel to the ground, which is not the real case. Another inaccuracy is the wingspan of the stub wings which is too large by around 10mm. Apart from these, there are several smaller details like the exhaust pipes that although not huge, they are there and noticeable. What this kit provides and the Hobbyboss one does not are the exhaust suppressors, which I left off to use later on a Hobbyboss kit. It contains some armament but I did not use any of them and just cut off the pylons from the rocket pods and used them instead.
| CONSTRUCTION |
I built this kit together with a Hobbyboss
Hind-V which I reviewed earlier here on Modeling Madness. So I tried to correct
these faults according to what’s in that kit. First thing I did was to narrow
the seats. I cut off around 3mm from the middle of them and glued them back
together. Although they are still a bit wide, they look much better than they
were originally. The cockpit of the Italeri is not bad and I only made some
minor modifications to it.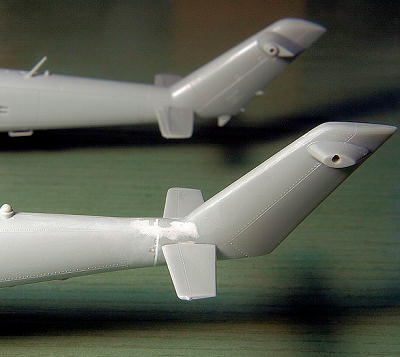
Next came the tail boom: I have an Airfix Hind in the stash which I bought with the intention of making an early Hind-A. Since the Airfix kit can be also built as a Hind-D, it offers both port and starboard tail rotors style. Since most (if not all) of the early Hind-A models had the starboard pusher tail rotor, I intend to use this for the Airfix kit when I build it, so I have the port puller tail rotor as spare, so it ended up correcting the Italeri tail, which has a lot of mistakes (as stated above, not enough sweep, incorrect cross section shape, and short in length). I sawed off the Italeri end of the boom and fitted the Airfix section here. After some putty and sanding, I got a satisfactory result, and the tail rotor now looked much better, and at least I got the overall length correct. Next came the main rotor. Somehow Italeri managed to make a mess out of this. It turns in the wrong direction, the blades are short and they are also narrow in chord and quite thick especially at the base.
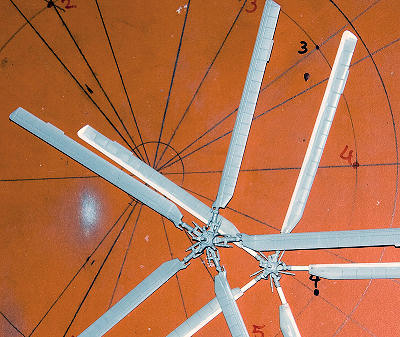 The rotor
hub is also incorrect of course. I sawed off the blades at the point where they
meet the main hub shafts. To get a wider chord, I used 2 Evergreen rods, one of
larger diameter than the other and glued these next to each other and then to
the leading edge of the blades. I left these longer than the blades to get the
length correct at least at the leading edge. These were than filled with filler
all the way, and sanded and filled several times to get a smooth finish. The
blade tips were cut from sheet styrene and glued and sanded to shape with the
aid of even more filler. Well, the main rotor alone took more filler than around
10 decent kits! After finishing the blades off one by one, I drilled small holes
in the ends and in the hub shafts to reinforce the join there and placed short
pieces of copper wire and glued them over these. The rotor hub was modified so
as to get the actuators at least on the right side, but it is still far off both
from the real one, and also from the excellent Hobbyboss kit representation.
The rotor
hub is also incorrect of course. I sawed off the blades at the point where they
meet the main hub shafts. To get a wider chord, I used 2 Evergreen rods, one of
larger diameter than the other and glued these next to each other and then to
the leading edge of the blades. I left these longer than the blades to get the
length correct at least at the leading edge. These were than filled with filler
all the way, and sanded and filled several times to get a smooth finish. The
blade tips were cut from sheet styrene and glued and sanded to shape with the
aid of even more filler. Well, the main rotor alone took more filler than around
10 decent kits! After finishing the blades off one by one, I drilled small holes
in the ends and in the hub shafts to reinforce the join there and placed short
pieces of copper wire and glued them over these. The rotor hub was modified so
as to get the actuators at least on the right side, but it is still far off both
from the real one, and also from the excellent Hobbyboss kit representation. 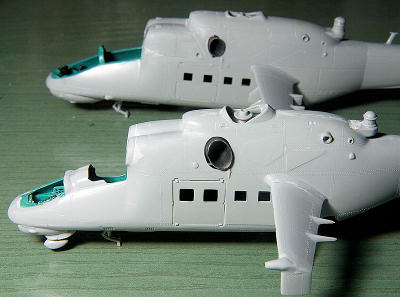
The main undercarriage was also modified. If
built straight from the box, the Hind will sit level to the ground, but it
should certainly be in a nose up position. Guided by the Hobbyboss kit, I cut
the parts to get the correct dimensions. Not all the actual linkages and
supports are presented here. The Hobbyboss kit is very detailed here and looking
at actual photos seems to be perfectly correct.
Another obvious mistake is in the wings. These are too wide in span and around 6mm was taken off at the base. The mistake seems to be at the base and the pylons are not far off from the correct positions fortunately. The pylons are moulded in one piece to the armament, but I cut these off and glued them to the wings. I had a lot of nice weapons left over from the Hobbyboss kit (of which I bought another providing me with even more spare weapons), so the Italeri bits went to the spares bin. The canopies were masked with Tamiya tape and glued with Krystal Kleer. The Italeri kit does provide the option for an open canopy which the Hobbyboss kit does not.
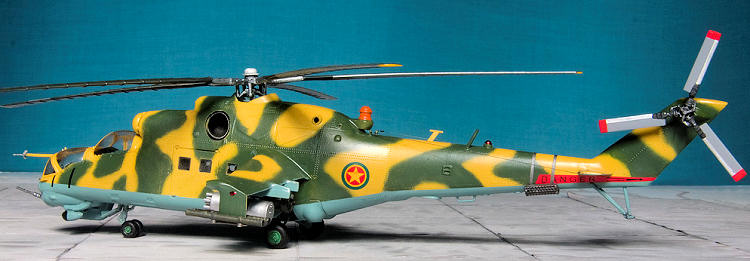
| COLORS & MARKINGS |
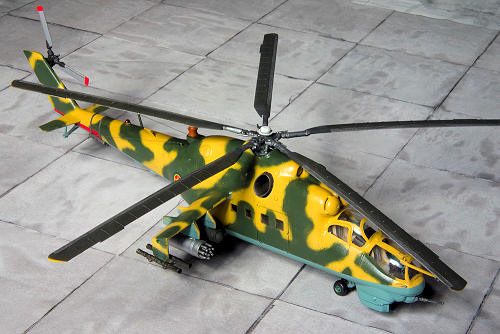 As with my
previous Hobbyboss Hind, markings came from the Linden Hill sheets. I chose an
Ethiopian Hind-D finished in a sand and green over light blue camouflage. The
sand colour is a mix of my own, and the green is Humbrol 105 which was
airbrushed free handedly. The demarcation line between these and the light blue
underside is hard edged according to the few available photos of these Hinds, so
it was masked off with tape. For the underside I used Model Master Russian
Underside blue. The rotor hub top was painted white and the dorsal antenna
fairing a dark orange. The main rotor is dark grey with aluminum leading edges
and yellow tips on the underside only. The tail rotor is a medium grey with
aluminum leading edges and red rotor blade tips. After applying a coat of Klear,
the decals were applied. They performed flawlessly, and the model was given an
overall coat of Humbrol satin varnish. The masking was removed and the armament
fitted with white glue. The chaff/flare dispensers were attached, their straps
were made from painted Tamiya tape strips. Wire antennae were made from fishing
line attached with superglue in a slack position and later tightened with a hot
screwdriver run underneath a few millimeters away, and then painted with MM
metalizer. I use this paint as I it does not form any blobs before drying on
such thin materials.
As with my
previous Hobbyboss Hind, markings came from the Linden Hill sheets. I chose an
Ethiopian Hind-D finished in a sand and green over light blue camouflage. The
sand colour is a mix of my own, and the green is Humbrol 105 which was
airbrushed free handedly. The demarcation line between these and the light blue
underside is hard edged according to the few available photos of these Hinds, so
it was masked off with tape. For the underside I used Model Master Russian
Underside blue. The rotor hub top was painted white and the dorsal antenna
fairing a dark orange. The main rotor is dark grey with aluminum leading edges
and yellow tips on the underside only. The tail rotor is a medium grey with
aluminum leading edges and red rotor blade tips. After applying a coat of Klear,
the decals were applied. They performed flawlessly, and the model was given an
overall coat of Humbrol satin varnish. The masking was removed and the armament
fitted with white glue. The chaff/flare dispensers were attached, their straps
were made from painted Tamiya tape strips. Wire antennae were made from fishing
line attached with superglue in a slack position and later tightened with a hot
screwdriver run underneath a few millimeters away, and then painted with MM
metalizer. I use this paint as I it does not form any blobs before drying on
such thin materials.
| CONCLUSIONS |
 Finishing
this model was a satisfaction not because of it being something good, but
because I managed to finish it and move on to something else!! Before I started,
I thought that it would be much easier to finish, but ended up being more time
consuming than I actually estimated. In the time spent on it, I could have
easily finished 2 Hobbyboss Hinds and with better results, but it’s the
challenge that sometimes drives us modelers to go on some projects which, after
we finish, we regret we started at first of all. As I said, I won’t make the
other Italeri Hind that I have in the stash, but it may be a source for some
spares like the engine suppressors and chaff/flare dispensers as well. This kit
is not recommended at all: for a 1/72nd scale Hind the choice at
present is the Hobbyboss.
Finishing
this model was a satisfaction not because of it being something good, but
because I managed to finish it and move on to something else!! Before I started,
I thought that it would be much easier to finish, but ended up being more time
consuming than I actually estimated. In the time spent on it, I could have
easily finished 2 Hobbyboss Hinds and with better results, but it’s the
challenge that sometimes drives us modelers to go on some projects which, after
we finish, we regret we started at first of all. As I said, I won’t make the
other Italeri Hind that I have in the stash, but it may be a source for some
spares like the engine suppressors and chaff/flare dispensers as well. This kit
is not recommended at all: for a 1/72nd scale Hind the choice at
present is the Hobbyboss.
| REFERENCES |
Mi-24 D, V, DU,
4+ Publications.
The Complete Encyclopedia of Aircraft
Photos on www.airliners.net.
March 2010
Copyright ModelingMadness.com. All rights reserved. No reproduction in part or in whole without express permission from the editor.
If you would like your product reviewed fairly and quickly, please contact the editor or see other details in the Note to Contributors.