Hobbyboss 1/72Mil Mi-24V Hind E
| KIT #: | 87220 |
| PRICE: | €12 (approx USD$18) |
| DECALS: | Two Options |
| REVIEWER: | Gordon Zammit |
| NOTES: | Linden Hill Decals used. |
| HISTORY |
The Hind was the first
 The Mil OKB
later made a thorough redesign of the front end of the helicopter which emerged
as the Mi-24D, known to NATO as the Hind-D, which became the main production
example for a long period during the cold war. The main differences were a new
cockpit with a crew of 2 in tandem and a turret mounted gun under the chin.
Other differences were various electronic countermeasures equipment and
targeting devices for the air-to-surface armament carried. The tail rotor was
reversed from the starboard to port on the Hind-A and consequently all Hind-Ds
and later had the tail rotor on the port side. The Hind-V, which the Hobbyboss
kit represents, is very similar externally to the Hind-D, and most modifications
are in the electronics fit, which can be very easily replicated by the modeler.
However the Russian AF depicted in the decals supplied with the kit are for a
Hind-P, with a side mounted 30mm gun instead of the turret mounted 12.7mm
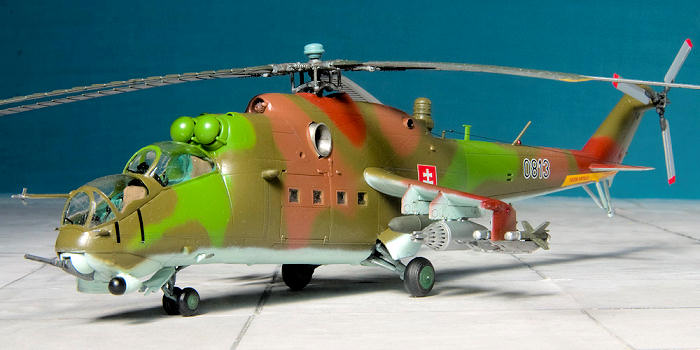
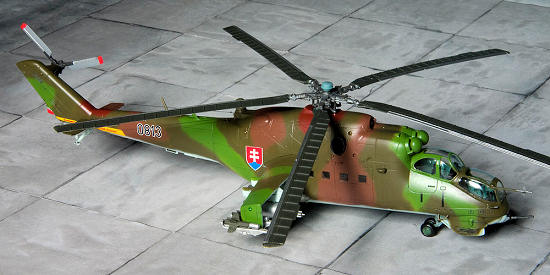
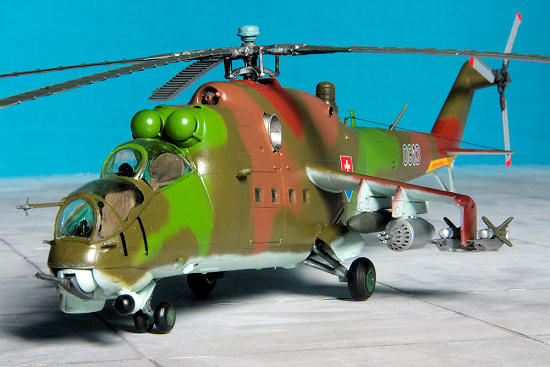
machine gun. I chose to build my Hind-V as a Slovak AF model, one of many
interesting colour schemes available on the 2 Linden Hill Decal sheets named
"Bush War Hinds" part 1 and 2.
The Mil OKB
later made a thorough redesign of the front end of the helicopter which emerged
as the Mi-24D, known to NATO as the Hind-D, which became the main production
example for a long period during the cold war. The main differences were a new
cockpit with a crew of 2 in tandem and a turret mounted gun under the chin.
Other differences were various electronic countermeasures equipment and
targeting devices for the air-to-surface armament carried. The tail rotor was
reversed from the starboard to port on the Hind-A and consequently all Hind-Ds
and later had the tail rotor on the port side. The Hind-V, which the Hobbyboss
kit represents, is very similar externally to the Hind-D, and most modifications
are in the electronics fit, which can be very easily replicated by the modeler.
However the Russian AF depicted in the decals supplied with the kit are for a
Hind-P, with a side mounted 30mm gun instead of the turret mounted 12.7mm
machine gun. I chose to build my Hind-V as a Slovak AF model, one of many
interesting colour schemes available on the 2 Linden Hill Decal sheets named
"Bush War Hinds" part 1 and 2.
| THE KIT |
This is the latest
kit in 1/72nd scale of this Soviet iconic gunship, and it is certainly
the best example in this scale. Hobbyboss seem to be focusing on a lot of nicely
molded helicopters in this scale from all over the world. They have also issued
a nice model of its carrier counterpart the Mi-8, which is also a great
improvement over the previously available models of the Mi-8. For the Hind,
before the Hobbyboss, we had the Airfix (and Heller), Hasegawa and Italeri all
of which had some inaccuracies in dimensions and other faults which we were not
able to detect easily when they were issued as there were very few references on
t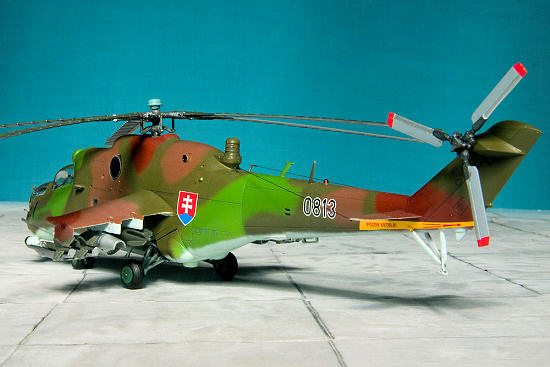 hese
Soviet machines. In fact while building this kit I also built an Italeri kit
(another review for it will follow shortly hopefully), and tried to correct as
much as I could to make it match the Hobbyboss example. But I won't do it again
and the other Italeri kit in my stash will end up in the spares bin now!
hese
Soviet machines. In fact while building this kit I also built an Italeri kit
(another review for it will follow shortly hopefully), and tried to correct as
much as I could to make it match the Hobbyboss example. But I won't do it again
and the other Italeri kit in my stash will end up in the spares bin now!
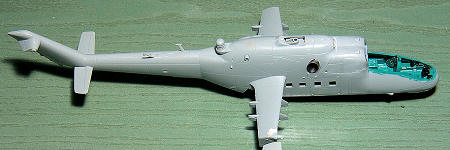
This kit has a very respectable interior complete with the troops cabin and seat, a very nice cockpit with side detail as well as pilots seats. I think for 1/72nd it is the best which can be achieved in styrene alone. The detail on the exterior in finely engraved and seems to match the many available photos of the real Hind. The kit also includes a lot of armament with it, enough to equip at least 2 Hinds with full weapons, and still have more left. There is no indication however as how to paint the armament on the instructions. Another annoying but understandable issue with the kit is the seam line running along the middle of the canopy. Also, the interior painting instructions are lacking and probably not accurate. For example, light blue is suggested for the cockpit, which might be true for newer or refurbished models, but older examples were always painted in the soviet blue-green colour which was standard at the time. As references now are quite abundant, we should not have a lot of trouble as how to paint this model.
| CONSTRUCTION |
Starting as usual at the cockpit, we have the
whole floor of the cockpit and troop compartment as one piece. I followed the
instructions and built the cockpit and interior and painted these from photos I
had of real Hind-D's. This assembly fits onto the fuselage halves by means of
several pegs that are about 4mm wide and the fit in nearly perfect and alignment
is also very good. In fact dry fitting the two halves and the interior is so
positive that the whole assembly stays together without glue. To have the
interior visible, you have the option to leave the cabin door open, but it's not
my taste, and I always finish my models with all
 doors and
cockpits in the closed position. In my opinion this gives the best impression of
the whole design of the aircraft with the aerodynamic profile clearly
represented, although I appreciate models which have a lot of more effort and
display the whole interior of course. Construction continued as per instructions
with the difference that I did not glue the main rotor hub in place and left it
so as to keep the rotors as separate assemblies and just place them in place
after everything if finished, as is usually done by all of us I suppose. I also
added some nose weight although the instructions do not mention it, just to be
sure not to end up having a tail sitter.
doors and
cockpits in the closed position. In my opinion this gives the best impression of
the whole design of the aircraft with the aerodynamic profile clearly
represented, although I appreciate models which have a lot of more effort and
display the whole interior of course. Construction continued as per instructions
with the difference that I did not glue the main rotor hub in place and left it
so as to keep the rotors as separate assemblies and just place them in place
after everything if finished, as is usually done by all of us I suppose. I also
added some nose weight although the instructions do not mention it, just to be
sure not to end up having a tail sitter.
 I then
tackled the canopy mold line problem. I sanded it down with wet and dry sand
paper, starting with 1000grit and than with 2000. I then polished it with
toothpaste and ended up with a very smooth but not perfectly clear transparency.
(I have made another attempt since then on the Italeri F-100D canopy and
polished this with Turtle Wax Metallic paint polish and the result is very
promising, and a lot clearer). I then dipped it in Johnsons Klear and left it to
dry in a small container. I dipped it again the day after and it ended up very
well. Construction was very simple just following the instructions and fit of
all parts was very good to excellent. The only trouble I found with building
this kit was the engine exhaust pipes. These are moulded in halves and do not
match very well. I tried to added pieces of styrene from flash of other kits to
build up the thickness differences and a lot of sanding and filler finally got a
good result. A little bit of filler is also required on the stub wings and in
front of the engine intakes as can be seen in the in progress photo. The main
undercarriage construction is not explained well on the instructions and may be
a little tricky to assemble, but it is a very good replica of the real thing.
Other than these, the progress is smooth and rapid.
I then
tackled the canopy mold line problem. I sanded it down with wet and dry sand
paper, starting with 1000grit and than with 2000. I then polished it with
toothpaste and ended up with a very smooth but not perfectly clear transparency.
(I have made another attempt since then on the Italeri F-100D canopy and
polished this with Turtle Wax Metallic paint polish and the result is very
promising, and a lot clearer). I then dipped it in Johnsons Klear and left it to
dry in a small container. I dipped it again the day after and it ended up very
well. Construction was very simple just following the instructions and fit of
all parts was very good to excellent. The only trouble I found with building
this kit was the engine exhaust pipes. These are moulded in halves and do not
match very well. I tried to added pieces of styrene from flash of other kits to
build up the thickness differences and a lot of sanding and filler finally got a
good result. A little bit of filler is also required on the stub wings and in
front of the engine intakes as can be seen in the in progress photo. The main
undercarriage construction is not explained well on the instructions and may be
a little tricky to assemble, but it is a very good replica of the real thing.
Other than these, the progress is smooth and rapid.
| COLORS & MARKINGS |
As already mentioned, I bought both sheets from
Linden Hill Decals, named Bush War Hinds collection part 1 & 2
that have Hinds from all over the world and intend to build some other
Hinds in the future from these very interesting sheets. I chose to built my
first Hind as a Slovak helo in a very unusual colour scheme. There are several
photos of these Hinds on the internet and they seemed to have been repainted in
similar scheme with different shades of colours. Their serial number seemed to
have been changed from white outlined black numbers to solid black. After
viewing a lot of photos from the internet, I decided to change the lighter shade
of green mentioned in the instructions as Humbrol 88 to a lighter shade, and I
chose Revell SM360. I kept the other
 colours
according to the Linden Hill instructions. After finishing the kit I am still
not sure which are the best colours to represent the Slovak colour scheme, but I
found a single older photo that seems to prove Linden Hill right is saying that
H88 is a good match for the older variation of the camouflage, so sticking to
the instructions might have been right. The propellers were sprayed according to
the photos of the real aircraft.
colours
according to the Linden Hill instructions. After finishing the kit I am still
not sure which are the best colours to represent the Slovak colour scheme, but I
found a single older photo that seems to prove Linden Hill right is saying that
H88 is a good match for the older variation of the camouflage, so sticking to
the instructions might have been right. The propellers were sprayed according to
the photos of the real aircraft.
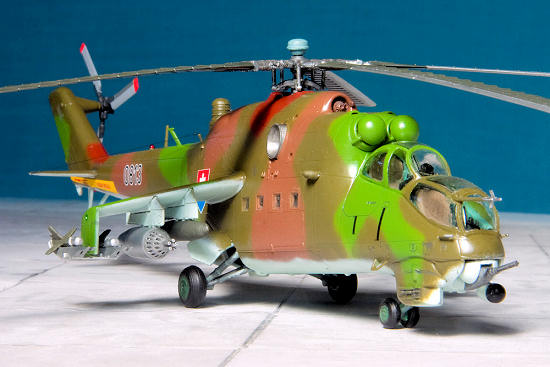
After finishing off the camouflage free-handly,
I sprayed some Klear, and 2 days after I applied the decals using a little Klear
again to set them in. They performed wonderfully and blended in very well. I
then srayed some Humbrol satin varnish all over. When I removed the masking from
the canopy, I was disappointed to find that the tape had left lines were it
ended and other pieces of tape overlapped. This left the canopy with a lot of
white lines all over and the canopy was nowhere near where it was before
masking. Probably this happened as the Klear had not cured totally before I
applied the masking tape. I left it for a few days and then started to sand it
with 2000 grit sand paper with water and a little liquid soap, until the lines
almost disappeared. After cleaning I started to apply coats of Klear again, and
after some four or five layers, the canopy was nearly as it was before but not
as good as it was, but that will have to do for this one. Next time I will
either wait for a week or more until I mask it, or else polish it with car
polish and mask it without Klear. I filled the side windows with Krystal Klear.
I painted the armament from reference photos of the real helicopter and from
| CONCLUSIONS |
This was a very pleasant build, and the only real problem was with the engine exhausts. I must say that I agree with others who have said that this is the best Hind in 1/72nd scale, although I do not have the Hasegawa, but this is known to have some inaccuracies. What this kit lacks and can be found in the Italeri Hind are the exhaust suppressors and the strap on chaff/flare dispensers, so if you have one in the stash don’t throw it away, as you can fit these on the Hobbyboss Hind to get something different. I will follow with an Italeri review to compare the kit and what modifications I did to try to get a decent result.
| REFERENCES |
Squadron/Signal 1083 Mil Mi-24 Hind in Action.
Mi-24 D, V,
DU, 4+ Publications.
The Complete Encyclopedia of Aircraft
October 2009 If you would like your product reviewed fairly and quickly , please
contact
me or see other details in the
Note to
Contributors.