MAC 1/72 Horch 180 type 1a
|
KIT # |
72055 |
|
PRICE: |
$20.98 ($17.96 at Squadron) |
|
DECALS: |
Two vehicles |
|
REVIEWER: |
|
|
NOTES: |
|
HISTORY |
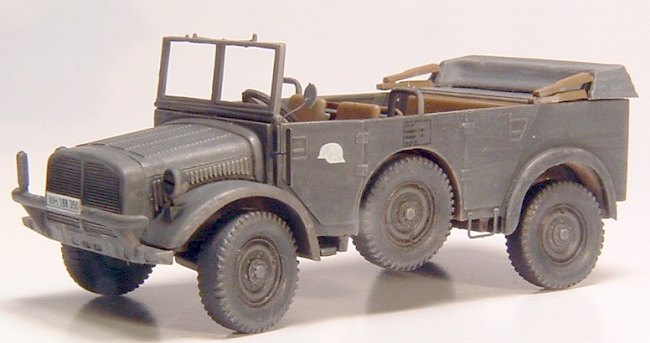
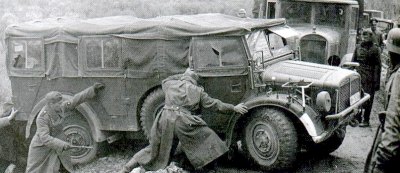 The Horch was developed in the 1930’s to put the
Wehrmacht on the road. It was produced from 1937 to 1940. It served in
virtually all theaters of the European war. It was also heavily modified,
serving as a communication car, an ammo vehicle, and as an anti-aircraft gun
carrier. Distinctive features of the vehicle were the side mounted spares and
the steer able rear wheels. There doesn’t seem to be a lot out on the web
about this vehicle. I’ve included what pictures I could find in discussion
groups in the article so that you’ve got some idea of what the real thing
looked like in service. If you look closely at the photo you can see the
rear wheels being steered.
The Horch was developed in the 1930’s to put the
Wehrmacht on the road. It was produced from 1937 to 1940. It served in
virtually all theaters of the European war. It was also heavily modified,
serving as a communication car, an ammo vehicle, and as an anti-aircraft gun
carrier. Distinctive features of the vehicle were the side mounted spares and
the steer able rear wheels. There doesn’t seem to be a lot out on the web
about this vehicle. I’ve included what pictures I could find in discussion
groups in the article so that you’ve got some idea of what the real thing
looked like in service. If you look closely at the photo you can see the
rear wheels being steered.
|
THE KIT |
 The kit consists of two injection-molded
sprues, a small photoetch sheet, instructions and decals for two vehicles.
One is a DAK (German Africa Corps.) vehicle the other is from the Eastern
Front. The molding is average with no flash but mold seam lines are present
on most parts. Clean up will not be a major part of construction. The
photoetch set is superb. It is a nice thickness and the fret attachment
points are very small and easy to cut with a single edge razor.
The kit consists of two injection-molded
sprues, a small photoetch sheet, instructions and decals for two vehicles.
One is a DAK (German Africa Corps.) vehicle the other is from the Eastern
Front. The molding is average with no flash but mold seam lines are present
on most parts. Clean up will not be a major part of construction. The
photoetch set is superb. It is a nice thickness and the fret attachment
points are very small and easy to cut with a single edge razor.
The instructions are acceptable; some of the parts locations are somewhat vague but nothing that will have you completely confused. I had two complaints about the parts. There is no clear material to replicate the windshield glass in my kit. I don’t know if this was an omission since nothing is mentioned about it in the instructions. The chassis on my example had a serious warp. For a look at the bits, here is the preview.
|
CONSTRUCTION |
I’m not normally an AFV or car modeler but I
figured that I could apply many aircraft techniques to a small kit like this.
I started out by washing the parts (never know what’s on them). I then
sprayed all the parts while they were still on
 the tree with Model Master
Panzer Grey. I think the DAK vehicle offers the more attractive of the two
options, but owing to my lack of having a suitable desert sand color on hand I
decided to go with the Eastern front scheme. The one exception I made to
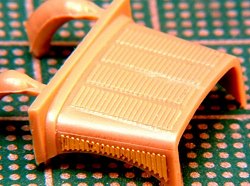
pre-painting was the hood. I removed it from the tree leaving a good size
stub for a paint handle. I scribed the hood opening line down each side of
the hood. I then cut the photoetch side louvers off the PE fret and applied
them to the sides of the hood with CA. I then sprayed the hood along with the
rest of the kit.
the tree with Model Master
Panzer Grey. I think the DAK vehicle offers the more attractive of the two
options, but owing to my lack of having a suitable desert sand color on hand I
decided to go with the Eastern front scheme. The one exception I made to
pre-painting was the hood. I removed it from the tree leaving a good size
stub for a paint handle. I scribed the hood opening line down each side of
the hood. I then cut the photoetch side louvers off the PE fret and applied
them to the sides of the hood with CA. I then sprayed the hood along with the
rest of the kit.
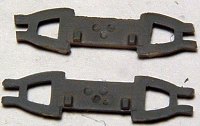 Assembly started with the chassis. MAC would have you
install the axles and the wishbones in an almost horizontal position. I
mocked it up and realized the Horch only needed some fuzzy dice to complete
the ‘low rider’ look! I decided to modify the front wishbones to articulate a
turn of the front wheels. All that it took to ‘turn’ the wheel was an angled
cut on both sides of the steering/wishbone arms. At the same time I would
install the suspension components so they would look ‘sprung’. Getting the
Wishbones, axles, and wheel hubs to line up turned into a major fiasco. I
threw in the towel and omitted the axles. Thus requiring only two hands to
assemble the model.
Assembly started with the chassis. MAC would have you
install the axles and the wishbones in an almost horizontal position. I
mocked it up and realized the Horch only needed some fuzzy dice to complete
the ‘low rider’ look! I decided to modify the front wishbones to articulate a
turn of the front wheels. All that it took to ‘turn’ the wheel was an angled
cut on both sides of the steering/wishbone arms. At the same time I would
install the suspension components so they would look ‘sprung’. Getting the
Wishbones, axles, and wheel hubs to line up turned into a major fiasco. I
threw in the towel and omitted the axles. Thus requiring only two hands to
assemble the model.
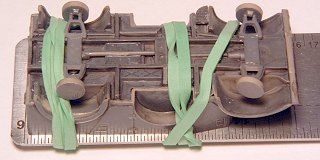 I ran into a second problem. My kits chassis was
warped. I thought I could correct this by simply doing a little green-stick
bending of the plastic and using the side components to keep everything
aligned. But the side components go together in such a way that there is no
way to force the chassis to straighten out. I took the chassis/body assembly
and used rubber bands to attach it to a steel ruler. I immersed the assembly
into hot water to soften the plastic and get the body back into alignment.
Problem solved.
I ran into a second problem. My kits chassis was
warped. I thought I could correct this by simply doing a little green-stick
bending of the plastic and using the side components to keep everything
aligned. But the side components go together in such a way that there is no
way to force the chassis to straighten out. I took the chassis/body assembly
and used rubber bands to attach it to a steel ruler. I immersed the assembly
into hot water to soften the plastic and get the body back into alignment.
Problem solved.
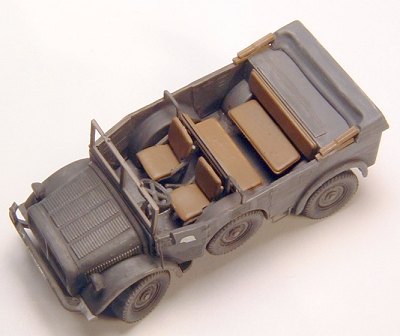
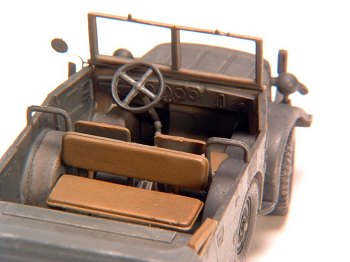 The next challenge to overcome is the seat assembly.
Four pieces make up each seat. I had a devil of a time getting them all lined
up so that they’re the same height, width as viewed from above. I think MAC
ought to have done something different here. They look good when finished but
if there’s a point in the kit where you’ll be tempted to start looking at your
stash for an alternate build, it’ll be assembling the seats.
The next challenge to overcome is the seat assembly.
Four pieces make up each seat. I had a devil of a time getting them all lined
up so that they’re the same height, width as viewed from above. I think MAC
ought to have done something different here. They look good when finished but
if there’s a point in the kit where you’ll be tempted to start looking at your
stash for an alternate build, it’ll be assembling the seats.
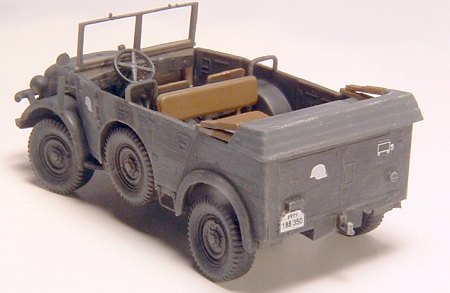
The rest of the kit went together in a straightforward manner. The photoetch can be maddening, not because it isn’t well done but because it is! The side view mirror is very nice… but you’ll have to be very careful not to crush it. I’ve really got to commend the photoetch fret. I normally build ships and I’d love to see attachment points this small on PE railings. Because they were so fine, they were very easy to trim; no filing was required to remove any burr.
You might notice the glass on the windshield. It’s clear as can be… mainly because there is nothing there! I’m not sure what MAC intended here. There isn’t anything in the instructions regarding the window. When I get my hands on some clear acetate, I will add the windows and the photoetch wipers later. It wouldn’t have taken much to put a scrap of acetate in the box for the windshield.
|
CAMOUFLAGE & MARKINGS |
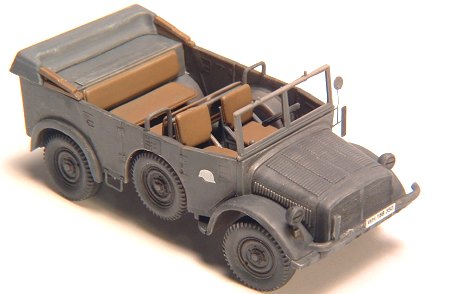 As I mentioned earlier, if I had it to do
again, I’d have built the DAK version. I think the sand scheme would have
really brought out the character of this little kit. But the panzer gray
scheme looks good too. I used MM Gunship gray on the canvas top and very dark
gray on the tires. I did a pastel wash to darken the shadows. I really find
this the best wash for me... damn near foolproof. A dry brushing of light
ghost gray helped bring out the details. The only colors in the vehicle are
the seats, which I used RAF dark earth for…(hey it’s brown). Another way to
help make this kit stand out would be to add an aerial recognition flag to lie
on the rear deck and top. The decals went on over a Future floor wax base. I
only apply the wax where the decal is going, after the model has dried and I
spray it with Testors Dullcote, you cannot tell that only sections received
the Future polish. The decals were both comprehensive and well printed; I had
no problem with them at all.
As I mentioned earlier, if I had it to do
again, I’d have built the DAK version. I think the sand scheme would have
really brought out the character of this little kit. But the panzer gray
scheme looks good too. I used MM Gunship gray on the canvas top and very dark
gray on the tires. I did a pastel wash to darken the shadows. I really find
this the best wash for me... damn near foolproof. A dry brushing of light
ghost gray helped bring out the details. The only colors in the vehicle are
the seats, which I used RAF dark earth for…(hey it’s brown). Another way to
help make this kit stand out would be to add an aerial recognition flag to lie
on the rear deck and top. The decals went on over a Future floor wax base. I
only apply the wax where the decal is going, after the model has dried and I
spray it with Testors Dullcote, you cannot tell that only sections received
the Future polish. The decals were both comprehensive and well printed; I had
no problem with them at all.
|
CONCLUSIONS |
 I had some nits with this kit. I wouldn’t
recommend it as a lark based on the price and complexity. However, if you
regularly build 1/72 AFV’s I think you really enjoy this kit. It’s got great
detail and nice potential for dioramas. In fact, you could through an AA gun
in the rear (MAC makes one) and have a really interesting one-off. This was
overall, a fun kit, despite the seats!
I had some nits with this kit. I wouldn’t
recommend it as a lark based on the price and complexity. However, if you
regularly build 1/72 AFV’s I think you really enjoy this kit. It’s got great
detail and nice potential for dioramas. In fact, you could through an AA gun
in the rear (MAC makes one) and have a really interesting one-off. This was
overall, a fun kit, despite the seats!
March 2003
|
REFERENCES |
None… Just some Googled pictures.
If you would like your product reviewed fairly and quickly, please contact me or see other details in the Note to Contributors.