Fujimi 1/24 Ford GT-40 1969 LeMans
| KIT #: | 12130 |
| PRICE: | $42.00 SRP when new |
| DECALS: | Two options |
| REVIEWER: | Mark Hiott |
| NOTES: | Curbside |
| HISTORY |
The Mk I was
the original Ford GT40. They were powered by a Ford 289 V8 producing 425hp. They
were fitted with Gurney-Weslake cylinder heads and used 4 Weber carburetors.
Only 4 of the cars were made: chassis #'s 1074, 1075, 1076 and 1084.
These cars were built to take on the best the world had to offer at the
LeMans 24 Hours.
John Wyer's
team was there but managed by David Yorkes. Wyer himself wasn't in Le Mans as
his wife was ill. The team entered two Ford GT40s, #1075 and #1076. Jacky Ickx
shared #1075, the car that won the previous year, with Jackie Oliver. David
Hobbs and Mike Hailwood shared #1076.
 The Kurt
Ahrens/Rolf Stommelen 917 qualified on pole. Soon after the start the poor
handling of the 917 and the inexperience of the driver resulted in a drama: the
death of British driver John Woolfe on lap 1 when his private Porsche 917
crashed at Maison Blanche. Woolfe was killed, probably due the fact that he had
not bothered to put on his safety belt. This was likely done because of the
style of the traditional start used at Le Mans until that year, in which drivers
were required to run across the track to their cars, climb in and get it started
as quickly as possible to pull away from the grid. Woolfe likely sacrificed
strapping his safety belts in order to gain a better start. The nearly full fuel
tank from Woolfe's car became dislodged and landed in front of the oncoming
Ferrari 312P of Chris Amon. Amon ran over it, causing it to explode under his
car, which led to his retirement. The race was stopped for 2 hours due to these
two first lap incidents, but was eventually restarted. The 2 official 917s were
put out of the race by clutch bell housing problems, but the 908 of Hans
Herrmann and Gérard Larrousse remained a serious candidate for the victory.
The Kurt
Ahrens/Rolf Stommelen 917 qualified on pole. Soon after the start the poor
handling of the 917 and the inexperience of the driver resulted in a drama: the
death of British driver John Woolfe on lap 1 when his private Porsche 917
crashed at Maison Blanche. Woolfe was killed, probably due the fact that he had
not bothered to put on his safety belt. This was likely done because of the
style of the traditional start used at Le Mans until that year, in which drivers
were required to run across the track to their cars, climb in and get it started
as quickly as possible to pull away from the grid. Woolfe likely sacrificed
strapping his safety belts in order to gain a better start. The nearly full fuel
tank from Woolfe's car became dislodged and landed in front of the oncoming
Ferrari 312P of Chris Amon. Amon ran over it, causing it to explode under his
car, which led to his retirement. The race was stopped for 2 hours due to these
two first lap incidents, but was eventually restarted. The 2 official 917s were
put out of the race by clutch bell housing problems, but the 908 of Hans
Herrmann and Gérard Larrousse remained a serious candidate for the victory.
In a dramatic finish, Ickx and Herrmann repeatedly overtook each other as the Porsche 908 had brake problems, and eventually Ickx managed to beat Herrmann by a few seconds. Ickx and Oliver won with GT40 chassis #1075, the same car that had won the previous year. This was second time the same car had won two years in a row; a Bentley Speed Six had done it in 1929 and 1930. Joest Racing would later repeat this feat twice. The second GT40 was able to come across the line in 3rd place, although 4 laps down.
| THE KIT |
 An
odd kit, with the 2-piece main body molded in a rather ugly pale blue that I
suppose was an attempt to aid in portraying the Gulf colors of the car. The rest
of the kit is molded in white and black. Also included is a beautiful set of
aluminum wheels. The molding is top notch, I didn't notice any ejector marks and
there is very little flash. Even though this is a kit of the Mk I, parts are
included for the MkII version.
An
odd kit, with the 2-piece main body molded in a rather ugly pale blue that I
suppose was an attempt to aid in portraying the Gulf colors of the car. The rest
of the kit is molded in white and black. Also included is a beautiful set of
aluminum wheels. The molding is top notch, I didn't notice any ejector marks and
there is very little flash. Even though this is a kit of the Mk I, parts are
included for the MkII version.
Instructions are well done and include color callouts.
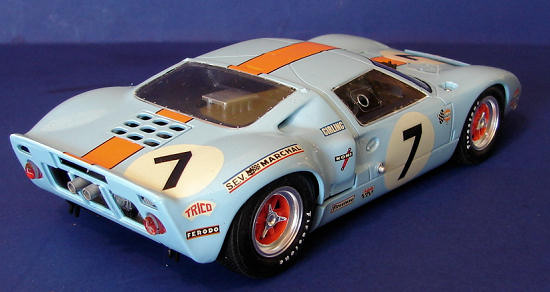
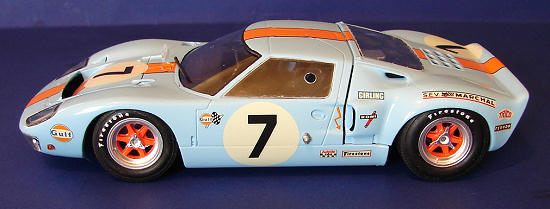
The decals are nicely printed and include the numbers for chassis #P1075 (as shown on the box) but also numbers for chassis #P1076. The orange "Gulf" stripe is provided as decals, so only the blue paint will be needed. Also included are both Firestone and Goodyear logos for the tires. The Goodyear logos would be used on a MkII.
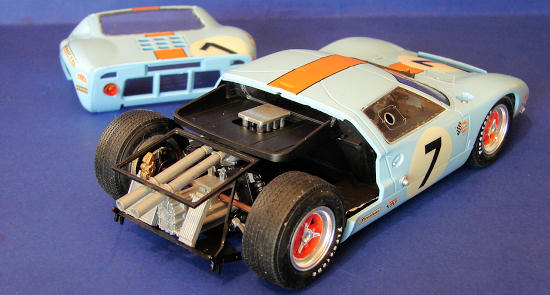
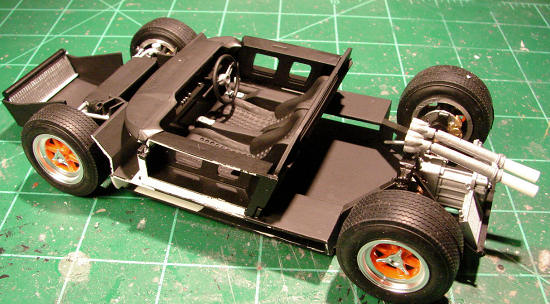
| CONSTRUCTION |
I
followed the instructions on this one. First up was the chassis. A bit of
modification is needed and the instructions tell you where to make the cuts.
Most of the chassis can be assembled prior to painting which makes things
easier. The instrument panel has decals for the gauges and they fit quite
nicely.
 The
tires use the poly tubes we car builders have come to know so well. However, the
way Fujimi uses them is a bit strange. There is no positive capture of the poly
tubes, so it's impossible to make the tire stay tight. I ended up gluing the
rims to the brake assemblies. Remove the chrome from the centers of the wheels
and install the knockoffs. The kit provides logos for the tires but the
instructions for them are in Japanese. If you have never used them that could be
a problem. They work like dry-transfers, but require water to stick. They are
mounted to a backing that is removed from the main sheet. A protective “cover”
sheet is then removed, exposing the reversed emblem attached to a see-through
backing. The emblem is positioned on the tire and water applied. Gentle rubbing
with a Q-tip will release the emblems from the backing. The backing is then
carefully removed and the emblem sticks to the tire. I add water after
positioning the emblem, but I suppose you could wet the tire first.
The
front suspension is next and it is a bit fragile. Care must be used installing
the assembled tire/brake assemblies. The fit of the shocks is not to good
either. The rear suspension on the other hand is VERY simplified. There are no
upper control arms and even though there are shocks, there is no way to mount
them to the lower arms. I have not seen a metal axle used in a kit in, oh, 20
years or so. Not sure the what year this was first molded, perhaps it was state
of the art then. Fujimi only provides the rear bulkhead, transaxle and some stub
exhausts. I would have liked a bit more detail in the back.
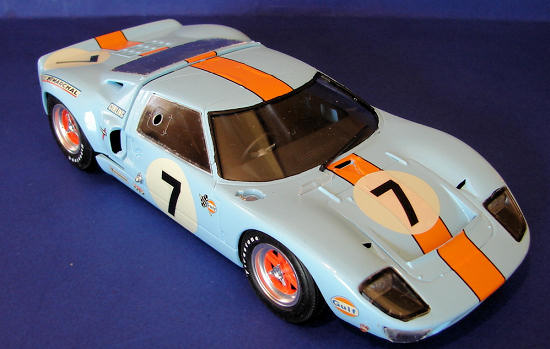
 The
body is a 2-piece affair and I have to wonder why Fujimi did it this way, I know
they make GT40 kits with one piece bodies. Perhaps they make a full engined kit,
although I have never seen one. I left the body in 2 parts so people would know
what to expect. I glued all the various body parts on before painting and filled
what few seams there were. You will need to fill the left side fuel cap and
Fujimi provides a plug for this. A bit of filler and some sanding is all it
needs. After painting I installed the windows and lights. The fit of the body
windows was very good as were the headlight covers. On the other hand, the fog
light covers hit the fog lights and will not lay flat. I suppose one could leave
out the housing and just install the lenses.
The
body is a 2-piece affair and I have to wonder why Fujimi did it this way, I know
they make GT40 kits with one piece bodies. Perhaps they make a full engined kit,
although I have never seen one. I left the body in 2 parts so people would know
what to expect. I glued all the various body parts on before painting and filled
what few seams there were. You will need to fill the left side fuel cap and
Fujimi provides a plug for this. A bit of filler and some sanding is all it
needs. After painting I installed the windows and lights. The fit of the body
windows was very good as were the headlight covers. On the other hand, the fog
light covers hit the fog lights and will not lay flat. I suppose one could leave
out the housing and just install the lenses.
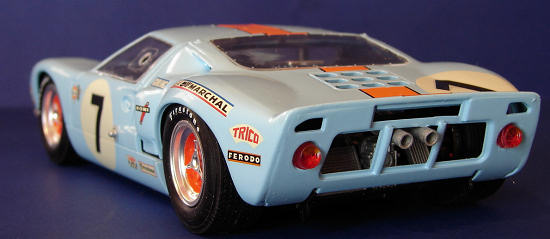
There should also be a rear view mirror attached to the inside of the
windshield. I didn't want to mar the glass with regular glue, but Kristal Klear
or white glue wouldn't hold it. The last bits installed were the number lights,
wiper arm and filler cap.
The last step was to fit the body to the chassis. If you glue the body halves together, you will have to install the exhaust pipe tips (parts A39) after the body is installed. Since I left the body in 2 parts, I installed them beforehand.
| COLORS & MARKINGS |
There are a couple places to get numbers matching Gulf
 I
tried several other paints that I thought would be close and ended up painting
the car a couple times. In the end I found a color by Rust-Oleum that I think is
a dead on match for the Gulf Blue. The paint does take awhile to dry (better
part of 24 hours) but dries to a nice gloss finish. The wheels need to be
painted orange and I decided to use Testors orange in the square bottle. Not a
perfect match, but it looks ok.
I
tried several other paints that I thought would be close and ended up painting
the car a couple times. In the end I found a color by Rust-Oleum that I think is
a dead on match for the Gulf Blue. The paint does take awhile to dry (better
part of 24 hours) but dries to a nice gloss finish. The wheels need to be
painted orange and I decided to use Testors orange in the square bottle. Not a
perfect match, but it looks ok.
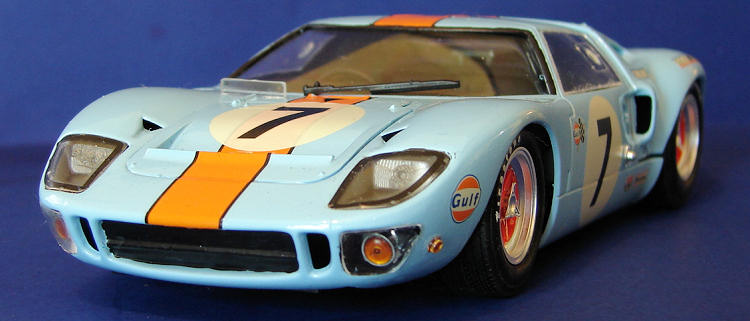
I opted to do chassis #1076 that carried the #7. It is one of the options provided in the kit. It does not have the orange nose that #6 had. After the paint had dried a couple days, I added the orange stripes. The fit of the stripes is not perfect but good enough. Note that the rear deck stripe does NOT go down around the back of the rear spoiler, it should stop at the top of the spoiler. The front stripe does go around under the nose of the car. The round decals for the numbers were an ivory color in my kit and they should be bright white. Not sure if it was a decal problem or they were printed that way. They are also a bit thin and the orange stripe on the hood shows through. I had real trouble with the driving light borders. I could not get them to fit and ended up not using them. It may have been a result of the poor fit of the covers. I also had trouble getting the hood stripe to conform to the intake at the base of the windshield. It is a NACA type intake and the decal just would not fit the opening. The other decals all went down well and responded to the setting solution.
| CONCLUSIONS |
 There are very few kits that I can say
I didn't like, this is one. The overly simplified suspension, the
2-piece body, the fact that it's a curbside and the "see-through" decals
just didn't make this a fun build. It does build into a very nice GT-40
and if you want one badly, this kit will do. On the other hand, my next
one will have a full suspension and engine.
There are very few kits that I can say
I didn't like, this is one. The overly simplified suspension, the
2-piece body, the fact that it's a curbside and the "see-through" decals
just didn't make this a fun build. It does build into a very nice GT-40
and if you want one badly, this kit will do. On the other hand, my next
one will have a full suspension and engine.| REFERENCES |
Internet for photos and the history.
May 2012
Thanks to your editor for supplying the review kit from his personal collection.
If you would like your product reviewed fairly and fairly quickly, please contact the editor or see other details in the Note to Contributors.
Back to the Reviews Index Page